Page 406 of 557

5-132
Driving your vehicle
Check spark plugs and ignitionsystem
Inspect your spark plugs as
described in chapter 7 and replace
them if necessary. Also check all
ignition wiring and components to be
sure they are not cracked, worn or
damaged in any way.
Use approved window washeranti-freeze in system
To keep the water in the window
washer system from freezing, add an
approved window washer anti-freeze
solution in accordance with instruc-
tions on the container. Window wash-
er anti-freeze is available from an
authorized HYUNDAI dealer and
most auto parts outlets. Do not use
engine coolant or other types of anti-
freeze as these may damage the
paint finish.
Do not let your parking brakefreeze
Under some conditions your parking
brake can freeze in the engaged
position. This is most likely to happen
when there is an accumulation of
snow or ice around or near the rear
brakes or if the brakes are wet. If
there is a risk the parking brake may
freeze, apply it only temporarily while
you put the gear selector lever in P
and block the rear wheels so the car
cannot roll. Then release the parking
brake.
Do not let ice and snow accu-mulate underneath
Under some conditions, snow and
ice can build up under the fenders
and interfere with the steering. When
driving in severe winter conditions
where this may happen, you should
periodically check underneath the
car to be sure the movement of the
front wheels and the steering com-
ponents is not obstructed.
Don't place foreign objects ormaterials in the engine com-partment
Placement of foreign object or mate-
rials which prevent cooling of the
engine, in the engine compartment,
may cause a failure or combustion.
The manufacturer is not responsible
for the damage caused by such
placement.
To keep locks from freezing
To keep the locks from freezing,
squirt an approved de-icer fluid or
glycerine into the key opening. If a
lock is covered with ice, squirt it with
an approved de-icing fluid to remove
the ice. If the lock is frozen internally,
you may be able to thaw it out by
using a heated key. Handle the heat-
ed key with care to avoid injury.
Page 473 of 557

W
WI
IP
P E
ER
R
B
B L
LA
A D
DE
ES
S
Blade Inspection
Contamination of either the windshield
or the wiper blades with foreign matter
can reduce the effectiveness of the
windshield wiper functionality.
Common sources of contamination
are insects, tree sap, and hot wax
treatments used by some commercial
car washes. If the blades are not wip-
ing properly, clean both the window
and the blades with a clean cloth
dampened with washer fluid.
To prevent damage to the wiper
blades, arms or other compo-
nents, do not:
Use gasoline, kerosene, paint
thinner, or other solvents on or
near them.
Attempt to move the wipers manually.
Use non-specified wiper blades.
Information
Commercial hot waxes applied by auto-
matic car washes have been known to
make the windshield difficult to clean.
Blade Replacement
When the wipers no longer clean
adequately, the blades may be worn
or cracked, and require replacement.
To prevent damage to the wiper
arms or other components, do not
attempt to move the wipers manu-
ally.
The use of a non-specified wiper
blade could result in wiper mal-
function and failure.
In order to prevent damage to the hood and the wiper arms, the
wiper arms should only be lifted
when in the top wiping position.
Always return the wiper arms to the windshield before driving.
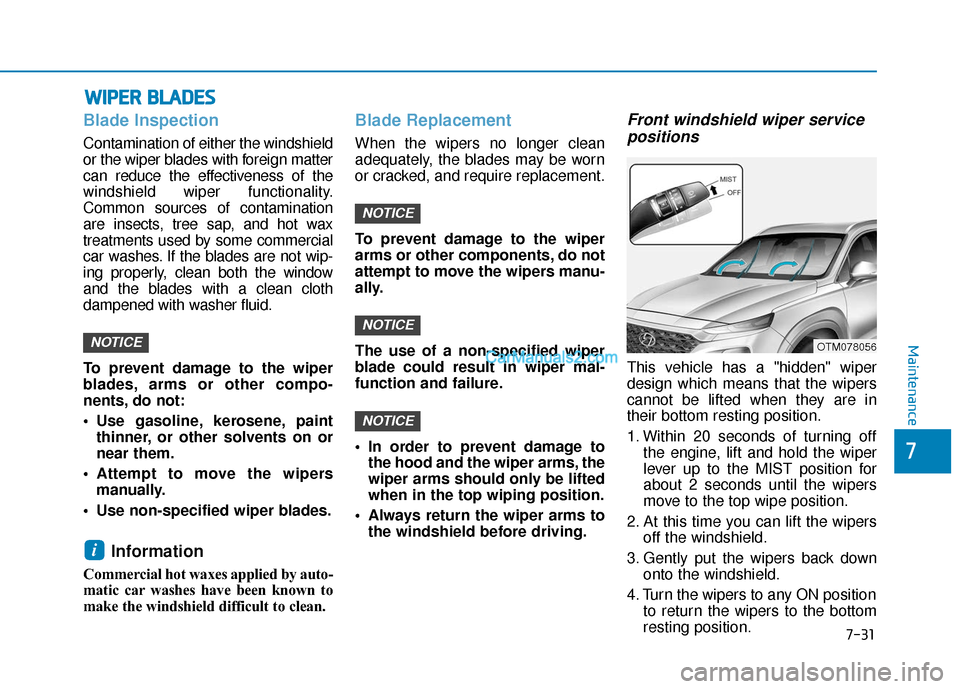
Front windshield wiper servicepositions
This vehicle has a "hidden" wiper
design which means that the wipers
cannot be lifted when they are in
their bottom resting position.
1. Within 20 seconds of turning off
the engine, lift and hold the wiper
lever up to the MIST position for
about 2 seconds until the wipers
move to the top wipe position.
2. At this time you can lift the wipers off the windshield.
3. Gently put the wipers back down onto the windshield.
4. Turn the wipers to any ON position to return the wipers to the bottom
resting position.
NOTICE
NOTICE
NOTICE
i
NOTICEOTM078056Maintenance
7
7-31
Page 474 of 557
Front windshield wiper bladereplacement
1. Raise the wiper arm.
Do not allow the wiper arm to fall
against the windshield, since it
may chip or crack the windshield.
2. Lift up the wiper blade clip (1).Then pull down the blade assem-
bly (2) and remove it.
3. Install the new blade assembly in the reverse order of removal.
4. Return the wiper arm on the wind- shield.
Rear window wiper bladereplacement
1. Raise the wiper arm and then
rotate the wiper blade assembly
(1).
2. Pull out the wiper blade assembly (2).
NOTICE
OOSEV078007
Maintenance
7-32
OLMB073098
OLMB073099
OLMB073100
Page 478 of 557
By jump starting
After a jump start from a good bat-
tery, drive the vehicle for at least 30
minutes or operate at idle for at least
60 minutes before it is shutoff.
Alternatively you may visit a dealer
for charge and battery test.
The vehicle may not restart if you
shut it off before the battery had a
chance to adequately recharge. See
"Jump Starting" in chapter 6 for more
information on jump starting proce-
dures.
Information
An inappropriately disposedbattery can be harmful to
the environment and human
health. Dispose of the bat-
tery according to your local
law(s) or regulations.
Reset Features
The following items may need to be
reset after the battery has been dis-
charged or the battery has been dis-
connected. See chapter 3 or 4 for:
Power Windows
Driver Position Memory System
Trip Computer
Climate Control System
Clock
Audio System
Sunroof
i
Maintenance
7-36
Page 499 of 557
Fuse NameFuse RatingProtected Component
IBU 215AIBU, Ignition Switch
SUNROOF 220APanoramic Sunroof
MODULE 17.5AIBU
P/WINDOWRH25APassenger Safety Power Window Module, Passenger Power Window Switch, Rear Power Window Switch RH
ISG15ALow DC-DC Converter (AMP), Instrument Cluster, A/C Control Module, A/V & Navigation Head Unit, Head Up
Display
RR SEAT (LH)25ARear Seat Heater LH, Rear Seat Folding Switch LH
CLUSTER7.5AInstrument Cluster, Head Up Display
MDPS10AMDPS Unit
A/C7.5AE/R Junction Block (Blower Relay), SUB Junction Block (PTC Heater 1/2 Relay), A/C Control Module, Cluster
Ionizer
CHILD LOCK15AICM Relay Box (Child Lock/Unlock Relay)
DOOR LOCK20ADoor Lock Relay, Door Unlock Relay, Liftgate Relay, Two Turn Unlock Relay
REAR A/C10ARear A/C Control Module, Rear Blower Motor, A/C Control Module
Instrument panel fuse panel
Maintenance
7
7-57
Page 500 of 557
Fuse NameFuse RatingProtected Component
SUNROOF 120APanoramic Sunroof
P/WINDOWLH25ADriver Safety Power Window Module, Rear Power Window Switch LH
MODULE 37.5AIBU
MODULE 67.5AAudio, A/V & Navigation Head Unit, Low DC-DC Converter (Audio/AMP), A/C Control Module, Electro Chromic
Mirror, Center Low Panel Switch, Driver IMS Control Module, Rear Seat Heater LH/RH, Front Air Ventilation
Control Module, Front Seat Warmer Control Module
WASHER15AMultifunction Switch
RR SEAT (RH)25ARear Seat Heater RH, Rear Seat Folding Switch RH
WIPER
(REAR)15ARear Wiper Relay, Rear Wiper Motor
AMP25AAMP, Low DC-DC Converter (AMP)
ACC7.5ASurround View Monitor, AMP, IBU, Front Wireless Charger, Front USB Charger, Low DC-DC Converter
(Audio/AMP), Audio, A/V & Navigation Head Unit, Rear USB Charger LH/RH
P/SEAT (PASS)30APassenger Seat Manual Switch
P/SEAT (DRV)30ADriver IMS Control Module, Driver Seat Manual Switch
Instrument panel fuse panel
Maintenance
7-58
Page 502 of 557
Engine compartment fuse panel
Fuse NameFuse RatingProtected Component
MULTI FUSE(9P)
MDPS80AMDPS Unit
EPB60AESC Module
B+450AICU Junction Block (Fuse - MODULE 8, S/HEATER FRT, P/WINDOW RH, AMP, SUN-
ROOF)
B+350AICU Junction Block (Fuse - P/WINDOW LH, RR SEAT (LH), P/SEAT (DRV), P/SEAT
(PASS))
B+250AICU Junction Block (IPS 8/IPS 10/IPS 11/IPS 12/IPS 13/IPS 14/IPS 15)
REAR HEATED40ARear Heated Relay
ABS 140AESC Module
BLOWER40ABlower Relay
ABS 240AESC Module
MULTI FUSE(2P)PTC HEATER 150ASUB Junction Block (PTC Heater 1 Relay)
PTC HEATER 250ASUB Junction Block (PTC Heater 2 Relay)
FUSE
B+150AICU Junction Block (IPS 1/IPS 2/IPS 3/IPS 5/IPS 6/IPS 7, Long/Short Term Load Latch
Relay)
B+550AICU Junction Block (Fuse - DOOR LOCK, IBU 1, IBU 2, BRAKE SWITCH, CHILD
LOCK, RR SEAT (RH), SUNROOF 2)
Maintenance
7-60
Page 518 of 557

A
AP
PP
PE
EA
A R
RA
A N
N C
CE
E
C
C A
A R
RE
E
Exterior Care
Exterior general caution
It is very important to follow the label
directions when using any chemical
cleaner or polish. Read all warning
and caution statements that appear
on the label.
Protecting your vehicle's finish
Washing
To help protect your vehicle’s finish
from rust and deterioration, wash it
thoroughly and frequently at least
once a month with lukewarm or cold
water.
If you use your vehicle for off-road
driving, you should wash it after each
off-road trip. Pay special attention to
the removal of any accumulation of
salt, dirt, mud, and other foreign
materials. Make sure the drain holes
in the lower edges of the doors and
rocker panels are kept clear and
clean. Insects, tar, tree sap, bird droppings,
industrial pollution and similar
deposits can damage your vehicle’s
finish if not removed immediately.
Even prompt washing with plain
water may not completely remove all
these deposits. A mild soap, safe for
use on painted surfaces, should be
used.
After washing, rinse the vehicle thor-
oughly with lukewarm or cold water.
Do not allow soap to dry on the fin-
ish.
Do not use strong soap, chemi-
cal detergents or hot water, and
do not wash the vehicle in direct
sunlight or when the body of the
vehicle is warm.
Be careful when washing the side windows of your vehicle.
Especially, with high-pressure
water, water may leak through
the windows and wet the interi-
or.
To prevent damage to the plastic parts, do not clean with chemi-
cal solvents or strong deter-
gents.
NOTICE
After washing the vehicle, test
the brakes while driving slowly
to see if they have been affected
by water before getting on the
road. If braking performance is
impaired, dry the brakes by
applying them lightly while
maintaining a slow forward
speed.
WARNING
Maintenance
7-76