2020 Hyundai Santa Fe ECU
[x] Cancel search: ECUPage 270 of 557

3-181
Convenient features of your vehicle
3
Roof Side Rails (if equipped)
If your vehicle comes equipped with
roof side rails, then roof rack cross-
bars can be installed on top of your
vehicle.
The roof rack crossbars are an
accessory and are available at your
local HYUNDAI dealer.
If the vehicle is equipped with a
sunroof, be sure not to position
cargo onto the roof rack in such a
way that it could interfere with
sunroof operation. When carrying cargo on the roof
rack, take the necessary precau-
tions to make sure the cargo
does not damage the roof of the
vehicle.
When carrying large objects on the roof rack, make sure they do
not exceed the overall roof
length or width.
NOTICE
NOTICE
E EX
X T
TE
ER
R I
IO
O R
R
F
F E
E A
A T
TU
U R
RE
ES
S
The following specification is
the maximum weight that can
be loaded onto the roof rack.
Distribute the load as evenly
as possible onto the roof rack
and secure the load firmly.
Loading cargo or luggage in
excess of the specified weight
limit on the roof rack may
damage your vehicle.
The vehicle center of gravity will
be higher when items are
loaded onto the roof rack.
Avoid sudden starts, braking,
sharp turns, abrupt maneuvers
or high speeds that may result
in loss of vehicle control or
rollover resulting in an accident.
Always drive slowly and turn
corners carefully when carry-
ing items on the roof rack.
Severe wind updrafts, caused
by passing vehicles or natural
causes, can cause sudden
upward pressure on items
loaded on the roof rack. This
is especially true when carry-
ing large, flat items such as
wood panels or mattresses.
This could cause the items to
fall off the roof rack and cause
damage to your vehicle or
others around you.
To prevent damage or loss of
cargo while driving, check fre-
quently before or while driving
to make sure the items on the
roof rack are securely fastened.
WARNING OTM048400
ROOF 220 lbs. (100kg)
RACK EVENLY DISTRIBUTED
Page 278 of 557
5-4
Driving your vehicle
Before Entering the Vehicle
• Be sure all windows, outside mir-ror(s), and outside lights are clean
and unobstructed.
Remove frost, snow, or ice.
Visually check the tires for uneven wear and damage.
Check under the vehicle for any sign of leaks.
Be sure there are no obstacles behind you if you intend to back
up.
Before Starting
Make sure the hood, the liftgate,and the doors are securely closed
and locked.
Adjust the position of the seat and steering wheel.
Adjust the inside and outside rearview mirrors.
Verify all the lights work.
Fasten your seatbelt. Check that all passengers have fastened their
seatbelts.
Check the gauges and indicators in the instrument panel and the
messages on the instrument dis-
play when the ignition switch is in
the ON position.
Check that any items you are car- rying are stored properly or fas-
tened down securely.
CALIFORNIA PROPOSITION 65
WARNING
Engine exhaust and a wide vari-
ety of automobile components
including components found in
the interior furnishings in a
vehicle, contain or emit harmful
chemicals known to the State of
California to cause cancer and
birth defects and reproductive
harm. In addition, certain fluids
contained in vehicles and cer-
tain products of components
contain or emit chemicals
known to the State of California
to cause cancer and birth
defects or other reproductive
harm.WARNING
B B
E
EF
FO
O R
RE
E
D
D R
RI
IV
V I
IN
N G
G
Page 291 of 557
5-17
Driving your vehicle
5
• If the driver presses the lever to + (Up) or - (Down) position, the
transmission may not make the
requested gear change if the next
gear is outside of the allowable
engine rpm range. The driver must
execute upshifts in accordance with
road conditions, taking care to keep
the engine rpms below the red zone.
• When accelerating from a stop on a slippery road, push the shift lever
forward into the + (Up) position.
This allows the transmission to
shift into the 2
ndgear which is bet-
ter for smooth driving on a slippery
road. Push the shift lever to the -
(Down) side to shift back to the 1
st
gear.
• When driving in Manual Shift Mode, slow down before shifting to
a lower gear. Otherwise, the lower
gear may not be engaged if the
engine rpms are outside of the
allowable range.
Shift-lock system
For your safety, the automatic trans-
mission has a shift-lock system
which prevents shifting the transmis-
sion from P (Park) into R (Reverse)
unless the brake pedal is depressed.
To shift the transmission from P
(Park) into R (Reverse):
1. Depress and hold the brake pedal.
2. Start the engine or place the igni-tion switch in the ON position.
3. Move the shift lever.
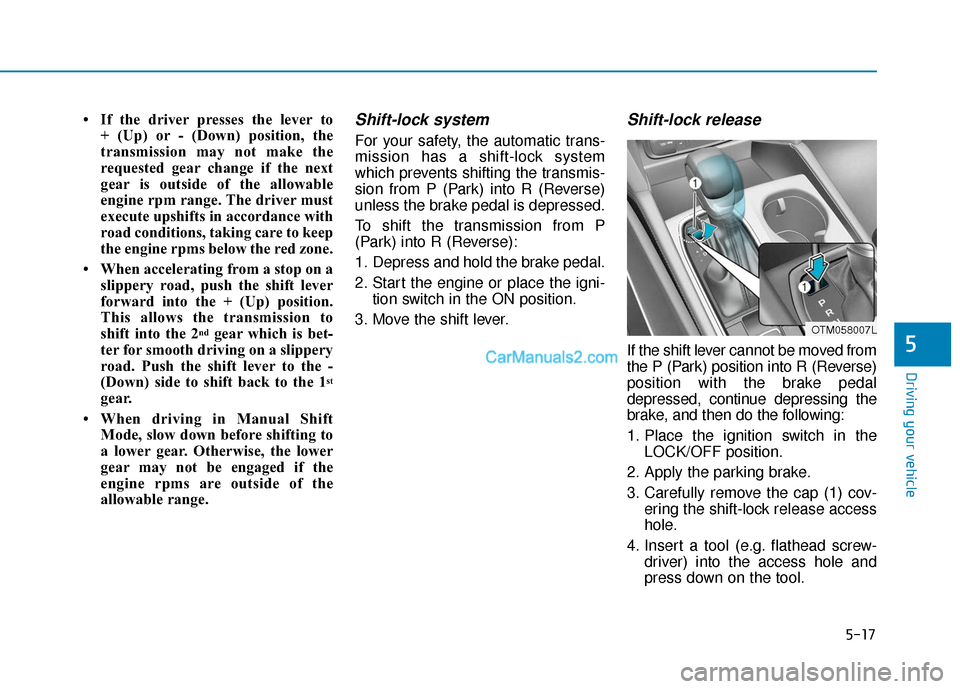
Shift-lock release
If the shift lever cannot be moved from
the P (Park) position into R (Reverse)
position with the brake pedal
depressed, continue depressing the
brake, and then do the following:
1. Place the ignition switch in the LOCK/OFF position.
2. Apply the parking brake.
3. Carefully remove the cap (1) cov- ering the shift-lock release access
hole.
4. Insert a tool (e.g. flathead screw- driver) into the access hole and
press down on the tool.
OTM058007L
Page 335 of 557

5-61
Driving your vehicle
5
System Malfunction
Check Forward Collision Avoidance
Assist system
When the FCA is not workingproperly, the FCA warning light
( ) will illuminate and the warn-
ing message will appear for a few
seconds. After the message dis-
appears, the master warning light
( ) will illuminate. In this case,
have the vehicle inspected by an
authorized HYUNDAI dealer.
The FCA warning message may appear along with the illumination
of the ESC (Electronic Stability
Control) warning light.
The FCA is only a supplemen-
tal system for the driver’s con-
venience. The driver should
hold the responsibility to con-
trol the vehicle operation. Do
not solely depend on the FCA
system. Rather, maintain a
safe braking distance, and, if
necessary, depress the brake
pedal to reduce the driving
speed.
In certain instances and
under certain driving condi-
tions, the FCA system may
activate prematurely. This ini-
tial warning message appears
on the LCD display with a
warning chime.
Also, in certain instances the
front radar sensor or camera
recognition system may not
detect the vehicle or pedestri-
an ahead. The FCA system
may not activate and the
warning message will not be
displayed.
WARNING If there is a malfunction with
the FCA system, the Forward
Collision avoidance assist
system is not applied even
though the braking system is
operating normally.
If the vehicle in front stops
suddenly, you may have less
control of the brake system.
Therefore, always keep a safe
distance between your vehicle
and the vehicle in front of you.
The FCA system may activate
during braking and the vehi-
cle may stop suddenly shift-
ing loose objects toward the
passengers. Always keep
loose objects secured.
The FCA system may not acti-
vate if the driver applies the
brake pedal to avoid a colli-
sion.
The brake control may not
work, possibly causing a colli-
sion, if a vehicle in front
abruptly stops. Always pay
extreme caution.
OIK057091L
Page 410 of 557
5-136
Driving your vehicle
Safety chains
You should always attach chains
between your vehicle and your trail-
er. Cross the safety chains under the
tongue of the trailer so that the
tongue will not drop to the road if it
becomes separated from the hitch.
Instructions about safety chains may
be provided by the hitch manufactur-
er or trailer manufacturer. Follow the
manufacturer’s recommendation for
attaching safety chains. Always leave
just enough slack so you can turn
with your trailer. And, never allow
safety chains to drag on the ground.
Trailer brakes
If your trailer is equipped with a brak-
ing system, make sure it conforms to
federal and/or local regulations and
that it is properly installed and oper-
ating correctly.
If your trailer weighs more than the
maximum trailer weight without trail-
er brakes loaded, then it needs its
own brakes and they must be ade-
quate. Be sure to read and follow the
instructions for the trailer brakes so
you’ll be able to install, adjust and
maintain them properly. Do not tap
into your vehicle's brake system.
Trailer brakes must be applied sepa-
rately from your vehicle's brake sys-
tem.
Driving with a trailer
Towing a trailer requires a certain
amount of experience. Before setting
out for the open road, you must get
to know your trailer. Acquaint your-
self with the feel of handling and
braking with the added weight of the
trailer. And always keep in mind that
the vehicle you are driving is now
longer and not nearly as responsive
as your vehicle is by itself.
Before you start, check the trailer
hitch and platform, safety chains,
electrical connector(s), lights, tires
and brakes.
During your trip, occasionally check
to be sure that the load is secure,
and that the lights and trailer brakes
are still working.
Do not use a trailer with its own
brakes unless you are absolute-
ly certain that you have properly
set up the brake system. Use an
experienced, competent trailer
shop for this work.
WARNING
Page 413 of 557
5-139
Driving your vehicle
5
5. Start the vehicle, apply the brakes,shift to neutral, release the park-
ing brake and slowly release the
brakes until the trailer chocks
absorb the load.
6. Reapply the brakes and parking brakes.
7. Move the shift lever to P (Park).
8. Shut off the vehicle and release the vehicle brakes but leave the
parking brake set.Driving the vehicle after it hasbeen parked on a hill
1. With the gear shift lever in P
(Park), apply the brakes and hold
the brake pedal down while per-
forming the following:
and
2. Slowly remove your foot from the brake pedal.
3. Drive slowly until the trailer is clear of the chocks.
4. Stop and have someone pick up and store the chocks.
Maintenance when trailer tow-
ing
Your vehicle will need service more
often when you regularly pull a trail-
er. Important items to pay particular
attention to include engine oil, auto-
matic transmission fluid, axle lubri-
cant and cooling system fluid. Brake
condition is another important item to
frequently check. If you’re trailering,
it’s a good idea to review these items
before you start your trip. Don't forget
to also maintain your trailer and
hitch. Follow the maintenance sched-
ule that accompanied your trailer and
check it periodically. Preferably,
inspect the vehicle and trailer at the
start of each day's driving. Inspect
the hitch mounting to make sure the
hitch is properly secured to the vehi-
cle. Inspect the trailer electrical
wiring to make sure brake lights, turn
signal lights, running lights, and haz-
ard lights are working properly.
Do not get out of the vehicle
without the parking brake
firmly set. If you have left the
engine running, the vehicle
can move suddenly. You and
others could be seriously or
fatally injured.
Do not apply the accelerator
pedal to hold the vehicle on
an uphill.
WARNING
Page 420 of 557
Overloading your vehicle may
cause damage. Repairs would not
be covered by your warranty. Do
not overload your vehicle.
NOTICE
If you carry items inside your
vehicle (e.g., suitcases, tools,
packages, or anything else),
they are moving as fast as the
vehicle. If you have to stop or
turn quickly, or if there is a
crash, the items will keep going
and can cause an injury if they
strike the driver or a passenger.
Put items in the cargo area of
your vehicle. Try to spread the
weight evenly.
Do not stack items, like suit-
cases, inside the vehicle
above the tops of the seats.
Do not leave an unsecured
child restraint in your vehicle.
When you carry something
inside the vehicle, secure it.
WARNING
Driving your vehicle
5-146
Page 438 of 557
6-18
What to do in an emergency
9. Loosen the lug nuts with the wheel lug nut wrench and remove them
with your fingers. Remove the
wheel from the studs and lay it flat
on the ground out of the way.
Remove any dirt or debris from the
studs, mounting surfaces, and
wheel.
10.Install the spare tire onto the studs of the hub.
11.Tighten the lug nuts with your fin- gers onto the studs with the
smaller end of the lug nuts clos-
est to the wheel.
12.Lower the vehicle to the ground by turning the jack handle coun-
terclockwise. 13.Use the wheel lug nut wrench to
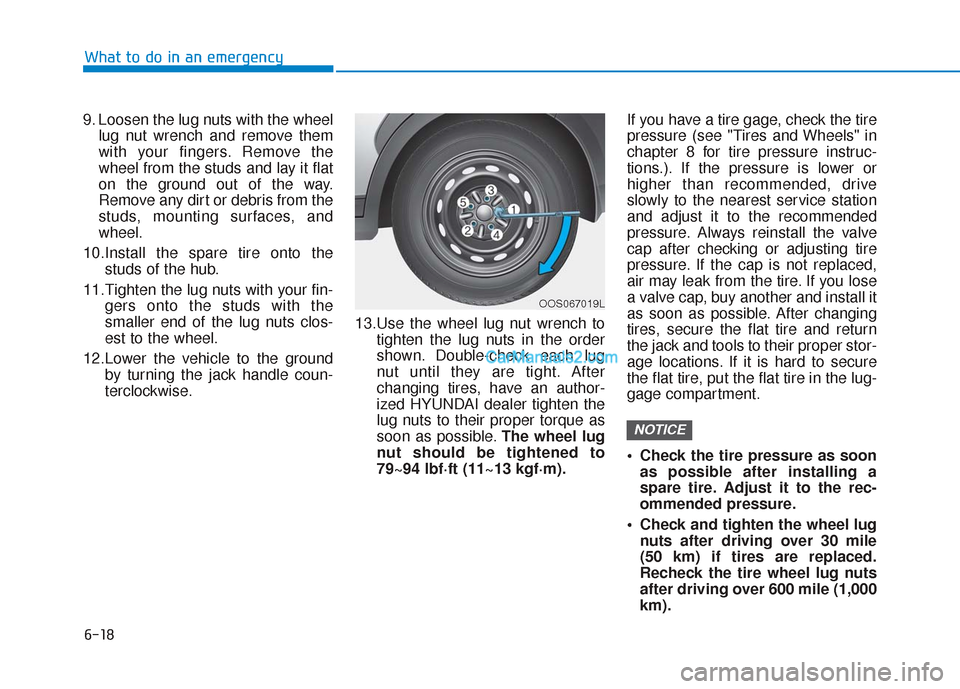
tighten the lug nuts in the order
shown. Double-check each lug
nut until they are tight. After
changing tires, have an author-
ized HYUNDAI dealer tighten the
lug nuts to their proper torque as
soon as possible. The wheel lug
nut should be tightened to
79~94 lbf·ft (11~13 kgf·m). If you have a tire gage, check the tire
pressure (see "Tires and Wheels" in
chapter 8 for tire pressure instruc-
tions.). If the pressure is lower or
higher than recommended, drive
slowly to the nearest service station
and adjust it to the recommended
pressure. Always reinstall the valve
cap after checking or adjusting tire
pressure. If the cap is not replaced,
air may leak from the tire. If you lose
a valve cap, buy another and install it
as soon as possible. After changing
tires, secure the flat tire and return
the jack and tools to their proper stor-
age locations. If it is hard to secure
the flat tire, put the flat tire in the lug-
gage compartment.
Check the tire pressure as soon
as possible after installing a
spare tire. Adjust it to the rec-
ommended pressure.
Check and tighten the wheel lug nuts after driving over 30 mile
(50 km) if tires are replaced.
Recheck the tire wheel lug nuts
after driving over 600 mile (1,000
km).
NOTICE
OOS067019L