2020 Hyundai Santa Fe ECU
[x] Cancel search: ECUPage 112 of 557
3-23
Convenient features of your vehicle
3
This system helps to protect your vehi-
cle and valuables. The horn will sound
and the hazard warning lights will blink
continuously if any of the following
occur:
- A door is opened without using theremote key or smart key.
- The liftgate is opened without using the remote key or smart key.
- The engine hood is opened.
The alarm continues for 30 seconds
(repeats 2 times unless the system is
disarmed), then the system resets. To
turn off the alarm, unlock the doors
with the remote key or smart key.
The Theft Alarm System automatically
sets 30 seconds after you lock the
doors and the liftgate. For the system
to activate, you must lock the doors
and the liftgate from outside the vehi-
cle with the remote key or smart key or
by pressing the button on the outside
of the door handle with the smart key
in your possession.
The hazard warning lights will blink
and the chime will sound once to indi-
cate the system is armed.
Once the security system is set, open-
ing any door, the liftgate, or the hood without using the remote key or smart
key will cause the alarm to activate.
The Theft Alarm System will not set if
the hood, the liftgate, or any door is
not fully closed. If the system will not
set, check the hood, the liftgate, or the
doors are fully closed.
Do not attempt to alter this system or
add other devices to it.
Information
• Do not lock the doors until all pas-
sengers have left the vehicle. If the
remaining passenger leaves the
vehicle when the system is armed,
the alarm will be activated.
• If the vehicle is not disarmed with the remote key or smart key, open
the doors by using the mechanical
key and place the ignition switch in
the ON position (for remote key) or
start the engine (for smart key) by
directly pressing the ignition switch
with the smart key.
• If the system is disarmed by unlock- ing the vehicle, but neither a door or
the liftgate is opened within 30 sec-
onds, the doors will relock and the
system will rearm automatically.
i
Even if your vehicle is
equipped with the Rear
Occupant Alert (ROA) system,
always make sure you check
the rear seat before you get
off the vehicle.
The alert may not operate if:
- The movement does notcontinue for a certain period
of time or the movement is
small.
- The rear passenger is cov- ered with an obstacle such
as a blanket.
- Also, always be cautious of the passenger’s safety as
the detection function and
2nd alert may not operate
according to the surround-
ing environment and certain
conditions.
WARNING
T TH
H E
EF
FT
T -
-A
A L
LA
A R
RM
M
S
S Y
Y S
ST
T E
EM
M
Page 123 of 557
3-34
Convenient features of your vehicle
To adjust the Zone setting:
1. Determine the desired Zone Number based upon your current
location on the Zone Map.
2. Press and hold the button for 6 seconds, the current Zone
Number will appear on the display.
3. Pressing and holding the button again will cause the numbers to
increment (Note: they will repeat
…13, 14, 15, 1, 2, …). Releasing
the button when the desired Zone
Number appears on the display
will set the new Zone.
4. Within about 5 seconds the com- pass will start displaying a com-
pass heading again.
There are some conditions that can
cause changes to the vehicle mag-
nets, such as installing a ski rack or
a CB antenna. Body repair work on
the vehicle can also cause changes
to the vehicle’s magnetic field. In
these situations, the compass will
need to be re-calibrated to quickly
correct these changes. If you need to recalibrate the com-
pass:
1. Press and hold the button for
more than 9 seconds. When the
compass memory is cleared a "C"
will appear in the display.
2. Drive the vehicle in 2 complete cir- cles at less than 5 mph (8 km/h).
Integrated HomeLink®Wireless
Control System
The HomeLink®Wireless Control
System can replace up to three
hand-held radio-frequency (RF)
transmitters with a single built-in
device. This innovative feature will
learn the radio frequency codes of
most current transmitters to operate
devices such as gate operators,
garage door openers, entry door
locks, security systems, even home
lighting. Both standard and rolling
code-equipped transmitters can be
programmed by following the out-
lined procedures.
Additional HomeLink
®information
can be found at: www.homelink.com
or by calling 1-800-355-3515.
Retain the original transmitter of the
RF device you are programming for
use in other vehicles as well as for
future HomeLink
®programming. It is
also suggested that upon the sale of
the vehicle, the programmed
HomeLink
®buttons be erased for
security purposes.
Page 126 of 557
3-37
Convenient features of your vehicle
3
Gate operator & Canadian program-ming
During programming, your handheld
transmitter may automatically stop
transmitting. Continue to press the
Integrated HomeLink
®Wireless
Control System button (note steps 2
through 3 in the Programming portion
of this document) while you press
and re-press ("cycle") your handheld
transmitter every two seconds until
the frequency signal has been
learned. The indicator light will flash
slowly and then rapidly after several
seconds upon successful training.
Operating HomeLink®
To operate, simply press and release
the programmed HomeLink®button.
Activation will now occur for the
trained device (i.e. garage door
opener, gate operator, security sys-
tem, entry door lock, home/office
lighting, etc.). For convenience, the
hand-held transmitter of the device
may also be used at any time.
Reprogramming a single HomeLink®
button
To program a device to HomeLink®
using a HomeLink®button previously
trained, follow these steps:
1. Press and hold the desired HomeLink
®button. DO NOT
release the button.
2. The indicator light will begin to flash after 20 seconds. Without releasing
the HomeLink
®button, proceed
with "Programming" step 2.
For questions or comments, contact
HomeLink
®at www.homelink.comor
1-800-355-3515.
Erasing HomeLink®buttons
Individual buttons cannot be erased.
However, to erase all three pro-
grammed buttons:
1. Press and hold the two outer HomeLink
®buttons until the indi-
cator light begins to flash after 10
seconds.
2. Release both buttons. Do not hold for longer than 20 seconds.
The Integrated HomeLink
®Wireless
Control System is now in the training
(learn) mode and can be pro-
grammed at any time following the
appropriate steps in the
Programming chapters above.
NVS
®is a registered trademark and
Z-Nav™ is a trademark of the Gentex
Corporation, Zeeland, Michigan.
HomeLink
®is a registered trademark
owned by Johnson Controls,
Incorporated, Milwaukee, Wisconsin.
FCC ID: NZLTLMHL4
IC: 4112A-TLMHL4
Page 137 of 557

3-48
Convenient features of your vehicle
Periodically remove any dirt that may accumulate on the sunroof
guide rail or between the sun-
roof and roof panel which can
make a noise.
Do not try to open the sunroof when the temperature is below
freezing or when the sunroof is
covered with snow or ice, other-
wise the motor could be dam-
aged. In cold and wet climates, the
sunroof may not work properly.
Resetting the Sunroof
The sunroof may need to be reset if
the following conditions occur:
The battery is discharged or dis-connected or the sunroof fuse has
been replaced or disconnected
The sunroof control lever is not operating correctly
To reset the sunroof, perform the fol-
lowing steps:
1. Turn the engine on and close the sunroof glass and sunshade com-
pletely. 2. Release the control lever.
3. Push and hold the sunroof control
lever forward (to close the sun-
shade) for about 10 seconds until
the sunroof moves slightly, then
release the control lever.
4. Push and hold the sunroof control lever forward until the sunroof
operates as follows:
Sunshade Open → Glass Tilt Open
→ Glass Slide Open → Glass Slide
Close → Sunshade Close
Then, release the control lever.
When this is complete, the sunroof
system is reset.
For more information, contact an
authorized HYUNDAI dealer.
Information
If you do not reset the sunroof, it may
not work properly.
Sunroof Open Warning
(if equipped)
If the driver turns off the engine when the sunroof is not fully
closed, the warning chime will
sound for approximately 3 seconds
and the sunroof open warning will
appear on the cluster LCD display.
If the driver turns off the engine and opens the door when the sun-
roof is not fully closed, the sunroof
open warning will appear on the
cluster LCD display until the door is
closed or the sunroof is fully closed.
Close the sunroof securely when
leaving your vehicle.
i
NOTICE
OTM048118
Page 138 of 557
3-49
Convenient features of your vehicle
3
Hood
Opening the hood
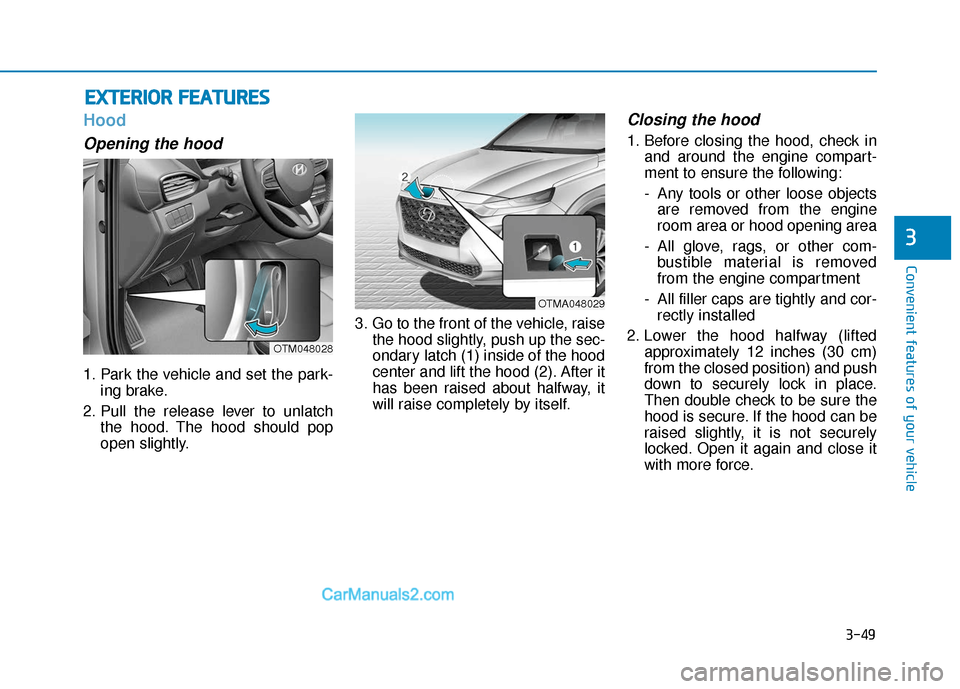
1. Park the vehicle and set the park-ing brake.
2. Pull the release lever to unlatch the hood. The hood should pop
open slightly. 3. Go to the front of the vehicle, raise
the hood slightly, push up the sec-
ondary latch (1) inside of the hood
center and lift the hood (2). After it
has been raised about halfway, it
will raise completely by itself.
Closing the hood
1. Before closing the hood, check inand around the engine compart-
ment to ensure the following:
- Any tools or other loose objectsare removed from the engine
room area or hood opening area
- All glove, rags, or other com- bustible material is removed
from the engine compartment
- All filler caps are tightly and cor- rectly installed
2. Lower the hood halfway (lifted approximately 12 inches (30 cm)
from the closed position) and push
down to securely lock in place.
Then double check to be sure the
hood is secure. If the hood can be
raised slightly, it is not securely
locked. Open it again and close it
with more force.
E EX
X T
TE
ER
R I
IO
O R
R
F
F E
E A
A T
TU
U R
RE
ES
S
OTM048028
OTMA048029
Page 139 of 557
3-50
Convenient features of your vehicle
Non-Powered Liftgate
(if equipped)
Opening the liftgate
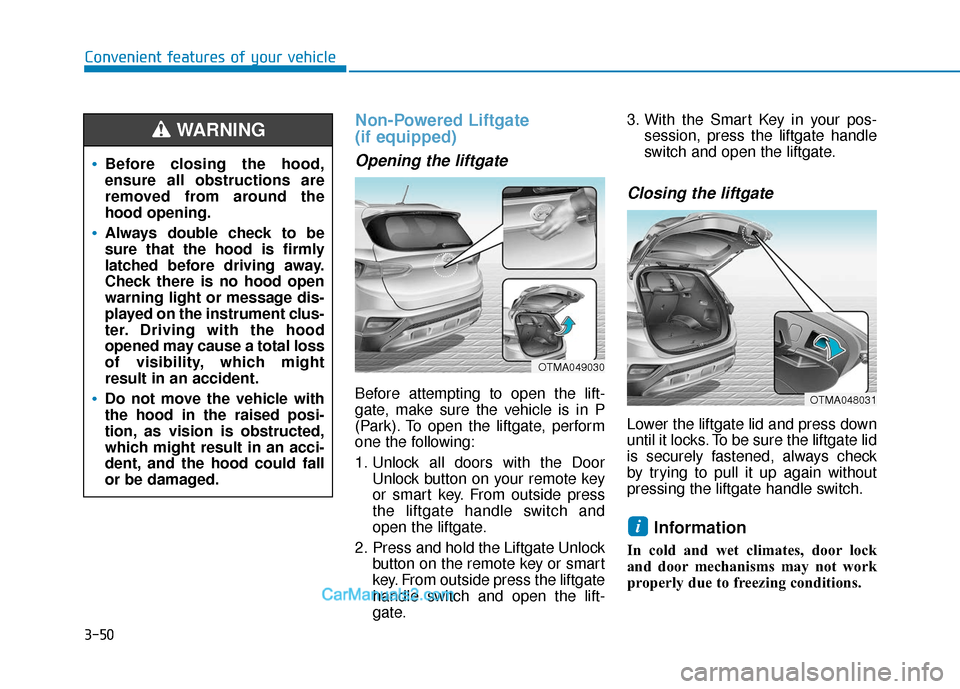
Before attempting to open the lift-
gate, make sure the vehicle is in P
(Park). To open the liftgate, perform
one the following:
1. Unlock all doors with the DoorUnlock button on your remote key
or smart key. From outside press
the liftgate handle switch and
open the liftgate.
2. Press and hold the Liftgate Unlock button on the remote key or smart
key. From outside press the liftgate
handle switch and open the lift-
gate. 3. With the Smart Key in your pos-
session, press the liftgate handle
switch and open the liftgate.
Closing the liftgate
Lower the liftgate lid and press down
until it locks. To be sure the liftgate lid
is securely fastened, always check
by trying to pull it up again without
pressing the liftgate handle switch.
Information
In cold and wet climates, door lock
and door mechanisms may not work
properly due to freezing conditions.
i
Before closing the hood,
ensure all obstructions are
removed from around the
hood opening.
Always double check to be
sure that the hood is firmly
latched before driving away.
Check there is no hood open
warning light or message dis-
played on the instrument clus-
ter. Driving with the hood
opened may cause a total loss
of visibility, which might
result in an accident.
Do not move the vehicle with
the hood in the raised posi-
tion, as vision is obstructed,
which might result in an acci-
dent, and the hood could fall
or be damaged.
WARNING
OTMA049030
OTMA048031
Page 152 of 557
3-63
Convenient features of your vehicle
3
Gasoline is highly flammable
and explosive. Failure to follow
these guidelines may result in
SERIOUS INJURY or DEATH:
Read and follow all warnings
posted at the gas station.
Before refueling, note the
location of the Emergency
Gasoline Shut-Off, if available,
at the gas station.
Before touching the fuel noz-
zle, you should eliminate the
potential build-up of static
electricity by touching a metal
part of the vehicle, a safe dis-
tance away from the fuel filler
neck, nozzle, or other gas
source, with your bare hand.
Do not use cellular phones
while refueling. Electric cur-
rent and/or electronic interfer-
ence from cellular phones can
potentially ignite fuel vapors
and cause a fire.
WARNING
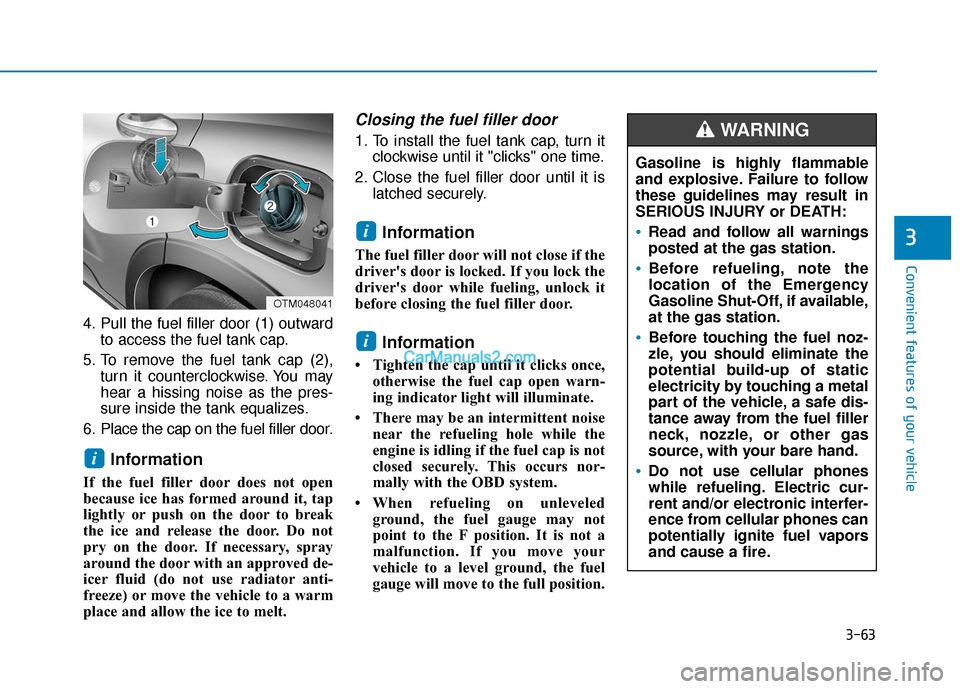
4. Pull the fuel filler door (1) outwardto access the fuel tank cap.
5. To remove the fuel tank cap (2), turn it counterclockwise. You may
hear a hissing noise as the pres-
sure inside the tank equalizes.
6. Place the cap on the fuel filler door.
Information
If the fuel filler door does not open
because ice has formed around it, tap
lightly or push on the door to break
the ice and release the door. Do not
pry on the door. If necessary, spray
around the door with an approved de-
icer fluid (do not use radiator anti-
freeze) or move the vehicle to a warm
place and allow the ice to melt.
Closing the fuel filler door
1. To install the fuel tank cap, turn it clockwise until it "clicks" one time.
2. Close the fuel filler door until it is latched securely.
Information
The fuel filler door will not close if the
driver's door is locked. If you lock the
driver's door while fueling, unlock it
before closing the fuel filler door.
Information
• Tighten the cap until it clicks once,otherwise the fuel cap open warn-
ing indicator light will illuminate.
• There may be an intermittent noise near the refueling hole while the
engine is idling if the fuel cap is not
closed securely. This occurs nor-
mally with the OBD system.
• When refueling on unleveled ground, the fuel gauge may not
point to the F position. It is not a
malfunction. If you move your
vehicle to a level ground, the fuel
gauge will move to the full position.
i
i
i
OTM048041
Page 153 of 557
3-64
Convenient features of your vehicle
Do not get back into a vehicle
once you have begun refuel-
ing. You can generate a build-
up of static electricity by
touching, rubbing or sliding
against any item or fabric
capable of producing static
electricity. Static electricity
discharge can ignite fuel
vapors causing a fire. If you
must re-enter the vehicle, you
should once again eliminate
potentially dangerous static
electricity discharge by touch-
ing a metal part of the vehicle,
away from the fuel filler neck,
nozzle or other gasoline
source, with your bare hand.
When using an approved
portable fuel container, be
sure to place the container on
the ground prior to refueling.
Static electricity discharge
from the container can ignite
fuel vapors causing a fire.
Do not over-fill or top-off your
vehicle tank, which can cause
gasoline spillage.
If a fire breaks out during refu-
eling, leave the vicinity of the
vehicle, and immediately con-
tact the manager of the gas
station and then contact the
local fire department. Follow
any safety instructions they
provide.
If pressurized fuel sprays out,
it can cover your clothes or
skin and thus subject you to
the risk of fire and burns.
Always remove the fuel cap
carefully and slowly. If the cap
is venting fuel or if you hear a
hissing sound, wait until the
condition stops before com-
pletely removing the cap.
Always check that the fuel cap
is installed securely to pre-
vent fuel spillage in the event
of an accident.
Once refueling has begun,
contact between your bare
hand and the vehicle should
be maintained until the filling
is complete.
Use only approved portable
plastic fuel containers designed
to carry and store gasoline.
When refueling, always move
the shift lever to the P (Park)
position (for automatic trans-
mission/dual clutch transmis-
sion), set the parking brake,
and place the ignition switch
to the LOCK/OFF position.
Sparks produced by electrical
components related to the
engine can ignite fuel vapors
causing a fire.
Do not use matches or a
lighter and do not smoke or
leave a lit cigarette in your
vehicle while at a gas station,
especially during refueling.