Page 504 of 557
Engine compartment fuse panel
Fuse NameFuse RatingProtected Component
PCB Block
SENSOR 615AElectronic Oil Pump Module, [2.0 T-GDI] Vacuum Pump
ABS 310AESC Module
SENSOR 710ASmart Cruise Control Radar
SENSOR 510ACanister Close Valve, E/R Junction Block (Cooling Fan Relay)
IGN COIL20AIgnition Coil #1/#2/#3/#4
SENSOR 110A
[2.4 GDI] Fuel Pump Relay, Variable Intake Solenoid Valve, Purge Control Solenoid
Valve, Oil Control Valve
[2.0 T-GDI] Fuel Pump Relay, RCV Control Solenoid Valve, Purge Control Solenoid
Valve, Oil Control Valve
E-CVVT 220APCM
A/C 110A[2.4 GDI] A/CON Relay
WIPER FRT 125AWiper Main Relay
TCU 210ATransmission Range Switch
ECU 310APCM
B/ALARM HORN15ABurglar Alarm Horn Relay, Horn Relay
Maintenance
7-62
Page 505 of 557
Engine compartment fuse panel
Fuse NameFuse RatingProtected Component
PCB Block
HORN15AHorn Relay
FUEL PUMP20AFuel Pump Relay
ECU 120APCM
SENSOR 210A[2.4 GDI] A/C Comp Relay, Oxygen Sensor (Up/Down)
[2.0 T-GDI] Oxygen Sensor (Up/Down)
E-CVVT 120APCM
POWER OUTLET 120AFront Power Outlet
POWER OUTLET 220ARear Power Outlet
ACC10AICU Junction Block (Fuse - ACC)
TCU 115APCM
IG 140APDM (IG1) Relay
Maintenance
7-63
7
Page 507 of 557
L
LI
IG
G H
H T
T
B
B U
U L
LB
B S
S
Consult an authorized HYUNDAI
dealer to replace most vehicle light
bulbs. It is difficult to replace vehicle
light bulbs because other parts of the
vehicle must be removed before you
can get to the bulb. This is especially
true for removing the headlamp
assembly to get to the bulb(s).
Removing/installing the headlamp
assembly can result in damage to
the vehicle.
Information
The headlamp and tail lamp lenses
could appear frosty if the vehicle is
washed after driving or the vehicle is
driven at night in wet weather. This
condition is caused by temperature
difference between the lamp inside
and outside and, it does not indicate a
problem with your vehicle. When
moisture condenses in the lamp, it will
be removed after driving with the
headlamp on. The removable level
may differ depending on lamp size,
lamp position and environmental con-
dition. However, if moisture is not
removed, we recommend that your
vehicle is inspected by an authorized
HYUNDAI dealer.
Headlamp, Parking lamp,
Daytime Running Light, Turn
signal lamp and Side marker
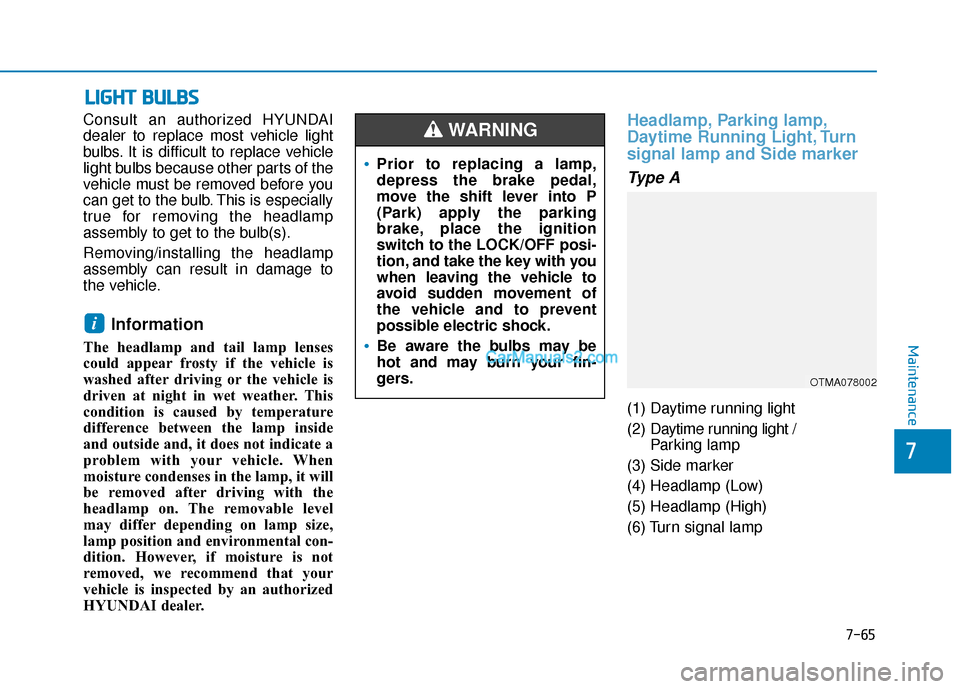
Type A
(1) Daytime running light
(2) Daytime running light /
Parking lamp
(3) Side marker
(4) Headlamp (Low)
(5) Headlamp (High)
(6) Turn signal lamp
i
•Prior to replacing a lamp,
depress the brake pedal,
move the shift lever into P
(Park) apply the parking
brake, place the ignition
switch to the LOCK/OFF posi-
tion, and take the key with you
when leaving the vehicle to
avoid sudden movement of
the vehicle and to prevent
possible electric shock.
Be aware the bulbs may be
hot and may burn your fin-
gers.
WARNING
OTMA078002
Maintenance
7-65
7
Page 508 of 557
Daytime running light (DRL),
parking lamp and side marker
lamp
If the LED lamp does not operate,
have the system checked by an
authorized HYUNDAI dealer.
The LED lamps cannot be replaced
as a single unit because it is an inte-
grated unit. The LED lamps has to be
replaced with the unit.
A skilled technician should check or
repair the LED lamp, for it may dam-
age related parts of the vehicle.
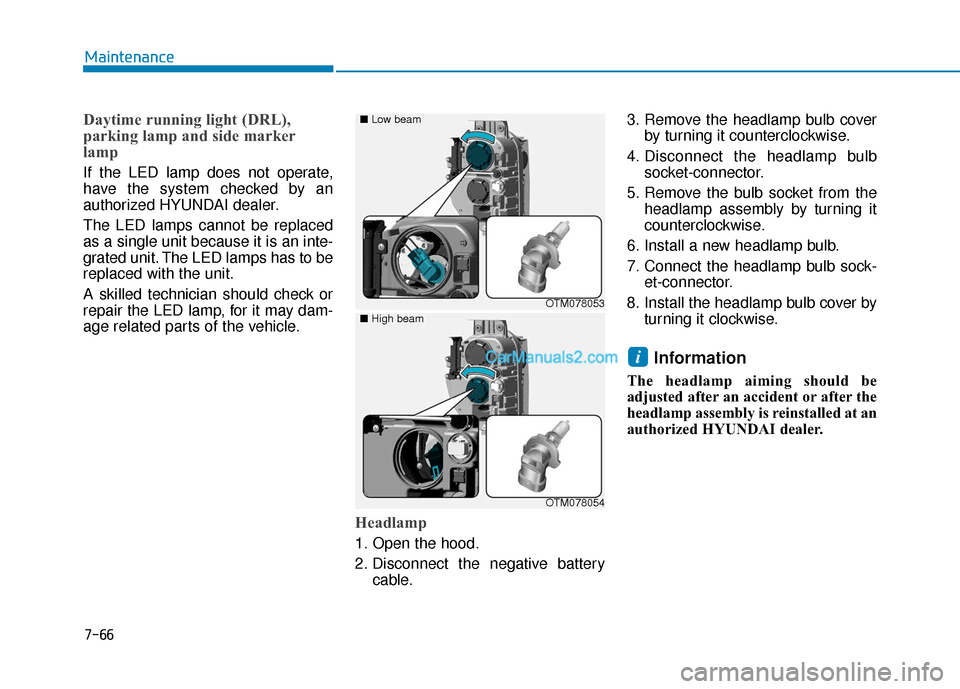
Headlamp
1. Open the hood.
2. Disconnect the negative batterycable. 3. Remove the headlamp bulb cover
by turning it counterclockwise.
4. Disconnect the headlamp bulb socket-connector.
5. Remove the bulb socket from the headlamp assembly by turning it
counterclockwise.
6. Install a new headlamp bulb.
7. Connect the headlamp bulb sock- et-connector.
8. Install the headlamp bulb cover by turning it clockwise.
Information
The headlamp aiming should be
adjusted after an accident or after the
headlamp assembly is reinstalled at an
authorized HYUNDAI dealer.
i
OTM078053
■
Low beam
OTM078054
■
High beam
Maintenance
7-66
Page 510 of 557
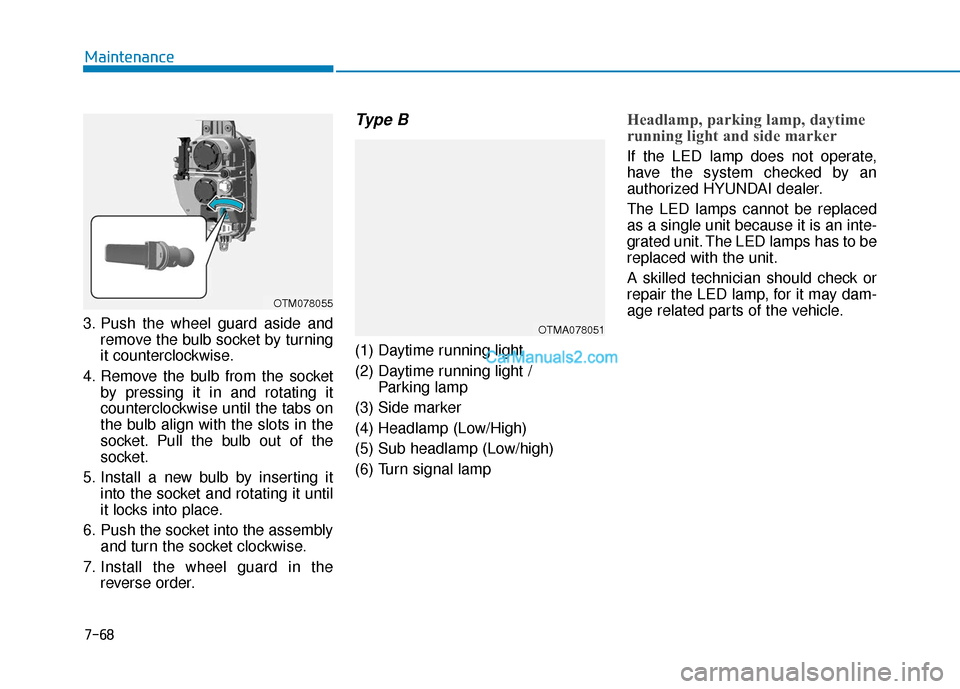
3. Push the wheel guard aside andremove the bulb socket by turning
it counterclockwise.
4. Remove the bulb from the socket by pressing it in and rotating it
counterclockwise until the tabs on
the bulb align with the slots in the
socket. Pull the bulb out of the
socket.
5. Install a new bulb by inserting it into the socket and rotating it until
it locks into place.
6. Push the socket into the assembly and turn the socket clockwise.
7. Install the wheel guard in the reverse order.
Type B
(1) Daytime running light
(2) Daytime running light / Parking lamp
(3) Side marker
(4) Headlamp (Low/High)
(5) Sub headlamp (Low/high)
(6) Turn signal lamp
Headlamp, parking lamp, daytime
running light and side marker
If the LED lamp does not operate,
have the system checked by an
authorized HYUNDAI dealer.
The LED lamps cannot be replaced
as a single unit because it is an inte-
grated unit. The LED lamps has to be
replaced with the unit.
A skilled technician should check or
repair the LED lamp, for it may dam-
age related parts of the vehicle.
7-68
Maintenance
OTM078055
OTMA078051
Page 511 of 557
7-69
7
Maintenance
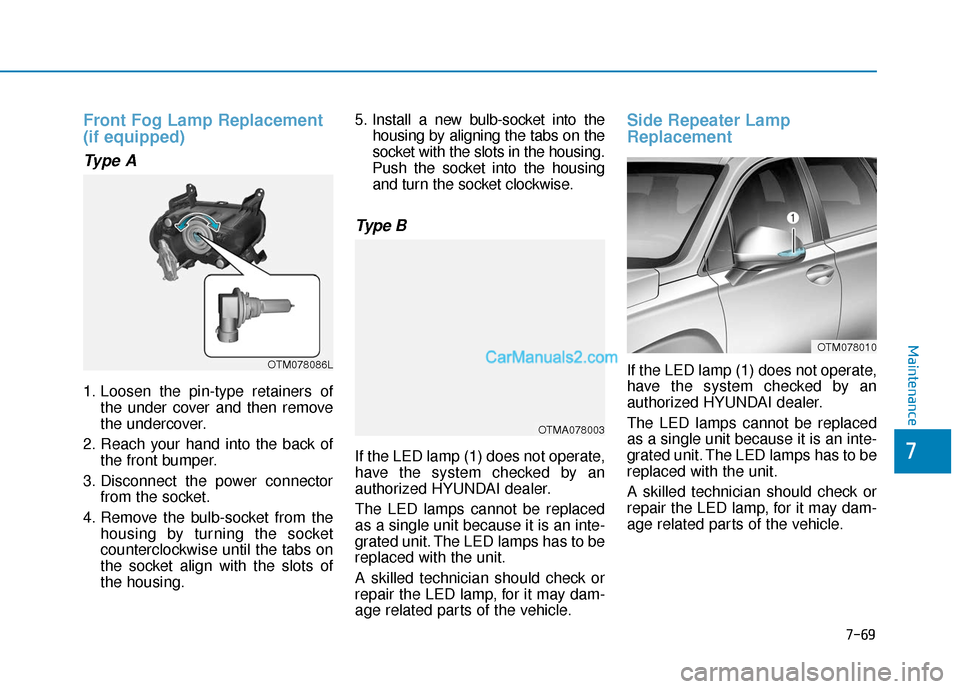
Front Fog Lamp Replacement
(if equipped)
Type A
1. Loosen the pin-type retainers ofthe under cover and then remove
the undercover.
2. Reach your hand into the back of the front bumper.
3. Disconnect the power connector from the socket.
4. Remove the bulb-socket from the housing by turning the socket
counterclockwise until the tabs on
the socket align with the slots of
the housing. 5. Install a new bulb-socket into the
housing by aligning the tabs on the
socket with the slots in the housing.
Push the socket into the housing and turn the socket clockwise.
Type B
If the LED lamp (1) does not operate,
have the system checked by an
authorized HYUNDAI dealer.
The LED lamps cannot be replaced
as a single unit because it is an inte-
grated unit. The LED lamps has to be
replaced with the unit.
A skilled technician should check or
repair the LED lamp, for it may dam-
age related parts of the vehicle.
Side Repeater Lamp
Replacement
If the LED lamp (1) does not operate,
have the system checked by an
authorized HYUNDAI dealer.
The LED lamps cannot be replaced
as a single unit because it is an inte-
grated unit. The LED lamps has to be
replaced with the unit.
A skilled technician should check or
repair the LED lamp, for it may dam-
age related parts of the vehicle.
OTM078010
OTMA078003
OTM078086L
7
Maintenance
Page 513 of 557
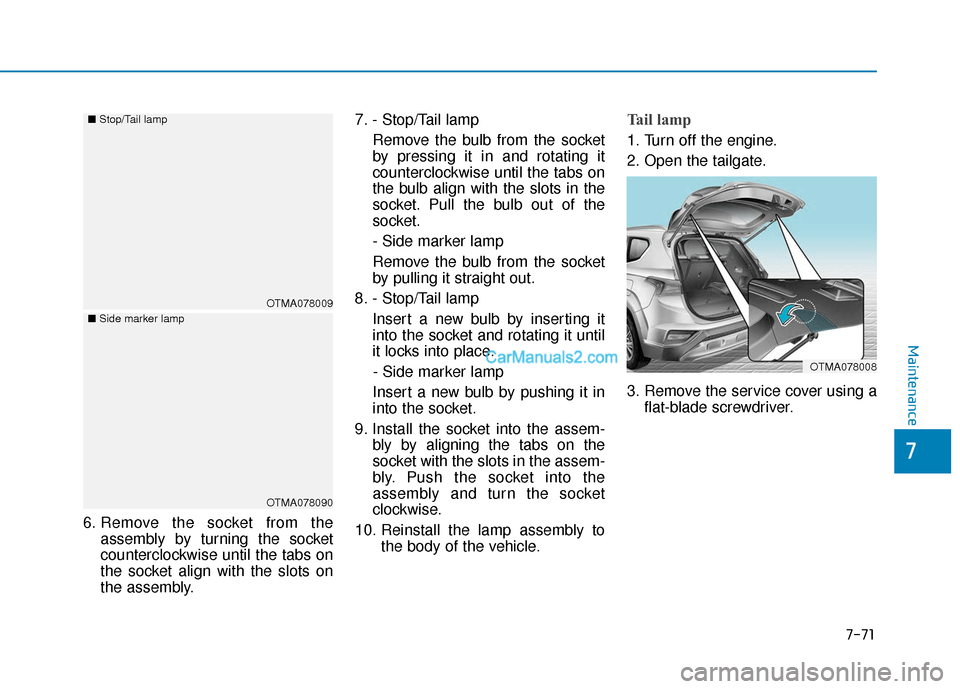
6. Remove the socket from theassembly by turning the socket
counterclockwise until the tabs on
the socket align with the slots on
the assembly. 7. - Stop/Tail lamp
Remove the bulb from the socket
by pressing it in and rotating it
counterclockwise until the tabs on
the bulb align with the slots in the
socket. Pull the bulb out of the
socket.
- Side marker lamp
Remove the bulb from the socket
by pulling it straight out.
8. - Stop/Tail lamp Insert a new bulb by inserting it
into the socket and rotating it until
it locks into place.- Side marker lamp
Insert a new bulb by pushing it in
into the socket.
9. Install the socket into the assem- bly by aligning the tabs on the
socket with the slots in the assem-
bly. Push the socket into the
assembly and turn the socket
clockwise.
10. Reinstall the lamp assembly to the body of the vehicle.
Tail lamp
1. Turn off the engine.
2. Open the tailgate.
3. Remove the service cover using aflat-blade screwdriver.
OTMA078008
OTMA078009
■
Stop/Tail lamp
OTMA078090
■
Side marker lamp
Maintenance
7-71
7
Page 514 of 557
4. Remove the socket from theassembly by turning the socket
counterclockwise until the tabs on
the socket align with the slots on
the assembly.
5. Remove the bulb from the socket by pulling it straight out.
6. Insert a new bulb by pushing it in into the socket.
7. Install the socket into the assem- bly by aligning the tabs on the
socket with the slots in the assem-
bly. Push the socket into the
assembly and turn the socket
clockwise.
8. Reinstall the lamp assembly to the body of the vehicle.
Turn signal lamp and back up lamp
If the light bulb does not operate,
have the vehicle checked by an
authorized HYUNDAI dealer.
Type B
(1) Tail lamp
(2) Stop lamp
(3) Side marker
(4) Turn signal lamp
(5) Back up lamp
OTMA078050
OTM078007
Maintenance
7-72
![Hyundai Santa Fe 2020 Owners Manual Engine compartment fuse panel
Fuse NameFuse RatingProtected Component
PCB Block
SENSOR 615AElectronic Oil Pump Module, [2.0 T-GDI] Vacuum Pump
ABS 310AESC Module
SENSOR 710ASmart Cruise Control Radar](/manual-img/35/16315/w960_16315-503.png "Hyundai Santa Fe 2020 Owners Manual Engine compartment fuse panel
Fuse NameFuse RatingProtected Component
PCB Block
SENSOR 615AElectronic Oil Pump Module, [2.0 T-GDI] Vacuum Pump
ABS 310AESC Module
SENSOR 710ASmart Cruise Control Radar")
![Hyundai Santa Fe 2020 Owners Manual Engine compartment fuse panel
Fuse NameFuse RatingProtected Component
PCB Block
HORN15AHorn Relay
FUEL PUMP20AFuel Pump Relay
ECU 120APCM
SENSOR 210A[2.4 GDI] A/C Comp Relay, Oxygen Sensor (Up/Down)
[](/manual-img/35/16315/w960_16315-504.png "Hyundai Santa Fe 2020 Owners Manual Engine compartment fuse panel
Fuse NameFuse RatingProtected Component
PCB Block
HORN15AHorn Relay
FUEL PUMP20AFuel Pump Relay
ECU 120APCM
SENSOR 210A[2.4 GDI] A/C Comp Relay, Oxygen Sensor (Up/Down)
[")