Page 472 of 557
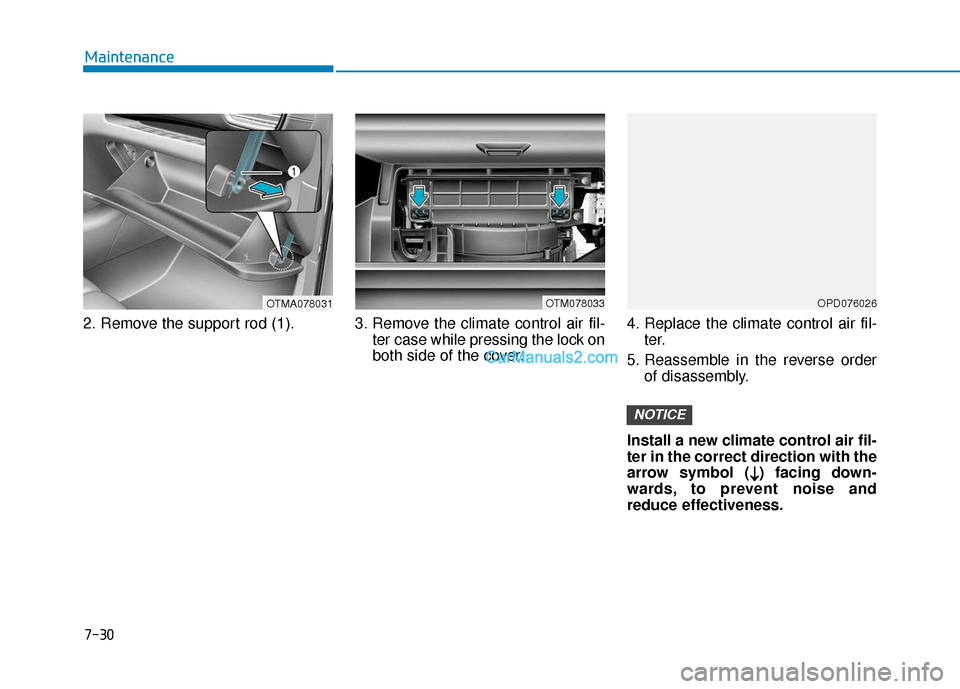
2. Remove the support rod (1). 3. Remove the climate control air fil-ter case while pressing the lock on
both side of the cover.4. Replace the climate control air fil-
ter.
5. Reassemble in the reverse order of disassembly.
Install a new climate control air fil-
ter in the correct direction with the
arrow symbol ( ↓ ↓) facing down-
wards, to prevent noise and
reduce effectiveness.
NOTICE
OTMA078031OPD076026OTM078033
Maintenance
7-30
Page 477 of 557
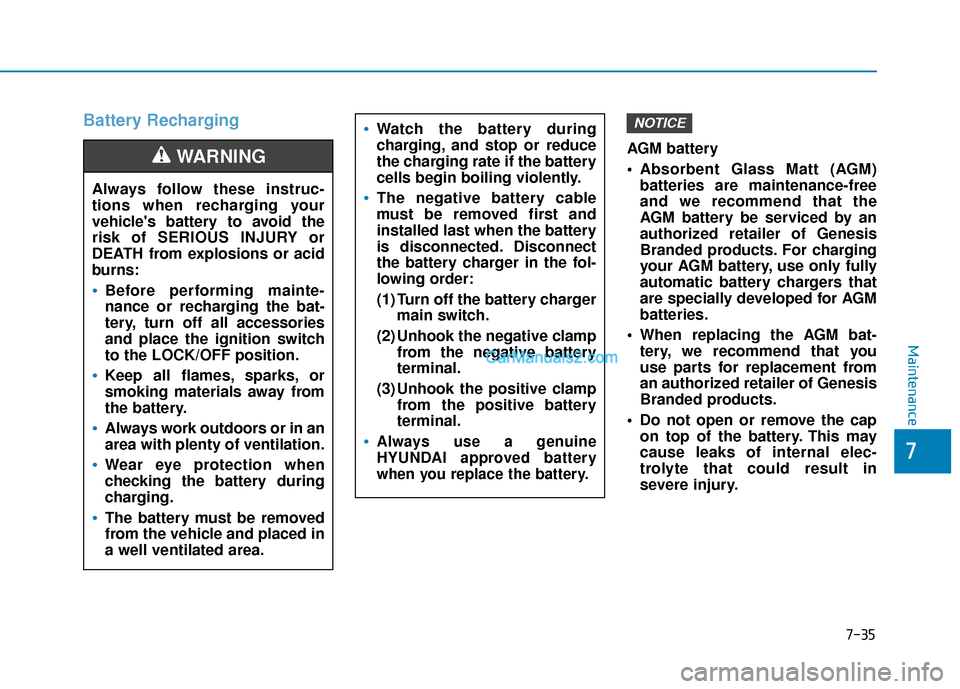
Battery Recharging
AGM battery
Absorbent Glass Matt (AGM)batteries are maintenance-free
and we recommend that the
AGM battery be serviced by an
authorized retailer of Genesis
Branded products. For charging
your AGM battery, use only fully
automatic battery chargers that
are specially developed for AGM
batteries.
When replacing the AGM bat- tery, we recommend that you
use parts for replacement from
an authorized retailer of Genesis
Branded products.
Do not open or remove the cap on top of the battery. This may
cause leaks of internal elec-
trolyte that could result in
severe injury.
NOTICE
Always follow these instruc-
tions when recharging your
vehicle's battery to avoid the
risk of SERIOUS INJURY or
DEATH from explosions or acid
burns:
Before performing mainte-
nance or recharging the bat-
tery, turn off all accessories
and place the ignition switch
to the LOCK/OFF position.
Keep all flames, sparks, or
smoking materials away from
the battery.
Always work outdoors or in an
area with plenty of ventilation.
Wear eye protection when
checking the battery during
charging.
The battery must be removed
from the vehicle and placed in
a well ventilated area.
WARNING
Watch the battery during
charging, and stop or reduce
the charging rate if the battery
cells begin boiling violently.
The negative battery cable
must be removed first and
installed last when the battery
is disconnected. Disconnect
the battery charger in the fol-
lowing order:
(1) Turn off the battery charger main switch.
(2) Unhook the negative clamp from the negative battery
terminal.
(3) Unhook the positive clamp from the positive battery
terminal.
Always use a genuine
HYUNDAI approved battery
when you replace the battery.
Maintenance
7
7-35
Page 478 of 557
By jump starting
After a jump start from a good bat-
tery, drive the vehicle for at least 30
minutes or operate at idle for at least
60 minutes before it is shutoff.
Alternatively you may visit a dealer
for charge and battery test.
The vehicle may not restart if you
shut it off before the battery had a
chance to adequately recharge. See
"Jump Starting" in chapter 6 for more
information on jump starting proce-
dures.
Information
An inappropriately disposedbattery can be harmful to
the environment and human
health. Dispose of the bat-
tery according to your local
law(s) or regulations.
Reset Features
The following items may need to be
reset after the battery has been dis-
charged or the battery has been dis-
connected. See chapter 3 or 4 for:
Power Windows
Driver Position Memory System
Trip Computer
Climate Control System
Clock
Audio System
Sunroof
i
Maintenance
7-36
Page 479 of 557
T
TI
IR
R E
ES
S
A
A N
N D
D
W
W H
HE
EE
EL
LS
S
Tire Care
For proper maintenance, safety, and
maximum fuel economy, you must
always maintain recommended tire
inflation pressures and stay within
the load limits and weight distribution
recommended for your vehicle.
All specifications (sizes and pres-
sures) can be found on a label
attached to the driver's side center
pillar.Replace tires that are worn,
show uneven wear, or are dam-
aged. Worn tires can cause
loss of braking effectiveness,
steering control, or traction.
ALWAYS replace tires with the
same size as each tire that
was originally supplied with
this vehicle. Using tires and
wheels other than the recom-
mended sizes could cause
unusual handling characteris-
tics, poor vehicle control, or
negatively affect your vehi-
cle's Anti-Lock Brake System
(ABS) resulting in a serious
accident.
Tire failure may cause loss of
vehicle control resulting in an
accident. To reduce risk of
SERIOUS INJURY or DEATH,
take the following precautions:
Inspect your tires monthly for
proper inflation as well as
wear and damage.
The recommended cold tire
pressure for your vehicle can
be found in this manual and on
the tire label located on the dri-
ver's side center pillar. Always
use a tire pressure gauge to
measure tire pressure. Tires
with too much or too little
pressure wear unevenly caus-
ing poor handling.
Check the pressure of the
spare every time you check
the pressure of the other tires
on your vehicle.
WARNING
OTM078063L
Maintenance
7
7-37
Page 483 of 557
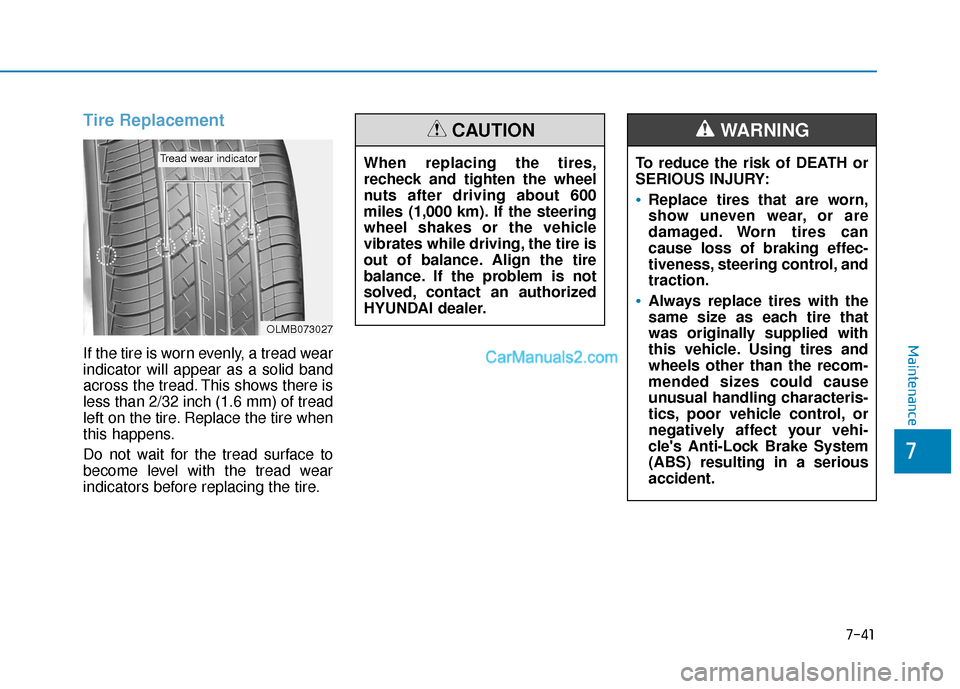
Tire Replacement
If the tire is worn evenly, a tread wear
indicator will appear as a solid band
across the tread. This shows there is
less than 2/32 inch (1.6 mm) of tread
left on the tire. Replace the tire when
this happens.
Do not wait for the tread surface to
become level with the tread wear
indicators before replacing the tire.
OLMB073027
Tread wear indicatorTo reduce the risk of DEATH or
SERIOUS INJURY:
Replace tires that are worn,
show uneven wear, or are
damaged. Worn tires can
cause loss of braking effec-
tiveness, steering control, and
traction.
Always replace tires with the
same size as each tire that
was originally supplied with
this vehicle. Using tires and
wheels other than the recom-
mended sizes could cause
unusual handling characteris-
tics, poor vehicle control, or
negatively affect your vehi-
cle's Anti-Lock Brake System
(ABS) resulting in a serious
accident.
WARNING
When replacing the tires,
recheck and tighten the wheel
nuts after driving about 600
miles (1,000 km). If the steering
wheel shakes or the vehicle
vibrates while driving, the tire is
out of balance. Align the tire
balance. If the problem is not
solved, contact an authorized
HYUNDAI dealer.
CAUTION
Maintenance
7
7-41
Page 499 of 557
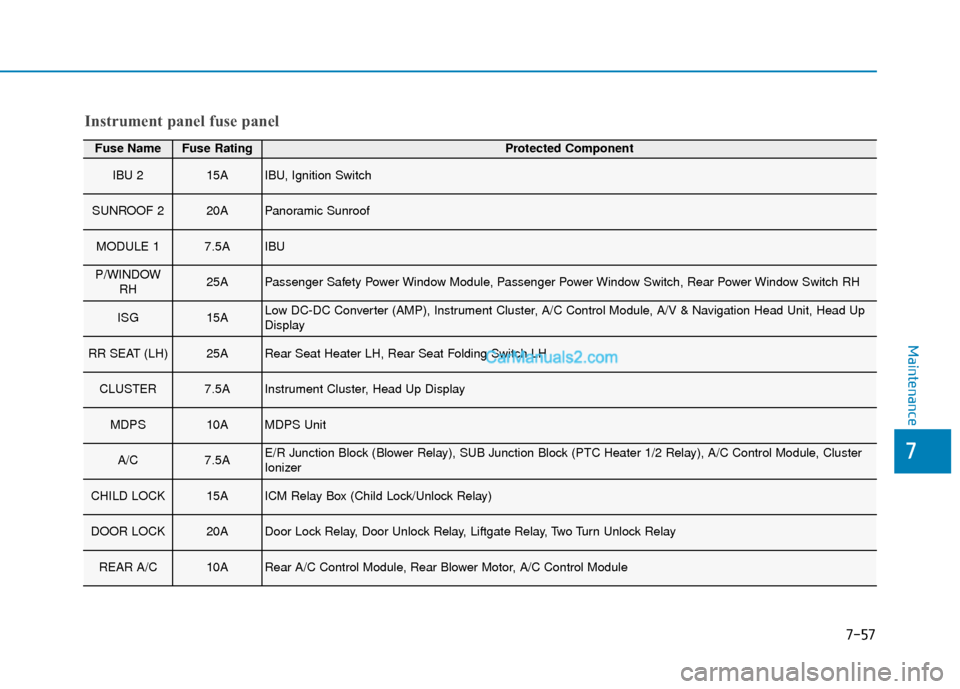
Fuse NameFuse RatingProtected Component
IBU 215AIBU, Ignition Switch
SUNROOF 220APanoramic Sunroof
MODULE 17.5AIBU
P/WINDOWRH25APassenger Safety Power Window Module, Passenger Power Window Switch, Rear Power Window Switch RH
ISG15ALow DC-DC Converter (AMP), Instrument Cluster, A/C Control Module, A/V & Navigation Head Unit, Head Up
Display
RR SEAT (LH)25ARear Seat Heater LH, Rear Seat Folding Switch LH
CLUSTER7.5AInstrument Cluster, Head Up Display
MDPS10AMDPS Unit
A/C7.5AE/R Junction Block (Blower Relay), SUB Junction Block (PTC Heater 1/2 Relay), A/C Control Module, Cluster
Ionizer
CHILD LOCK15AICM Relay Box (Child Lock/Unlock Relay)
DOOR LOCK20ADoor Lock Relay, Door Unlock Relay, Liftgate Relay, Two Turn Unlock Relay
REAR A/C10ARear A/C Control Module, Rear Blower Motor, A/C Control Module
Instrument panel fuse panel
Maintenance
7
7-57
Page 502 of 557
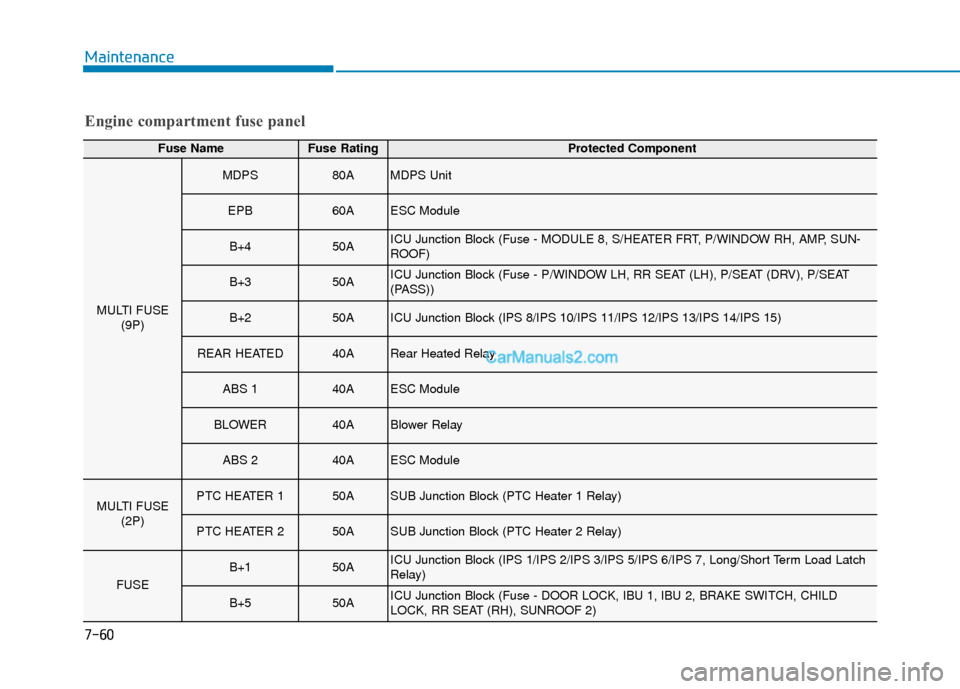
Engine compartment fuse panel
Fuse NameFuse RatingProtected Component
MULTI FUSE(9P)
MDPS80AMDPS Unit
EPB60AESC Module
B+450AICU Junction Block (Fuse - MODULE 8, S/HEATER FRT, P/WINDOW RH, AMP, SUN-
ROOF)
B+350AICU Junction Block (Fuse - P/WINDOW LH, RR SEAT (LH), P/SEAT (DRV), P/SEAT
(PASS))
B+250AICU Junction Block (IPS 8/IPS 10/IPS 11/IPS 12/IPS 13/IPS 14/IPS 15)
REAR HEATED40ARear Heated Relay
ABS 140AESC Module
BLOWER40ABlower Relay
ABS 240AESC Module
MULTI FUSE(2P)PTC HEATER 150ASUB Junction Block (PTC Heater 1 Relay)
PTC HEATER 250ASUB Junction Block (PTC Heater 2 Relay)
FUSE
B+150AICU Junction Block (IPS 1/IPS 2/IPS 3/IPS 5/IPS 6/IPS 7, Long/Short Term Load Latch
Relay)
B+550AICU Junction Block (Fuse - DOOR LOCK, IBU 1, IBU 2, BRAKE SWITCH, CHILD
LOCK, RR SEAT (RH), SUNROOF 2)
Maintenance
7-60
Page 503 of 557
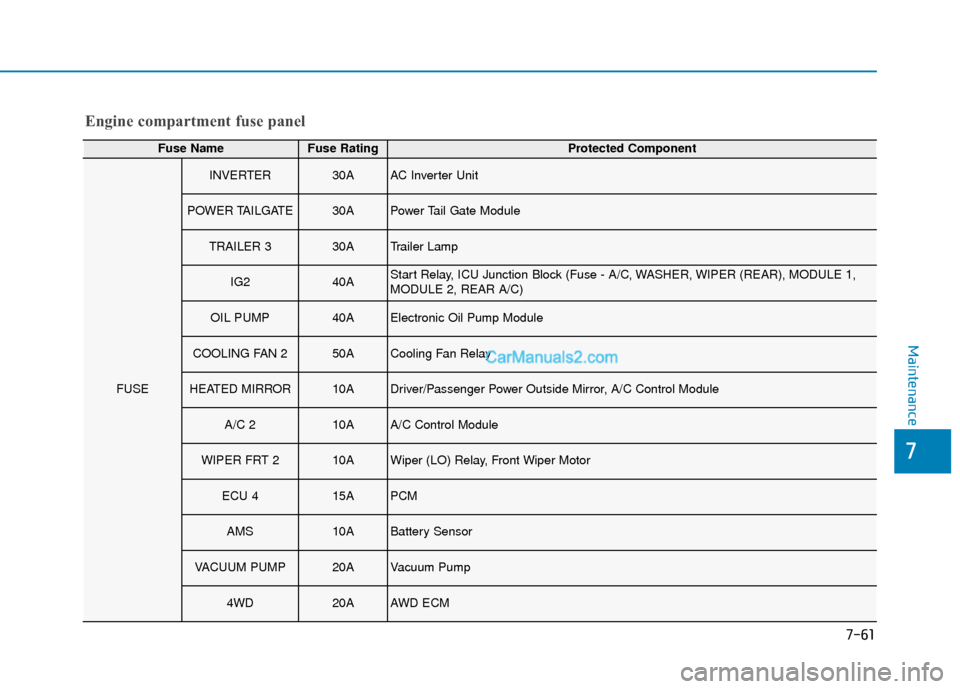
Engine compartment fuse panel
Fuse NameFuse RatingProtected Component
FUSE
INVERTER30AAC Inverter Unit
POWER TAILGATE30APower Tail Gate Module
TRAILER 330ATrailer Lamp
IG240AStart Relay, ICU Junction Block (Fuse - A/C, WASHER, WIPER (REAR), MODULE 1,
MODULE 2, REAR A/C)
OIL PUMP40AElectronic Oil Pump Module
COOLING FAN 250ACooling Fan Relay
HEATED MIRROR10ADriver/Passenger Power Outside Mirror, A/C Control Module
A/C 210AA/C Control Module
WIPER FRT 210AWiper (LO) Relay, Front Wiper Motor
ECU 415APCM
AMS10ABattery Sensor
VACUUM PUMP20AVacuum Pump
4WD20AAWD ECM
Maintenance
7
7-61