2020 Hyundai Santa Fe Hold lock
[x] Cancel search: Hold lockPage 23 of 557
Safety system of your vehicle
2
Safety Precautions
Adjusting the seats so that you are
sitting in a safe, comfortable position
plays an important role in driver and
passenger safety together with the
seat belts and air bags in an acci-
dent.
Air bags
You can take steps to reduce the risk
of being injured by an inflating air
bag. Sitting too close to an air bag
greatly increases the risk of injury in
the event the air bag inflates.
The National Highway Traffic Safety
Administration (NHTSA) recom-
mends that drivers allow at least 10
inches (25 cm) between the center of
the steering wheel and their chest.
Seat belts
Always fasten your seat belt before
starting any trip.
At all times, passengers should sit
upright and be properly restrained.
Infants and small children must be
restrained in appropriate child
restraint systems. Adults and chil-
dren who have outgrown a booster
seat must be restrained using the
seat belts.
Do not use a cushion that
reduces friction between the
seat and the passenger. The
passenger's hips may slide
under the lap portion of the seat
belt during an accident or a
sudden stop. Serious or fatal
internal injuries could result
because the seat belt cannot
operate properly.
WARNING
To reduce the risk of serious
injury or death from an inflating
air bag, take the following pre-
cautions:
•Adjust the driver's seat as far
to the rear as possible while
maintaining the ability to
maintain full control of the
vehicle.
Adjust the front passenger
seat as far to the rear as pos-
sible.
Hold the steering wheel by the
rim with hands at the 9 o'clock
and 3 o'clock positions to
minimize the risk of injuries to
your hands and arms.
NEVER place anything or any-
one between the steering
wheel and the air bag.
Do not allow the front passen-
ger to place feet or legs on the
dashboard to minimize the
risk of leg injuries.
WARNING
2-5
Page 25 of 557
2-7
Safety system of your vehicle
2
Manual adjustment (if equipped)
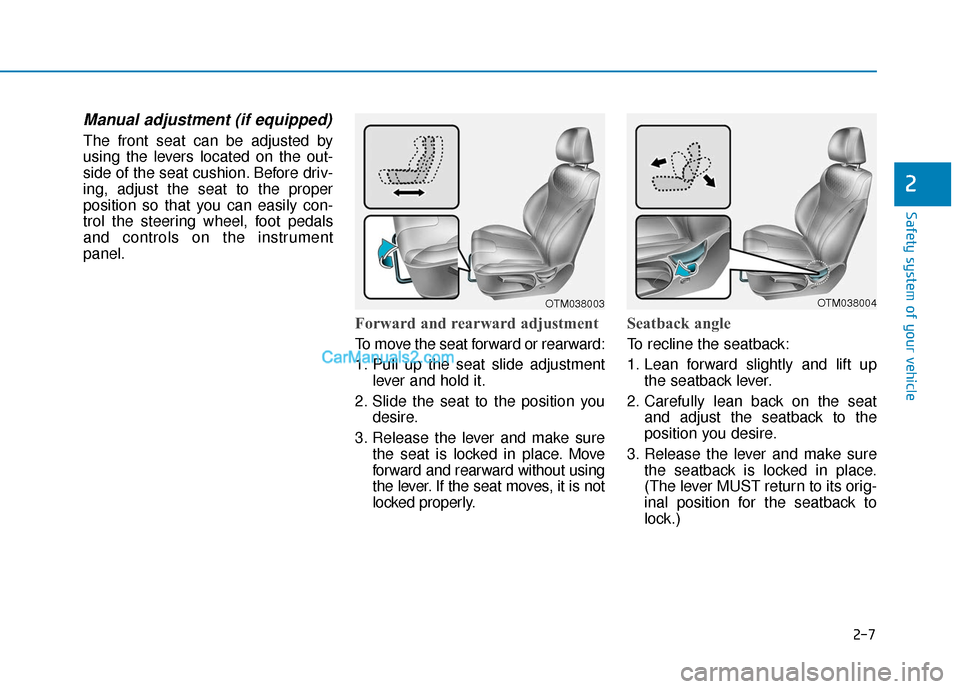
The front seat can be adjusted by
using the levers located on the out-
side of the seat cushion. Before driv-
ing, adjust the seat to the proper
position so that you can easily con-
trol the steering wheel, foot pedals
and controls on the instrument
panel.
Forward and rearward adjustment
To move the seat forward or rearward:
1. Pull up the seat slide adjustmentlever and hold it.
2. Slide the seat to the position you desire.
3. Release the lever and make sure the seat is locked in place. Move
forward and rearward without using
the lever. If the seat moves, it is not
locked properly.
Seatback angle
To recline the seatback:
1. Lean forward slightly and lift upthe seatback lever.
2. Carefully lean back on the seat and adjust the seatback to the
position you desire.
3. Release the lever and make sure the seatback is locked in place.
(The lever MUST return to its orig-
inal position for the seatback to
lock.)
OTM038003OTM038004
Page 31 of 557

2-13
Safety system of your vehicle
2
Rear Seats
Rear seat adjustment
Seatback angle
To recline the seatback:
1. Pull up the seatback recline lever.
2. Hold the lever and adjust the seat-back of the seat to the position
you desire.
3. Release the lever and make sure the seatback is locked in place.
(The lever MUST return to its original
position for the seatback to lock.)
Folding the rear seat
The rear seatbacks can be folded to
facilitate carrying long items or to
increase the luggage capacity of the
vehicle. To fold down the rear seatback:
1. Set the front seatback to the
upright position and if necessary,
slide the front seat forward.
2. Lower the rear head restraints to the lowest position by pushing and
holding the release button (1) and
pushing down on the head
restraint (2).
OTM038022
Never allow passengers to sit
on top of the folded down
seatback while the vehicle is
moving. This is not a proper
seating position and no seat
belts are available for use.
This could result in serious
injury or death in case of an
accident or sudden stop.
Objects carried on the folded
down seatback should not
extend higher than the top of
the front seatbacks. This
could allow cargo to slide for-
ward and cause injury or dam-
age during sudden stops.
WARNING
OTMA038101
Page 33 of 557

2-15
Safety system of your vehicle
2
2nd row seat folding (from outside) (if equipped)
Push the 2nd row seat back folding
switch (1) located on both sides of
the tailgate. (L : Left seatback folding,
R : Right seatback folding)
Do not place objects in the rear
seats, since they cannot be
properly secured and may hit
vehicle occupants in a collision
causing serious injury or death.
WARNING
When returning the rear seat-
back from a folded to an upright
position, hold the seatback and
return it slowly. Ensure that the
seatback is completely locked
into its upright position by
pushing on the top of the seat-
back. In an accident or sudden
stop, the unlocked seatback
could allow cargo to move for-
ward with great force and enter
the passenger compartment,
which could result in serious
injury or death.
WARNING
Make sure the vehicle is off, the
shift lever is in P (Park), and the
parking brake is securely applied
whenever loading or unloading
cargo. Failure to take these steps
may allow the vehicle to move if
the shift lever is inadvertently
moved to another position.
WARNING
Be careful when loading
cargo through the rear pas-
senger seats to prevent dam-
age to the vehicle interior.
When cargo is loaded through
the rear passenger seats,
ensure the cargo is properly
secured to prevent it from
moving while driving.
Unsecured cargo in the pas-
senger compartment can
cause damage to the vehicle
or injury to it's occupants.
CAUTION
OTMA038034
Rear seat folding
Do not fold the rear seats, if
passengers, pets or luggage are
on the rear seats.
It may cause injury or damage
to passengers, pets, luggage.
WARNING
Page 35 of 557
2-17
Safety system of your vehicle
2
To prevent damage, NEVER hit or
pull on the head restraints.
Front seat head restraints
The vehicle's front and passenger's
seats are equipped with adjustable
head restraints for the passengers
safety and comfort.
NOTICE
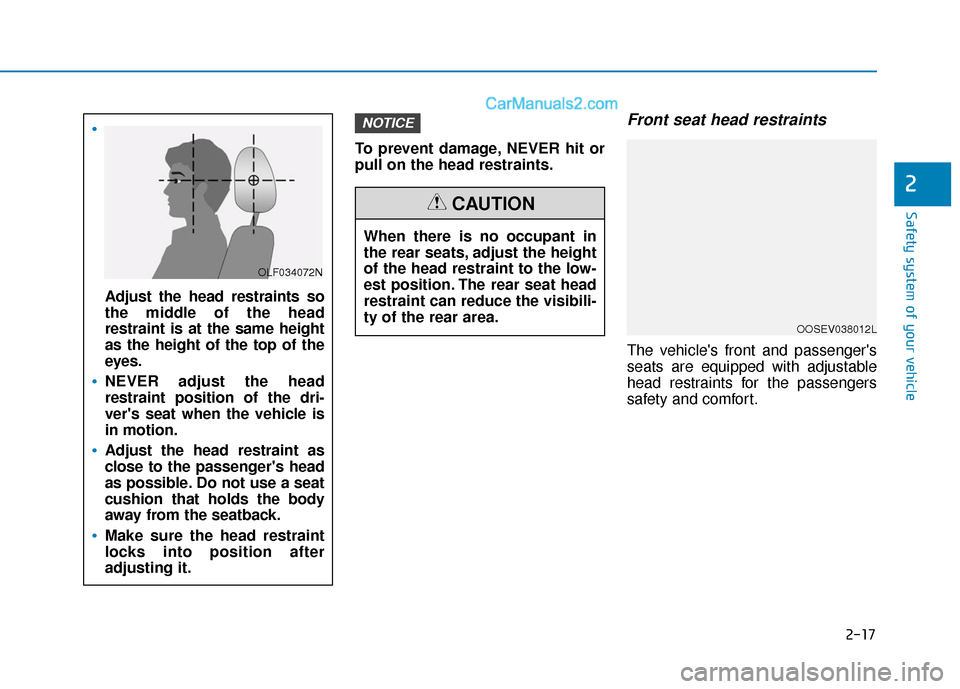
Adjust the head restraints so
the middle of the head
restraint is at the same height
as the height of the top of the
eyes.
NEVER adjust the head
restraint position of the dri-
ver's seat when the vehicle is
in motion.
Adjust the head restraint as
close to the passenger's head
as possible. Do not use a seat
cushion that holds the body
away from the seatback.
Make sure the head restraint
locks into position after
adjusting it.
OLF034072N
When there is no occupant in
the rear seats, adjust the height
of the head restraint to the low-
est position. The rear seat head
restraint can reduce the visibili-
ty of the rear area.
CAUTION
OOSEV038012L
Page 60 of 557
2-42
Safety system of your vehicle
After selecting a proper child seat for
your child, check to make sure it fits
properly in your vehicle. Follow the
instructions provided by the manu-
facturer when installing the child
seat. Note these general steps when
installing the seat to your vehicle:
Properly secure the child
restraint to the vehicle. All child
restraints must be secured to the
vehicle with the lap part of a
lap/shoulder belt or with the
LATCH system. If using the
lap/shoulder belt for your child
restraint, the convertible locking
retractor should be pulled all the
way out to engage the "automatic
locking" mode. (See page 2-45.)
Make sure the child restraint is
firmly secured. After installing a
child restraint to the vehicle, push
and pull the seat forward-and-
back and side-to-side to verify that
it is securely attached to the seat.
A child restraint secured with a
seat belt should be installed as
firmly as possible. However, some
side-to-side movement can be
expected.
Secure the child in the child
restraint. Make sure the child is
properly strapped in the child
restraint according to the manu-
facturer instructions.
Lower Anchors and Tether for Children (LATCH System)
The LATCH system holds a child
restraint during driving and in an acci-
dent. This system is designed to
make installation of the child restraint
easier and reduce the possibility of
improperly installing your child
restraint. The LATCH system uses
anchors in the vehicle and attach-
ments on the child restraint. The
LATCH system eliminates the need
to use seat belts to secure the child
restraint to the rear seats.
Lower anchors are metal bars built
into the vehicle. There are two lower
anchors for each LATCH seating
position that will accommodate a
child restraint with lower attachments.
To use the LATCH system in your
vehicle, you must have a child
restraint with LATCH attachments.
The child seat manufacturer will pro-
vide you with instructions on how to
use the child seat with its attachments
for the LATCH lower anchors.
A child restraint in a closed
vehicle can become very hot. To
prevent burns, check the seat-
ing surface and buckles before
placing your child in the child
restraint.
CAUTION
Page 66 of 557

2-48
Safety system of your vehicle
5. Remove as much slack from the belt as possible by pushing down
on the child restraint system while
feeding the shoulder belt back into
the retractor.
6. Push and pull on the child restraint system to confirm that the seat
belt is holding it firmly in place. If it
is not, release the seat belt and
repeat steps 2 through 6.
7. Double check that the retractor is in the "Automatic Locking" mode
by attempting to pull more of the
seat belt out of the retractor. If you
cannot, the retractor is in the
"Automatic Locking" mode.
If your CRS manufacturer instructs or
recommends you to use a tether
anchor with the lap/shoulder belt,
refer to the previous pages for more
information. When the seat belt is allowed to
retract to its fully stowed position,
the retractor will automatically
switch from the "Automatic
Locking" mode to the emergency
lock mode for normal adult usage.
To remove the child restraint, press
the release button on the buckle and
then pull the lap/shoulder belt out of
the restraint and allow the seat belt
to retract fully.
NOTICE
If the retractor is not in the
"Automatic Locking" mode, the
child restraint can move when
your vehicle turns or stops sud-
denly. A child can be seriously
injured or killed if the child
restraint is not properly anchored
in the car, including manually
pulling the seat belt all the way
out to shift the rectractor to the
"Automatic Locking" mode.
WARNING
Page 71 of 557
2-53
Safety system of your vehicle
2
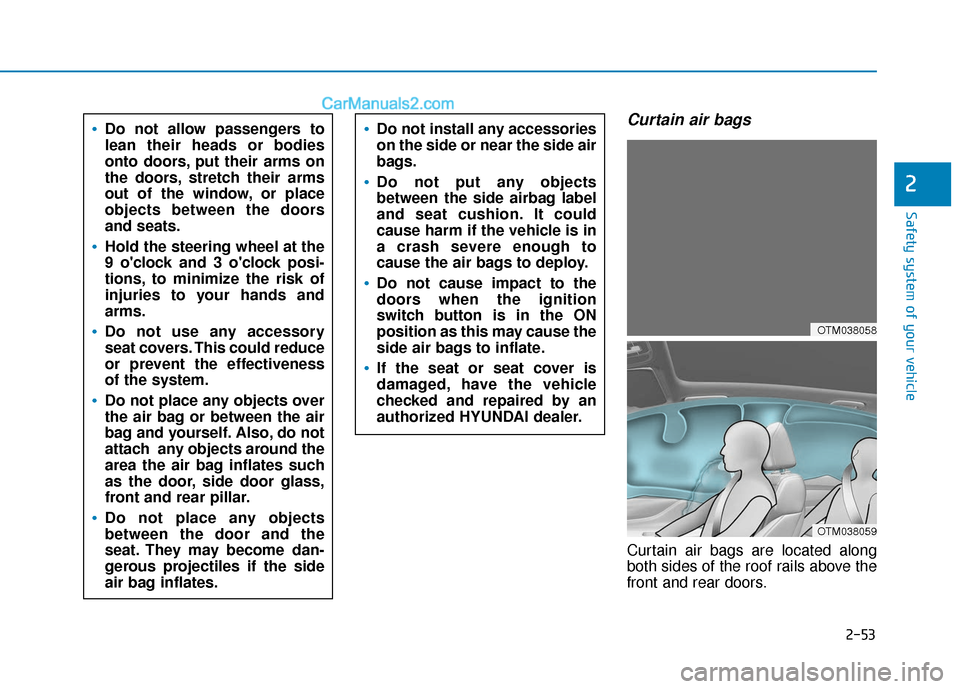
Curtain air bags
Curtain air bags are located along
both sides of the roof rails above the
front and rear doors.
Do not allow passengers to
lean their heads or bodies
onto doors, put their arms on
the doors, stretch their arms
out of the window, or place
objects between the doors
and seats.
Hold the steering wheel at the
9 o'clock and 3 o'clock posi-
tions, to minimize the risk of
injuries to your hands and
arms.
Do not use any accessory
seat covers. This could reduce
or prevent the effectiveness
of the system.
Do not place any objects over
the air bag or between the air
bag and yourself. Also, do not
attach any objects around the
area the air bag inflates such
as the door, side door glass,
front and rear pillar.
Do not place any objects
between the door and the
seat. They may become dan-
gerous projectiles if the side
air bag inflates.
Do not install any accessories
on the side or near the side air
bags.
Do not put any objects
between the side airbag label
and seat cushion. It could
cause harm if the vehicle is in
a crash severe enough to
cause the air bags to deploy.
Do not cause impact to the
doors when the ignition
switch button is in the ON
position as this may cause the
side air bags to inflate.
If the seat or seat cover is
damaged, have the vehicle
checked and repaired by an
authorized HYUNDAI dealer.
OTM038058
OTM038059