2020 Hyundai Santa Fe Set up
[x] Cancel search: Set upPage 425 of 557
6-5
What to do in an emergency
6
Information
An inappropriately disposedbattery can be harmful to the
environment and human
health. Dispose of the battery
according to your local law(s)
or regulations.
To prevent damage to your vehicle:
Only use a 12-volt power supply (battery or jumper system) to
jump start your vehicle.
Do not attempt to jump start your vehicle by push-starting.
Jump starting procedure
1. Position the vehicles close enough that the jumper cables will reach,
but do not allow the vehicles to
touch.
2. Avoid fans or any moving parts in the engine compartment at all
times, even when the vehicles are
turned off.
3. Turn off all electrical devices such as radios, lights, air conditioning,
etc. Put the vehicles in P (Park)
and set the parking brakes. Turn
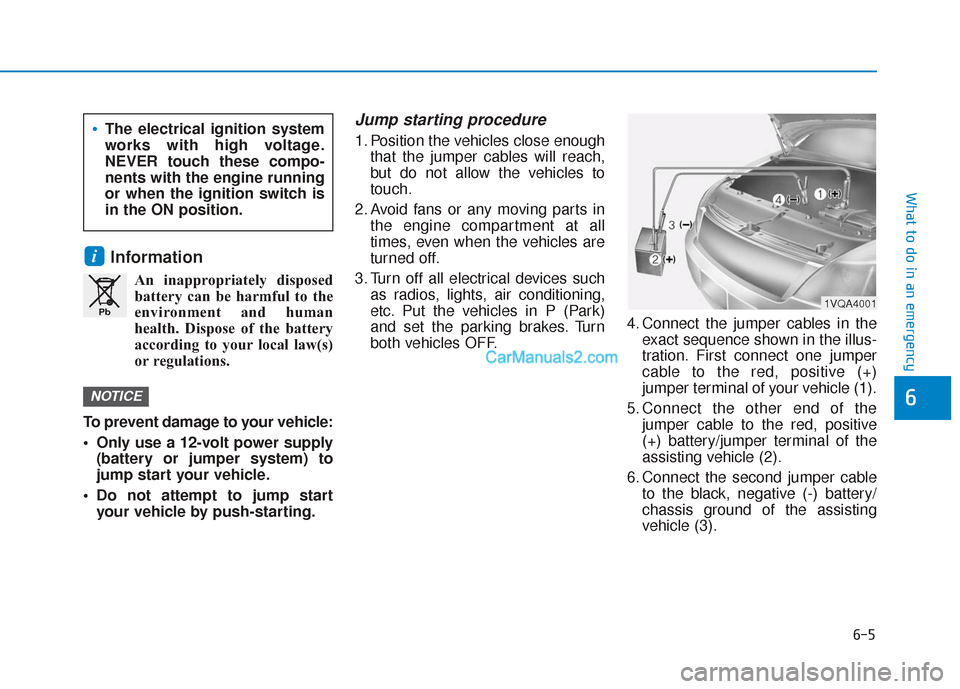
both vehicles OFF. 4. Connect the jumper cables in the
exact sequence shown in the illus-
tration. First connect one jumper
cable to the red, positive (+)
jumper terminal of your vehicle (1).
5. Connect the other end of the jumper cable to the red, positive
(+) battery/jumper terminal of the
assisting vehicle (2).
6. Connect the second jumper cable to the black, negative (-) battery/
chassis ground of the assisting
vehicle (3).
NOTICE
i
Pb
The electrical ignition system
works with high voltage.
NEVER touch these compo-
nents with the engine running
or when the ignition switch is
in the ON position.
1VQA4001
Page 426 of 557
6-6
What to do in an emergency
7. Connect the other end of the sec- ond jumper cable to the black,
negative (-) chassis ground of your
vehicle (4).
Do not allow the jumper cables to contact anything except the cor-
rect battery or jumper terminals or
the correct ground. Do not lean
over the battery when making con-
nections.
8. Start the engine of the assisting vehicle and let it run at approxi-
mately 2,000 rpm for a few min-
utes. Then start your vehicle.
9. Operate your vehicle for at least 30 minutes of driving or at least 60
minutes of engine running at idle
before shutting off the engine.
Without sufficient time to charge
the battery, another no-start will
occur. You can also visit your near-
est dealer to request the battery
be charged and tested.
If your vehicle will not start after a
few attempts, it probably requires
servicing. In this event please seek
qualified assistance. If the cause of
your battery discharging is not
apparent, have your vehicle checked
by an authorized HYUNDAI dealer. Disconnect the jumper cables in the
exact reverse order you connected
them:
1. Disconnect the jumper cable from
the black, negative (-) chassis
ground of your vehicle (4).
2. Disconnect the other end of the jumper cable from the black, neg-
ative (-) battery/chassis ground of
the assisting vehicle (3).
3. Disconnect the second jumper cable from the red, positive (+)
battery/jumper terminal of the
assisting vehicle (2).
4. Disconnect the other end of the jumper cable from the red, posi-
tive (+) jumper terminal of your
vehicle (1). If your temperature gage indicates
overheating, you experience a loss
of power, or hear loud pinging or
knocking, the engine may be over-
heating. If this happens, you should:
1. Pull off the road and stop as soon
as it is safe to do so.
2. Place the shift lever in P (Park) and set the parking brake. If the air
conditioning is ON, turn it OFF.
3. If engine coolant is running out under the vehicle or steam is com-
ing out from the hood, stop the
engine. Do not open the hood until
the coolant has stopped running or
the steaming has stopped. If there
is no visible loss of engine coolant
and no steam, leave the engine
running and check to be sure the
engine cooling fan is operating. If
the fan is not running, turn the
engine off.
I IF
F
T
T H
H E
E
E
E N
N G
GI
IN
N E
E
O
O V
VE
ER
R H
H E
EA
A T
TS
S
Page 428 of 557

6-8
What to do in an emergency
T
TI
IR
R E
E
P
P R
R E
ES
SS
SU
U R
RE
E
M
M O
ON
NI
IT
T O
O R
RI
IN
N G
G
S
S Y
Y S
ST
T E
EM
M
(
( T
T P
P M
M S
S)
)
(1) Low Tire Pressure / TPMS
Malfunction Indicator Lamp
(2) Low Tire Pressure / Tire Pressure Monitor /
TPMS Malfunction Display
(shown on the cluster LCD display)
Check Tire Pressure
You can check the tire pressure inthe Assist mode on the cluster.
Refer to the "LCD Display Mode" section in chapter 3.
A "Drive to display" message will appear for the first few minutes of
driving after initial engine start up.
If the tire pressure is not displayed
after a few minutes of driving,
check the tire pressures. The displayed tire pressure values
may differ from those measured
with a tire pressure gage.
You can change the tire pressure unit in the User Settings mode on
the cluster.
- psi, kpa, bar (Refer to the "UserSettings Mode" section in
chapter 3).
OTMA048184
OTM068003
OTM048125L
Page 439 of 557

6-19
What to do in an emergency
6If any of the equipment such as the
jack, lug nuts, studs, or other equip-
ment is damaged or in poor condi-
tion, do not attempt to change the
tire and call for assistance.
Use of compact spare tires
Compact spare tires are designed for
emergency use only. Drive carefully
on the compact spare tire and
always follow the safety precautions.When driving with the compact spare
tire mounted to your vehicle:
Check the tire pressure after
installing the compact spare tire.
The compact spare tire should be
inflated to 60 psi (420 kPa). Do not take this vehicle through an
automatic car wash while the com-
pact spare tire is installed.
Do not use the compact spare tire on any other vehicle because this
tire has been designed especially
for your vehicle.
The compact spare tire’s tread life is shorter than a regular tire. Inspect
your compact spare tire regularly
and replace worn compact spare
tires with the same size and design,
mounted on the same wheel.
Do not use more than one com- pact spare tire at a time.
Do not tow a trailer while the com- pact spare tire is installed.
When the original tire and wheel
are repaired and reinstalled on the
vehicle, the lug nut torque must be
set correctly. The correct lug nut
tightening torque is 79~94 lbf·ft
(11~13 kgf·m).
NOTICE
Your vehicle has metric threads
on the studs and lug nuts. Make
certain during tire changing that
the same nuts that were
removed are reinstalled. If you
have to replace your lug nuts
make sure they have metric
threads to avoid damaging the
studs and ensure the wheel is
properly secured to the hub.
Consult an authorized HYUNDAI
dealer for assistance.
CAUTION
To prevent compact spare tire
failure and loss of control pos-
sibly resulting in an accident:
Use the compact spare tire
only in an emergency.
NEVER operate your vehicle
over 50 mph (80 km/h).
Do not exceed the vehicle's
maximum load rating or the
load carrying capacity shown
on the sidewall of the com-
pact spare tire.
Do not use the compact spare
tire continuously. Repair or
replace the original tire as
soon as possible to avoid fail-
ure of the compact spare tire.
WARNING
Page 440 of 557
6-20
What to do in an emergency
Jack label
To prevent damaging the com-
pact spare tire and your vehicle:
Drive slowly enough for the
road conditions to avoid all
hazards, such as a potholes
or debris.
Avoid driving over obstacles.
The compact spare tire diame-
ter is smaller than the diame-
ter of a conventional tire and
reduces the ground clearance
approximately 1 inch (25 mm).
Do not use tire chains on the
compact spare tire. Because
of the smaller size, a tire chain
will not fit properly.
Do not use the compact spare
tire on any other wheels, nor
should standard tires, snow
tires, wheel covers or trim
rings be used with the com-
pact spare wheel.
CAUTION
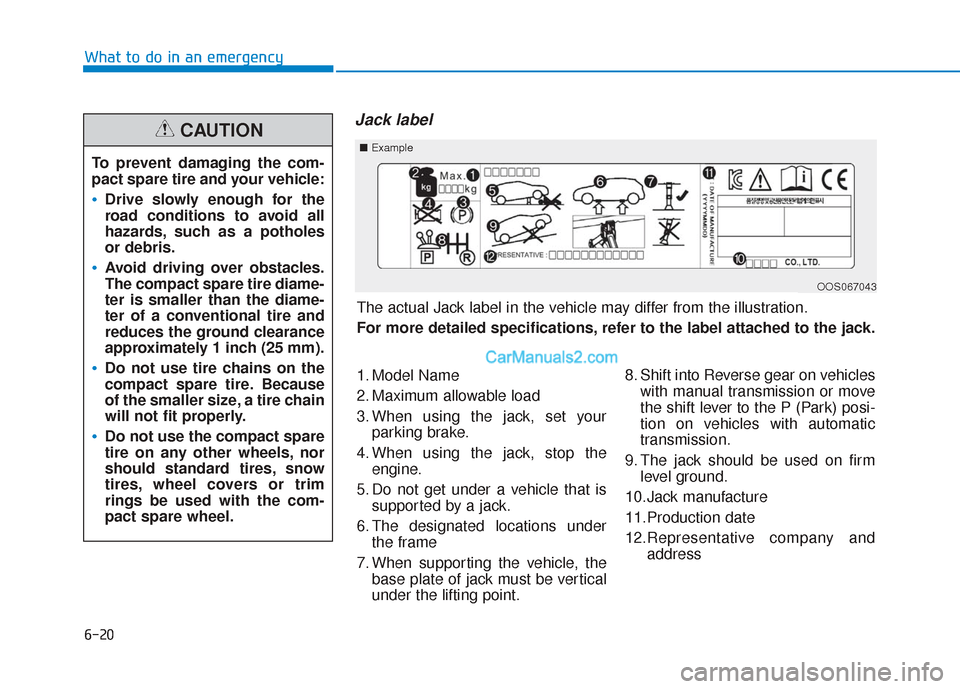
The actual Jack label in the vehicle may differ from the illustration.
For more detailed specifications, refer to the label attached to the jack.
1. Model Name
2. Maximum allowable load
3. When using the jack, set yourparking brake.
4. When using the jack, stop the engine.
5. Do not get under a vehicle that is supported by a jack.
6. The designated locations under the frame
7. When supporting the vehicle, the base plate of jack must be vertical
under the lifting point. 8. Shift into Reverse gear on vehicles
with manual transmission or move
the shift lever to the P (Park) posi-
tion on vehicles with automatic
transmission.
9. The jack should be used on firm level ground.
10.Jack manufacture
11.Production date
12.Representative company and address
■Example
OOS067043
Page 443 of 557
7
Maintenance
Engine Compartment .............................................7-3
Maintenance Services ...........................................7-4
Owner's Responsibility .....................................................7-4
Owner Maintenance Precautions..................................7-4
Owner Maintenance ..............................................7-5
Owner Maintenance Schedule .......................................7-6
Scheduled maintenance services.........................7-7
Normal Maintenance Schedule (2.4 GDI) ....................7-8
Maintenance Under Severe Usage Conditions (2.4 GDI) ........................................................7-11
Normal Maintenance Schedule (2.0 T-GDI) ..............7-13
Maintenance Under Severe Usage
Conditions (2.0 T-GDI)....................................................7-16
Explanation of Scheduled
Maintenance Items ...............................................7-18
Engine Oil ..............................................................7-21
Checking the Engine Oil Level .....................................7-21
Checking the Engine Oil and Filter .............................7-22
Engine Coolant .....................................................7-23
Checking the Engine Coolant Level ............................7-23
Changing Engine Coolant .............................................7-25
Brake Fluid ............................................................7-26
Checking the Brake Fluid Level ...................................7-26
Washer Fluid .........................................................7-27
Checking the Washer Fluid Level................................7-27
Air Cleaner ............................................................7-27
Filter Replacement ..........................................................7-27
Climate Control Air Filter ....................................7-29
Filter Inspection ...............................................................7-29
Wiper blades .........................................................7-31
Blade Inspection ..............................................................7-31
Blade Replacement .........................................................7-31
Battery...................................................................7-33
For Best Battery Service .............................................7-34
Battery Recharging ........................................................7-35
Reset Features.................................................................7-36
7
Maintenance
7
Page 463 of 557
7-21
7
Maintenance
E
EN
N G
GI
IN
N E
E
O
O I
IL
L
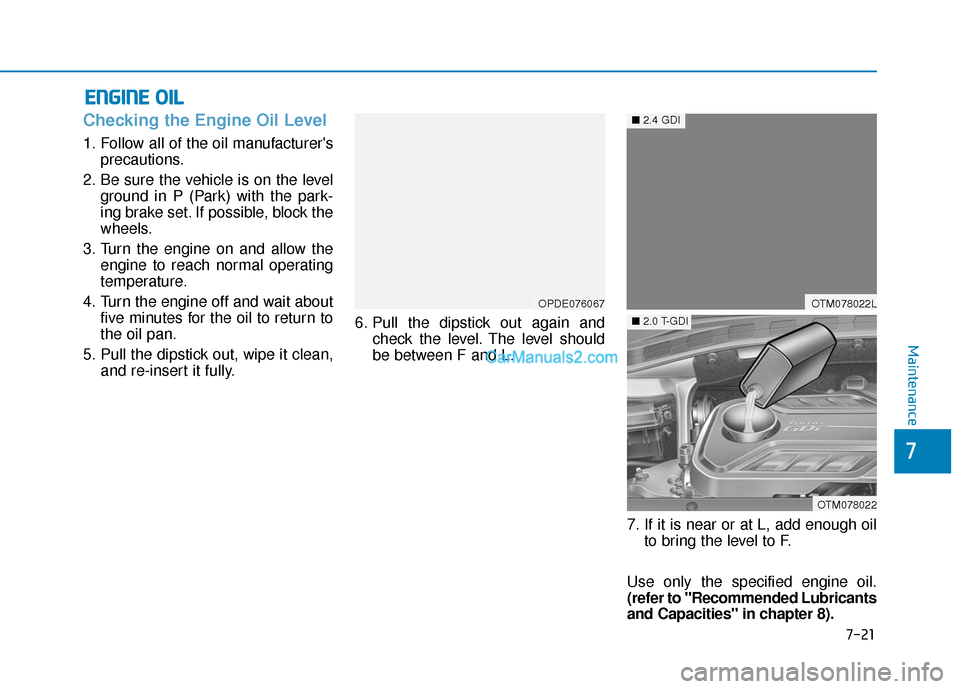
Checking the Engine Oil Level
1. Follow all of the oil manufacturer's
precautions.
2. Be sure the vehicle is on the level ground in P (Park) with the park-
ing brake set. If possible, block the
wheels.
3. Turn the engine on and allow the engine to reach normal operating
temperature.
4. Turn the engine off and wait about five minutes for the oil to return to
the oil pan.
5. Pull the dipstick out, wipe it clean, and re-insert it fully. 6. Pull the dipstick out again and
check the level. The level should
be between F and L.
7. If it is near or at L, add enough oilto bring the level to F.
Use only the specified engine oil.
(refer to "Recommended Lubricants
and Capacities" in chapter 8).
OPDE076067OTM078022L
OTM078022
■ 2.4 GDI
■2.0 T-GDI
Page 478 of 557
By jump starting
After a jump start from a good bat-
tery, drive the vehicle for at least 30
minutes or operate at idle for at least
60 minutes before it is shutoff.
Alternatively you may visit a dealer
for charge and battery test.
The vehicle may not restart if you
shut it off before the battery had a
chance to adequately recharge. See
"Jump Starting" in chapter 6 for more
information on jump starting proce-
dures.
Information
An inappropriately disposedbattery can be harmful to
the environment and human
health. Dispose of the bat-
tery according to your local
law(s) or regulations.
Reset Features
The following items may need to be
reset after the battery has been dis-
charged or the battery has been dis-
connected. See chapter 3 or 4 for:
Power Windows
Driver Position Memory System
Trip Computer
Climate Control System
Clock
Audio System
Sunroof
i
Maintenance
7-36