2020 Hyundai Ioniq Plug-in Hybrid drive mode
[x] Cancel search: drive modePage 20 of 635

1-9
Your vehicle at a glance
1
I IN
NT
TE
ER
RI
IO
OR
R
O
OV
VE
ER
RV
VI
IE
EW
W
-
-
P
PL
LU
UG
G-
-I
IN
N
H
HY
YB
BR
RI
ID
D
V
VE
EH
HI
IC
CL
LE
E
1. Door lock/unlock button ........................3-10
2. Driver position memory system ............3-14
3. Side view mirror folding switch ..............3-39
4. Side view mirror control switch ..............3-38
5. Central door lock switch ........................3-11
6. Power window lock switch......................3-41
7. Power window switches ........................3-44
8. Instrument panel illumination control
switch ....................................................3-60
9. Blind-Spot Collision Warning system
button ....................................................5-87
10. Lane Keeping Assist system button ....5-79
11. ESC(Electronic Stability Control)
OFF button ..........................................5-41
12. Fuel filler door open switch ..................3-55
13. AUTO/LOCK mode selection button ......H7
14. Scheduled charging deactivation
button ....................................................6-5
15. Hood release lever ..............................3-49
16. Fuse box ..............................................7-50
17. Steering wheel tilt/telescopic lever ......3-17
18. Steering wheel ....................................3-16
19. Seat........................................................2-4
OAEPH019010N
The actual shape may differ from the illustration.
Page 43 of 635

2-21
Safety system of your vehicle
2
While the vehicle is in the ready
( ) mode, push either of the
switches to warm the driver's seat or
front passenger's seat.During mild weather or under condi-
tions where the operation of the seat
warmer is not needed, keep the
switches in the OFF position.
Each time you push the switch, the
temperature setting of the seat is
changed as follows :
When pressing the switch for more
than 1.5 seconds with the seat
warmer operating, the seat warmer
will turn OFF.
The seat warmer defaults to the
OFF position whenever the Engine
Start/Stop button is in the ON posi-
tion.
Information
With the seat warmer switch in the
ON position, the heating system in the
seat turns off or on automatically
depending on the seat temperature.
Rear seat warmers (if equipped)
While the vehicle is in the ready
( ) mode, push either of the
switches to warm the rear seat.
During mild weather or under condi-
tions where the operation of the seat
warmer is not needed, keep the
switches in the OFF position.
i
OFF HIGH ( )
LOW ( ) MIDDLE ( )
→→
→
→
OAE036023
OAEPH038015
OAEPH038076
■Type A
■Type B
Page 50 of 635
2-28
Safety system of your vehicle
Rear Seat Belt – Passenger's 3-
point system with convertible
locking retractor
This type of seat belt combines the
features of both an emergency locking
retractor seat belt and an automatic
locking retractor seat belt. Convertible
retractor type seat belts are installed in
the rear seat positions to help accom-
modate the installation of child
restraint systems. Although a convert-
ible retractor is also installed in the
front passenger seat position, NEVER
place any infant/child restraint system
in the front seat of the vehicle.
To fasten your seat belt:
Pull the seat belt out of the retractor
and insert the metal tab into the buck-
le. There will be an audible "click"
when the tab locks into the buckle.
When not securing a child restraint,
the seat belt operates in the same way
as the driver's seat belt (Emergency
Locking Retractor Type). It automati-
cally adjusts to the proper length only
after the lap belt portion of the seat
belt is adjusted manually so that it fits
snugly across your hips.When the seat belt is fully extended
from the retractor to allow the installa-
tion of a child restraint system, the
seat belt operation changes to allow
the belt to retract, but not to extend
(Automatic Locking Retractor Type).
Refer to the "Using a Child Restraint
System" section in this chapter.
Although the seat belt retractor
provides the same level of protec-
tion for seated passengers in
either emergency or automatic
locking modes, the emergency
locking mode allows seated pas-
sengers to move freely in their
seat while keeping some tension
on the belt. During a collision or
sudden stop, the retractor auto-
matically locks the belt to help
restrain your body.
To deactivate the automatic lock-
ing mode, unbuckle the seat belt
and allow the belt to fully retract.
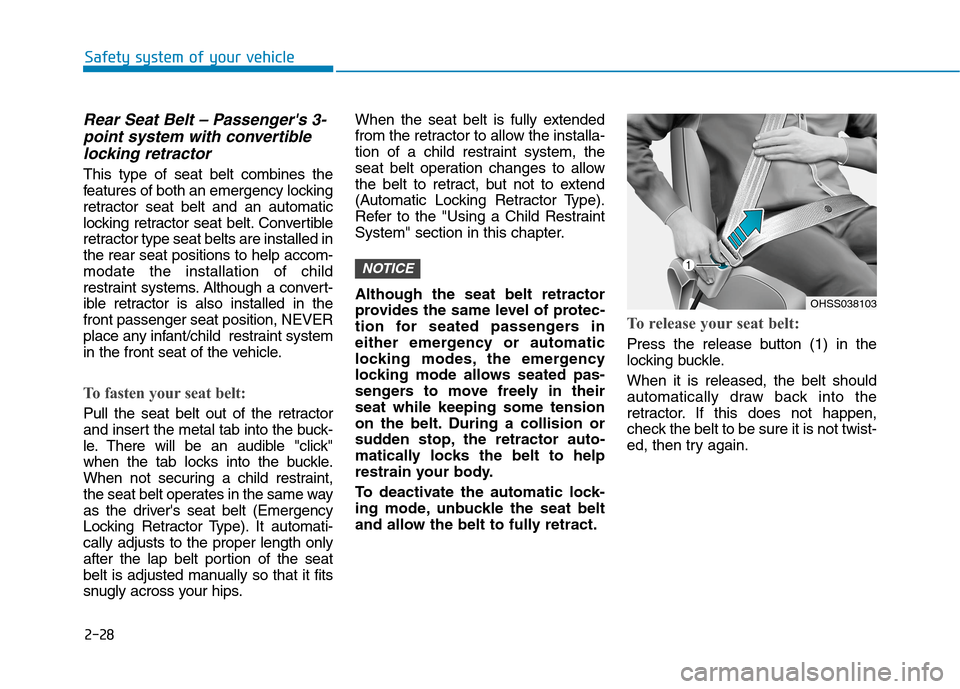
To release your seat belt:
Press the release button (1) in the
locking buckle.
When it is released, the belt should
automatically draw back into the
retractor. If this does not happen,
check the belt to be sure it is not twist-
ed, then try again.
NOTICE
OHSS038103
Page 71 of 635

2-49
Safety system of your vehicle
2
Where Are the Air Bags?
Driver's and passenger's front
air bags
Your vehicle is equipped with a
Advanced Supplemental Restraint
System (SRS) and lap/shoulder belts
at both the driver and passenger
seating positions.
The SRS consists of air bags which
are located in the center of the steer-
ing wheel, in the driver's side lower
crash pad below the steering wheel
column and the passenger's side
front panel pad above the glove box.
The air bags are labeled with the let-
ters "AIR BAG" embossed on the
pad covers.The purpose of the SRS is to provide
the vehicle's driver and front passen-
gers with additional protection than
that offered by the seat belt system
alone. The advanced SRS offers the
ability to control the air bag inflation
within two levels. A first stage level is
provided for moderate-severity
impacts. A second stage level is pro-
vided for more severe impacts.
According to the impact severity, the
SRS Control Module (SRSCM) con-
trols the air bag inflation. Failure to
properly wear seat belts can
increase the risk or severity of injury
in an accident.
OAEE039032
OAE036033
OAEPH038036
■Driver's knee air bag
■Driver's front air bag
■Passenger's front air bag
Page 93 of 635

Convenient features of your vehicle
Accessing your vehicle .........................................3-3
Smart Key ............................................................................3-3
Immobilizer System ..........................................................3-8
Door locks ...............................................................3-9
Operating Door Locks from Outside the Vehicle .....3-9
Operating Door Locks from Inside the Vehicle ......3-10
Auto Door Lock/Unlock Features ...............................3-12
Child-Protector Rear Door Locks ...............................3-12
Theft-alarm system.............................................3-13
Driver position memory system ........................3-14
Storing Positions into Memory ..................................3-14
Recalling Positions from Memory...............................3-15
Easy Access Function ....................................................3-15
Steering wheel......................................................3-16
Electric Power Steering (EPS) .....................................3-16
Tilt Steering / Telescope Steering ..............................3-16
Horn ....................................................................................3-17
Heated Steering Wheel (for Canada) .........................3-18
Mirrors ...................................................................3-19
Inside Rearview Mirror ..................................................3-19
Side View Mirrors .........................................................3-36
Reverse Parking Aid Function ....................................3-39
Windows ................................................................3-41
Power Windows ...............................................................3-42
Sunroof..................................................................3-45
Sunroof Opening and Closing ......................................3-46
Sliding the Sunroof .........................................................3-46
Tilting the Sunroof .........................................................3-47
Sunshade ...........................................................................3-47
Resetting the Sunroof ...................................................3-48
Exterior features .................................................3-49
Hood ...................................................................................3-49
Liftgate ..............................................................................3-50
Fuel Filler Door (Hybrid vehicle) .................................3-52
Fuel Filler Door (Plug-in hybrid vehicle) ..................3-55
Instrument cluster................................................3-58
Instrument Cluster Control............................................3-60
Gauges and Meters ........................................................3-61
Warning and Indicator Lights .......................................3-67
LCD Display Messages ...................................................3-80
LCD Display ..........................................................3-96
LCD Display Control ........................................................3-96
LCD display modes ..........................................................3-97
3
Page 96 of 635

3-4
Convenient features of your vehicle
Unlocking
To unlock:
1. Carry the Smart Key.
2. Either press the driver's outside
door handle button or press the
Door Unlock button (2) on the
smart key.3. The driver's door will unlock. The
hazard warning lights will blink two
times.
If you press the driver's outside
door handle button or Door Unlock
button on the smart key again
within four seconds, then all the
doors will unlock.
Two press unlock setting:
Two press unlock setting can be
changed according to owner's
preference.
Select or deselect the 'Two Press
Unlock' menu in the User Settings
mode on the LCD display (User
Settings ➞Door and select or
deselect Two Press Unlock).
Information
• The door handle button will only
operate when the smart key is with-
in 28~40 inches (0.7~1 m) from the
outside door handle and other peo-
ple can also open the doors.
• If you press the front passenger's
outside door handle, while carrying
the Smart Key, all doors will unlock.
• After unlocking the doors, the doors
will lock automatically after 30 sec-
onds unless a door is opened.
• Either the driver or front passenger
door can be opened with the door
handle button when the smart key is
within this range.
i
OAE046001
Page 107 of 635

3-15
Convenient features of your vehicle
3
Recalling Positions from
Memory
1. Check that the shift lever is in P
(Park) while the Engine Start/Stop
button is in the ON position.
2. Press the desired memory button
(1 or 2). The system will beep once,
and then the driver's seat position,
side view mirror position and instru-
ment panel illumination intensity
will automatically adjust to the
stored positions.
3. "Driver 1 (or 2) settings is applied"
will appear on the LCD display. While recalling the "1" memory
position, pressing the SET or 1
button temporarily stops the
adjustment of the recalled memo-
ry position. Pressing the 2 button
recalls the "2" memory position.
While recalling the "2" memory
position, pressing the SET or 2
button temporarily stops the
adjustment of the recalled memo-
ry position. Pressing the 1 button
recalls the "1" memory position.
While recalling the stored posi-
tions, pressing one of the con-
trol buttons for the driver’s seat,
side view mirror or instrument
panel illumination will cause the
movement of that component to
stop and move in the direction
that the control button is
pressed.
Easy Access Function
The system will move the driver's
seat automatically as follows:
The shift lever is in P (Park)
It will move the driver's seat rear-
ward when the Engine Start/Stop
button is in the OFF position and
the driver's door is opened.
It will move the driver's seat forward
when the vehicle is turned ON or
the driver’s door is closed with the
smart key with you.
You can activate or deactivate the
Easy Access Function from the User
Settings mode on the LCD display.
For more information, refer to the
"LCD Display" section in this
chapter.
NOTICE
Page 115 of 635
3-23
Convenient features of your vehicle
3
If you need to recalibrate the com-
pass:
1.Press and hold the Control Button
for more than 6 seconds. When the
compass memory is cleared, a "C"
will appear in the display.
2.Drive the vehicle in 2 complete cir-
cles at less than 5 mph (8 km/h).Integrated HomeLink®Wireless
Control System
The HomeLink®Wireless Control
System can replace up to three
hand-held radio-frequency (RF)
transmitters with a single built-in
device. This innovative feature will
learn the radio frequency codes of
most current transmitters to operate
devices such as gate operators,
garage door openers, entry door
locks, security systems, even home
lighting. Both standard and rolling
code-equipped transmitters can be
programmed by following the out-
lined procedures.
Additional HomeLink
®information
can be found at: www.homelink.com,
www.youtube.com/HomeLinkGentex
or by calling 1-800-355-3515.
Retain the original transmitter of the
RF device you are programming for
use in other vehicles as well as for
future HomeLink
®programming. It is
also suggested that upon the sale of
the vehicle, the programmed
HomeLink
®buttons be erased for
security purposes.Before programming HomeLink
®
to a garage door opener or gate
operator, make sure people and
objects are out of the way of the
device to prevent potential harm
or damage. Do not use the
HomeLink
®with any garage door
opener that lacks the safety stop
and reverse features required by
U.S. federal safety standards
(this includes any garage door
opener model manufactured
before April 1, 1982). A garage
door that cannot detect an object
- signaling the door to stop and
reverse - does not meet current
U.S. federal safety standards.
Using a garage door opener
without these features increases
the risk of serious injury or
death.
WARNING