Page 297 of 613
3-150
Convenient features of your vehicle
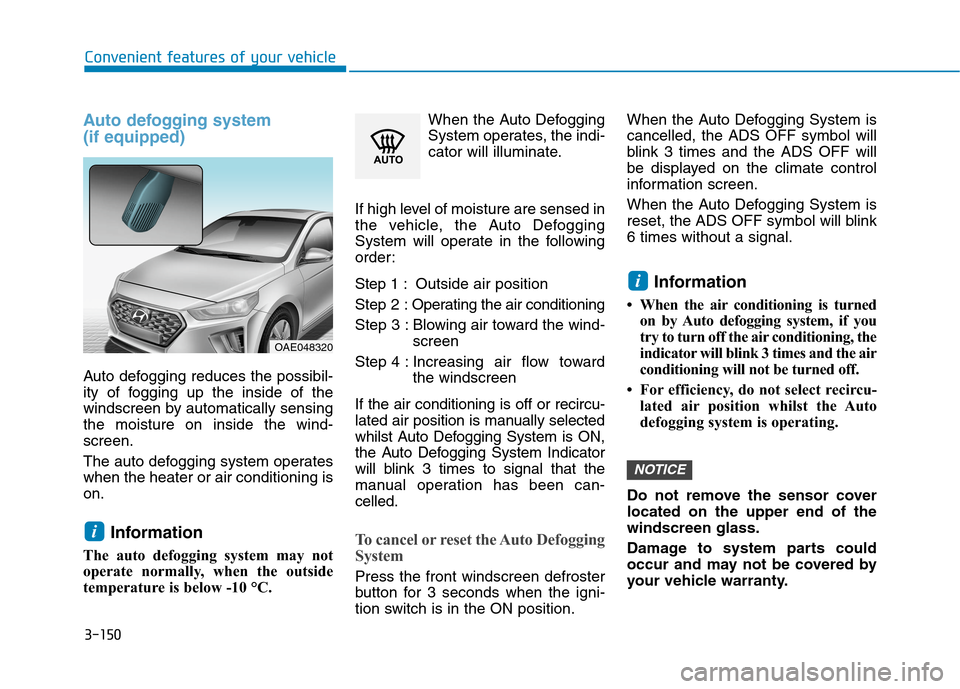
Auto defogging system
(if equipped)
Auto defogging reduces the possibil-
ity of fogging up the inside of the
windscreen by automatically sensing
the moisture on inside the wind-
screen.
The auto defogging system operates
when the heater or air conditioning is
on.
Information
The auto defogging system may not
operate normally, when the outside
temperature is below -10 °C.When the Auto Defogging
System operates, the indi-
cator will illuminate.
If high level of moisture are sensed in
the vehicle, the Auto Defogging
System will operate in the following
order:
Step 1 : Outside air position
Step 2 :Operating the air conditioning
Step 3 : Blowing air toward the wind-
screen
Step 4 : Increasing air flow toward
the windscreen
If the air conditioning is off or recircu-
lated air position is manually selected
whilst Auto Defogging System is ON,
the Auto Defogging System Indicator
will blink 3 times to signal that the
manual operation has been can-
celled.To cancel or reset the Auto Defogging
System
Press the front windscreen defroster
button for 3 seconds when the igni-
tion switch is in the ON position.When the Auto Defogging System is
cancelled, the ADS OFF symbol will
blink 3 times and the ADS OFF will
be displayed on the climate control
information screen.
When the Auto Defogging System is
reset, the ADS OFF symbol will blink
6 times without a signal.
Information
• When the air conditioning is turned
on by Auto defogging system, if you
try to turn off the air conditioning, the
indicator will blink 3 times and the air
conditioning will not be turned off.
• For efficiency, do not select recircu-
lated air position whilst the Auto
defogging system is operating.
Do not remove the sensor cover
located on the upper end of the
windscreen glass.
Damage to system parts could
occur and may not be covered by
your vehicle warranty.
NOTICE
i
i
OAE048320
Page 479 of 613
6-6
The following items may need to be
reset after the battery has been dis-
charged or the battery has been dis-
connected.
See chapter 3 or 4 for:
Power Windows
Trip Computer
Climate Control System
Clock
Audio System
Sunroof
Driver Position Memory System
External power source using 12V
battery
The use of external power acces-
sories may reduce performance
and function of the vehicle.
Especially, the use of dash cam-
eras may shut off the power of the
vehicle prior to the dash camera's
automatic shut-down.
If the power of the vehicle is shut
off, start the vehicle as explained.
(refer to "Using the 12V Battery
Reset Switch")Jump starting
In the event vehicle still does not
have a functional 12V battery (check
if interior lights will not turn on) then
you can try a jump start to the engine
compartment jumper terminals using
a 12V booster pack or jumper cables
from another vehicle's 12V battery
according to the following instruc-
tions.1. Position the vehicles close enough
that the jumper cables will reach,
but do not allow the vehicles to
touch.
2. Avoid fans or any moving parts in
the engine compartment at all
times, even when the vehicles are
turned off.
3. Turn off all electrical devices such
as radios, lights, air conditioning,
etc. Put the vehicles in P (Park)
and set the parking brake. Turn
both vehicles OFF.
NOTICE
What to do in an emergency
Jump starting can be danger-
ous if done incorrectly. Follow
the jump starting procedure in
this section to avoid serious
injury or damage to your vehi-
cle. If in doubt about how to
properly jump start your vehi-
cle, we strongly recommend
that you have a service techni-
cian or towing service do it for
you.
CAUTION
Page 519 of 613
7
Maintenance
7
Maintenance
Engine compartment .............................................7-3
Maintenance services ...........................................7-5
Owner's responsibility ......................................................7-5
Owner maintenance precautions ..................................7-5
Owner maintenance ...............................................7-6
How to Disconnect the (-) Cable for
Regular Maintenance .......................................................7-6
Owner maintenance schedule ........................................7-7
Scheduled maintenance services.........................7-8
Normal maintenance schedule .......................................7-9
Maintenance under severe usage conditions ..........7-13
Explanation of scheduled maintenance items .7-15
Engine oil ..............................................................7-17
Checking the engine oil level .......................................7-17
Checking the engine oil and filter ..............................7-18
Engine coolant/inverter coolantz .....................7-19
Checking the coolant level ...........................................7-19
Changing coolant.............................................................7-22
Brake fluid ............................................................7-23
Checking the brake fluid level .....................................7-23
Hybrid Starter & Generator (HSG) belt ............7-23
Checking the hybrid starter & generator (HSG)
belt ......................................................................................7-23
Washer fluid .........................................................7-24
Checking the washer fluid level ..................................7-24
Air cleaner ............................................................7-25
Parking brake .......................................................7-25
Checking the parking brake .........................................7-25
Filter replacement ...........................................................7-25
Climate control air filter .....................................7-27
Filter inspection ...............................................................7-27
Wiper blades .........................................................7-29
Blade inspection ..............................................................7-29
Blade replacement ..........................................................7-29
Battery (12 volt, plug-in hybrid vehicle) .........7-32
For best battery service................................................7-33
Battery capacity label ....................................................7-34
Battery recharging .........................................................7-34
Reset features .................................................................7-35
7
Page 530 of 613
7-12
Maintenance
Normal maintenance schedule
Number of months or driving distance, whichever comes first
Months1224364860728496
Km×1,000153045607590105120
Steering gear rack, linkage and bootsIIIIIIII
Driveshaft and bootsIIII
Tyre (pressure & tread wear) IIIIIIII
Front suspension ball jointsIIIIIIII
Bolt and nuts on chassis and bodyIIIIIIII
Air conditioner refrigerant IIIIIIII
Air conditioner compressorIIIIIIII
Climate control air filterIIIIIIII
Exhaust systemIIII
MAINTENANCE
INTERVALS
MAINTENANCE
ITEM
I : Inspect and if necessary, adjust, correct, clean or replace.
R : Replace or change.
Page 532 of 613
7-14
Maintenance
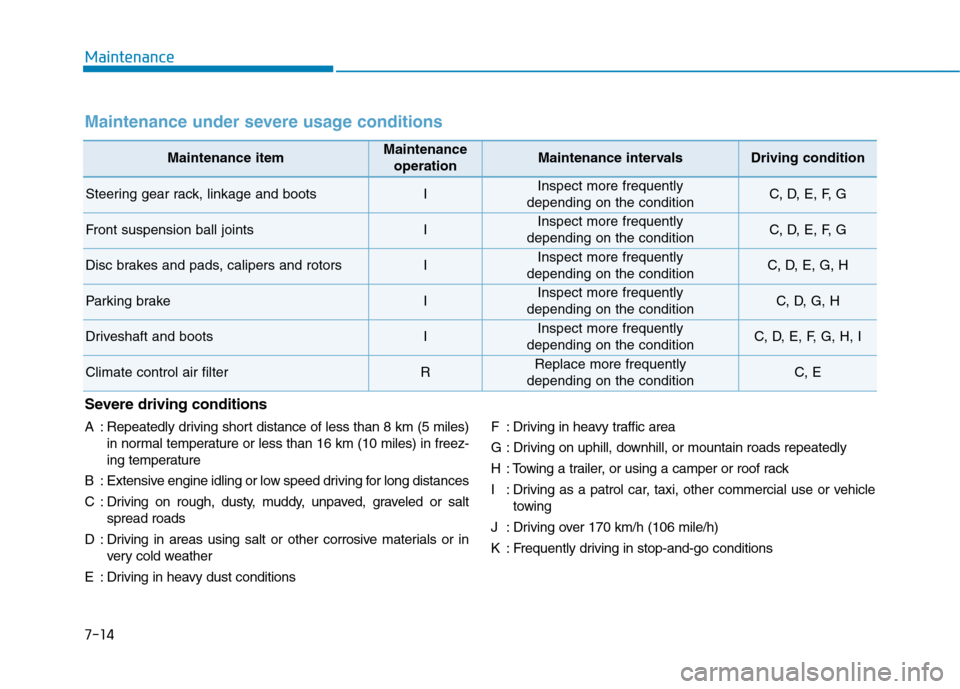
Maintenance itemMaintenance
operationMaintenance intervalsDriving condition
Steering gear rack, linkage and bootsIInspect more frequently
depending on the conditionC, D, E, F, G
Front suspension ball jointsIInspect more frequently
depending on the conditionC, D, E, F, G
Disc brakes and pads, calipers and rotorsIInspect more frequently
depending on the conditionC, D, E, G, H
Parking brakeIInspect more frequently
depending on the conditionC, D, G, H
Driveshaft and bootsIInspect more frequently
depending on the conditionC, D, E, F, G, H, I
Climate control air filterRReplace more frequently
depending on the conditionC, E
Maintenance under severe usage conditions
Severe driving conditions
A : Repeatedly driving short distance of less than 8 km (5 miles)
in normal temperature or less than 16 km (10 miles) in freez-
ing temperature
B : Extensive engine idling or low speed driving for long distances
C : Driving on rough, dusty, muddy, unpaved, graveled or salt
spread roads
D : Driving in areas using salt or other corrosive materials or in
very cold weather
E : Driving in heavy dust conditionsF : Driving in heavy traffic area
G : Driving on uphill, downhill, or mountain roads repeatedly
H : Towing a trailer, or using a camper or roof rack
I : Driving as a patrol car, taxi, other commercial use or vehicle
towing
J : Driving over 170 km/h (106 mile/h)
K : Frequently driving in stop-and-go conditions
Page 545 of 613
7-27
7
Maintenance
C CL
LI
IM
MA
AT
TE
E
C
CO
ON
NT
TR
RO
OL
L
A
AI
IR
R
F
FI
IL
LT
TE
ER
R
Filter inspection
The climate control air filter should be
replaced according to the Maintenance
Schedule.
If the vehicle is operated in
severely air-polluted cities or on
dusty rough roads for a long period,
it should be inspected more fre-
quently and replaced sooner.
Replace the climate control air filter
by following the procedure below and
be careful to avoid damaging other
components.
1. With the glove box open, remove
the stoppers on both sides to allow
the glove box to hang freely on the
hinges.2. Remove the support rod (1).
OAE076013ROAE076014R
Page 546 of 613
7-28
Maintenance
3. Press and hold the lock (1) on
both sides of the cover.
4. Pull out (2) the cover.5. Replace the climate control air filter.
6. Reassemble in the reverse order
of disassembly.Install a new climate control air fil-
ter in the correct direction with the
arrow symbol (
↓ ↓) facing down-
wards to prevent noise and
reduced effectiveness.
NOTICE
OHG070041OAE076015
Page 553 of 613
7-35
7
Maintenance
By jump starting
After a jump start from a good bat-
tery, drive the vehicle for 20-30 min-
utes before it is shutoff. The vehicle
may not restart if you shut it off
before the battery had a chance to
adequately recharge. See “Jump
Starting” in chapter 6 for more infor-
mation on jump starting procedures.
Information
An inappropriately disposed
battery can be harmful to
the environment and human
health. Dispose of the bat-
tery according to your local
law(s) or regulations.
Reset features
The following items need to be reset
after the battery has been dis-
charged or the battery has been dis-
connected.
See chapter 3 or 4 for:
Power Windows
Trip Computer
Climate Control System
Clock
Audio System
Sunroof
Driver Position Memory System
i
(Continued)
Watch the battery during
charging, and stop or reduce
the charging rate if the battery
cells begin boiling violently.
The negative battery cable
must be removed first and
installed last when the battery
is disconnected. Disconnect
the battery charger in the fol-
lowing order:
(1) Turn off the battery charger
main switch.
(2) Unhook the negative
clamp from the negative
battery terminal.
(3) Unhook the positive clamp
from the positive battery
terminal.
Always use a genuine HYUNDAI
approved battery when you
replace the battery.