2020 Hyundai Ioniq Hybrid radio
[x] Cancel search: radioPage 12 of 613

H127. Check if the charging indicator
light of the high voltage battery on
the instrument cluster is turned
ON. Charging is not done when
the charging indicator lamp is
OFF.
When the charging connector and
charging plug are not connected
properly, reconnect the charging
cable to charge.
Information
• Even though charging is possible
with the ignition switch in the
ON/START position, for your safe-
ty, start charging when the ignition
switch is in the LOCK/OFF position
and the vehicle shifted to P (Park).
After charging has started, you can
use electrical components such as
the radio by placing the ignition
switch in the ACC or ON position.
• During AC charging, the radio
reception may be bad.
• Moving the shift lever from P (Park)
to R (Reverse)/N(Neutral)/D (Drive)
stops the charging process.
To restart the charging process,
move the shift lever to P (Park),
place the ignition switch to the
LOCK/OFF position, and discon-
nect the charging cable. Then, con-
nect the charging cable.8. After charging has started, the esti-
mated charging time is displayed on
the instrument cluster for about 1
minute.
If you open the driver seat door
whilst charging, the estimated charg-
ing time is also displayed on the
instrument cluster for about 1
minute.
When scheduled charging is set, the
estimated charging time is displayed
as “--" .
Information
Depending on the condition and dura-
bility of the high voltage battery,
charger specifications, and ambient
temperature, the time required for
charging the battery may vary.
i
i
C CH
HA
AR
RG
GI
IN
NG
G
T
TH
HE
E
P
PL
LU
UG
G-
-I
IN
N
H
HY
YB
BR
RI
ID
D
V
VE
EH
HI
IC
CL
LE
E
(
(C
CO
ON
NT
T.
.)
)
OAEPHQ018032/OAEPHQ048804
■Type A■Type B
OAEPHQ049818L
Page 20 of 613

H209. Check if the charging indicator
light of the high voltage battery on
the instrument cluster is turned
ON. Charging is not done when
the charging indicator lamp is
OFF.
When the charging connector is
not connected properly, reconnect
the charging cable to charge it
again.
Information
• Even though charging is possible
with the ignition switch in the
ON/START position, for your safe-
ty, start charging when the ignition
switch is in the LOCK/OFF position
and the vehicle shifted to P (Park).
After charging has started, you can
use electrical components such as
the radio by placing the ignition
switch in ACC or ON position.
• Moving the shift lever from P (Park)
to R (Reverse)/N(Neutral)/D (Drive)
stops the charging process.
To restart the charging process,
move the shift lever to P (Park),
place the ignition switch to the
LOCK/OFF position, and discon-
nect the charging cable. Then, con-
nect the charging cable.10. After charging has started, the
estimated charging time is dis-
played on the instrument cluster
for about 1 minute.
If you open the driver seat door
whilst charging, the estimated
charging time is also displayed on
the instrument cluster for about 1
minute.
When scheduled charging is set,
the estimated charging time is
displayed as “--" .
i
C CH
HA
AR
RG
GI
IN
NG
G
T
TH
HE
E
P
PL
LU
UG
G-
-I
IN
N
H
HY
YB
BR
RI
ID
D
V
VE
EH
HI
IC
CL
LE
E
(
(C
CO
ON
NT
T.
.)
)
OAEPHQ018032/OAEPHQ048804
■Type A■Type B
OAEPHQ049818L
Page 59 of 613
F2
Your Hyundai should not be modified in any way without the approval of Hyundai. Any mod-
ifications may adversely affect the safety, durability and performance of your Hyundai. In
addition, those components which are subjected to modification or are added to the vehicle
specification, and any resultant consequential damage will not be covered by the vehicle
manufacturer's warranty.
Your vehicle is equipped with electronic fuel injection and other electronic components.
It is possible for an improperly installed/adjusted two-way radio or mobile phone to adversely
affect electronic systems. For this reason, we recommend that you carefully follow the radio
manufacturer's instructions or consult your Hyundai dealer for precautionary measures or
special instructions.
CAUTION: MODIFICATIONS TO YOUR HYUNDAI
TWO-WAY RADIO OR MOBILE TELEPHONE INSTALLATION
Page 153 of 613
![Hyundai Ioniq Hybrid 2020 Owners Manual - RHD (UK, Australia) 3-6
Remote key precautions
The remote key may not work if any
of the following occur:
The key is in the ignition switch.
You exceed the operating distance
limit (about 30 m [90 feet]).
The remote k Hyundai Ioniq Hybrid 2020 Owners Manual - RHD (UK, Australia) 3-6
Remote key precautions
The remote key may not work if any
of the following occur:
The key is in the ignition switch.
You exceed the operating distance
limit (about 30 m [90 feet]).
The remote k](/manual-img/35/14927/w960_14927-152.png)
3-6
Remote key precautions
The remote key may not work if any
of the following occur:
The key is in the ignition switch.
You exceed the operating distance
limit (about 30 m [90 feet]).
The remote key battery is weak.
Other vehicles or objects may be
blocking the signal.
The weather is extremely cold.
The remote key is close to a radio
transmitter such as a radio station
or an airport which can interfere
with normal operation of the remote
key.
When the remote key does not work
correctly, open and close the door
with the mechanical key. If you have a
problem with the remote key, it is rec-
ommended that you contact an autho-
rised HYUNDAI dealer.
If the remote key is in close proximity
to your mobile phone, the signal could
be blocked by your mobile phone's
normal operational signals.This is especially important when the
phone is active such as making and
receiving calls, text messaging,
and/or sending/receiving emails.
Avoid placing the remote key and your
mobile phone in the same location
and always try to maintain an ade-
quate distance between the two
devices.
Information
Changes or modifications not express-
ly approved by the party responsible
for compliance could void the user’s
authority to operate the equipment. If
the keyless entry system is inoperative
due to changes or modifications not
expressly approved by the party
responsible for compliance, it will not
be covered by your manufacturer’s
vehicle warranty.
Keep the remote key away from
electromagnetic materials that
block electromagnetic waves to
the key surface.
Battery replacement
If the remote key is not working prop-
erly, try replacing the battery with a
new one.
Battery Type: CR2032
To replace the battery:
1. Insert a slim tool into the slot and
gently pry open the cover.
2. Remove the old battery and insert
the new battery. Make sure the
battery position is correct.
3. Reinstall the rear cover of the
remote key.
NOTICE
i
Convenient features of your vehicle
OLM042302
Page 156 of 613
3-9
Convenient features of your vehicle
Start-up
You can start the engine without
inserting the key.For detailed infor-
mation refer to the Engine
Start/Stop button in chapter 5.
To prevent damaging the smart
key:
Keep the smart key away from
water or any liquid and fire. If the
inside of the smart key gets
damp (due to drinks or moisture),
or is heated, internal circuit may
malfunction and may void the
vehicle warranty.
Avoid dropping or throwing the
smart key.
Protect the smart key from
extreme temperatures.
Always have the smart key with
you when leaving the vehicle. If
the smart key is left near the vehi-
cle, the vehicle battery may be dis-
charged.
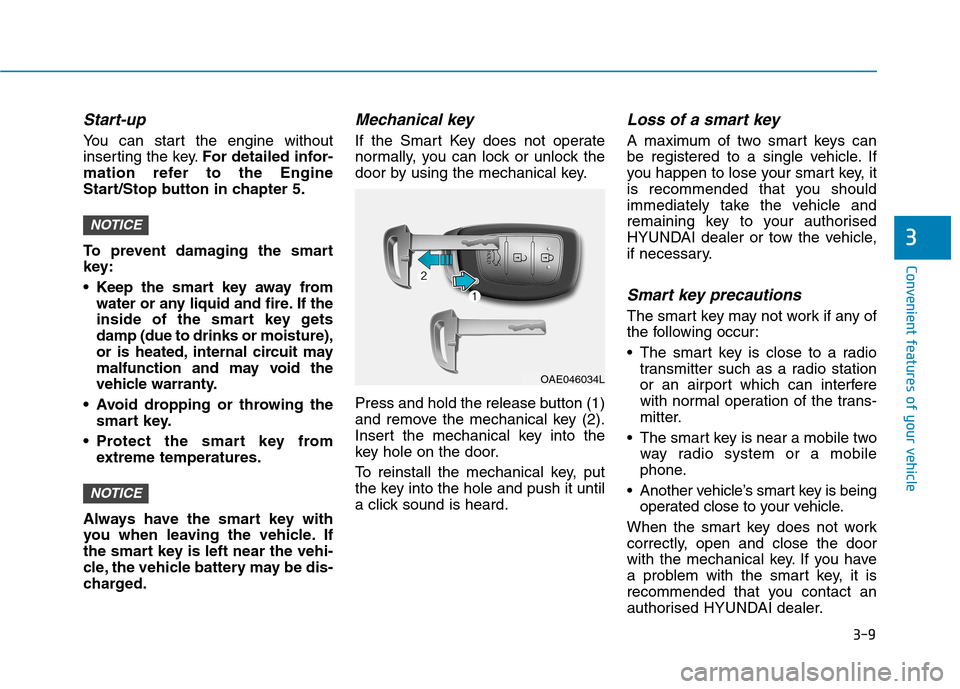
Mechanical key
If the Smart Key does not operate
normally, you can lock or unlock the
door by using the mechanical key.
Press and hold the release button (1)
and remove the mechanical key (2).
Insert the mechanical key into the
key hole on the door.
To reinstall the mechanical key, put
the key into the hole and push it until
a click sound is heard.
Loss of a smart key
A maximum of two smart keys can
be registered to a single vehicle. If
you happen to lose your smart key, it
is recommended that you should
immediately take the vehicle and
remaining key to your authorised
HYUNDAI dealer or tow the vehicle,
if necessary.
Smart key precautions
The smart key may not work if any of
the following occur:
The smart key is close to a radio
transmitter such as a radio station
or an airport which can interfere
with normal operation of the trans-
mitter.
The smart key is near a mobile two
way radio system or a mobile
phone.
Another vehicle’s smart key is being
operated close to your vehicle.
When the smart key does not work
correctly, open and close the door
with the mechanical key. If you have
a problem with the smart key, it is
recommended that you contact an
authorised HYUNDAI dealer.
NOTICE
NOTICE3
OAE046034L
Page 313 of 613
Do not operate audio remote con-
trol buttons simultaneously.
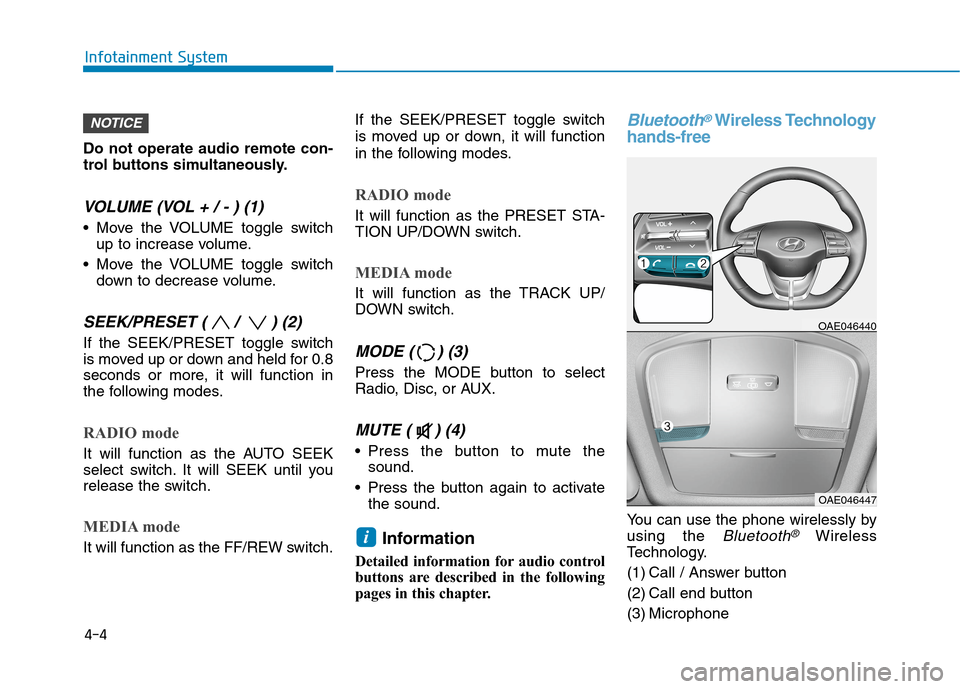
VOLUME (VOL + / - ) (1)
Move the VOLUME toggle switch
up to increase volume.
Move the VOLUME toggle switch
down to decrease volume.
SEEK/PRESET ( / ) (2)
If the SEEK/PRESET toggle switch
is moved up or down and held for 0.8
seconds or more, it will function in
the following modes.
RADIO mode
It will function as the AUTO SEEK
select switch. It will SEEK until you
release the switch.
MEDIA mode
It will function as the FF/REW switch.If the SEEK/PRESET toggle switch
is moved up or down, it will function
in the following modes.
RADIO mode
It will function as the PRESET STA-
TION UP/DOWN switch.
MEDIA mode
It will function as the TRACK UP/
DOWN switch.
MODE ( ) (3)
Press the MODE button to select
Radio, Disc, or AUX.
MUTE ( ) (4)
Press the button to mute the
sound.
Press the button again to activate
the sound.
Information
Detailed information for audio control
buttons are described in the following
pages in this chapter.
Bluetooth®Wireless Technology
hands-free
You can use the phone wirelessly by
using the
Bluetooth®Wireless
Technology.
(1) Call / Answer button
(2) Call end button
(3) Microphone
OAE046440
OAE046447
i
NOTICE
4-4
Infotainment System
Page 393 of 613
5-79
Driving your vehicle
5
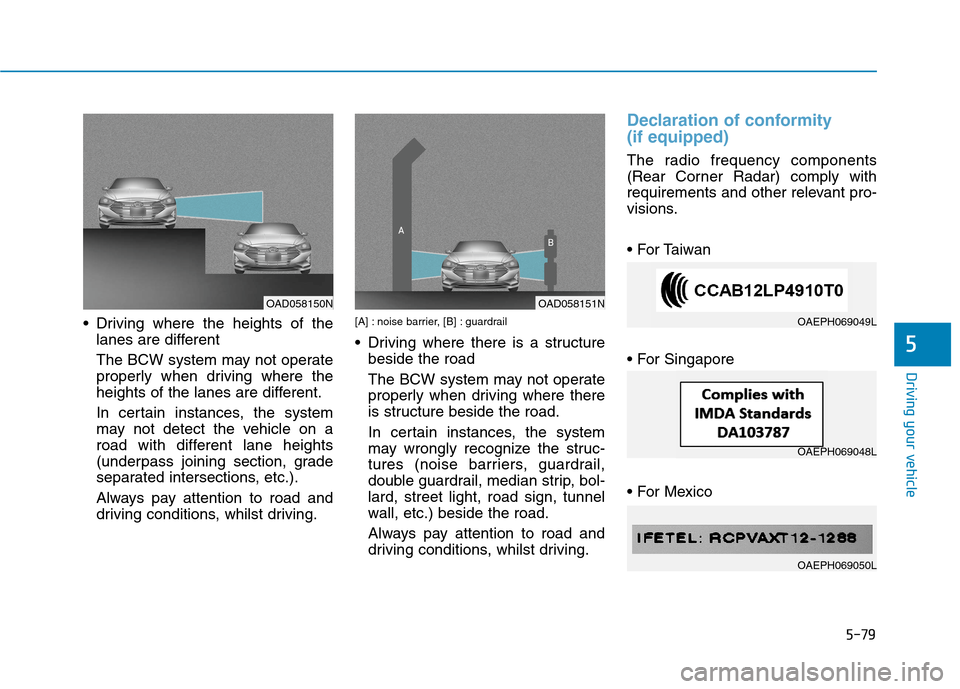
Driving where the heights of the
lanes are different
The BCW system may not operate
properly when driving where the
heights of the lanes are different.
In certain instances, the system
may not detect the vehicle on a
road with different lane heights
(underpass joining section, grade
separated intersections, etc.).
Always pay attention to road and
driving conditions, whilst driving.[A] : noise barrier, [B] : guardrail
Driving where there is a structure
beside the road
The BCW system may not operate
properly when driving where there
is structure beside the road.
In certain instances, the system
may wrongly recognize the struc-
tures (noise barriers, guardrail,
double guardrail, median strip, bol-
lard, street light, road sign, tunnel
wall, etc.) beside the road.
Always pay attention to road and
driving conditions, whilst driving.
Declaration of conformity
(if equipped)
The radio frequency components
(Rear Corner Radar) comply with
requirements and other relevant pro-
visions.
OAD058150NOAD058151N
OAEPH069049L
OAEPH069048L
OAEPH069050L
Page 479 of 613
6-6
The following items may need to be
reset after the battery has been dis-
charged or the battery has been dis-
connected.
See chapter 3 or 4 for:
Power Windows
Trip Computer
Climate Control System
Clock
Audio System
Sunroof
Driver Position Memory System
External power source using 12V
battery
The use of external power acces-
sories may reduce performance
and function of the vehicle.
Especially, the use of dash cam-
eras may shut off the power of the
vehicle prior to the dash camera's
automatic shut-down.
If the power of the vehicle is shut
off, start the vehicle as explained.
(refer to "Using the 12V Battery
Reset Switch")Jump starting
In the event vehicle still does not
have a functional 12V battery (check
if interior lights will not turn on) then
you can try a jump start to the engine
compartment jumper terminals using
a 12V booster pack or jumper cables
from another vehicle's 12V battery
according to the following instruc-
tions.1. Position the vehicles close enough
that the jumper cables will reach,
but do not allow the vehicles to
touch.
2. Avoid fans or any moving parts in
the engine compartment at all
times, even when the vehicles are
turned off.
3. Turn off all electrical devices such
as radios, lights, air conditioning,
etc. Put the vehicles in P (Park)
and set the parking brake. Turn
both vehicles OFF.
NOTICE
What to do in an emergency
Jump starting can be danger-
ous if done incorrectly. Follow
the jump starting procedure in
this section to avoid serious
injury or damage to your vehi-
cle. If in doubt about how to
properly jump start your vehi-
cle, we strongly recommend
that you have a service techni-
cian or towing service do it for
you.
CAUTION