2020 Hyundai Ioniq Electric emergency
[x] Cancel search: emergencyPage 374 of 561
5-138
Driving your vehicle
The severe weather conditions of
winter quickly wear out tires and
cause other problems. To minimize
winter driving problems, you should
take the following suggestions:
Snow or Icy Conditions
You need to keep sufficient distance
between your vehicle and the vehicle
in front of you.
Apply the brakes gently. Speeding,
rapid acceleration, sudden brake
applications, and sharp turns are
potentially very hazardous practices.
During deceleration use the paddle
shifter (left side lever) to increase
regenerative braking. However, avoid
increasing the regenerative braking
level suddenly. Sudden change of the
regenerative braking level on snowy
or icy roads may cause the vehicle to
skid and may cause loss of vehicle
control leading to an accident.
To drive your vehicle in deep snow, it
may be necessary to use snow tires.
Always carry emergency equipment.
Some of the items you may want to
carry include tow straps or chains, a
flashlight, emergency flares, sand, a
shovel, jumper cables, a window
scraper, gloves, ground cloth, cover-
alls, a blanket, etc.
Snow tires
If you mount snow tires on your vehi-
cle, make sure to use radial tires of
the same size and load range as the
original tires. Mount snow tires on all
four wheels to balance your vehicle’s
handling in all weather conditions.
The traction provided by snow tires
on dry roads may not be as high as
your vehicle's original equipment
tires. Check with the tire dealer for
maximum speed recommendations.
Information
Do not install studded tires without
first checking local, state and munici-
pal regulations for possible restric-
tions against their use.
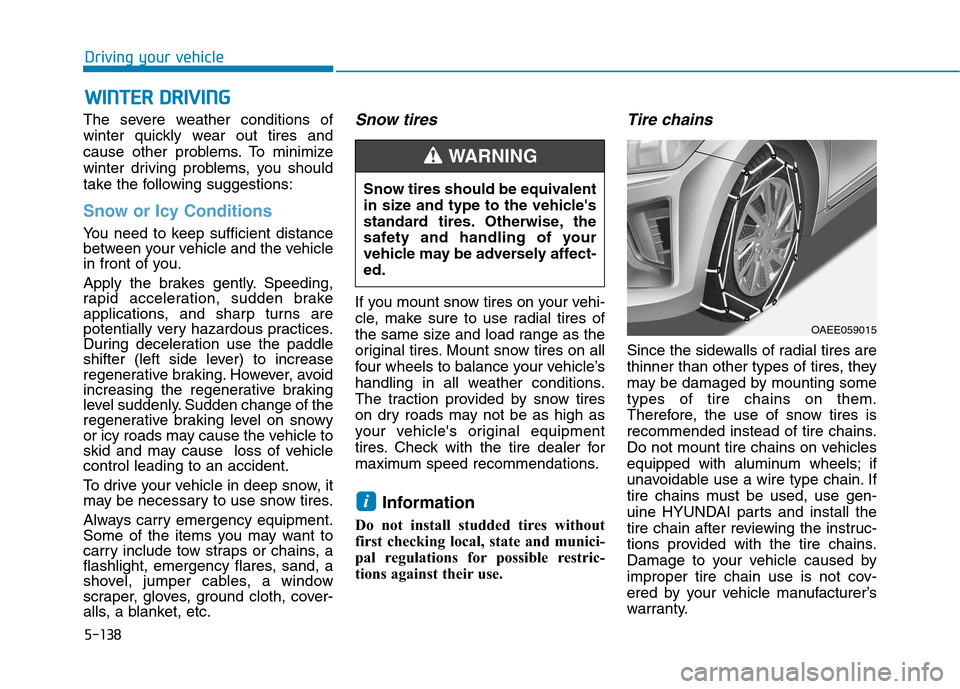
Tire chains
Since the sidewalls of radial tires are
thinner than other types of tires, they
may be damaged by mounting some
types of tire chains on them.
Therefore, the use of snow tires is
recommended instead of tire chains.
Do not mount tire chains on vehicles
equipped with aluminum wheels; if
unavoidable use a wire type chain. If
tire chains must be used, use gen-
uine HYUNDAI parts and install the
tire chain after reviewing the instruc-
tions provided with the tire chains.
Damage to your vehicle caused by
improper tire chain use is not cov-
ered by your vehicle manufacturer’s
warranty.
i
W WI
IN
NT
TE
ER
R
D
DR
RI
IV
VI
IN
NG
G
Snow tires should be equivalent
in size and type to the vehicle's
standard tires. Otherwise, the
safety and handling of your
vehicle may be adversely affect-
ed.
WARNING
OAEE059015
Page 375 of 561
5-139
Driving your vehicle
5
The use of tire chains may
adversely affect vehicle han-
dling:
Drive less than 20 mph (30
km/h) or the chain manufac-
turer's recommended speed
limit, whichever is lower.
Drive carefully and avoid
bumps, holes, sharp turns,
and other road hazards, which
may cause the vehicle to
bounce.
Avoid sharp turns or locked
wheel braking.
WARNING Information
• Install tire chains only in pairs and
on the front tires. It should be noted
that installing tire chains on the
tires will provide a greater driving
force, but will not prevent side
skids.
• Do not install studded tires without
first checking local, state and
municipal regulations for possible
restrictions against their use.
Chain Installation
When installing tire chains, follow the
manufacturer's instructions and
mount them as tightly possible. Drive
slowly (less than 20 mph (30 km/h))
with chains installed. If you hear the
chains contacting the body or chas-
sis, stop and tighten them. If they still
make contact, slow down until the
noise stops. Remove the tire chains
as soon as you begin driving on
cleared roads.
When mounting snow chains, park
the vehicle on level ground away
from traffic. Turn on the vehicle
Hazard Warning Flasher and place a
triangular emergency warning device
behind the vehicle (if available).
Always place the vehicle in P (Park),
apply the parking brake and turn off
the vehicle before installing snow
chains.i
Page 383 of 561
What to do in an emergency
6
Hazard Warning Flasher .......................................6-2
In Case of an Emergency While Driving.............6-2
If the Vehicle Stalls While Driving .................................6-2
If the Vehicle Stalls at a Crossroad or Crossing .......6-2
If you Have a Flat Tire While Driving ..........................6-3
If the Vehicle Will Not Start .................................6-3
Confirm the EV Battery Is Not Low on the Charge
Gauge ...................................................................................6-3
Jump Starting (12V Battery) ................................6-4
If the Vehicle Overheats .......................................6-7
Tire Pressure Monitoring System (TPMS).........6-8
Check Tire Pressure .........................................................6-8
Tire Pressure Monitoring System .................................6-9
Low Tire Pressure Telltale ............................................6-10
Low Tire Pressure LCD Display with
Position Indicator ............................................................6-10
TPMS Malfunction Indicator ........................................6-11
Changing a Tire with TPMS..........................................6-12
If You Have a Flat Tire........................................6-14
With Tire Mobility Kit (TMK) ........................................6-14
Towing ...................................................................6-21
Towing service .................................................................6-21
Removable Towing Hook ...............................................6-22
Emergency Towing..........................................................6-23
Page 384 of 561
6-2
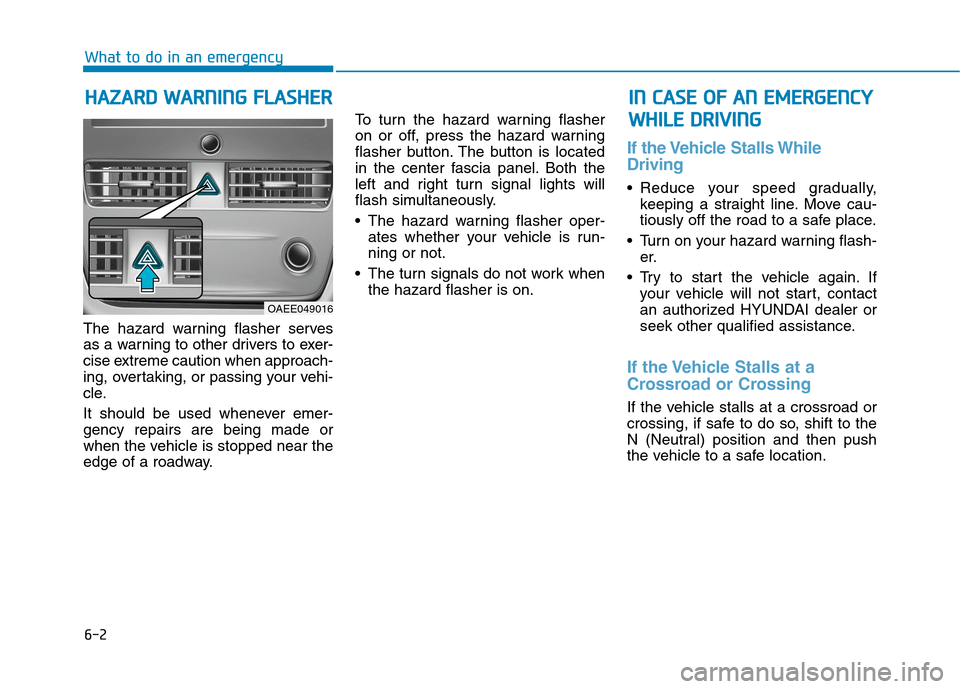
The hazard warning flasher serves
as a warning to other drivers to exer-
cise extreme caution when approach-
ing, overtaking, or passing your vehi-
cle.
It should be used whenever emer-
gency repairs are being made or
when the vehicle is stopped near the
edge of a roadway.To turn the hazard warning flasher
on or off, press the hazard warning
flasher button. The button is located
in the center fascia panel. Both the
left and right turn signal lights will
flash simultaneously.
• The hazard warning flasher oper-
ates whether your vehicle is run-
ning or not.
The turn signals do not work when
the hazard flasher is on.
If the Vehicle Stalls While
Driving
Reduce your speed gradually,
keeping a straight line. Move cau-
tiously off the road to a safe place.
Turn on your hazard warning flash-
er.
Try to start the vehicle again. If
your vehicle will not start, contact
an authorized HYUNDAI dealer or
seek other qualified assistance.
If the Vehicle Stalls at a
Crossroad or Crossing
If the vehicle stalls at a crossroad or
crossing, if safe to do so, shift to the
N (Neutral) position and then push
the vehicle to a safe location.
H HA
AZ
ZA
AR
RD
D
W
WA
AR
RN
NI
IN
NG
G
F
FL
LA
AS
SH
HE
ER
R
What to do in an emergency
I
IN
N
C
CA
AS
SE
E
O
OF
F
A
AN
N
E
EM
ME
ER
RG
GE
EN
NC
CY
Y
W WH
HI
IL
LE
E
D
DR
RI
IV
VI
IN
NG
G
OAEE049016
Page 385 of 561
6-3
What to do in an emergency
If you Have a Flat Tire While
Driving
If a tire goes flat while you are driving:
Take your foot off the accelerator
pedal and let the vehicle slow down
while driving straight ahead. Do not
apply the brakes immediately to
slow down the vehicle, but use the
paddle shifter (left side lever) to
increase regenerative braking con-
trol. Also, do not or attempt to pull
off the road as this may cause loss
of vehicle control resulting in an
accident. When the vehicle has
slowed to such a speed that it is
safe to do so, brake carefully and
pull off the road. Drive off the road
as far as possible and park on firm,
level ground. If you are on a divided
highway, do not park in the median
area between the two traffic lanes.
When the vehicle is stopped, press
the hazard warning flasher button,
shift to P(Park), apply the parking
brake, and place the POWER but-
ton in the OFF position. Have all passengers get out of the
vehicle. Be sure they all get out on
the side of the vehicle that is away
from traffic.
When changing a flat tire, follow
the instructions provided later in
this chapter.
Confirm the EV Battery Is Not
Low on the Charge Gauge
Be sure the gear is in P (Park). The
vehicle starts only when the gear is
in P (Park).
Check the 12-volt battery connec-
tions to be sure they are clean and
tight.
Turn on the interior light. If the light
dims or goes out when you operate
the starter, the battery is drained.
Do not push or pull the vehicle to
start it. This could cause damage to
your vehicle. See instructions for
"Jump Starting" provided in this
chapter.
6
I IF
F
T
TH
HE
E
V
VE
EH
HI
IC
CL
LE
E
W
WI
IL
LL
L
N
NO
OT
T
S ST
TA
AR
RT
T
Page 386 of 561
6-4
What to do in an emergency
Jump starting can be dangerous if
done incorrectly. Follow the jump
starting procedure in this section to
avoid serious injury or damage to
your vehicle. If in doubt about how to
properly jump start your vehicle, we
strongly recommend that you have a
service technician or towing service
do it for you.
J JU
UM
MP
P
S
ST
TA
AR
RT
TI
IN
NG
G
(
(1
12
2V
V
B
BA
AT
TT
TE
ER
RY
Y)
)
To prevent SERIOUS INJURY or
DEATH to you or bystanders,
always follow these precautions
when working near or handling
the battery:
Always read and follow
instructions carefully
when handling a battery.
Wear eye protection
designed to protect the
eyes from acid splashes.
Keep all flames, sparks,
or smoking materials
away from the battery.
(Continued)
WARNING
(Continued)
Hydrogen is always
present in battery cells,
is highly combustible,
and may explode if ignit-
ed.
Keep batteries out of
reach of children.
Batteries contain sulfu-
ric acid which is highly
corrosive. Do not allow
acid to contact your
eyes, skin or clothing.
If acid gets into your eyes, flush
your eyes with clean water for at
least 15 minutes and get imme-
diate medical attention. If acid
gets on your skin, thoroughly
wash the area. If you feel pain or
a burning sensation, get med-
ical attention immediately.
(Continued)(Continued)
•When lifting a plastic-cased
battery, excessive pressure
on the case may cause battery
acid to leak. Lift with a battery
carrier or with your hands on
opposite corners.
Do not attempt to jump start
your vehicle if your battery is
frozen.
NEVER attempt to recharge
the battery when the vehicle's
battery cables are connected
to the battery.
The electrical ignition switch
works with high voltage.
NEVER touch these compo-
nents with the " " indicator
ON or when the POWER but-
ton is in the ON position.
Page 387 of 561
6-5
What to do in an emergency
6
Information
An inappropriately disposed
battery can be harmful to the
environment and human
health. Dispose the battery
according to your local law(s)
or regulations.
To prevent damage to your vehi-
cle:
Only use a 12-volt power supply
(battery or jumper system) to
jump start your vehicle.
Do not attempt to jump start
your vehicle by push-starting.
Jump starting procedure
1. Position the vehicles close enough
that the jumper cables will reach,
but do not allow the vehicles to
touch.
2. Avoid fans or any moving parts in
the motor compartment at all
times, even when the vehicles are
turned off.
3. Turn off all electrical devices such
as radios, lights, air conditioning,
etc. Put the vehicles in P (Park)
and set the parking brakes. Turn
both vehicles OFF.4. Connect the jumper cables in the
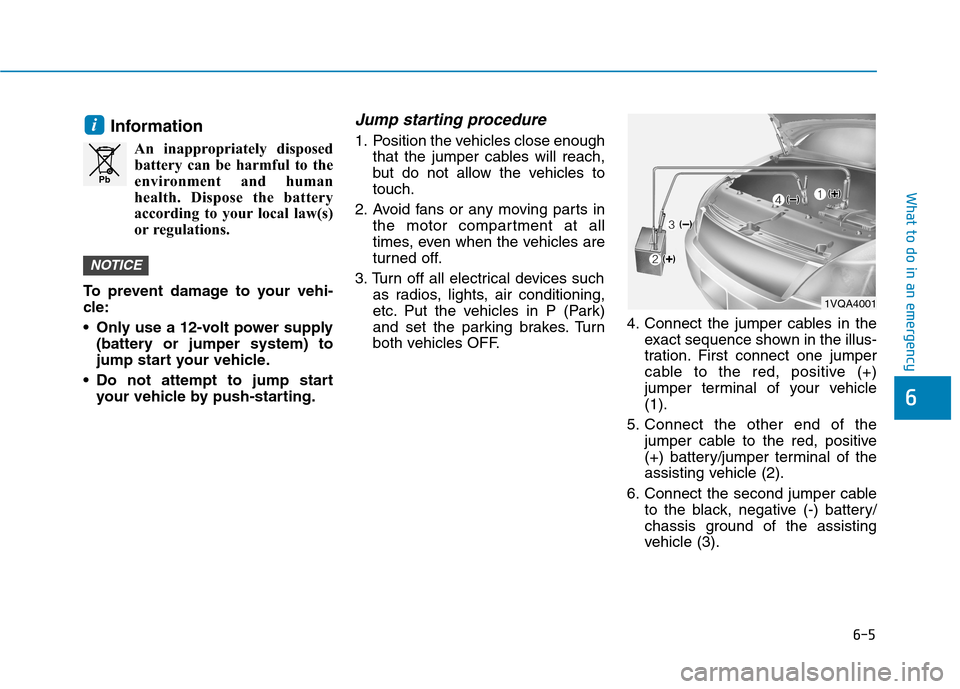
exact sequence shown in the illus-
tration. First connect one jumper
cable to the red, positive (+)
jumper terminal of your vehicle
(1).
5. Connect the other end of the
jumper cable to the red, positive
(+) battery/jumper terminal of the
assisting vehicle (2).
6. Connect the second jumper cable
to the black, negative (-) battery/
chassis ground of the assisting
vehicle (3).
NOTICE
i
Pb
1VQA4001
Page 388 of 561
6-6
What to do in an emergency
7. Connect the other end of the sec-
ond jumper cable to the black,
negative (-) chassis ground of
your vehicle (4).
Do not allow the jumper cables to
contact anything except the cor-
rect battery or jumper terminals or
the correct ground. Do not lean
over the battery when making
connections.
8. Start the motor of the assisting
vehicle and let it run at approxi-
mately 2,000 rpm for a few min-
utes. Then start your vehicle.
9. After your vehicle starts allow it to
operate at least 30 minutes with-
out shutting it down, this will help
charge back the 12V battery.
If your vehicle will not start after a
few attempts, it probably requires
servicing. In this event please seek
qualified assistance. If the cause of
your battery discharging is not
apparent, have your vehicle checked
by an authorized HYUNDAI dealer.Disconnect the jumper cables in the
exact reverse order you connected
them:
1. Disconnect the jumper cable from
the black, negative (-) chassis
ground of your vehicle (4).
2. Disconnect the other end of the
jumper cable from the black, neg-
ative (-) battery/chassis ground of
the assisting vehicle (3).
3. Disconnect the second jumper
cable from the red, positive (+)
battery/jumper terminal of the
assisting vehicle (2).
4. Disconnect the other end of the
jumper cable from the red, positive
(+) jumper terminal of your vehicle
(1).