Page 215 of 561
3-130
Convenient features of your vehicle
System Maintenance
Climate control air filter
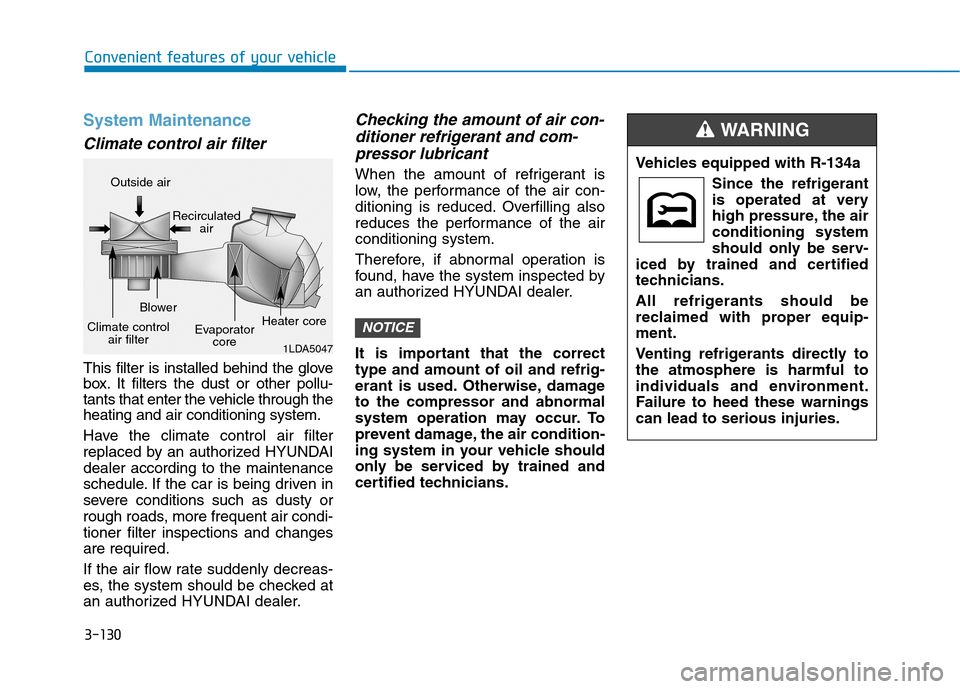
This filter is installed behind the glove
box. It filters the dust or other pollu-
tants that enter the vehicle through the
heating and air conditioning system.
Have the climate control air filter
replaced by an authorized HYUNDAI
dealer according to the maintenance
schedule. If the car is being driven in
severe conditions such as dusty or
rough roads, more frequent air condi-
tioner filter inspections and changes
are required.
If the air flow rate suddenly decreas-
es, the system should be checked at
an authorized HYUNDAI dealer.
Checking the amount of air con-
ditioner refrigerant and com-
pressor lubricant
When the amount of refrigerant is
low, the performance of the air con-
ditioning is reduced. Overfilling also
reduces the performance of the air
conditioning system.
Therefore, if abnormal operation is
found, have the system inspected by
an authorized HYUNDAI dealer.
It is important that the correct
type and amount of oil and refrig-
erant is used. Otherwise, damage
to the compressor and abnormal
system operation may occur. To
prevent damage, the air condition-
ing system in your vehicle should
only be serviced by trained and
certified technicians.
NOTICE
1LDA5047
Outside air
Recirculated
air
Climate control
air filterBlower
Evaporator
coreHeater core
Vehicles equipped with R-134a
Since the refrigerant
is operated at very
high pressure, the air
conditioning system
should only be serv-
iced by trained and certified
technicians.
All refrigerants should be
reclaimed with proper equip-
ment.
Venting refrigerants directly to
the atmosphere is harmful to
individuals and environment.
Failure to heed these warnings
can lead to serious injuries.
WARNING
Page 216 of 561
3-131
Convenient features of your vehicle
3
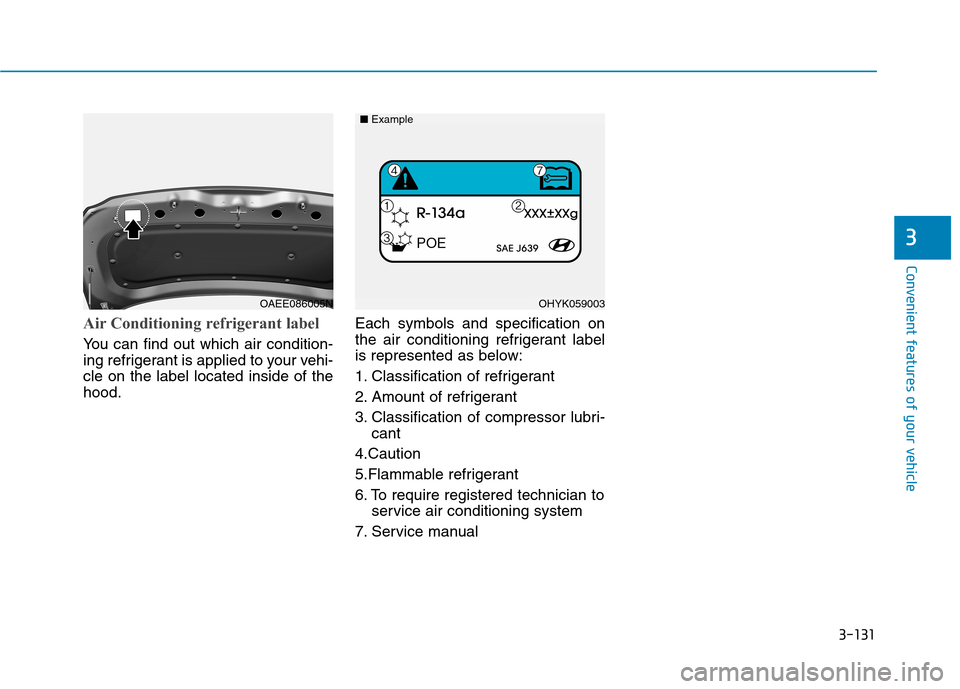
Air Conditioning refrigerant label
You can find out which air condition-
ing refrigerant is applied to your vehi-
cle on the label located inside of the
hood.Each symbols and specification on
the air conditioning refrigerant label
is represented as below:
1. Classification of refrigerant
2. Amount of refrigerant
3. Classification of compressor lubri-
cant
4.Caution
5.Flammable refrigerant
6. To require registered technician to
service air conditioning system
7. Service manual
OHYK059003 ■ExampleOAEE086005N
Page 396 of 561
6-14
What to do in an emergency
With Tire Mobility Kit (TMK)
For safe operation, carefully read
and follow the instructions in this
manual before use.
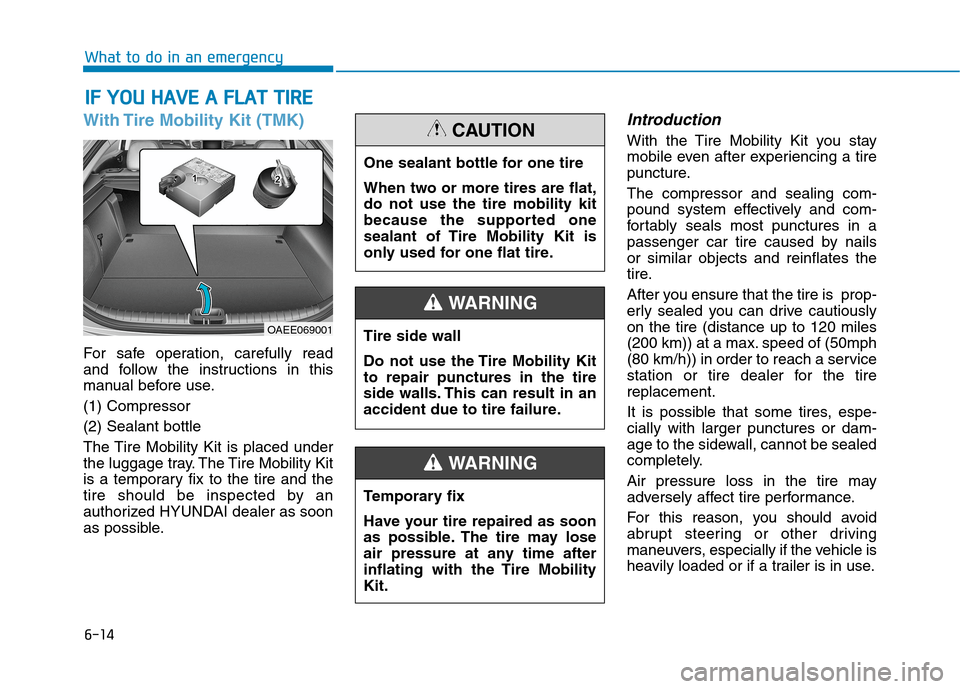
(1) Compressor
(2) Sealant bottle
The Tire Mobility Kit is placed under
the luggage tray. The Tire Mobility Kit
is a temporary fix to the tire and the
tire should be inspected by an
authorized HYUNDAI dealer as soon
as possible.
Introduction
With the Tire Mobility Kit you stay
mobile even after experiencing a tire
puncture.
The compressor and sealing com-
pound system effectively and com-
fortably seals most punctures in a
passenger car tire caused by nails
or similar objects and reinflates the
tire.
After you ensure that the tire is prop-
erly sealed you can drive cautiously
on the tire (distance up to 120 miles
(200 km)) at a max. speed of (50mph
(80 km/h)) in order to reach a service
station or tire dealer for the tire
replacement.
It is possible that some tires, espe-
cially with larger punctures or dam-
age to the sidewall, cannot be sealed
completely.
Air pressure loss in the tire may
adversely affect tire performance.
For this reason, you should avoid
abrupt steering or other driving
maneuvers, especially if the vehicle is
heavily loaded or if a trailer is in use.
I IF
F
Y
YO
OU
U
H
HA
AV
VE
E
A
A
F
FL
LA
AT
T
T
TI
IR
RE
E
OAEE069001
One sealant bottle for one tire
When two or more tires are flat,
do not use the tire mobility kit
because the supported one
sealant of Tire Mobility Kit is
only used for one flat tire.
CAUTION
Tire side wall
Do not use the Tire Mobility Kit
to repair punctures in the tire
side walls. This can result in an
accident due to tire failure.
WARNING
Temporary fix
Have your tire repaired as soon
as possible. The tire may lose
air pressure at any time after
inflating with the Tire Mobility
Kit.
WARNING
Page 397 of 561
6-15
What to do in an emergency
6
The Tire Mobility Kit is not designed
or intended as a permanent tire
repair method and is to be used for
one tire only.
This instruction shows you step by
step how to temporarily seal the
puncture simply and reliably.
Read the section "Notes on the safe
use of the Tire Mobility Kit".
Notes on the safe use of the
Tire Mobility Kit
Park your car at the side of the
road so that you can work with the
Tire Mobility Kit away from moving
traffic.
To be sure your vehicle will not
move, even when you're on fairly
level ground, always set your park-
ing brake.
Only use the Tire Mobility Kit for
sealing/inflation passenger car
tires. Only punctured areas located
within the tread region of the tire
can be sealed using the tire mobil-
ity kit.
Do not use on motorcycles, bicy-
cles or any other type of tires. When the tire and wheel are dam-
aged, do not use Tire Mobility Kit
for your safety.
Use of the Tire Mobility Kit may not
be effective for tire damage larger
than approximately 0.15 inch (4
mm).
Please contact the nearest
HYUNDAI dealership if the tire
cannot be made roadworthy with
the Tire Mobility Kit.
Do not use the Tire Mobility Kit, if a
flat tire or an under-inflated tire is
further severely damaged by being
continuously driven.
Do not remove any foreign objects
such as nails or screws that have
penetrated the tire.
Provided the car is outdoors, leave
the vehicle ON ( indicator ON).
Otherwise operating the compres-
sor may eventually drain the car
battery. Never leave the Tire Mobility Kit
unattended while it is being used.
Do not leave the compressor run-
ning for more than 10 minutes at a
time or it may overheat.
Do not use the Tire Mobility Kit if
the ambient temperature is below
-22°F (-30°C) or over 158°F
(70°C).
In case of skin contact with the
sealant, wash the area thoroughly
with plenty of water. If the irritation
persists, seek medical attention.
In case of eye contact with the
sealant, flush your eyes for at least
15 minutes. If the irritation persists,
seek medical attention.
In case of swallowing the sealant,
rinse the mouth and drink plenty of
water. However, never give any-
thing to an unconscious person
and seek medical attention imme-
diately.
Long time exposure to the sealant
may cause damage to bodily tissue
such as kidney, etc.
Page 398 of 561
6-16
What to do in an emergency
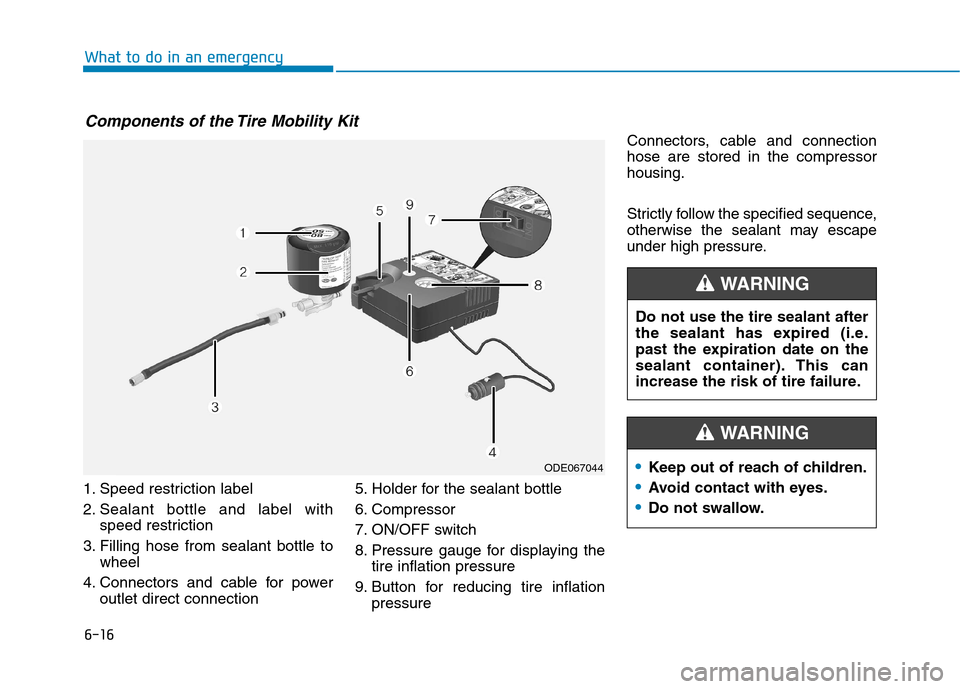
1. Speed restriction label
2. Sealant bottle and label with
speed restriction
3. Filling hose from sealant bottle to
wheel
4. Connectors and cable for power
outlet direct connection5. Holder for the sealant bottle
6. Compressor
7. ON/OFF switch
8. Pressure gauge for displaying the
tire inflation pressure
9. Button for reducing tire inflation
pressureConnectors, cable and connection
hose are stored in the compressor
housing.
Strictly follow the specified sequence,
otherwise the sealant may escape
under high pressure.
Components of the Tire Mobility Kit
ODE067044
Do not use the tire sealant after
the sealant has expired (i.e.
past the expiration date on the
sealant container). This can
increase the risk of tire failure.
WARNING
Keep out of reach of children.
Avoid contact with eyes.
Do not swallow.
WARNING
Page 399 of 561
6-17
What to do in an emergency
6
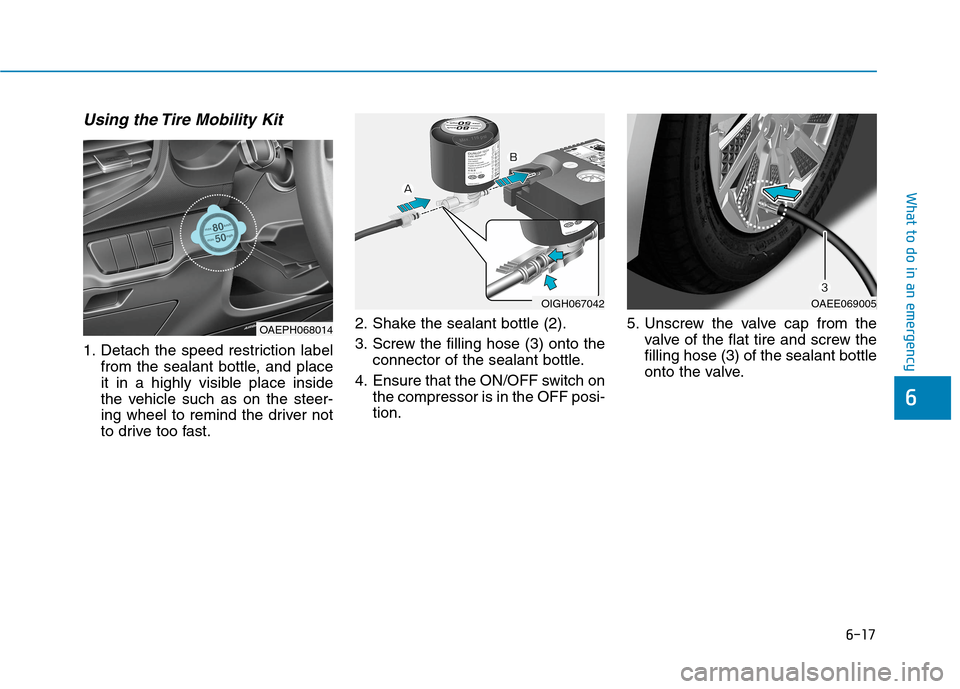
Using the Tire Mobility Kit
1. Detach the speed restriction label
from the sealant bottle, and place
it in a highly visible place inside
the vehicle such as on the steer-
ing wheel to remind the driver not
to drive too fast.2. Shake the sealant bottle (2).
3. Screw the filling hose (3) onto the
connector of the sealant bottle.
4. Ensure that the ON/OFF switch on
the compressor is in the OFF posi-
tion.5. Unscrew the valve cap from the
valve of the flat tire and screw the
filling hose (3) of the sealant bottle
onto the valve.
OIGH067042
OAEPH068014
OAEE069005
Page 400 of 561
6-18
What to do in an emergency
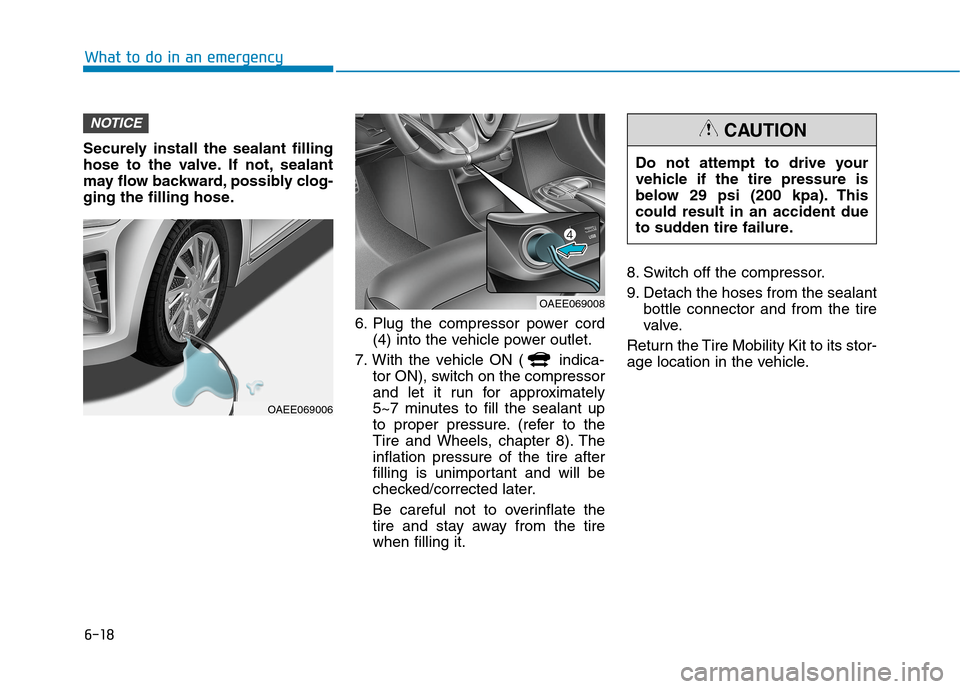
Securely install the sealant filling
hose to the valve. If not, sealant
may flow backward, possibly clog-
ging the filling hose.
6. Plug the compressor power cord
(4) into the vehicle power outlet.
7. With the vehicle ON ( indica-
tor ON), switch on the compressor
and let it run for approximately
5~7 minutes to fill the sealant up
to proper pressure. (refer to the
Tire and Wheels, chapter 8). The
inflation pressure of the tire after
filling is unimportant and will be
checked/corrected later.
Be careful not to overinflate the
tire and stay away from the tire
when filling it.8. Switch off the compressor.
9. Detach the hoses from the sealant
bottle connector and from the tire
valve.
Return the Tire Mobility Kit to its stor-
age location in the vehicle.
NOTICE
OAEE069006
OAEE069008
Do not attempt to drive your
vehicle if the tire pressure is
below 29 psi (200 kpa). This
could result in an accident due
to sudden tire failure.
CAUTION
Page 401 of 561
6-19
What to do in an emergency
6
Distributing the sealant
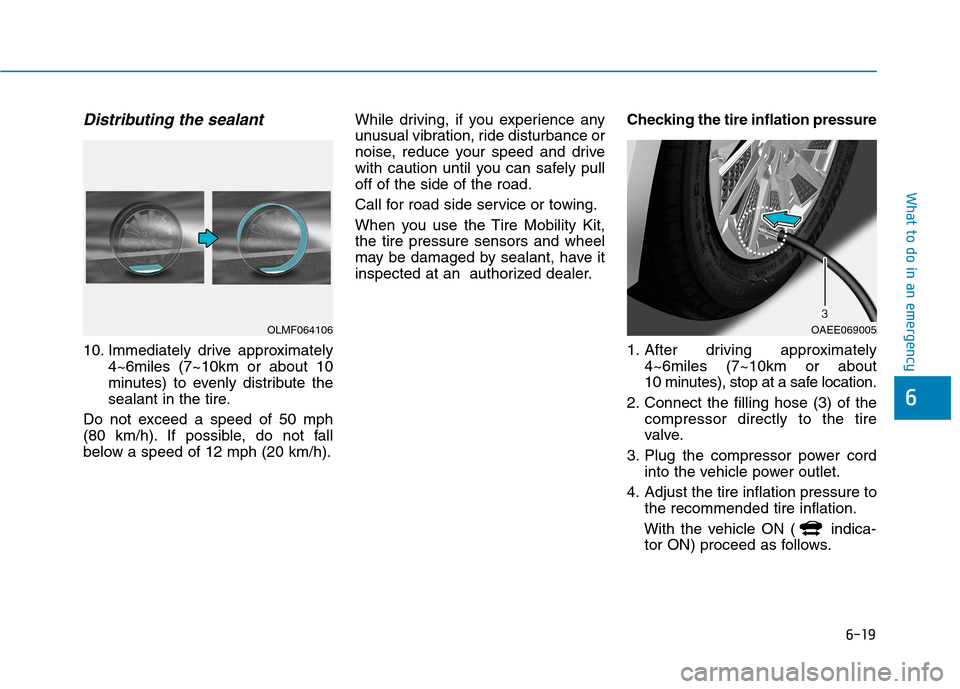
10. Immediately drive approximately
4~6miles (7~10km or about 10
minutes) to evenly distribute the
sealant in the tire.
Do not exceed a speed of 50 mph
(80 km/h). If possible, do not fall
below a speed of 12 mph (20 km/h).While driving, if you experience any
unusual vibration, ride disturbance or
noise, reduce your speed and drive
with caution until you can safely pull
off of the side of the road.
Call for road side service or towing.
When you use the Tire Mobility Kit,
the tire pressure sensors and wheel
may be damaged by sealant, have it
inspected at an authorized dealer.Checking the tire inflation pressure
1. After driving approximately
4~6miles (7~10km or about
10 minutes), stop at a safe location.
2. Connect the filling hose (3) of the
compressor directly to the tire
valve.
3. Plug the compressor power cord
into the vehicle power outlet.
4. Adjust the tire inflation pressure to
the recommended tire inflation.
With the vehicle ON ( indica-
tor ON) proceed as follows.
OLMF064106OAEE069005