2020 HONDA ODYSSEY Navigation Manual (in English)
-
 1
1 -
 2
2 -
 3
3 -
 4
4 -
 5
5 -
 6
6 -
 7
7 -
 8
8 -
 9
9 -
 10
10 -
 11
11 -
 12
12 -
 13
13 -
 14
14 -
 15
15 -
 16
16 -
 17
17 -
 18
18 -
 19
19 -
 20
20 -
 21
21 -
 22
22 -
 23
23 -
 24
24 -
 25
25 -
 26
26 -
 27
27 -
 28
28 -
 29
29 -
 30
30 -
 31
31 -
 32
32 -
 33
33 -
 34
34 -
 35
35 -
 36
36 -
 37
37 -
 38
38 -
 39
39 -
 40
40 -
 41
41 -
 42
42 -
 43
43 -
 44
44 -
 45
45 -
 46
46 -
 47
47 -
 48
48 -
 49
49 -
 50
50 -
 51
51 -
 52
52 -
 53
53 -
 54
54 -
 55
55 -
 56
56 -
 57
57 -
 58
58 -
 59
59 -
 60
60 -
 61
61 -
 62
62 -
 63
63 -
 64
64 -
 65
65 -
 66
66 -
 67
67 -
 68
68 -
 69
69 -
 70
70 -
 71
71 -
 72
72 -
 73
73 -
 74
74 -
 75
75 -
 76
76 -
 77
77 -
 78
78 -
 79
79 -
 80
80 -
 81
81 -
 82
82 -
 83
83 -
 84
84 -
 85
85 -
 86
86 -
 87
87 -
 88
88 -
 89
89 -
 90
90 -
 91
91 -
 92
92 -
 93
93 -
 94
94 -
 95
95 -
 96
96 -
 97
97 -
 98
98 -
 99
99 -
 100
100 -
 101
101 -
 102
102 -
 103
103 -
 104
104 -
 105
105 -
 106
106 -
 107
107 -
 108
108 -
 109
109 -
 110
110 -
 111
111 -
 112
112 -
 113
113 -
 114
114 -
 115
115 -
 116
116 -
 117
117 -
 118
118 -
 119
119 -
 120
120 -
 121
121 -
 122
122 -
 123
123 -
 124
124 -
 125
125 -
 126
126
 31
uuDisplay Mode SettingsuSwitching Display Mode Manually
System SetupIllumination
controlOperation
(Display
Mode) iconSelects Day or Night display mode when the user
wants to change the brightne")
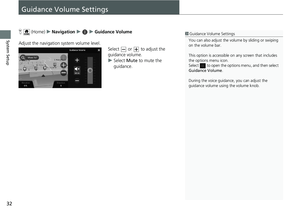
 32
System Setup
Guidance Volume Settings
H (Home)uNavigationuuGuidance Volume
Adjust the navigation system volume level.
Select or to adjust the
guidance volume.
uSelect Mute to mute the
guidanc")
 33
System Setup
Map and Vehicle
H (Home)uNavigationuuSettingsuMap and Vehicle
Change the map settings.
Select an option.
The following options are available:
•Vehicle Selection: Changes the icon to")
 34
uuMap and VehicleuVehicle Selection
System Setup
Vehicle Selection
H (Home)uNavigationuuSettingsuMap and VehicleuVehicle
Selection
You can choose your vehicle icon.
1.Select or to choose the")
 35
uuMap and VehicleuDriving Map View (Map Orientation)
System Setup
Driving Map View (Map Orientation)
H (Home)uNavigationuuSettingsuMap and VehicleuDriving
Map View
Select the map orientation.
1.Se")
 36
uuMap and VehicleuMap Theme
System Setup
Map Theme
H (Home)uNavigationuuSettingsuMap and VehicleuMap
Theme
Changes the color of the map data.
1.Select an option.
2.Select Save.")
 37
uuMap and VehicleuMap Layer
System Setup
Map Layer
H (Home)uNavigationuuSettingsuMap and VehicleuMap
Layer
Sets the data that appears on the map screen.
1.Select an option(s).
2.Select Save.1Map L")
 38
uuMap and VehicleumyMaps
System Setup
myMaps
H (Home)uNavigationuuSettingsuMap and VehicleumyMaps
View installed maps the system uses.
Select an item.")