Page 313 of 595
311
uuCustomized Features u
Continued
Features
Clock
Clock Adjustment
Clock Format
Auto Time Zone*
Manual Time Zone
Auto Daylight Saving Time
Clock Display
Overlay Clock Location
Clock Reset
Clock
Wallpaper
*1 : Does not appear when you chan ge the screen interface design.
*2 : Appears only when you change the screen interface design.
Voice Prompt
Voice Recog. Volume
Song by Voice
Song by Voice Phonetic Modification
Phonebook Phonetic Modification
Automatic Phone Sync
One Press Voice OperationVoice Recog.
Clock/Wallpaper Type*1/
Clock Type*2
* Not available on all models
20 CLARITY PHEV-31TRW6200.book 311 ページ 2019年9月24日 火曜日 午後12時9分
Page 317 of 595
315
uuCustomized Features u
Continued
Features
■List of customizable options
*1:Does not appear when you chan ge the screen interface design.
*2:Appears only when you change the screen interface design.
Setup
Group Customizable Features Desc
ription Selectable Settings
ClockClock
Clock/
Wallpaper
Type
*1/
Clock
Type
*2
Clock
See Info on P. 316
Wallpaper
Clock Adjustment
Auto Time Zone*
Manual Time Zone
Auto Daylight Saving Time
Clock Format
Clock Display
Overlay Clock Location
Clock Reset
* Not available on all models
20 CLARITY PHEV-31TRW6200.book 315 ページ 2019年9月24日 火曜日 午後12時9分
Page 318 of 595

316
uuCustomized Features u
Features
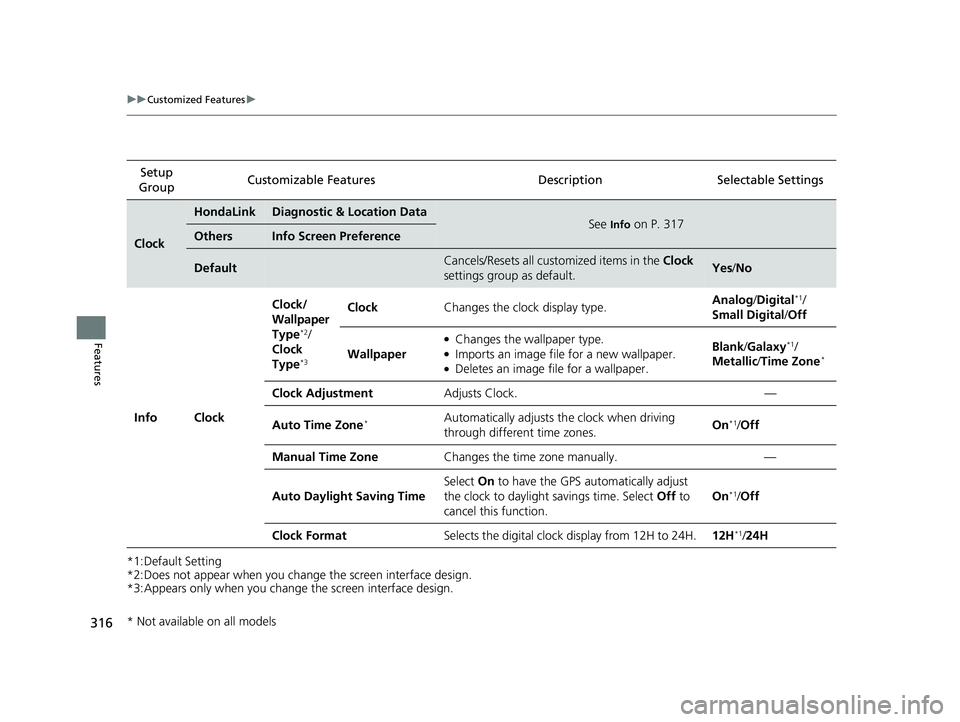
*1:Default Setting
*2:Does not appear when you change the screen interface design.
*3:Appears only when you change the screen interface design.Setup
Group Customizable Features Desc
ription Selectable Settings
Clock
HondaLinkDiagnostic & Location DataSee Info on P. 317OthersInfo Screen Preference
DefaultCancels/Resets all customized items in the Clock
settings group as default.Yes /No
Info Clock Clock/
Wallpaper
Type
*2/
Clock
Type
*3
Clock Changes the clock display type. Analog
/Digital*1/
Small Digital /Off
Wallpaper
●Changes the wallpaper type.●Imports an image file for a new wallpaper.●Deletes an image file for a wallpaper. Blank
/Galaxy
*1/
Metallic /Time Zone*
Clock Adjustment Adjusts Clock. —
Auto Time Zone
*Automatically adjusts th e clock when driving
through different time zones. On*1/
Off
Manual Time Zone Changes the time zone manually. —
Auto Daylight Saving Time Select
On to have the GPS automatically adjust
the clock to daylight savings time. Select Off to
cancel this function. On
*1/
Off
Clock Format Selects the digital clock display from 12H to 24H. 12H
*1/24H
* Not available on all models
20 CLARITY PHEV-31TRW6200.book 316 ページ 2019年9月24日 火曜日 午後12時9分
Page 319 of 595
317
uuCustomized Features u
Continued
Features
*1:Default SettingSetup
Group Customizable Features Desc
ription Selectable Settings
Info
ClockClock Display
Selects whether the clock display comes on. On
*1/Off
Overlay Clock Location Changes the clock display layout. Upper Right
*1/
Upper
Left /Lower Right /
Lower Left /Off
Clock Reset Resets the clock settings to the factory default. Yes/No
HondaLink Diagnostic & Location
Data Turns HondaLink
® on and off. On
*1/Off
Others Info Screen Preference Selects the top menu when the
Info is selected.
●Info Top - A brief menu pops up.●Info Menu- A full menu pops up.●Off- A menu does not pop up. Info Top
/Info
Menu
*1/ Off
Default Cancels/Resets all cust
omized items in the Info
settings group as default. Yes
/No
20 CLARITY PHEV-31TRW6200.book 317 ページ 2019年9月24日 火曜日 午後12時9分
Page 327 of 595
325
uuCustomized Features u
Continued
Features
*1:Default Setting
*2:Does not appear when you chan ge the screen interface design.
*3:Appears only when you change the screen interface design.
Setup
Group Customizable Features
Description Selectable Settings
System Clock Clock/
Wallpaper
Type
*2/
Clock
Type
*3
Clock
See
Info on P. 316
Wallpaper
Clock Adjustment
Auto Time Zone
*
Manual Time Zone
Auto Daylight Saving Time
Clock Format
Clock Display
Overlay Clock Location
Clock Reset
Others Language Change the display language. English (United
States)
*1/
Français /
Español
* Not available on all models
20 CLARITY PHEV-31TRW6200.book 325 ページ 2019年9月24日 火曜日 午後12時9分
Page 491 of 595

489
uuMaintenance Under the Hood uChanging the Engine Oil and Oil Filter
Continued
Maintenance
Changing the Engine Oil and Oil Filter
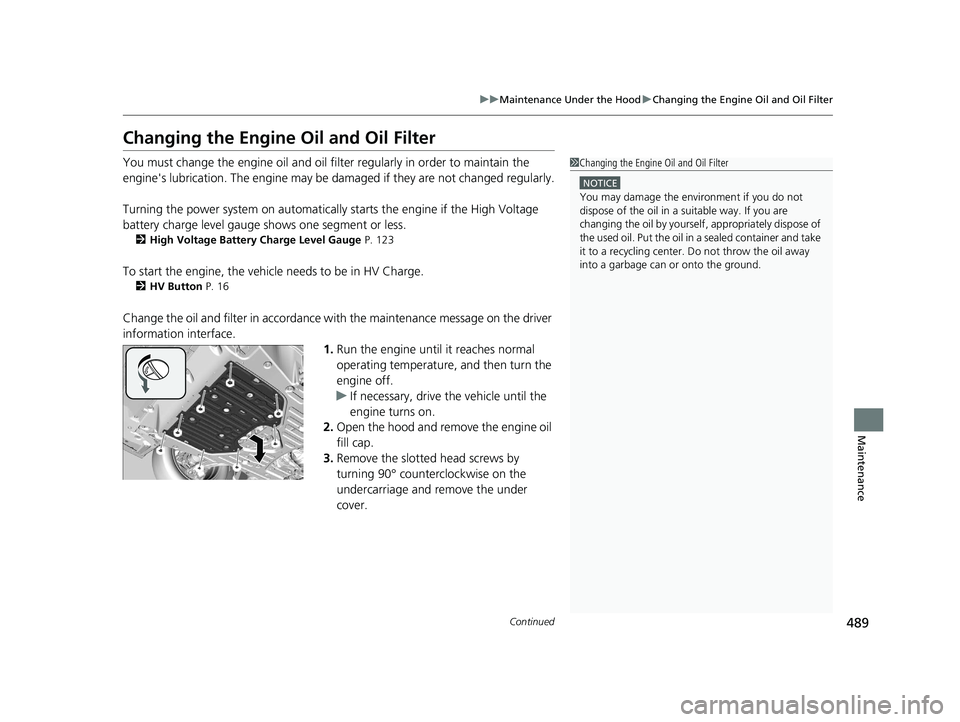
You must change the engine oil and oil fi lter regularly in order to maintain the
engine's lubrication. The engine may be damaged if they are not changed regularly.
Turning the power system on automatically starts the engine if the High Voltage
battery charge level gauge shows one segment or less.
2 High Voltage Battery Charge Level Gauge P. 123
To start the engine, the vehicle needs to be in HV Charge.
2HV Button P. 16
Change the oil and filter in accordance with the maintenance message on the driver
information interface.
1.Run the engine until it reaches normal
operating temperature, and then turn the
engine off.
u If necessary, drive the vehicle until the
engine turns on.
2. Open the hood and remove the engine oil
fill cap.
3. Remove the slotted head screws by
turning 90° counterclockwise on the
undercarriage and remove the under
cover.
1Changing the Engine Oil and Oil Filter
NOTICE
You may damage the environment if you do not
dispose of the oil in a suitable way. If you are
changing the oil by yourself , appropriately dispose of
the used oil. Put the oil in a sealed container and take
it to a recycling center. Do not throw the oil away
into a garbage can or onto the ground.
20 CLARITY PHEV-31TRW6200.book 489 ページ 2019年9月24日 火曜日 午後12時9分
Page 495 of 595
493
uuMaintenance Under the Hood uEngine Coolant
Maintenance
1. Make sure the engine and radiator are
cool.
2. Turn the radiator cap 1/8 turn counter-
clockwise and relieve any pressure in the
cooling system.
3. Push down and turn the radiator cap
counter-clockwise to remove it.
4. The coolant level should be up to the base
of the filler neck. Add coolant if it is low.
5. Put the radiator cap back on, and tighten it
fully.
■Radiator1Radiator
NOTICE
Pour the fluid slowly and ca refully so you do not spill
any. Clean up any spills immediately; they can
damage components in the engine compartment.
3WARNING
Removing the radiator cap while the
engine is hot can cause the coolant to spray
out, seriously scalding you.
Always let the engine and radiator cool
down before removing the radiator cap.
Radiator Cap
20 CLARITY PHEV-31TRW6200.book 493 ページ 2019年9月24日 火曜日 午後12時9分
Page 514 of 595

512
Maintenance
12-Volt Battery
Checking the 12-Volt Battery
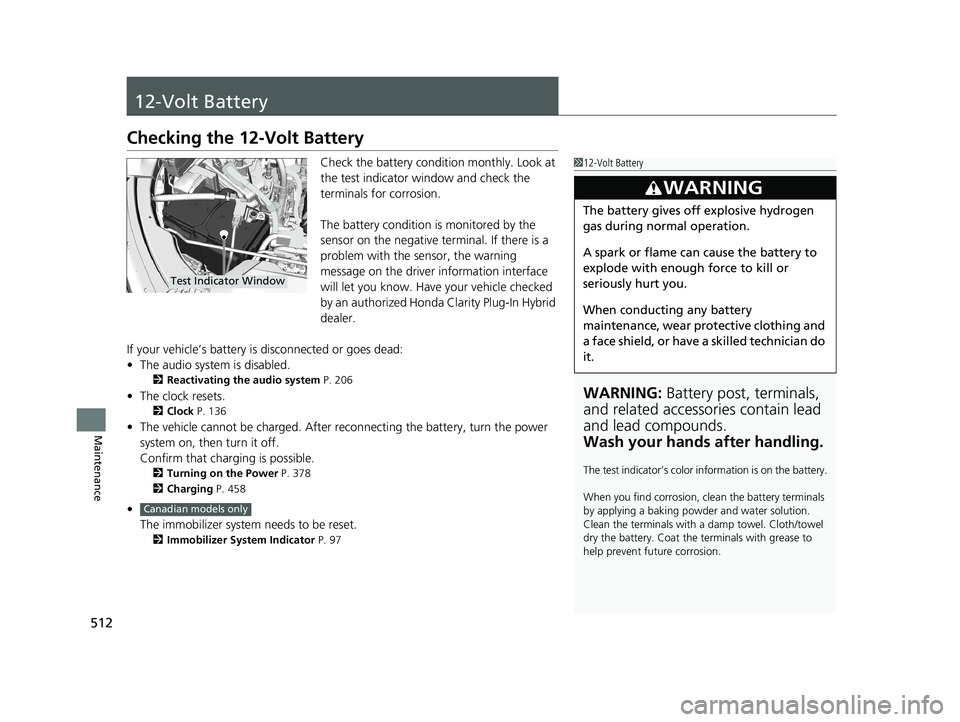
Check the battery condition monthly. Look at
the test indicator window and check the
terminals for corrosion.
The battery condition is monitored by the
sensor on the negative terminal. If there is a
problem with the sensor, the warning
message on the driver information interface
will let you know. Have your vehicle checked
by an authorized Honda Clarity Plug-In Hybrid
dealer.
If your vehicle’s battery is disconnected or goes dead:
• The audio system is disabled.
2 Reactivating the audio system P. 206
•The clock resets.
2 Clock P. 136
•The vehicle cannot be charged. After reconnecting the batte ry, turn the power
system on, then turn it off.
Confirm that charging is possible.
2 Turning on the Power P. 378
2 Charging P. 458
•
The immobilizer system needs to be reset.
2 Immobilizer System Indicator P. 97
112-Volt Battery
WARNING: Battery post, terminals,
and related accessories contain lead
and lead compounds.
Wash your hands after handling.
The test indicator’s color in formation is on the battery.
When you find corrosion, cl ean the battery terminals
by applying a baking powder and water solution.
Clean the terminals with a damp towel. Cloth/towel
dry the battery. Coat the terminals with grease to
help prevent future corrosion.
3WARNING
The battery gives off explosive hydrogen
gas during normal operation.
A spark or flame can cause the battery to
explode with enough force to kill or
seriously hurt you.
When conducting any battery
maintenance, wear prot ective clothing and
a face shield, or have a skilled technician do
it.
Test Indicator Window
Canadian models only
20 CLARITY PHEV-31TRW6200.book 512 ページ 2019年9月24日 火曜日 午後12時9分