2020 FORD F250 SUPER DUTY ECU
[x] Cancel search: ECUPage 355 of 633
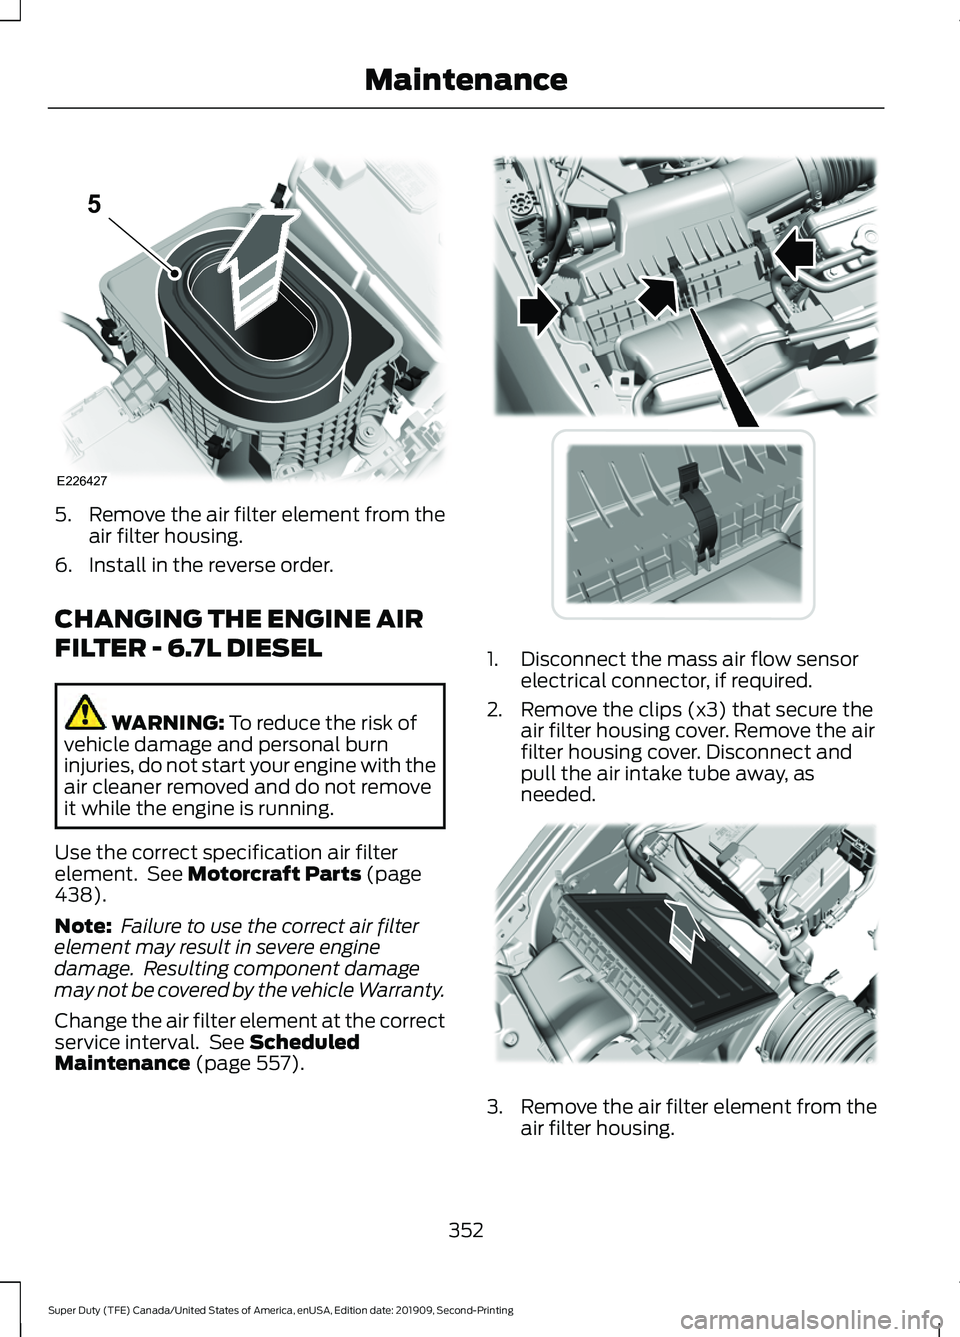
5.
Remove the air filter element from the
air filter housing.
6. Install in the reverse order.
CHANGING THE ENGINE AIR
FILTER - 6.7L DIESEL WARNING: To reduce the risk of
vehicle damage and personal burn
injuries, do not start your engine with the
air cleaner removed and do not remove
it while the engine is running.
Use the correct specification air filter
element. See
Motorcraft Parts (page
438).
Note: Failure to use the correct air filter
element may result in severe engine
damage. Resulting component damage
may not be covered by the vehicle Warranty.
Change the air filter element at the correct
service interval. See
Scheduled
Maintenance (page 557). 1. Disconnect the mass air flow sensor
electrical connector, if required.
2. Remove the clips (x3) that secure the air filter housing cover. Remove the air
filter housing cover. Disconnect and
pull the air intake tube away, as
needed. 3.
Remove the air filter element from the
air filter housing.
352
Super Duty (TFE) Canada/United States of America, enUSA, Edition date: 201909, Second-Printing MaintenanceE226427
5 E310318 E310319
Page 358 of 633
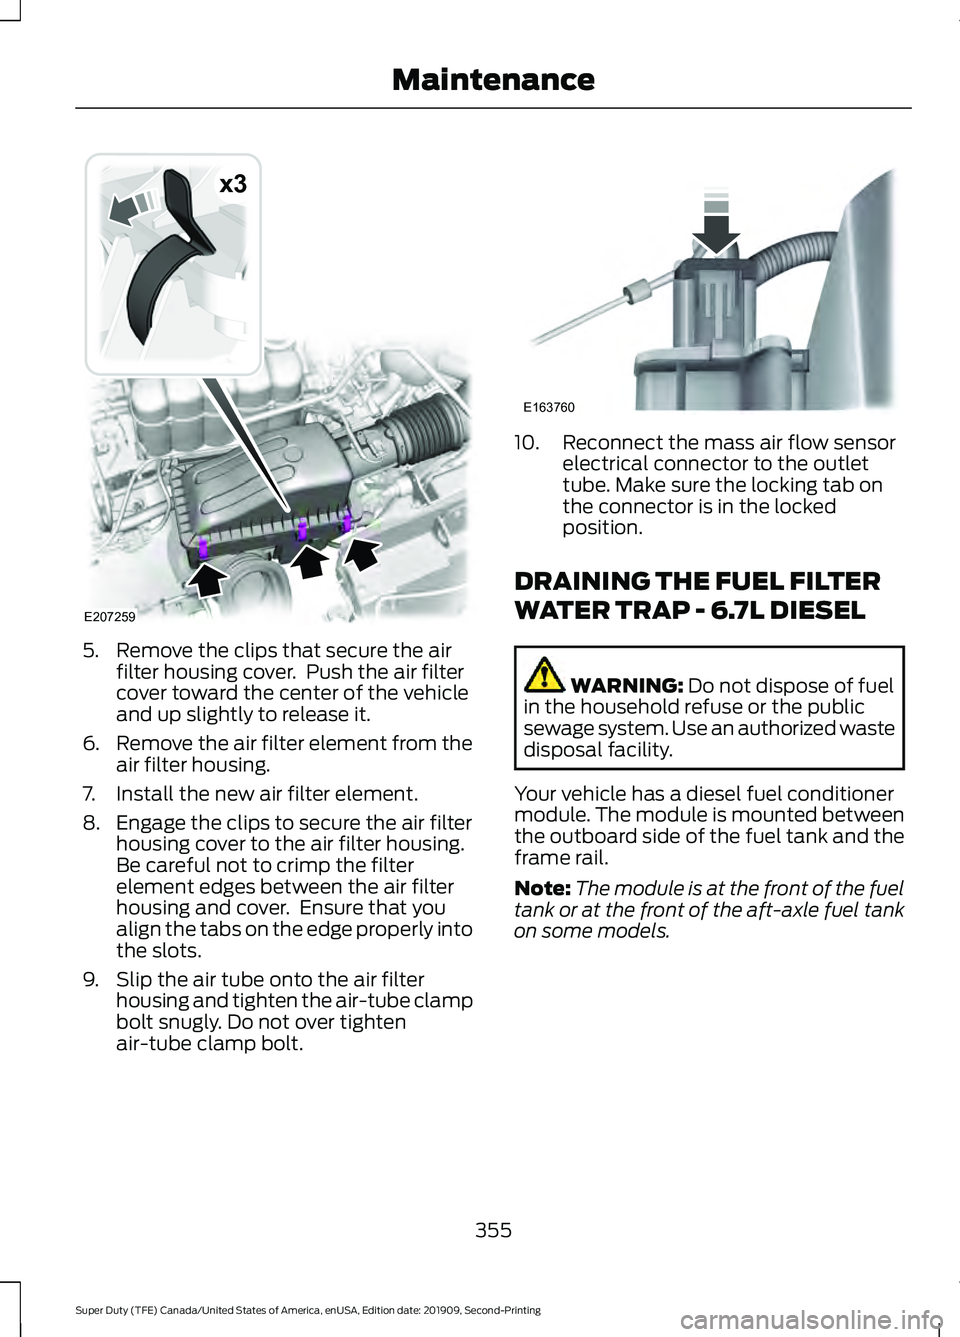
5. Remove the clips that secure the air
filter housing cover. Push the air filter
cover toward the center of the vehicle
and up slightly to release it.
6. Remove the air filter element from the
air filter housing.
7. Install the new air filter element.
8. Engage the clips to secure the air filter housing cover to the air filter housing.
Be careful not to crimp the filter
element edges between the air filter
housing and cover. Ensure that you
align the tabs on the edge properly into
the slots.
9. Slip the air tube onto the air filter housing and tighten the air-tube clamp
bolt snugly. Do not over tighten
air-tube clamp bolt. 10. Reconnect the mass air flow sensor
electrical connector to the outlet
tube. Make sure the locking tab on
the connector is in the locked
position.
DRAINING THE FUEL FILTER
WATER TRAP - 6.7L DIESEL WARNING: Do not dispose of fuel
in the household refuse or the public
sewage system. Use an authorized waste
disposal facility.
Your vehicle has a diesel fuel conditioner
module. The module is mounted between
the outboard side of the fuel tank and the
frame rail.
Note: The module is at the front of the fuel
tank or at the front of the aft-axle fuel tank
on some models.
355
Super Duty (TFE) Canada/United States of America, enUSA, Edition date: 201909, Second-Printing MaintenanceE207259
x3 E163760
Page 385 of 633
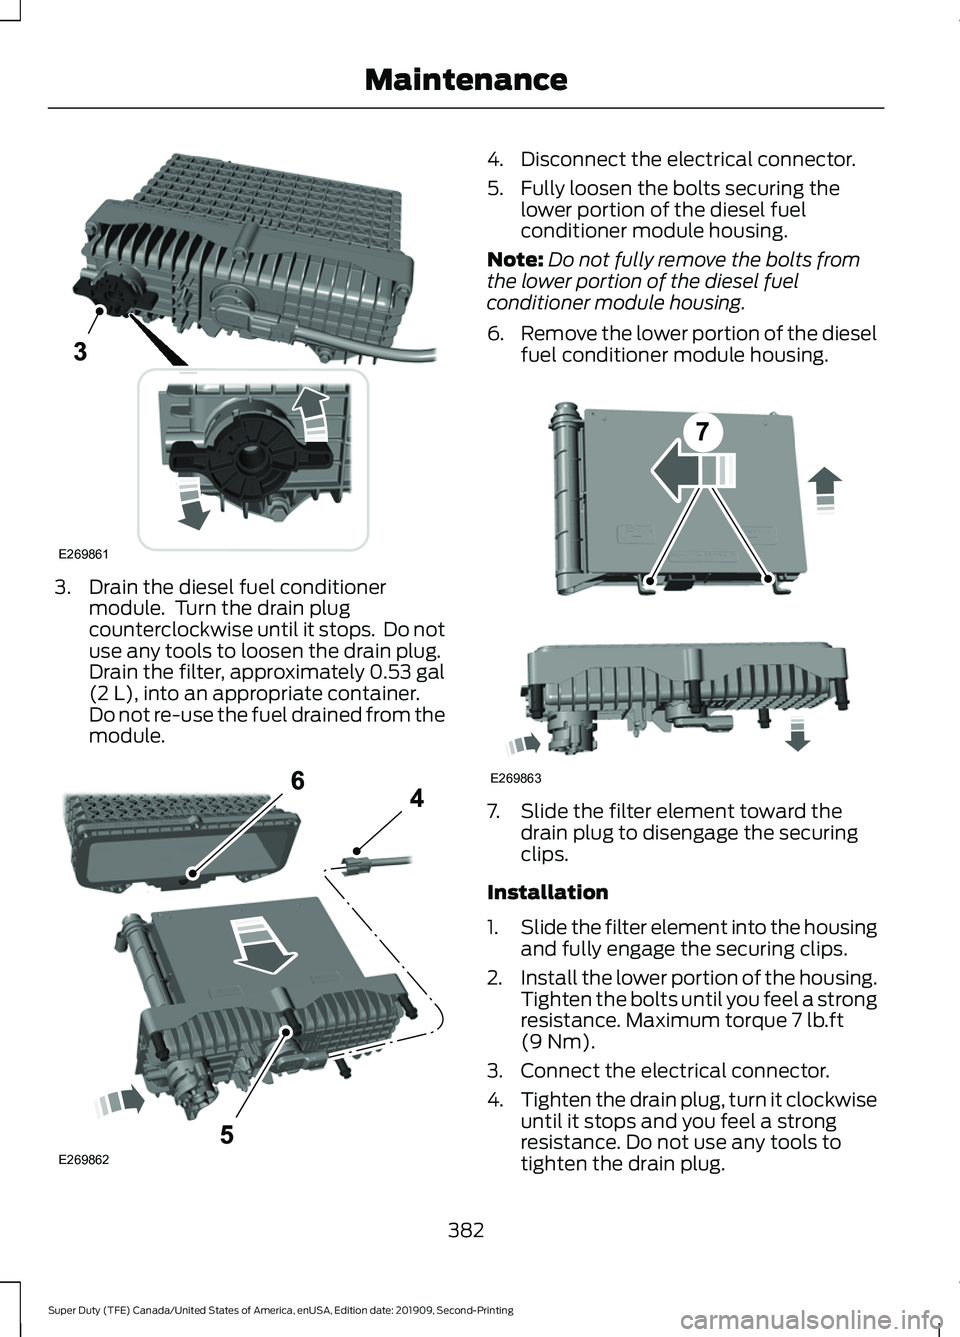
3. Drain the diesel fuel conditioner
module. Turn the drain plug
counterclockwise until it stops. Do not
use any tools to loosen the drain plug.
Drain the filter, approximately 0.53 gal
(2 L), into an appropriate container.
Do not re-use the fuel drained from the
module. 4. Disconnect the electrical connector.
5. Fully loosen the bolts securing the
lower portion of the diesel fuel
conditioner module housing.
Note: Do not fully remove the bolts from
the lower portion of the diesel fuel
conditioner module housing.
6. Remove the lower portion of the diesel
fuel conditioner module housing. 7. Slide the filter element toward the
drain plug to disengage the securing
clips.
Installation
1. Slide the filter element into the housing
and fully engage the securing clips.
2. Install the lower portion of the housing.
Tighten the bolts until you feel a strong
resistance. Maximum torque
7 lb.ft
(9 Nm).
3. Connect the electrical connector.
4. Tighten the drain plug, turn it clockwise
until it stops and you feel a strong
resistance. Do not use any tools to
tighten the drain plug.
382
Super Duty (TFE) Canada/United States of America, enUSA, Edition date: 201909, Second-Printing MaintenanceE269861 E269862 E269863
Page 417 of 633
non-recommended tires and wheels can
cause steering, suspension, axle, transfer
case or power transfer unit failure.
Follow the Ford recommended tire
inflation pressure found on the Safety
Compliance Certification Label (on the
door hinge pillar, door latch post or the
door edge that meets the door latch
post, next to the driver seat), or Tire
Label on the B-Pillar or the edge of the
driver door. Failure to follow the tire
pressure recommendations can cause
uneven treadwear patterns and
adversely affect the way your vehicle
handles.
WARNING: Do not use snow chains
on snow-free roads.
Note: Do not use snow chains on vehicles
with LT275/65R20 or LT 285/75R18 sized
tires.
The tires on your vehicle have all-weather
treads to provide traction in rain and snow.
However, in some climates, you may need
to use snow tires and cables. If you need
to use cables, we recommend that you use
steel wheels of the same size and
specification, as cables may chip
aluminum wheels.
Note: The suspension insulation and
bumpers will help prevent vehicle damage.
Do not remove these components from your
vehicle when using snow tires and chains.
Follow these guidelines when using snow
tires and chains:
• If possible, avoid fully loading your
vehicle.
• Use only SAE Class S chains.
• Install chains securely, verifying that
the chains do not touch any wiring,
brake lines or fuel lines.
• Only install snow chains on the rear
axle. •
For Dual Rear Wheel (DRW) vehicles,
only install snow chains on the outer
wheel of each pair.
• Drive cautiously. If you hear the chains
rub or bang against your vehicle, stop
and retighten the chains. If this does
not work, remove the chains to prevent
damage to your vehicle.
• Remove the tire chains when you no
longer need them. Do not use tire
chains on dry roads.
If you have any questions regarding snow
chains or cables, please contact your
authorized dealer.
TIRE PRESSURE MONITORING
SYSTEM
Vehicle Tire Pressure Monitoring
System WARNING:
The tire pressure
monitoring system is not a substitute for
manually checking tire pressures. You
should periodically check tire pressures
using a pressure gauge. Failure to
correctly maintain tire pressures could
increase the risk of tire failure, loss of
control, vehicle rollover and personal
injury. Check each tire, including the
spare, if provided, monthly when
cold and inflated to the inflation
pressure recommended by the vehicle
manufacturer on the vehicle placard or tire
inflation pressure label. If your vehicle has
tires of a different size than the size
indicated on the vehicle placard or tire
inflation pressure label, you should
determine the proper tire inflation pressure
for those tires.
414
Super Duty (TFE) Canada/United States of America, enUSA, Edition date: 201909, Second-Printing Wheels and Tires
Page 427 of 633
WARNING: To help prevent your
vehicle from moving when changing a
wheel, shift the transmission into park
(P), set the parking brake and use an
appropriate block or wheel chock to
secure the wheel diagonally opposite to
the wheel being changed. For example,
when changing the front left wheel,
place an appropriate block or wheel
chock on the right rear wheel. WARNING:
Always use the jack
provided as original equipment with your
vehicle. If using a jack other than the one
provided, make sure the jack capacity is
adequate for the vehicle weight,
including any vehicle cargo or
modifications. If you are unsure if the jack
capacity is adequate, contact the
authorized dealer. WARNING:
Failure to follow these
guidelines could result in an increased
risk of loss of vehicle control, injury or
death. WARNING:
Never place anything
between the vehicle jack and your
vehicle. WARNING:
Never place anything
between the vehicle jack and the ground. WARNING:
Park your vehicle so
that you do not obstruct the flow of
traffic or place yourself in any danger and
set up a warning triangle. WARNING:
Do not work on your
vehicle when the jack is the only support
as your vehicle could slip off the jack.
Failure to follow this instruction could
result in personal injury or death. WARNING:
Do not get under a
vehicle that is only supported by a
vehicle jack. WARNING:
Do not attempt to
change a tire on the side of the vehicle
close to moving traffic. Pull far enough
off the road to avoid the danger of being
hit when operating the jack or changing
the wheel. WARNING:
Only use the spare
wheel carrier to stow the wheel provided
with your vehicle. Other wheel sizes
could cause the spare wheel carrier to
fail if it does not fit securely or is too
heavy.
Note: Do not use impact tools or power
tools operating at over 200 RPM on the
spare wheel carrier winch, which may cause
it to malfunction and prevent a secure fit.
Override the winch at least three times
(there is an audible click each time) to make
sure the wheel and tire fit securely.
Note: Passengers should not remain in the
vehicle when the vehicle is being jacked.
1. Park the vehicle on a level firm ground and activate the hazard flashers.
2. Apply the parking brake, place the transmission in park (P), switch the
engine off.
3. Block the wheel diagonally opposite the flat tire. For example, if the left
front tire is flat, block the right rear
wheel.
424
Super Duty (TFE) Canada/United States of America, enUSA, Edition date: 201909, Second-Printing Wheels and Tires
Page 434 of 633

2. Slide the wheel partially under the
vehicle and install the retainer through
the wheel center. If equipped, you may
have to remove the wheel center cap
prior to pushing the retainer through
the center of the wheel. To remove the
center cap, press it off with the lug
wrench tip from the inner side of the
wheel. Pull on the cable to align the
components at the end of the cable. 3.
Turn the lug wrench clockwise until the
tire is raised to its stowed position
underneath the vehicle. The wrench
will become harder to turn and the
spare tire winch will ratchet or slip
when the tire is raised to maximum
tightness. You will hear a clicking sound
from the winch indicating that the tire
is properly stowed. Check that the tire
lies flat against the frame and is
properly tightened.
4. Carefully place all tools back in the tool
kit bag.
5. Reinstall the tool kit bag and tighten the wing nut.
6. Properly reinstall the jack into the bracket and tighten the wing nut.
TECHNICAL SPECIFICATIONS
Wheel Lug Nut Torque Specifications WARNING: When you install a wheel, always remove any corrosion, dirt or foreign
materials present on the mounting surfaces of the wheel or the surface of the wheel
hub, brake drum or brake disc that contacts the wheel. Make sure to secure any fasteners
that attach the rotor to the hub so they do not interfere with the mounting surfaces of
the wheel. Installing wheels without correct metal-to-metal contact at the wheel
mounting surfaces can cause the wheel nuts to loosen and the wheel to come off while
your vehicle is in motion, resulting in loss of vehicle control, personal injury or death. lb.ft (Nm)
Bolt size
150 lb.ft (204 Nm)
M14 x 1.5
* Torque specifications are for nut and bolt threads free of dirt and rust. Use only Ford
recommended replacement fasteners.
On vehicles equipped with single rear wheels, retighten the lug nuts to the specified torque
at 100 miles (160 kilometers) after any wheel disturbance (such as tire rotation, changing
a flat tire, wheel removal).
On vehicles equipped with dual rear wheels, retighten the wheel lug nuts to the specified
torque at 100 miles (160 kilometers), and again at 500 miles (800 kilometers) of new
vehicle operation and after any wheel disturbance (such as tire rotation, changing a flat
tire, wheel removal).
It is important to follow the proper wheel mounting and lug nut torque procedures.
431
Super Duty (TFE) Canada/United States of America, enUSA, Edition date: 201909, Second-Printing Wheels and Tires
Page 480 of 633
CREATING A VEHICLE WI-FI
HOTSPOT
You can create a Wi-Fi hotspot in your
vehicle and allow devices to connect to it
for access to the Internet.
Press the button to enter the
settings menu.
1. Select Connectivity Features.
2. Select
Vehicle Hotspot.
Note: The vehicle hotspot default setting
is on.
3. Select
Settings.
4. Make sure that you have Wi-Fi visibility
switched on.
Note: The Wi-Fi Visibility default setting is
on.
Finding the Wi-Fi Hotspot Name
and Password Press the button to enter the
settings menu.
1. Select
Connectivity Features.
2. Select
Vehicle Hotspot.
3. Select
Settings.
Note: The SSID is the hotspot name.
4. Scroll to
Hide password.
5. Uncheck the box.
Connecting a Device to the Wi-Fi
Hotspot
1. On your device, turn on Wi-Fi and select
the hotspot from the list of available
Wi-Fi networks.
2. When prompted, enter the password.
Purchasing a Data Plan
1. Connect a device to the hotspot. Note:
The vehicle network carrier ’s portal
opens on your device.
2. If the portal does not open on your device, open a website and it redirects
to the vehicle network carrier ’s portal.
Note: Secure websites do not redirect.
Note: If you have an active plan, the system
does not redirect to the vehicle network
carrier ’s portal when you connect a device.
Visit the vehicle network carrier ’s website
to purchase more data.
Note: If data usage information is available
in the vehicle hotspot menu, it is
approximate.
Note: If you carry out a master reset, the
system does not remove your vehicle from
your vehicle network carrier ’s account. To
remove your vehicle from the account,
contact your vehicle network carrier.
Note: The vehicle network carrier provides
Vehicle Hotspot services, subject to your
vehicle network carrier agreement, coverage
and availability.
CHANGING THE VEHICLE WI-
FI HOTSPOT NAME OR
PASSWORD Press the button to enter the
settings menu.
1. Select
Connectivity Features.
2. Select
Vehicle Hotspot.
3. Select
Settings.
4. Select
SSID: ___.
5. Enter your required SSID.
6. Select
Done.
7. Select
Password: ___.
8. Enter your required password.
9. Select
Done.
477
Super Duty (TFE) Canada/United States of America, enUSA, Edition date: 201909, Second-Printing Vehicle Wi-Fi Hotspot
(If Equipped)
Page 495 of 633
__ is a dynamic listing, meaning that it
could be the name of anything, such as a
contact or phone number.
Phone Controls
Use the phone buttons on your steering
wheel to answer, reject, or hang up a call.
Accessing Features through the
Phone Menu
You can access your call history,
phonebook, sent text messages, as well
as access phone and system settings.
1. Press the PHONE button to enter the
phone menu.
2. Scroll through the menu to view contacts, text messages, and the
phone dialer.
SYNC™ APPLICATIONS AND
SERVICES
• 911 Assist: Can alert 911 in the event of
an emergency.
• SYNC AppLink: Allows you to connect
to and use certain applications (if your
phone is compatible).
These features may require activation.
Available AppLink enabled apps vary by
market.
911 Assist WARNING:
Unless the 911 Assist
setting is set on before a crash, the
system will not dial for help which could
delay response time, potentially
increasing the risk of serious injury or
death after a crash. WARNING:
Do not wait for 911
Assist to make an emergency call if you
can do it yourself. Dial emergency
services immediately to avoid delayed
response time which could increase the
risk of serious injury or death after a
crash. If you do not hear 911 Assist within
five seconds of the crash, the system or
phone may be damaged or
non-functional. WARNING:
Always place your
phone in a secure location in your vehicle
so it does not become a projectile or get
damaged in a crash. Failure to do so may
cause serious injury to someone or
damage the phone which could prevent
911 Assist from working properly.
Note: The SYNC 911 Assist feature must be
set on before the incident.
Note: The SYNC 911 Assist feature only
operates in the U.S., Canada or in a territory
in which 911 is the emergency number.
Note: Before setting this feature on, make
sure that you read the 911 Assist Privacy
Notice later in this section for important
information.
Note: If any user switches 911 Assist to on
or off, that setting applies for all paired
phones. If 911 Assist is switched off, either
a voice message plays or a display message
or an icon comes on when your vehicle is
started and after a previously paired phone
connects.
Note: Every phone operates differently.
While SYNC 911 Assist works with most
cellular phones, some may have trouble
using this feature.
492
Super Duty (TFE) Canada/United States of America, enUSA, Edition date: 201909, Second-Printing SYNC™
(If Equipped)