2020 FORD F250 SUPER DUTY four wheel drive
[x] Cancel search: four wheel drivePage 294 of 633
System consistently shows Pro Trailer
Backup Assist™ Stop now Maximum
trailer angle Press Knob to Exit
:
• The system uses your measurements
to determine sticker position and
establish system limits. Accurate
sticker placement and trailer
measurements provide the best
system performance. If you are
consistently receiving this warning, it is
likely there is an issue with sticker
placement or the entered
measurements. Make sure that the
sticker is placed correctly based on
step 3 and the measurements were
made correctly according to step 4.
The troubleshooting guide for trailer
measurements can also be reviewed
for help in making measurements.
• To change sticker location or change
trailer measurements, go into the
information display menu, select trailer
options, select change trailer setting
and then select the change sticker
option.
• If the sticker location needs to be
changed, the previous sticker must be
removed and a new sticker needs to
be placed on the trailer. ONLY ONE
STICKER SHOULD BE PLACED ON THE
TRAILER FOR PROPER SYSTEM
FUNCTION.
• Disregard the prompt to remove this
sticker and continue to the next step if
you only plan to update the
measurements for the current sticker
location. System consistently shows
Pro Trailer
Backup Assist™ Stop Now Take Control
of Steering Wheel
:
• The system displays this warning when
it can no longer steer the vehicle and
you must take over steering. There are
four reasons why this warning displays
and additional information regarding
the reason for the warning is available
on the center display.
• The steering wheel is touched when
under system control. Avoid touching
the wheel during system operation.
• The maximum speed for feature
operation is exceeded. System
performance is optimized at slower
speeds. Reverse slowly.
• The sticker was lost by the camera
system. Once your vehicle is stopped,
additional warnings indicate the sticker
was lost. Refer to sticker lost
troubleshooting tips.
• An internal condition for system
operation was not met which requires
your vehicle to return to manual control
of the steering. Using the system for an
extended period of time can cause the
steering system to heat up and turn off
Pro Trailer Backup Assist steering
control to protect itself. The system
may require a cool down time of up to
30 minutes. Keep the system off and
drive forward at a normal speed or
switch the vehicle off.
Note: The system is designed to be used
with the same trailer connection every time
the trailer is chosen from the selection
menu. When using a different drawbar or a
different pin hole on drawbars with more
than one, connecting the drawbar to your
vehicle affects the trailer measurements.
Take the measurements again and update
if required.
291
Super Duty (TFE) Canada/United States of America, enUSA, Edition date: 201909, Second-Printing Towing
Page 297 of 633
Pro Trailer Backup Assist™ Trailer Not
Detected Pull Forward to Initialize Press
Knob to Exit or Trailer Reverse Guidance
Trailer Not Detected Pull Forward to
Initialize Press OK to Exit
:
• If the vehicle has not moved during this
key cycle, it must be driven forward to
initialize the sensing system.
• Extended operation at speeds below
1 mph (1 km/h) may cause the sensing
system to lose the trailer position and
the system needs to be re-initialized.
• Drive forward above
2 mph (3 km/h)
and the system indicates when it
initializes.
System repeatedly displays
Pro Trailer
Backup Assist™ Stop Now System Not
Active Press Knob to Exit
:
• System is not fully activated. Select
the trailer in the information display by
using the controls on the steering
wheel and wait until
Pro Trailer
Backup Assist™ Backup Slowly Turn
Knob to Steer Press Knob to Exit
displays before starting to move
backward.
• This displays if you backup during the
calibration process. Drive forward and
complete calibration.
System does not reverse straight:
• Verify sensor is correctly installed. See
Fifth Wheel and Gooseneck Trailer
Sensor Installation.
• Factors such as the hitch connection,
road camber, road slope and
compliance in the trailer suspension
can influence how straight the system
is able to reverse the trailer when the
knob is not turned. You can
compensate for the trailer drifting to
the right or left by slowly turning the
knob until the trailer is following your
preferred path and then holding the
knob in that position. System consistently shows
Pro Trailer
Backup Assist™ Stop now Maximum
trailer angle Press Knob to Exit
:
• Verify sensor is correctly installed. See
Fifth Wheel and Gooseneck Trailer
Sensor Installation.
• Verify the correct trailer is selected in
the information display.
• The system may need to be
recalibrated. The system can be
recalibrated by using the information
display to delete the trailer and
repeating the setup process. If the
same sensor is installed on another
trailer, create a new trailer in the
information display and complete the
setup and calibration process for the
new trailer. If using the same sensor on
multiple trailers, disconnect the 7/12
pin connector when switching trailers.
See Setting Up The System.
System consistently shows
Pro Trailer
Backup Assist™ Stop Now Take Control
of Steering Wheel
:
• The system displays this warning when
it can no longer steer the vehicle and
you must take over steering. There are
four reasons why this warning displays
and additional information regarding
the reason for the warning is available
on the center display.
• The steering wheel is touched when
under system control. Avoid touching
the wheel during system operation.
• The maximum speed for feature
operation is exceeded. System
performance is optimized at slower
speeds. Reverse slowly.
294
Super Duty (TFE) Canada/United States of America, enUSA, Edition date: 201909, Second-Printing Towing
Page 312 of 633
•
Allow more distance for stopping with
a trailer attached. Anticipate stops and
brake gradually.
• Avoid parking on a grade. However, if
you must park on a grade:
1. Turn the steering wheel to point your vehicle tires away from traffic flow.
2. Set your vehicle parking brake.
3. Place the transmission in park (P).
4. Place wheel chocks in front and back of the trailer wheels. (Chocks not
included with vehicle.)
Your vehicle may be equipped with a
temporary or conventional spare tire. A
"temporary" spare tire is different in size
(diameter or width), tread-type
(All-Season or All Terrain) or is from a
different manufacturer than the road tires
on your vehicle. Consult information on the
tire label or Safety Compliance label for
limitations when using.
Launching or Retrieving a Boat or
Personal Watercraft (PWC)
Note: Disconnect the wiring to the trailer
before backing the trailer into the water.
Note: Reconnect the wiring to the trailer
after
you remove the trailer from the water.
When backing down a ramp during boat
launching or retrieval:
• Do not allow the static water level to
rise above the bottom edge of the rear
bumper.
• Do not allow waves to break higher
than
6 in (15 cm) above the bottom
edge of the rear bumper.
Exceeding these limits may allow water to
enter vehicle components:
• Causing internal damage to the
components.
• Affecting driveability, emissions, and
reliability. Replace the rear axle lubricant anytime
the rear axle has been submerged in water.
Water may have contaminated the rear
axle lubricant, which is not normally
checked or changed unless a leak is
suspected or other axle repair is required.
TOWING THE VEHICLE ON
FOUR WHEELS
WARNING:
If your vehicle has a
steering wheel lock make sure the
ignition is in the accessory or on position
when being towed.
Emergency Towing
If your vehicle becomes inoperable
(without access to wheel dollies,
car-hauling trailer, or flatbed transport
vehicle), it can be flat-towed (all wheels
on the ground, regardless of the powertrain
and transmission configuration) under the
following conditions:
• Your vehicle is facing forward for
towing in a forward direction.
• Place the transmission in neutral (N).
If you cannot move the transmission
into neutral (N), you may need to
override it. See
Transmission (page
207).
• Maximum speed is 35 mph (56 km/h).
• Maximum distance is
50 mi (80 km).
Recreational Towing
Note: Put your climate control system in
recirculated air mode to prevent exhaust
fumes from entering your vehicle.
See
Climate Control (page 142).
309
Super Duty (TFE) Canada/United States of America, enUSA, Edition date: 201909, Second-Printing Towing
Page 313 of 633
Follow these guidelines if you have a need
for recreational towing, such as towing
your vehicle behind a motorhome. We have
designed these guidelines to prevent
damage to your transmission.
Two-wheel Drive Vehicles
Do not tow your vehicle with any wheels
on the ground, as vehicle or transmission
damage may occur. You must tow your
vehicle with all four (4) wheels off the
ground, such as when using a car-hauling
trailer.
Four-wheel Drive Vehicles
Only tow a four-wheel drive vehicle that
with all wheels on the ground. To do this,
place the transfer case in its neutral
position and engage the four-wheel-down
towing feature.
Perform the steps in the following section
after positioning your vehicle behind the
tow vehicle and properly securing them
together.
Note:
Make sure you properly secure your
vehicle to the tow vehicle.
Four-wheel-down Towing
1. Put the ignition in the on position, but do not start the engine. If your vehicle
has an ignition key, turn the key to on.
If your vehicle has intelligent access,
press the engine START/STOP button
once without pressing the brake pedal.
2. Press and hold the brake pedal.
3. Rotate the four-wheel drive switch to 2H.
4. Shift the transmission to neutral (N).
5. Enable neutral tow through the information display by selecting
Settings
from the cluster menu.
6. Then select
Advanced Settings.
7. Then select
Vehicle. 8. Then select
Neutral Tow. Press and
hold the OK button. If completed
successfully, the information display
shows
Neutral Tow Enabled Leave
Transmission in Neutral. This indicates
that your vehicle is safe to tow with all
wheels on the ground.
Note: If you do not see the message in the
display, you must perform the procedure
again from the beginning.
Note: You may hear an audible noise as the
transfer case shifts into its neutral position.
This is normal.
9. Leave the transmission in neutral (N) and turn the ignition as far as it will go
toward the off position (it will not turn
fully off when the transmission is in
neutral). If your vehicle has an ignition
key, you must leave the key in the
ignition while towing. To lock and
unlock your vehicle, use the keyless
entry keypad or extra set of keys. If your
vehicle has intelligent access, press the
engine
START/STOP button once
without pressing the brake pedal. You
do not need to leave your keys in the
vehicle. You can lock and unlock your
vehicle as you normally do.
10. Release the brake pedal. WARNING:
Do not disconnect the
battery during recreational towing. It
prevents the transfer case from shifting
properly and may cause the vehicle to
roll, even if the transmission is in park
(P). WARNING:
Shifting the transfer
case to its neutral position for
recreational towing may cause the
vehicle to roll, even if the transmission is
in park (P). It may injure the driver and
others. Make sure you press the foot
brake and the vehicle is in a secure, safe
position when you shift to neutral (N).
310
Super Duty (TFE) Canada/United States of America, enUSA, Edition date: 201909, Second-Printing Towing
Page 314 of 633
Note:
Failing to put the transfer case in its
neutral position while towing with all four
wheels on the ground will damage vehicle
components.
Note: You can check four-wheel-down
towing status at any time by opening the
driver's door or turning the ignition to the
accessory or on position. A message
displays in the information display
confirming your vehicle is in neutral tow.
To exit four-wheel-down towing and return
the transfer case to its 2H position:
1. With your vehicle still properly secured
to the tow vehicle, put the ignition in
the on position, but do not start the
engine. If your vehicle has an ignition
key, switch the key to on. If your vehicle
has intelligent access, press the engine
START/STOP
button once without
pressing the brake pedal.
2. Press and hold the brake pedal.
3. Shift the transmission out of neutral (N) and into any other gear.
4. Release the brake pedal.
Note: If completed successfully, the
instrument cluster displays 2H and Neutral
Tow Disabled
.
Note: If the indicator light and message do
not display, you must perform the procedure
again from the beginning.
Note: You may hear an audible noise as the
transfer case shifts out of its neutral
position. This is normal.
Note: If
Shift Delayed Pull Forward
displays in the instrument cluster, transfer
case gear tooth blockage is present. See
resolving the shift delayed pull forward
message instructions after this section.
5. Apply the parking brake and disconnect
the vehicle from the tow vehicle. 6. Release the parking brake, start the
engine and shift the transmission to
drive (D) to make sure the transfer
case is out of neutral (N).
7. If the transfer case does not successfully shift out of neutral (N),
set the parking brake until you can have
your vehicle serviced.
Resolving the Shift Delay Pull Forward
Message
If the instrument cluster displays
Shift
Delayed Pull Forward. You need to
perform the following steps:
1. Press and hold the brake pedal.
2. Put the transmission into neutral (N), and then start the engine.
3. With the engine running, shift the transmission to drive (D) and let the
vehicle roll forward, up to
3 ft (1 m).
You may hear an audible noise as the
transfer case shifts out of its neutral
position. This is normal.
4. Make sure the instrument cluster displays
Neutral Tow Disabled.
311
Super Duty (TFE) Canada/United States of America, enUSA, Edition date: 201909, Second-Printing Towing
Page 315 of 633

ECONOMICAL DRIVING
Your fuel economy is affected by several
things, such as how you drive, the
conditions you drive under, and how you
maintain your vehicle.
You may improve your fuel economy by
keeping these things in mind:
•
Accelerate and slow down in a smooth,
moderate fashion.
• Drive at steady speeds without
stopping.
• Anticipate stops; slowing down may
eliminate the need to stop.
• Combine errands and minimize
stop-and-go driving.
• Close the windows for high-speed
driving.
• Drive at reasonable speeds (traveling
at 55 mph [88 km/h] uses 15% less
fuel than traveling at 65 mph [105
km/h]).
• Keep the tires properly inflated and use
only the recommended size.
• Use the recommended engine oil.
• Perform all regularly scheduled
maintenance.
Avoid these actions; they reduce your fuel
economy:
• Sudden accelerations or hard
accelerations.
• Revving the engine before turning it off.
• Idle for periods longer than one minute.
• Warm up your vehicle on cold
mornings.
• Use the air conditioner or front
defroster.
• Use the speed control in hilly terrain.
• Rest your foot on the brake pedal while
driving. •
Drive a heavily loaded vehicle or tow a
trailer.
• Carry unnecessary weight
(approximately 1 mpg [0.4 km/L] is
lost for every 400 lb [180 kilogram] of
weight carried).
• Driving with the wheels out of
alignment.
Conditions
• Heavily loading a vehicle or towing a
trailer may reduce fuel economy at any
speed.
• Adding certain accessories to your
vehicle (for example bug deflectors,
rollbars, light bars, running boards, ski
racks or luggage racks) may reduce
fuel economy.
• To maximize the fuel economy, drive
with the tonneau cover installed (if
equipped).
• Using fuel blended with alcohol may
lower fuel economy.
• Fuel economy may decrease with lower
temperatures during the first 5–10 mi
(12 –16 km) of driving.
• Driving on flat terrain offers improved
fuel economy as compared to driving
on hilly terrain.
• Transmissions give their best fuel
economy when operated in the top
cruise gear and with steady pressure
on the gas pedal.
• Four-wheel-drive operation (if
equipped) is less fuel efficient than
two-wheel-drive operation.
OFF-ROAD DRIVING
(IF EQUIPPED)
Note: The following off-road driving
information applies to Tremor package
equipped vehicles only.
312
Super Duty (TFE) Canada/United States of America, enUSA, Edition date: 201909, Second-Printing Driving Hints
Page 328 of 633
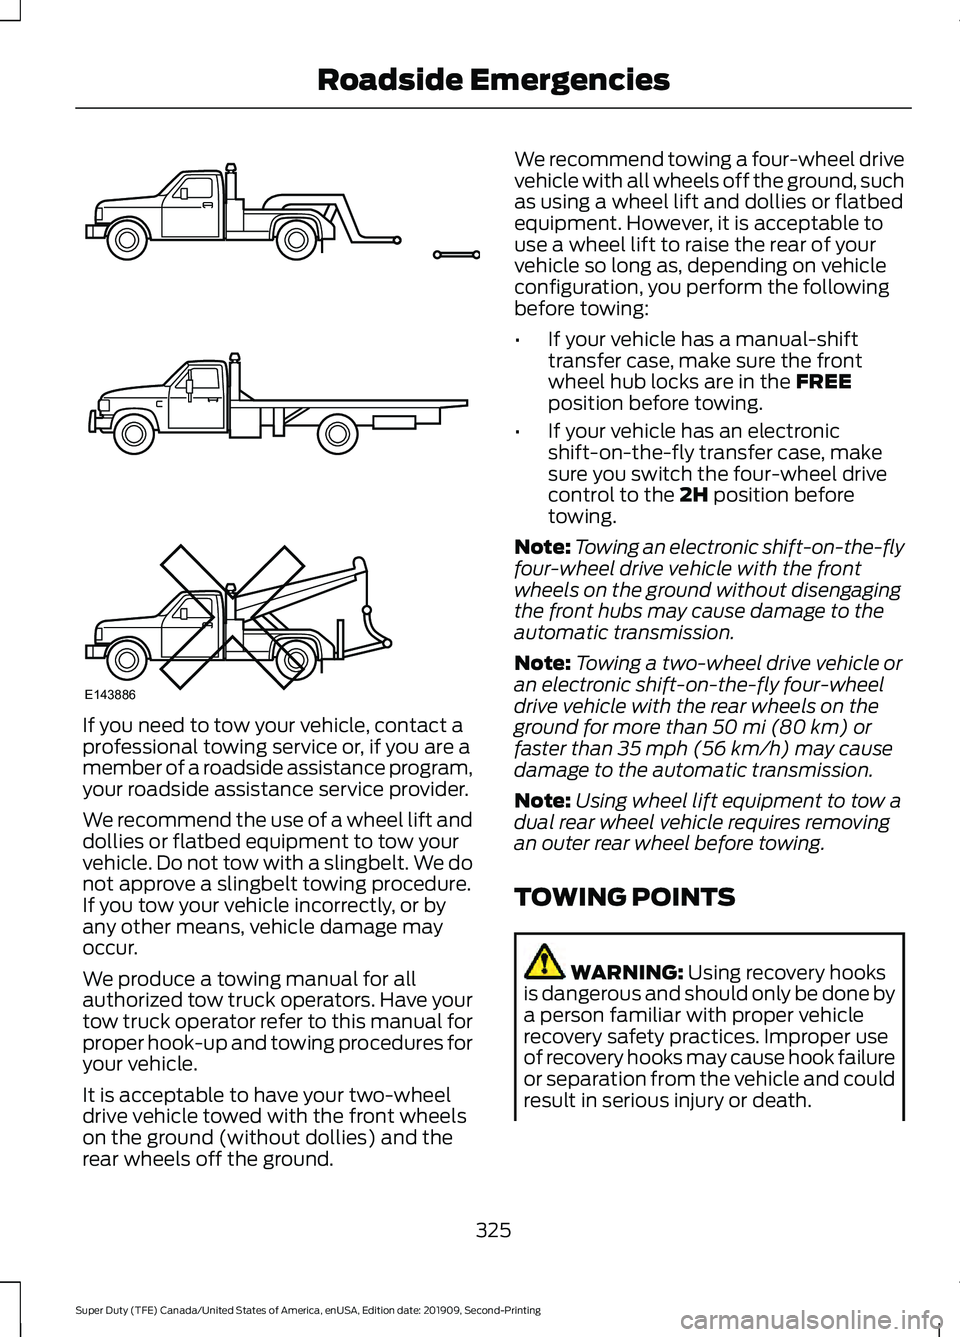
If you need to tow your vehicle, contact a
professional towing service or, if you are a
member of a roadside assistance program,
your roadside assistance service provider.
We recommend the use of a wheel lift and
dollies or flatbed equipment to tow your
vehicle. Do not tow with a slingbelt. We do
not approve a slingbelt towing procedure.
If you tow your vehicle incorrectly, or by
any other means, vehicle damage may
occur.
We produce a towing manual for all
authorized tow truck operators. Have your
tow truck operator refer to this manual for
proper hook-up and towing procedures for
your vehicle.
It is acceptable to have your two-wheel
drive vehicle towed with the front wheels
on the ground (without dollies) and the
rear wheels off the ground. We recommend towing a four-wheel drive
vehicle with all wheels off the ground, such
as using a wheel lift and dollies or flatbed
equipment. However, it is acceptable to
use a wheel lift to raise the rear of your
vehicle so long as, depending on vehicle
configuration, you perform the following
before towing:
•
If your vehicle has a manual-shift
transfer case, make sure the front
wheel hub locks are in the FREE
position before towing.
• If your vehicle has an electronic
shift-on-the-fly transfer case, make
sure you switch the four-wheel drive
control to the
2H position before
towing.
Note: Towing an electronic shift-on-the-fly
four-wheel drive vehicle with the front
wheels on the ground without disengaging
the front hubs may cause damage to the
automatic transmission.
Note: Towing a two-wheel drive vehicle or
an electronic shift-on-the-fly four-wheel
drive vehicle with the rear wheels on the
ground for more than
50 mi (80 km) or
faster than 35 mph (56 km/h) may cause
damage to the automatic transmission.
Note: Using wheel lift equipment to tow a
dual rear wheel vehicle requires removing
an outer rear wheel before towing.
TOWING POINTS WARNING:
Using recovery hooks
is dangerous and should only be done by
a person familiar with proper vehicle
recovery safety practices. Improper use
of recovery hooks may cause hook failure
or separation from the vehicle and could
result in serious injury or death.
325
Super Duty (TFE) Canada/United States of America, enUSA, Edition date: 201909, Second-Printing Roadside EmergenciesE143886
Page 338 of 633
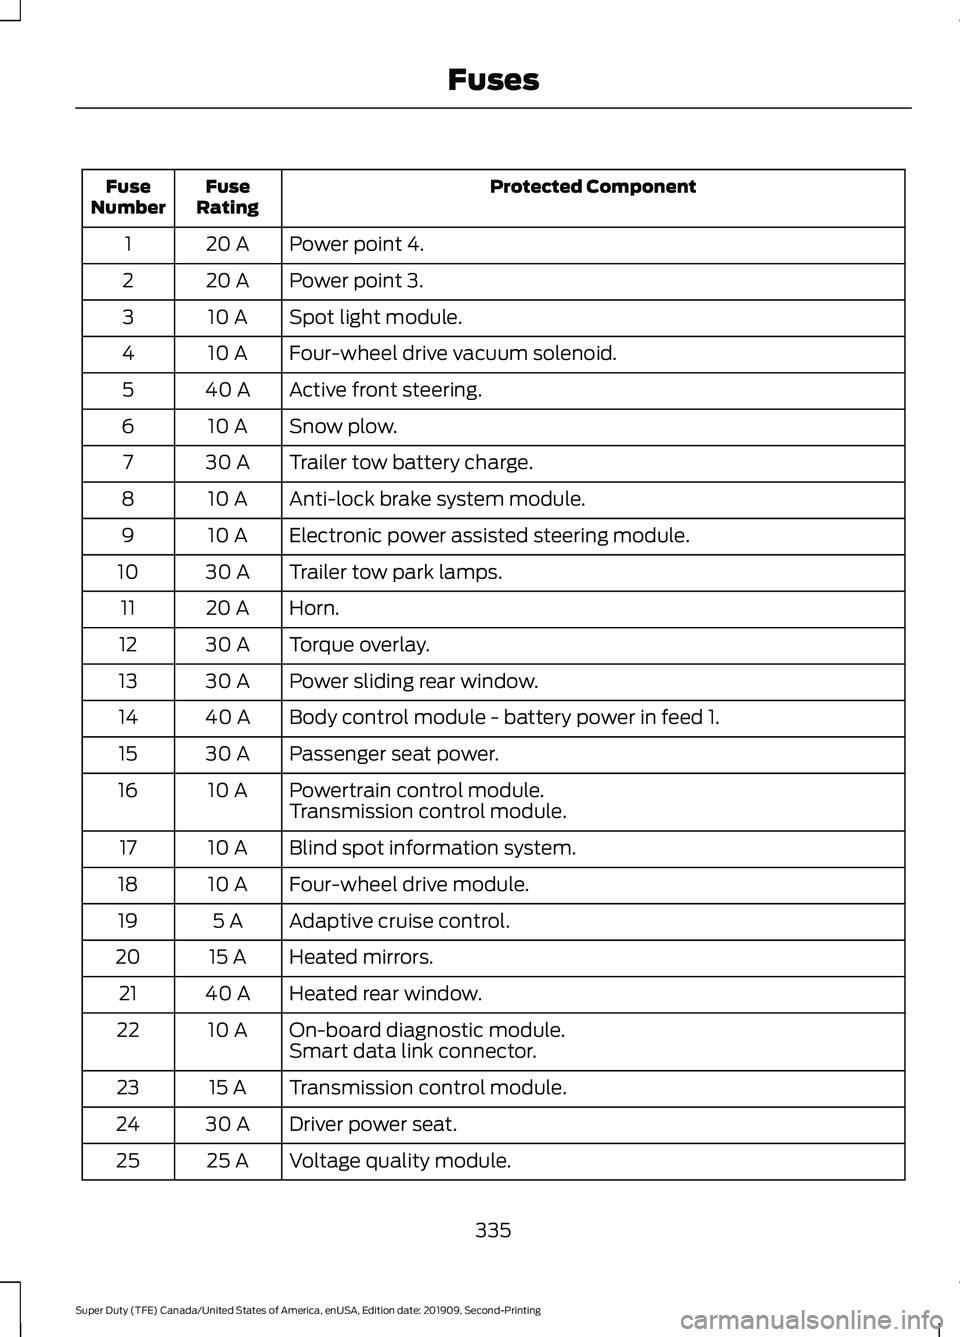
Protected Component
Fuse
Rating
Fuse
Number
Power point 4.
20 A
1
Power point 3.
20 A
2
Spot light module.
10 A
3
Four-wheel drive vacuum solenoid.
10 A
4
Active front steering.
40 A
5
Snow plow.
10 A
6
Trailer tow battery charge.
30 A
7
Anti-lock brake system module.
10 A
8
Electronic power assisted steering module.
10 A
9
Trailer tow park lamps.
30 A
10
Horn.
20 A
11
Torque overlay.
30 A
12
Power sliding rear window.
30 A
13
Body control module - battery power in feed 1.
40 A
14
Passenger seat power.
30 A
15
Powertrain control module.
10 A
16
Transmission control module.
Blind spot information system.
10 A
17
Four-wheel drive module.
10 A
18
Adaptive cruise control.
5 A
19
Heated mirrors.
15 A
20
Heated rear window.
40 A
21
On-board diagnostic module.
10 A
22
Smart data link connector.
Transmission control module.
15 A
23
Driver power seat.
30 A
24
Voltage quality module.
25 A
25
335
Super Duty (TFE) Canada/United States of America, enUSA, Edition date: 201909, Second-Printing Fuses