Page 423 of 631

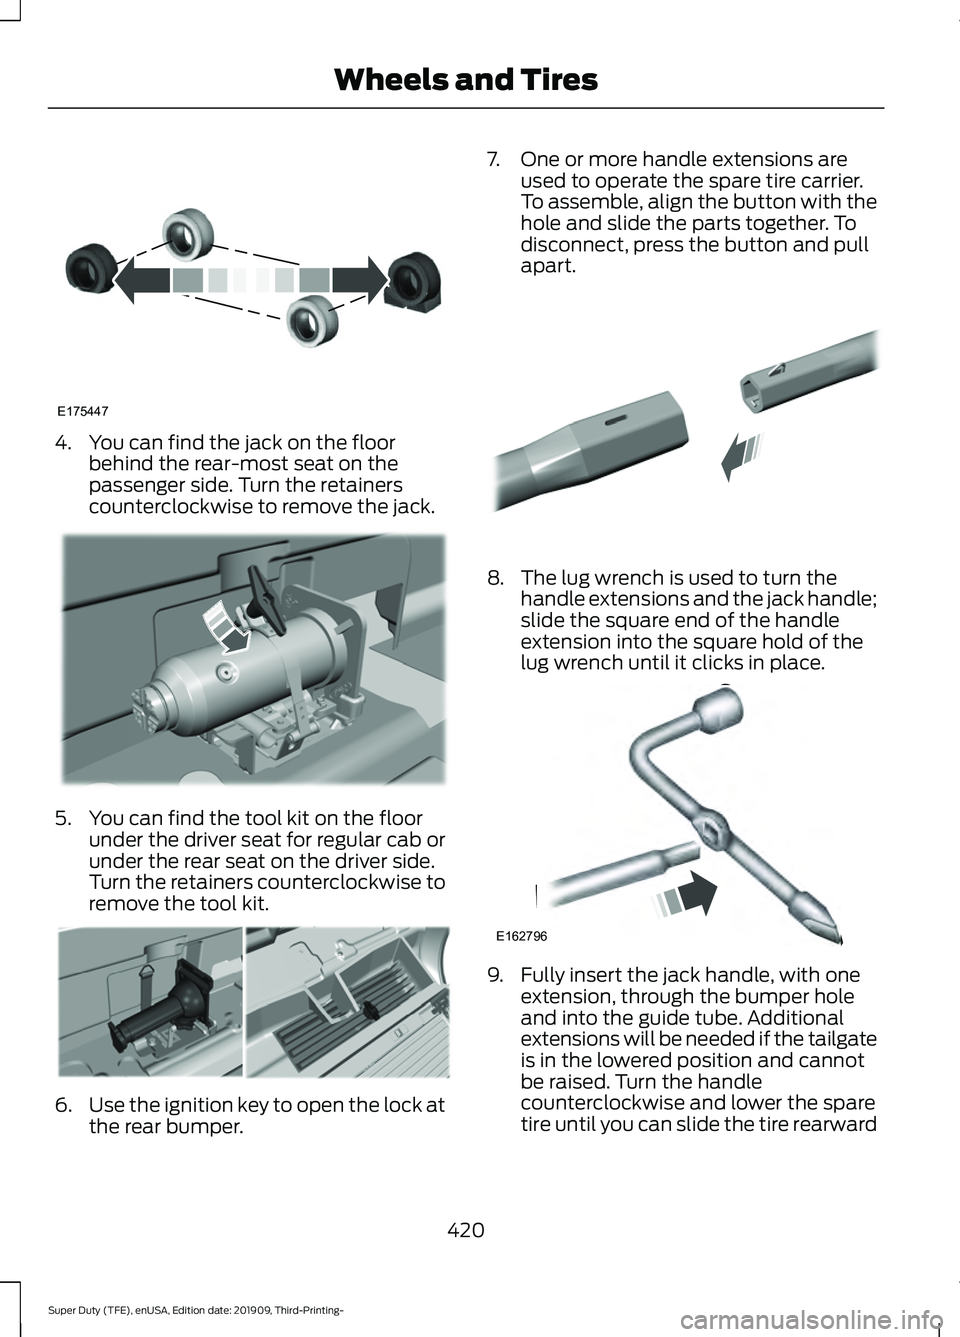
4. You can find the jack on the floor
behind the rear-most seat on the
passenger side. Turn the retainers
counterclockwise to remove the jack. 5. You can find the tool kit on the floor
under the driver seat for regular cab or
under the rear seat on the driver side.
Turn the retainers counterclockwise to
remove the tool kit. 6.
Use the ignition key to open the lock at
the rear bumper. 7. One or more handle extensions are
used to operate the spare tire carrier.
To assemble, align the button with the
hole and slide the parts together. To
disconnect, press the button and pull
apart. 8. The lug wrench is used to turn the
handle extensions and the jack handle;
slide the square end of the handle
extension into the square hold of the
lug wrench until it clicks in place. 9. Fully insert the jack handle, with one
extension, through the bumper hole
and into the guide tube. Additional
extensions will be needed if the tailgate
is in the lowered position and cannot
be raised. Turn the handle
counterclockwise and lower the spare
tire until you can slide the tire rearward
420
Super Duty (TFE), enUSA, Edition date: 201909, Third-Printing- Wheels and TiresE175447 E309424 E309795 E308882 E162796
Page 424 of 631

and the cable is slack. You will feel
some resistance when you turn the jack
handle assembly. If not replacing the
spare or flat tire to the underbody
storage area, raise the wheel retainer
up into the installed position.
10. Slide the retainer through the center of the spare tire wheel and remove
the spare tire. 11. Remove the wheel trim with the lug
wrench tip, or use the wheel trim tool
described later in this section.
12. Loosen each wheel lug nut one-half turn counterclockwise, but do not
remove them until the wheel is raised
off the ground. For dual rear wheel,
assemble the lug wrench and
extension tool together to access the
lug nuts. 13. Position the jack under the correct
jacking points according to following
pictures.
Removing Wheel Trim With Single
Wheels
1. Insert the flat end of the lug wrench between the wheel rim and the wheel
trim.
2. Carefully remove the wheel trim.
Vehicles With Dual Rear Alloy Wheels 421
Super Duty (TFE), enUSA, Edition date: 201909, Third-Printing- Wheels and TiresE310417 E309794 E338541
Page 427 of 631
Front passenger side (4x4): F-350 dual
rear wheel
Front driver side (4x4): F-350 dual rear
wheel
Note:
Make sure the jack fits onto the flat
area on the outboard side of the differential
housing. Rear: F-350 dual rear wheel
Front: F-450 and F-550
Rear: F-450 and F-550
Insert the hooked end of the jack handle
into the jack and turn the jack handle
clockwise. For hydraulic jacks, operate the
handle up-and-down until the wheel is
completely off the ground and high enough
to install the spare tire.
Note:
Hydraulic jacks have a pressure relief
valve that prevents lifting loads which
exceed the jack's rated capacity.
F-250 and F-350 Single Rear Wheel
Vehicles
424
Super Duty (TFE), enUSA, Edition date: 201909, Third-Printing- Wheels and TiresE162815 E162814 E162817 E162816 E162818
Page 428 of 631

F-350 Dual Rear Wheel Vehicles
Remove the lug nuts with the lug wrench,
replace the flat tire with the spare, making
sure the valve stem of the spare is facing
outward when replacing a front wheel. For
the rear wheel position on vehicles with
single rear wheel fitments, install the spare
with the valve stem facing outward. For
vehicles with dual rear wheels, the valve
stem of the spare must face outward when
replacing an inner wheel, but must face
inward when replacing an outboard wheel.
Reinstall the lug nuts until the wheel is
snug against the hub. Do not fully tighten
the lug nuts until the wheel has been
lowered.
Lower the vehicle completely by turning
the jack handle counterclockwise until the
vehicle is completely lowered. Note:
For F-350 Dual Rear Wheel, F-450
and F-550 Vehicles, insert the notched end
of the jack handle to the release valve, open
the release valve slightly by turning the
handle counterclockwise. Stop turning the
release valve when vehicle start to lower.
Make sure to close the valve when you
completely lower your vehicle.
F-350 Dual Rear Wheel, F-450 and
F-550 Vehicles. Installing the lug Nuts and Ornaments
8-lug nut torque sequence
425
Super Duty (TFE), enUSA, Edition date: 201909, Third-Printing- Wheels and TiresE162811 E162819 E162812 E161441
13
4
27
6
5
8
Page 430 of 631

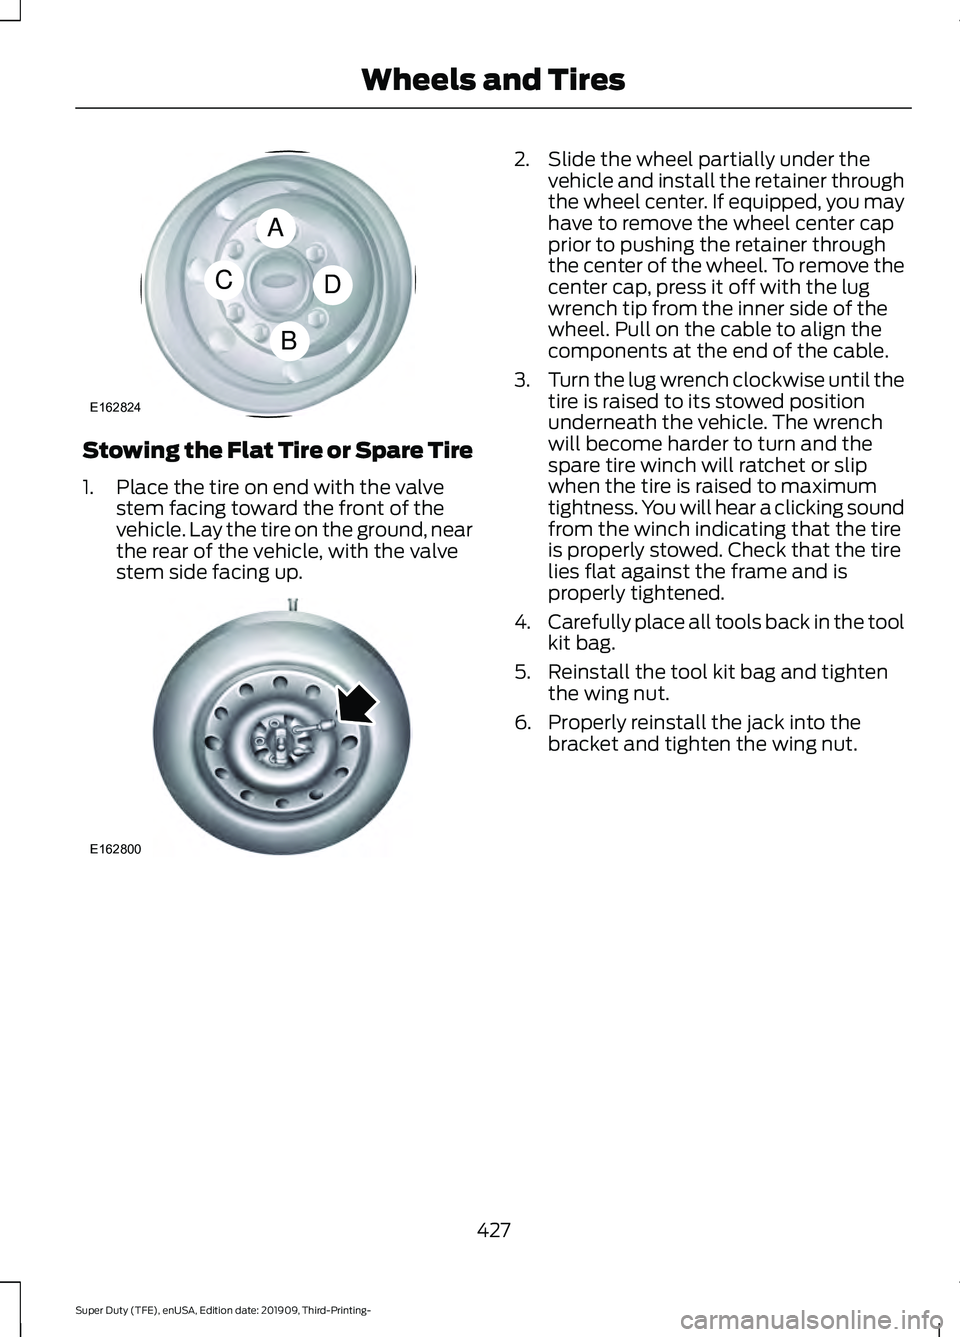
Stowing the Flat Tire or Spare Tire
1. Place the tire on end with the valve
stem facing toward the front of the
vehicle. Lay the tire on the ground, near
the rear of the vehicle, with the valve
stem side facing up. 2. Slide the wheel partially under the
vehicle and install the retainer through
the wheel center. If equipped, you may
have to remove the wheel center cap
prior to pushing the retainer through
the center of the wheel. To remove the
center cap, press it off with the lug
wrench tip from the inner side of the
wheel. Pull on the cable to align the
components at the end of the cable.
3. Turn the lug wrench clockwise until the
tire is raised to its stowed position
underneath the vehicle. The wrench
will become harder to turn and the
spare tire winch will ratchet or slip
when the tire is raised to maximum
tightness. You will hear a clicking sound
from the winch indicating that the tire
is properly stowed. Check that the tire
lies flat against the frame and is
properly tightened.
4. Carefully place all tools back in the tool
kit bag.
5. Reinstall the tool kit bag and tighten the wing nut.
6. Properly reinstall the jack into the bracket and tighten the wing nut.
427
Super Duty (TFE), enUSA, Edition date: 201909, Third-Printing- Wheels and TiresA
C
B
D
E162824 E162800
Page 446 of 631
Materials
Specification
Name
WSS-M2C938-AMERCON® LV,
Motorcraft® MERCON® LV Automatic Transmission
Fluid(U.S.)
Motorcraft® MERCON® LV Automatic Transmission
Fluid / Huile pour boîte automatique MERCON® LV
Motorcraft®(Canada)
XT-10-QLVC(U.S.)
CXT-10-LV6(Canada)
Locks
Materials Specification
Name
-
Motorcraft® Penetrating and Lock Lubricant(U.S.)
Motorcraft® Penetrating Fluid / Liquide dégrippant
Motorcraft®(Canada)
XL-1(U.S.)
CXC-51-A(Canada)
Transfer Case
Capacities Quantity
Variant
1.9 qt (1.8 L)
All.
Materials Specification
Name
WSS-M2C938-AMERCON® LV,
Motorcraft® MERCON® LV Automatic Transmission
Fluid(U.S.)
Motorcraft® MERCON® LV Automatic Transmission
Fluid / Huile pour boîte automatique MERCON® LV
Motorcraft®(Canada)
XT-10-QLVC(U.S.)
CXT-10-LV6(Canada)
443
Super Duty (TFE), enUSA, Edition date: 201909, Third-Printing- Capacities and Specifications
Page 447 of 631
Front Axle
Capacities
Quantity
Variant
2.75 qt (2.6 L)
Four wheel drive.
Materials Specification
Name
WSP-M2C197-A
Motorcraft® SAE 80W-90 Premium Rear Axle
Lubricant(U.S.)
Motorcraft® SAE 80W-90 Premium Axle Lubricant
/ Lubrifiant pour essieux de très haute qualité SAE
80W-90 Motorcraft®(Canada)
XY-80W90-QL(U.S.)
CXY-80W90-1L(Canada)
Rear Axle - 10.5
Capacities Quantity
Variant
3.3–3.5 qt (3.1– 3.3 L)
With Electronic Locking Differential.
3.5–3.6 qt (3.3– 3.4 L)
Without Electronic Locking Differential.
Materials Specification
Name
WSS-M2C942-A
Motorcraft® SAE 75W-85 Premium Synthetic
Hypoid Gear Lubricant(U.S.)
Motorcraft® SAE 75W-85 Premium Synthetic
Hypoid Gear Lubricant / Huile synthétique de haute
qualité pour engrenages hypoïdes SAE 75W-85
Motorcraft®(Canada)
XY-75W85-QL(U.S. & Canada)
444
Super Duty (TFE), enUSA, Edition date: 201909, Third-Printing- Capacities and Specifications
Page 449 of 631

Materials
Specification
Name
WSS-M14P19-A
Motorcraft® Premium Windshield Wash Concen-
trate with Bitterant(U.S.)
Motorcraft® Premium Quality Windshield Washer
Fluid / Liquide lave-glace de haute qualité Motor-
craft®(Canada)
ZC-32-B2(U.S.)
CXC-37-A/B/D/F(Canada)
CAPACITIES AND
SPECIFICATIONS - 6.7L DIESEL
Use oil and fluid that meets the defined
specification and viscosity grade.
If you do not use oil and fluid that meets
the defined specification and viscosity
grade, it could result in:
• Component damage not covered by
the vehicle warranty.
• Longer engine cranking periods.
• Increased emission levels.
• Reduced engine performance. •
Reduced fuel economy.
• Reduced brake performance.
Note: We recommend an engine block
heater at temperatures below – 10°F
(– 23°C).
Air Conditioning System WARNING: The air conditioning
refrigerant system contains refrigerant
under high pressure. Only qualified
personnel should service the air
conditioning refrigerant system. Opening
the air conditioning refrigerant system
can cause personal injury.
Capacities Refrigerant Oil
Refrigerant
Variant
3.7 fl oz (110 ml)
27 oz (0.765 kg)
All.
446
Super Duty (TFE), enUSA, Edition date: 201909, Third-Printing- Capacities and Specifications