2020 FORD EXPLORER instrument panel
[x] Cancel search: instrument panelPage 143 of 555
Note:
Do not place objects under the front
seats as this may interfere with the airflow
to the rear seats.
Note: Remove any snow, ice or leaves from
the air intake area at the base of the
windshield.
Note: To improve the time to reach a
comfortable temperature in hot weather,
drive with the windows open until you feel
cold air through the air vents.
Automatic Climate Control
Note: Adjusting the settings when your
vehicle interior is extremely hot or cold is
not necessary. Automatic mode is best
recommended to maintain set temperature.
Note: The system adjusts to heat or cool
the interior to the temperature you select
as quickly as possible.
Note: For the system to function efficiently,
the instrument panel and side air vents
should be fully open.
Note: If you select AUTO during cold
outside temperatures, the system directs
air flow to the windshield and side window
air vents. In addition, the blower motor may
run at a slower speed until the engine warms
up.
Note: If you select
AUTO during hot
temperatures and the inside of the vehicle
is hot, the system uses recirculated air to
maximize interior cooling. Blower motor
speed may also reduce until the air cools.
Quickly Heating the Interior
1. Press and release
AUTO.
2. Adjust the temperature function to the
setting you prefer.
Recommended Settings for
Heating
1. Press and release
AUTO. 2.
Adjust the temperature function to the
setting you prefer. Use
72°F (22°C) as
a starting point, then adjust the setting
as necessary.
Quickly Cooling the Interior
1. Press and release
MAX A/C.
Recommended Settings for
Cooling
1. Press and release
AUTO.
2. Adjust the temperature function to the
setting you prefer. Use
72°F (22°C) as
a starting point, then adjust the setting
as necessary.
Defogging the Side Windows in
Cold Weather
1. Press and release defrost or maximum
defrost.
2. Adjust the temperature control to the setting you prefer. Use
72°F (22°C) as
a starting point, then adjust the setting
as necessary.
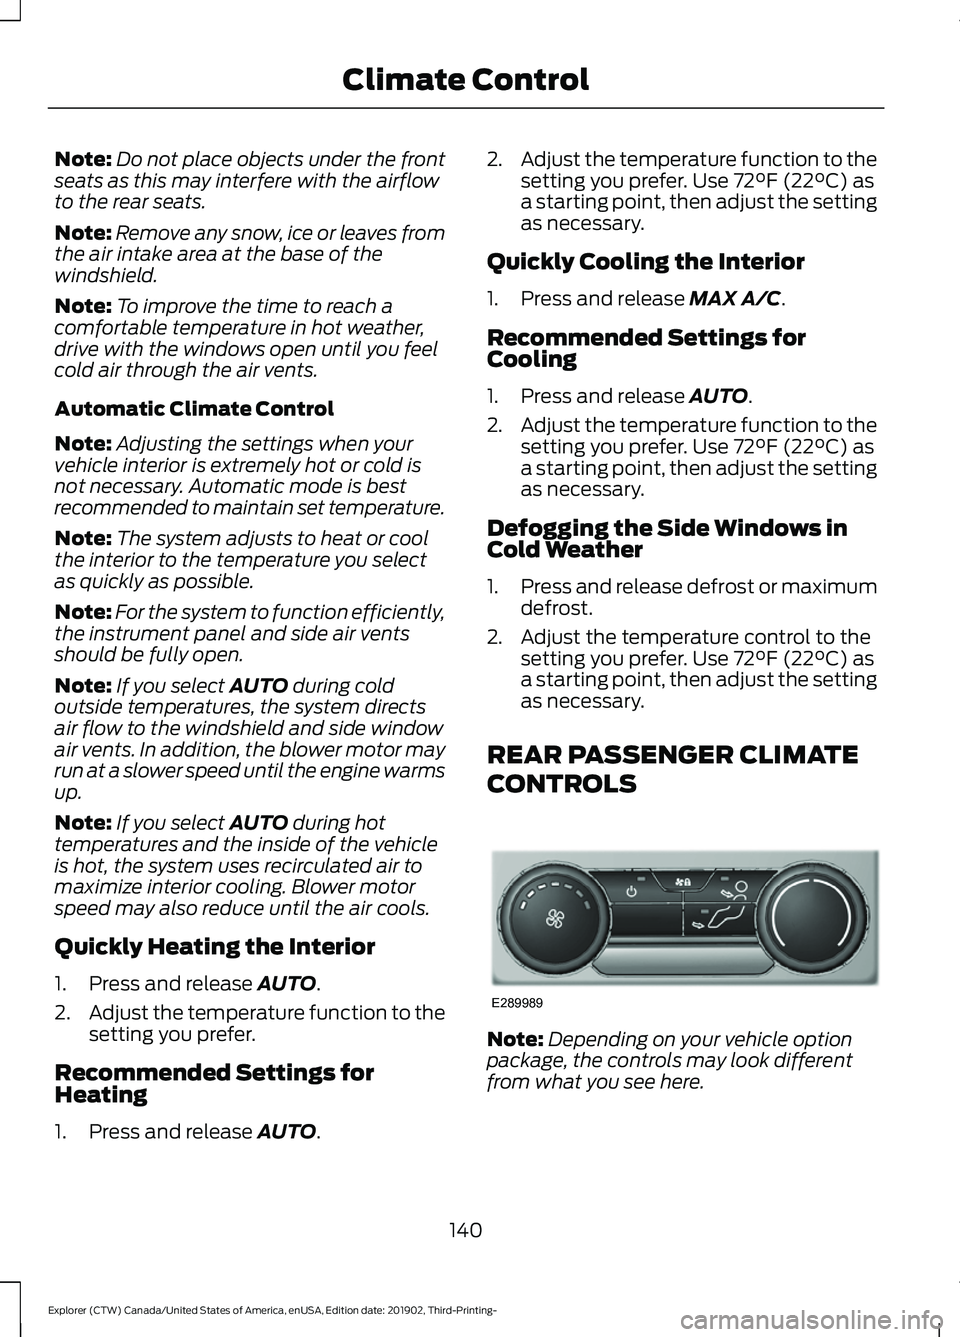
REAR PASSENGER CLIMATE
CONTROLS Note:
Depending on your vehicle option
package, the controls may look different
from what you see here.
140
Explorer (CTW) Canada/United States of America, enUSA, Edition date: 201902, Third-Printing- Climate ControlE289989
Page 170 of 555
12 Volt DC Power Point
WARNING: Do not plug optional
electrical accessories into the cigar
lighter socket. Incorrect use of the cigar
lighter can cause damage not covered
by the vehicle warranty, and can result
in fire or serious injury.
Note: When you switch the ignition on, you
can use the socket to power 12 volt
appliances with a maximum current rating
of 15 amps.
Note: If the power supply does not work
after you switch the ignition off, switch the
ignition on.
Note: Do not hang any accessory from the
accessory plug.
Note: Do not use the power point over the
vehicle capacity of 12 volt DC 180 watts or
a fuse may blow.
Note: Always keep the power point caps
closed when not in use.
Do not insert objects other than an
accessory plug into the power point. This
damages the power point and may blow
the fuse.
Run the vehicle for full capacity use of the
power point.
To prevent the battery from running out of
charge:
• Do not use the power point longer than
necessary when the vehicle is not
running.
• Do not leave devices plugged in
overnight or when you park your vehicle
for extended periods. USB Port and Power Point
Locations
USB Ports and Power Points may be in the
following locations:
•
On the lower instrument panel.
• Inside the center console.
• On the front of the center console.
• On the rear of the center console.
• In the cargo area.
• On the passenger side floor panel.
• 3rd row on the quarter trim panels.
Note: Some of the USB ports may not have
data transfer capabilities.
Note: Incorrect use of the USB ports can
cause damage not covered by the vehicle
warranty.
110 Volt AC Power Point
(If Equipped) WARNING:
Do not keep electrical
devices plugged in the power point
whenever the device is not in use. Do not
use any extension cord with the 110 volt
AC power point, since it will defeat the
safety protection design. Doing so may
cause the power point to overload due
to powering multiple devices that can
reach beyond the 150 watt load limit and
could result in fire or serious injury.
Note: The power point turns off when you
switch off the ignition, when the vehicle is
not in accessory mode or when the battery
voltage drops below 11 volts.
You can use the power point for electric
devices that require up to 150 watts. It is
on the rear of the center console.
167
Explorer (CTW) Canada/United States of America, enUSA, Edition date: 201902, Third-Printing- Auxiliary Power Points
Page 172 of 555
Note:
This device controls the rate of
charge, or charging power. During charging,
the device and the charger may heat up, this
is normal. If the battery gets hotter than
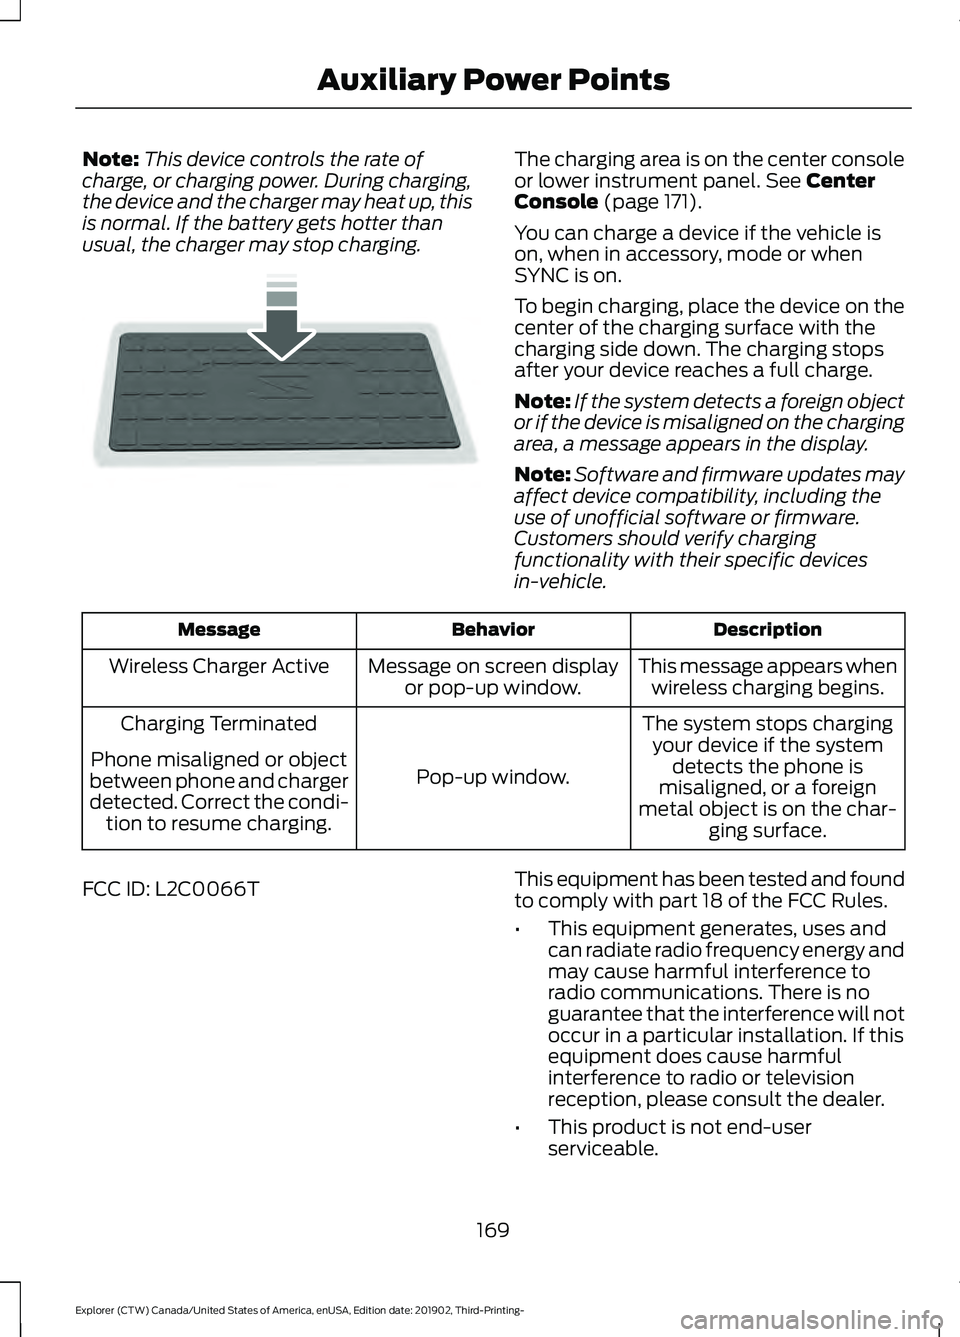
usual, the charger may stop charging. The charging area is on the center console
or lower instrument panel. See Center
Console (page 171).
You can charge a device if the vehicle is
on, when in accessory, mode or when
SYNC is on.
To begin charging, place the device on the
center of the charging surface with the
charging side down. The charging stops
after your device reaches a full charge.
Note: If the system detects a foreign object
or if the device is misaligned on the charging
area, a message appears in the display.
Note: Software and firmware updates may
affect device compatibility, including the
use of unofficial software or firmware.
Customers should verify charging
functionality with their specific devices
in-vehicle. Description
Behavior
Message
This message appears whenwireless charging begins.
Message on screen display
or pop-up window.
Wireless Charger Active
The system stops chargingyour device if the system detects the phone is
misaligned, or a foreign
metal object is on the char- ging surface.
Pop-up window.
Charging Terminated
Phone misaligned or object
between phone and charger
detected. Correct the condi- tion to resume charging.
FCC ID: L2C0066T This equipment has been tested and found
to comply with part 18 of the FCC Rules.
•
This equipment generates, uses and
can radiate radio frequency energy and
may cause harmful interference to
radio communications. There is no
guarantee that the interference will not
occur in a particular installation. If this
equipment does cause harmful
interference to radio or television
reception, please consult the dealer.
• This product is not end-user
serviceable.
169
Explorer (CTW) Canada/United States of America, enUSA, Edition date: 201902, Third-Printing- Auxiliary Power PointsE250812
Page 197 of 555
2.
Press the button on the left side of the
instrument panel to open the fuel filler
door. The fuel filler door can take up to
15 seconds to open before you can
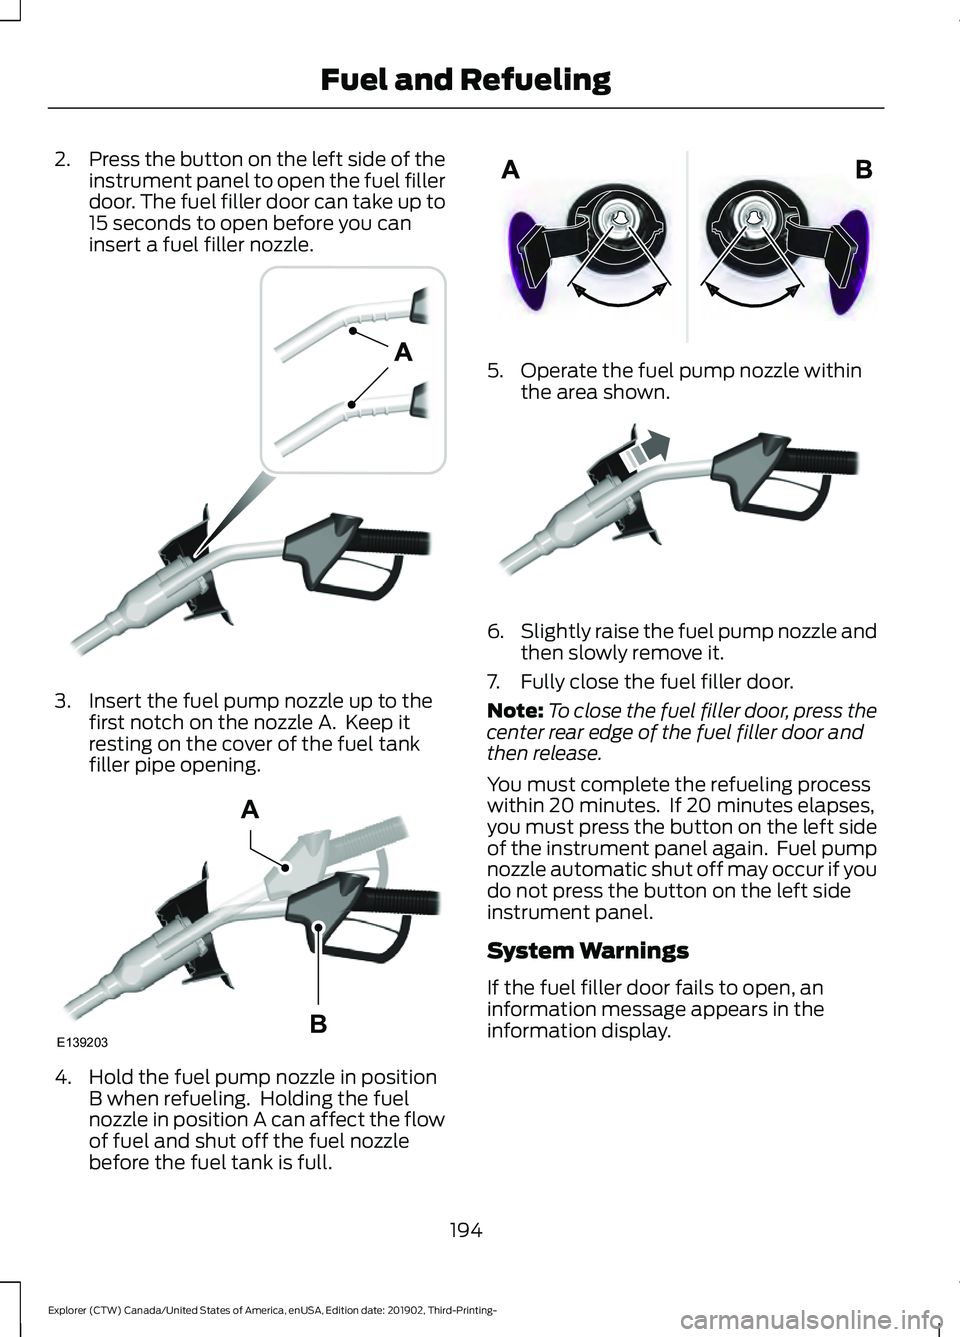
insert a fuel filler nozzle. 3. Insert the fuel pump nozzle up to the
first notch on the nozzle A. Keep it
resting on the cover of the fuel tank
filler pipe opening. 4. Hold the fuel pump nozzle in position
B when refueling. Holding the fuel
nozzle in position A can affect the flow
of fuel and shut off the fuel nozzle
before the fuel tank is full. 5. Operate the fuel pump nozzle within
the area shown. 6.
Slightly raise the fuel pump nozzle and
then slowly remove it.
7. Fully close the fuel filler door.
Note: To close the fuel filler door, press the
center rear edge of the fuel filler door and
then release.
You must complete the refueling process
within 20 minutes. If 20 minutes elapses,
you must press the button on the left side
of the instrument panel again. Fuel pump
nozzle automatic shut off may occur if you
do not press the button on the left side
instrument panel.
System Warnings
If the fuel filler door fails to open, an
information message appears in the
information display.
194
Explorer (CTW) Canada/United States of America, enUSA, Edition date: 201902, Third-Printing- Fuel and RefuelingE139202 E139203
A
B E206912 E119081
Page 218 of 555
When you release the accelerator pedal or
press the brake pedal, the brake controller
automatically detects the amount of
deceleration requested and optimizes how
much of the deceleration will be produced
by regenerative braking. The remaining
portion is generated by standard friction
braking. When the battery is almost fully
charged, the amount of regenerative
braking is limited to avoid overcharging,
and the requested deceleration is
produced by standard friction braking
alone.
Regenerative braking does not take the
place of the standard friction brakes; it only
assists them. Regenerative braking has
also been designed to interact with the
anti-lock brake system. Regenerative
braking is disabled when the anti-lock
brake system is activated or the battery is
fully charged.
HINTS ON DRIVING WITH
ANTI-LOCK BRAKES
The anti-lock braking system does not
eliminate the risks when:
•
You drive too closely to the vehicle in
front of you.
• Your vehicle is hydroplaning.
• You take corners too fast.
• The road surface is poor.
Note: If the system activates, the brake
pedal may pulse and may travel further.
Maintain pressure on the brake pedal. You
may also hear a noise from the system. This
is normal. ELECTRIC PARKING BRAKE WARNING: Always fully apply the
parking brake and make sure you shift
into park (P). Failure to follow this
instruction could result in personal injury
or death. WARNING:
If you drive extended
distances with the parking brake applied,
you could cause damage to the brake
system. WARNING:
The electric parking
brake does not operate if the vehicle
battery is running out of charge.
Your vehicle has an electric parking brake.
You operate it with a switch instead of a
lever. The switch is on the center console
or to the left-hand side of the steering
wheel, on the lower part of the instrument
panel.
Note: The electric parking brake makes
noises during operation. This is normal.
Applying the Electric Parking
Brake Pull the switch upward.
The red warning lamp flashes
during operation and illuminates
when the parking brake is
applied. Note:
It remains illuminated for a short
period of time after you switch the ignition
off.
215
Explorer (CTW) Canada/United States of America, enUSA, Edition date: 201902, Third-Printing- BrakesE267156 E270480
Page 303 of 555

Vehicles Sold in Canada: Getting
Roadside Assistance
To fully assist you should you have a
vehicle concern, Ford Motor Company of
Canada, Limited offers a complimentary
roadside assistance program. This program
is eligible within Canada or the continental
United States.
The service is available 24 hours a day,
seven days a week.
This program is separate from the New
Vehicle Limited Warranty, but the coverage
is concurrent with the powertrain coverage
period of your vehicle. Canadian roadside
coverage and benefits may differ from the
U.S. coverage.
If you require more information, please call
us in Canada at 1-800-665-2006, or visit
our website at www.ford.ca.
HAZARD FLASHERS
Note:
The hazard flashers operate when
the ignition is in any position, or if the key is
not in the ignition. If used when the vehicle
is not running, the battery loses charge. As
a result, there may be insufficient power to
restart your vehicle. The flasher control is on the
instrument panel. Use your
hazard flashers when your
vehicle is creating a safety hazard for other
motorists.
• Press the flasher control and all front
and rear direction indicators flash.
• Press the button again to switch them
off. FUEL SHUTOFF WARNING: If your vehicle has been
involved in a crash, have the fuel system
checked. Failure to follow this instruction
could result in fire, personal injury or
death.
Note: When you try to restart your vehicle
after a fuel shutoff, the vehicle makes sure
that various systems are safe to restart.
Once the vehicle determines the systems
are safe, then the vehicle allows you to
restart.
Note: In the event that your vehicle does
not restart after your third attempt, contact
a qualified technician.
The fuel pump shutoff stops the flow of
fuel to the engine in the event of a
moderate to severe crash. Not every
impact causes a shutoff.
Should your vehicle shut off after a crash,
you may restart your vehicle.
If your vehicle has a key system:
1. Switch off the ignition.
2. Switch to start position.
3. Switch off the ignition.
4. Switch on the ignition to re-enable the
fuel pump.
5. If the vehicle does not start, repeat steps 1 through 4.
If your vehicle has a push button start
system:
1. Press START/STOP to switch off your
vehicle.
2. Press the brake pedal and START/STOP
to switch on your
vehicle.
3. Remove your foot from the brake pedal
and press
START/STOP to switch off
your vehicle.
300
Explorer (CTW) Canada/United States of America, enUSA, Edition date: 201902, Third-Printing- Roadside Emergencies
Page 321 of 555

Protected Component
Fuse Rating
Fuse or Relay
Number
USB smart charger 2.
5A
139
Traffic cam.
5A
142
Battery electronic control module.
15A
146
Left-hand headlamp module.
30A
148
Right-hand headlamp module.
30A
149
Not used (spare).
40A
150
Transmission control module (hybrid
electric vehicle).
25A
155
DC/DC converter (hybrid electric vehicle).
15A
159
Not used (spare).
10A
160
Low voltage service disconnect.
20A
168
Coolant pump (hybrid electric vehicle).
10A
169
Traction battery coolant pump (hybrid
electric vehicle).
10A
170
Pedestrian sounder (hybrid electric
vehicle).
Not used (spare).
10A
177
Note: Spare fuse amperage may vary.
Passenger Compartment Fuse
Panel
The fuse panel is under the instrument
panel to the left of the steering column. Note:
It may be easier to access the fuse
panel if you remove the finish trim piece.
318
Explorer (CTW) Canada/United States of America, enUSA, Edition date: 201902, Third-Printing- Fuses
Page 323 of 555

Protected Component
Fuse Rating
Fuse or Relay
Number
Rear climate control.
Not used.
—
10
Not used.
—
11
Climate control head.
7.5A
12
Gear shift module.
Steering column control module.
7.5A
13
Smart datalink connector.
Instrument cluster.
Not used (spare).
15A
14
SYNC.
15A
15
Integrated control panel.
Not used.
—
16
Headlamp control module.
7.5A
17
Not used (spare).
7.5A
18
Headlamp switch.
5A
19
Push button ignition switch.
Ignition switch.
5A
20
Telematics control unit module.
Key inhibit solenoid lock.
Not used.
5A
21
Not used (spare).
5A
22
Not used (spare).
30A
23
Moonroof.
30A
24
Not used (spare).
20A
25
Not used (spare).
30A
26
Not used (spare).
30A
27
Not used (spare).
30A
28
Not used (spare).
15A
29
Trailer brake connector.
5A
30
320
Explorer (CTW) Canada/United States of America, enUSA, Edition date: 201902, Third-Printing- Fuses