2020 FORD EXPLORER buttons
[x] Cancel search: buttonsPage 167 of 555
Gate Operator / Canadian
Programming
Canadian radio-frequency laws require
transmitter signals to
“time-out” (or quit)
after several seconds of transmission –
which may not be long enough for
HomeLink to pick up the signal during
programming. Similar to this Canadian law,
some U.S. gate operators are designed to
“time-out” in the same manner.
Note: If programming a garage door opener
or gate operator, it is advised to unplug the
device during the “cycling” process to
prevent possible overheating.
1. Press and hold the HomeLink button while you press and release, every two
seconds, your hand-held transmitter
until the HomeLink indicator light
changes from a slow to a rapidly
blinking light.
2. Release both the HomeLink and hand-held transmitter buttons.
3. Continue programing HomeLink. See In-Vehicle Programming
.
Erasing the Function Button Codes
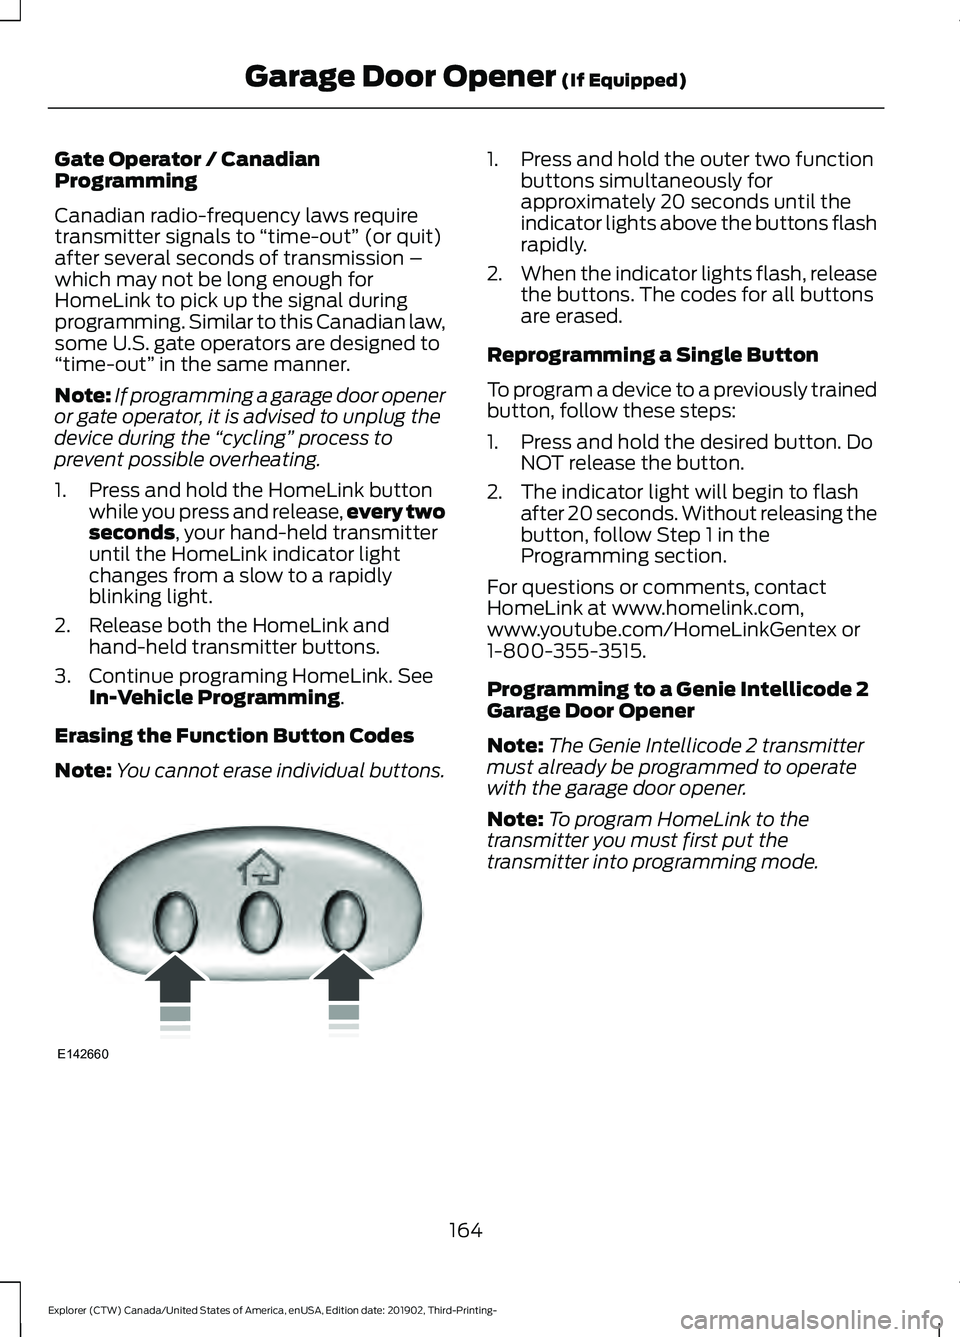
Note: You cannot erase individual buttons. 1. Press and hold the outer two function
buttons simultaneously for
approximately 20 seconds until the
indicator lights above the buttons flash
rapidly.
2. When the indicator lights flash, release
the buttons. The codes for all buttons
are erased.
Reprogramming a Single Button
To program a device to a previously trained
button, follow these steps:
1. Press and hold the desired button. Do NOT release the button.
2. The indicator light will begin to flash after 20 seconds. Without releasing the
button, follow Step 1 in the
Programming section.
For questions or comments, contact
HomeLink at www.homelink.com,
www.youtube.com/HomeLinkGentex or
1-800-355-3515.
Programming to a Genie Intellicode 2
Garage Door Opener
Note: The Genie Intellicode 2 transmitter
must already be programmed to operate
with the garage door opener.
Note: To program HomeLink to the
transmitter you must first put the
transmitter into programming mode.
164
Explorer (CTW) Canada/United States of America, enUSA, Edition date: 201902, Third-Printing- Garage Door Opener
(If Equipped)E142660
Page 168 of 555
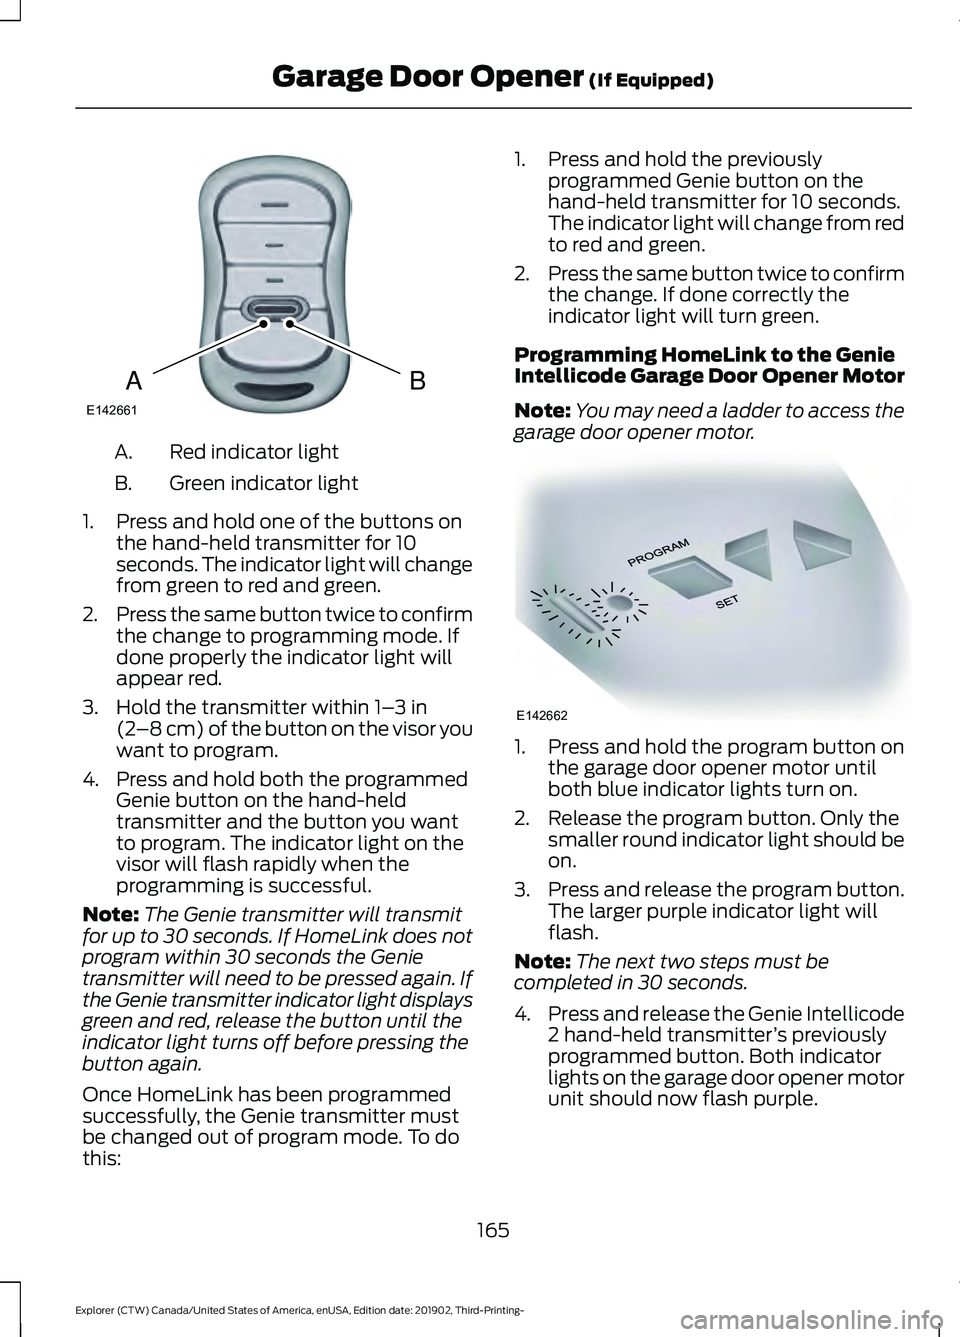
Red indicator light
A.
Green indicator light
B.
1. Press and hold one of the buttons on the hand-held transmitter for 10
seconds. The indicator light will change
from green to red and green.
2. Press the same button twice to confirm
the change to programming mode. If
done properly the indicator light will
appear red.
3. Hold the transmitter within 1– 3 in
(2 –8 cm) of the button on the visor you
want to program.
4. Press and hold both the programmed Genie button on the hand-held
transmitter and the button you want
to program. The indicator light on the
visor will flash rapidly when the
programming is successful.
Note: The Genie transmitter will transmit
for up to 30 seconds. If HomeLink does not
program within 30 seconds the Genie
transmitter will need to be pressed again. If
the Genie transmitter indicator light displays
green and red, release the button until the
indicator light turns off before pressing the
button again.
Once HomeLink has been programmed
successfully, the Genie transmitter must
be changed out of program mode. To do
this: 1. Press and hold the previously
programmed Genie button on the
hand-held transmitter for 10 seconds.
The indicator light will change from red
to red and green.
2. Press the same button twice to confirm
the change. If done correctly the
indicator light will turn green.
Programming HomeLink to the Genie
Intellicode Garage Door Opener Motor
Note: You may need a ladder to access the
garage door opener motor. 1. Press and hold the program button on
the garage door opener motor until
both blue indicator lights turn on.
2. Release the program button. Only the smaller round indicator light should be
on.
3. Press and release the program button.
The larger purple indicator light will
flash.
Note: The next two steps must be
completed in 30 seconds.
4. Press and release the Genie Intellicode
2 hand-held transmitter ’s previously
programmed button. Both indicator
lights on the garage door opener motor
unit should now flash purple.
165
Explorer (CTW) Canada/United States of America, enUSA, Edition date: 201902, Third-Printing- Garage Door Opener
(If Equipped)BAE142661 E142662
Page 169 of 555
5. Press and hold the previously
programmed button on the visor for 2
seconds. Repeat this step up to 3 times
until the garage door moves.
Programming is now complete.
Clearing a HomeLink Device
To erase programming from the three
HomeLink buttons press and hold the two
outer HomeLink buttons until the indicator
light begins to flash. The indicator light will
begin flashing in 10 to 20 seconds, at which
time both buttons should be released.
Programming has now been erased, and
the indicator light should blink slowly to
indicate the device is in train mode when
any of the three HomeLink buttons are
pressed.
FCC and RSS-210 Industry Canada
Compliance
This device complies with Part 15 of the
FCC Rules and with RSS-210 of Industry
Canada. Operation is subject to the
following two conditions: (1) this device
may not cause harmful interference, and
(2) this device must accept any
interference received, including
interference that may cause undesired
operation. WARNING: Changes or
modifications not expressively approved
by the party responsible for compliance
could void the user's authority to operate
the equipment. The term "IC:" before the
radio certification number only signifies
that Industry Canada technical
specifications were met. This equipment complies with FCC
radiation exposure limits set forth for an
uncontrolled environment. End Users must
follow the specific operating instructions
for satisfying RF exposure compliance. This
transmitter must be at least
8 in (20 cm)
from the user and must not be co-located
or operating in conjunction with any other
antenna or transmitter.
The term “IC:” before the
certification/registration number only
signifies that Industry Canada technical
specifications were met.
166
Explorer (CTW) Canada/United States of America, enUSA, Edition date: 201902, Third-Printing- Garage Door Opener
(If Equipped)
Page 206 of 555
The electric parking brake may apply when
you shift to park (P) without the brake
pedal fully pressed. The electric parking
brake applies when you shift to park (P)
on large slopes. The electric parking brake
releases with the drive away release
function or manually as described in the
Releasing the Electric Parking Brake
section. See Electric Parking Brake
(page 215).
Note: A warning tone sounds if you open
the driver door and you have not shifted the
transmission selector to park (P).
Reverse (R)
With the transmission selector in reverse
(R), your vehicle moves backward. Always
come to a complete stop before shifting
into and out of reverse (R).
Neutral (N)
With the transmission selector in neutral
(N), you can start your vehicle and it is free
to roll. Hold the brake pedal down when in
this position.
Drive (D)
Drive (D) is the normal driving position for
the best fuel economy and smoothness.
Shift the transmission selector to drive (D)
to allow your vehicle to move forward and
shift automatically through the forward
gears.
The transmission shifts to the appropriate
gear for optimum performance based on
ambient temperature, road slope, vehicle
load and your input. Manual Mode (M) - Vehicles with
Paddle Shifters
With the transmission selector in manual
(M), the driver can change gears up or
down. After selecting the Manual (M)
button while the transmission range
selector is in Drive (D) position you now
have control of selecting the gear you
desire using shift buttons on the steering
wheel. See Understanding your SelectShift
Automatic
™ transmission later in this
section.
To exit manual mode, push the manual
(M) button on your transmission selector.
Low (L) - Vehicles without Paddle
Shifters
With the transmission selector in low (L),
your vehicle provides maximum engine
braking. You can shift the transmission into
low (L) at any vehicle speed. The intent is
not for use under extended or normal
driving conditions, and results in lower fuel
economy.
Automatic Return to Park
Note: This feature does not operate when
your vehicle is in Stay in Neutral mode or
neutral tow.
The transmission returns to park (P) if any
of the following occur:
• You switch the ignition off.
• Your seatbelt is not fastened, and you
open the driver door.
• The driver door is open, and you
unfasten your seatbelt.
If you switch the ignition off when your
vehicle is moving, your vehicle shifts into
neutral (N) until it slows down enough to
shift into park (P).
203
Explorer (CTW) Canada/United States of America, enUSA, Edition date: 201902, Third-Printing- Transmission
Page 270 of 555
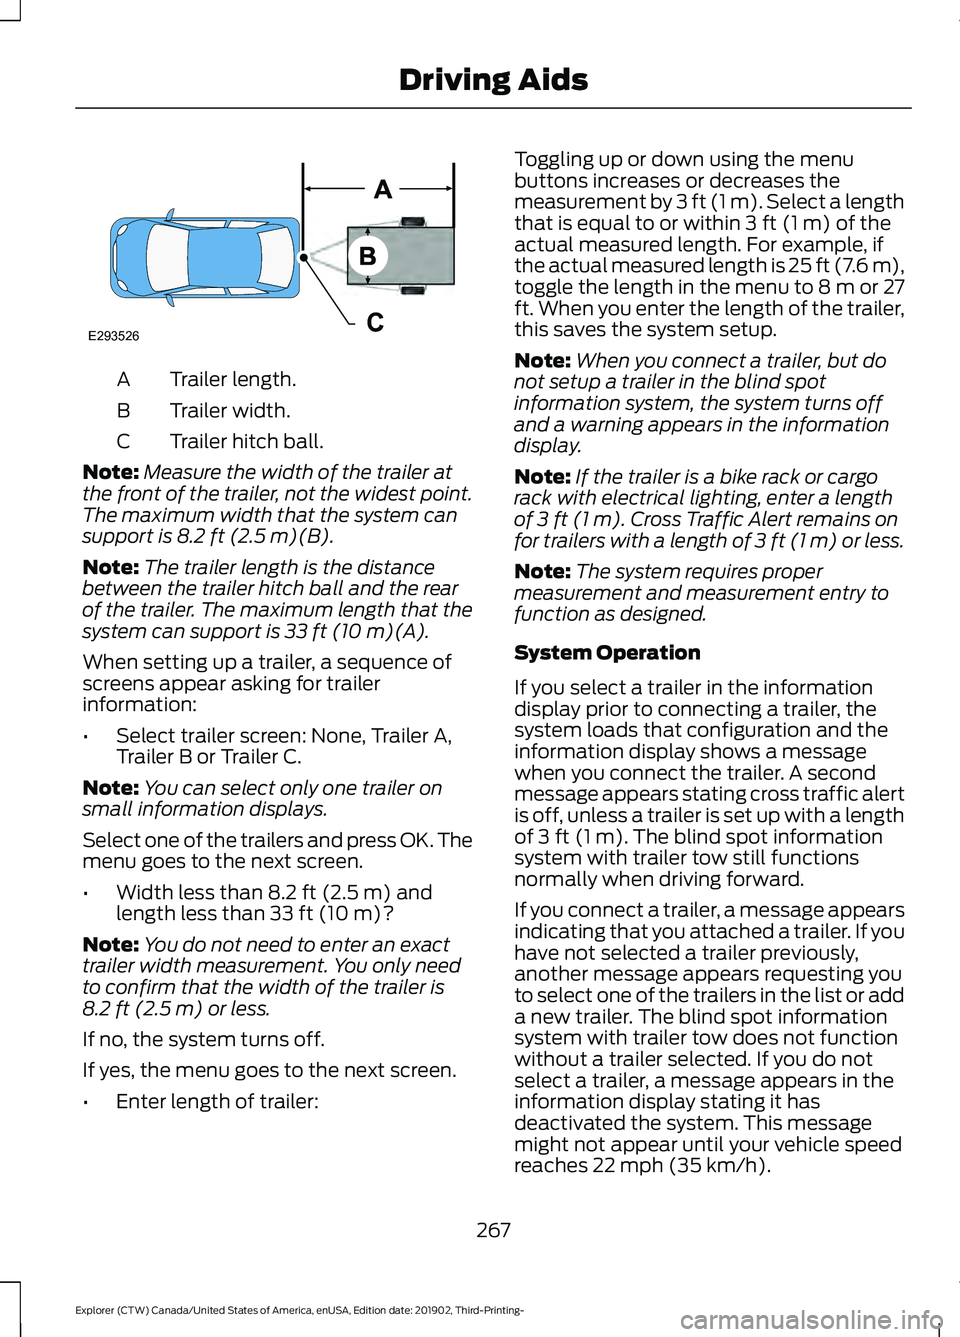
Trailer length.
A
Trailer width.
B
Trailer hitch ball.
C
Note: Measure the width of the trailer at
the front of the trailer, not the widest point.
The maximum width that the system can
support is 8.2 ft (2.5 m)(B).
Note: The trailer length is the distance
between the trailer hitch ball and the rear
of the trailer. The maximum length that the
system can support is
33 ft (10 m)(A).
When setting up a trailer, a sequence of
screens appear asking for trailer
information:
• Select trailer screen: None, Trailer A,
Trailer B or Trailer C.
Note: You can select only one trailer on
small information displays.
Select one of the trailers and press OK. The
menu goes to the next screen.
• Width less than
8.2 ft (2.5 m) and
length less than 33 ft (10 m)?
Note: You do not need to enter an exact
trailer width measurement. You only need
to confirm that the width of the trailer is
8.2 ft (2.5 m)
or less.
If no, the system turns off.
If yes, the menu goes to the next screen.
• Enter length of trailer: Toggling up or down using the menu
buttons increases or decreases the
measurement by
3 ft (1 m). Select a length
that is equal to or within 3 ft (1 m) of the
actual measured length. For example, if
the actual measured length is 25 ft (7.6 m),
toggle the length in the menu to 8 m or 27
ft. When you enter the length of the trailer,
this saves the system setup.
Note: When you connect a trailer, but do
not setup a trailer in the blind spot
information system, the system turns off
and a warning appears in the information
display.
Note: If the trailer is a bike rack or cargo
rack with electrical lighting, enter a length
of
3 ft (1 m). Cross Traffic Alert remains on
for trailers with a length of 3 ft (1 m) or less.
Note: The system requires proper
measurement and measurement entry to
function as designed.
System Operation
If you select a trailer in the information
display prior to connecting a trailer, the
system loads that configuration and the
information display shows a message
when you connect the trailer. A second
message appears stating cross traffic alert
is off, unless a trailer is set up with a length
of
3 ft (1 m). The blind spot information
system with trailer tow still functions
normally when driving forward.
If you connect a trailer, a message appears
indicating that you attached a trailer. If you
have not selected a trailer previously,
another message appears requesting you
to select one of the trailers in the list or add
a new trailer. The blind spot information
system with trailer tow does not function
without a trailer selected. If you do not
select a trailer, a message appears in the
information display stating it has
deactivated the system. This message
might not appear until your vehicle speed
reaches
22 mph (35 km/h).
267
Explorer (CTW) Canada/United States of America, enUSA, Edition date: 201902, Third-Printing- Driving AidsE293526
Page 345 of 555
CHECKING THE WIPER
BLADES
Run the tip of your fingers over the edge of
the blade to check for roughness.
Clean the wiper blades with washer fluid
or water applied with a soft sponge or
cloth.
CHANGING THE FRONT WIPER
BLADES
You can improve poor wiper quality by
cleaning the wiper blades and the
windshield.
Replace the wiper blades at least annually
for optimum performance.
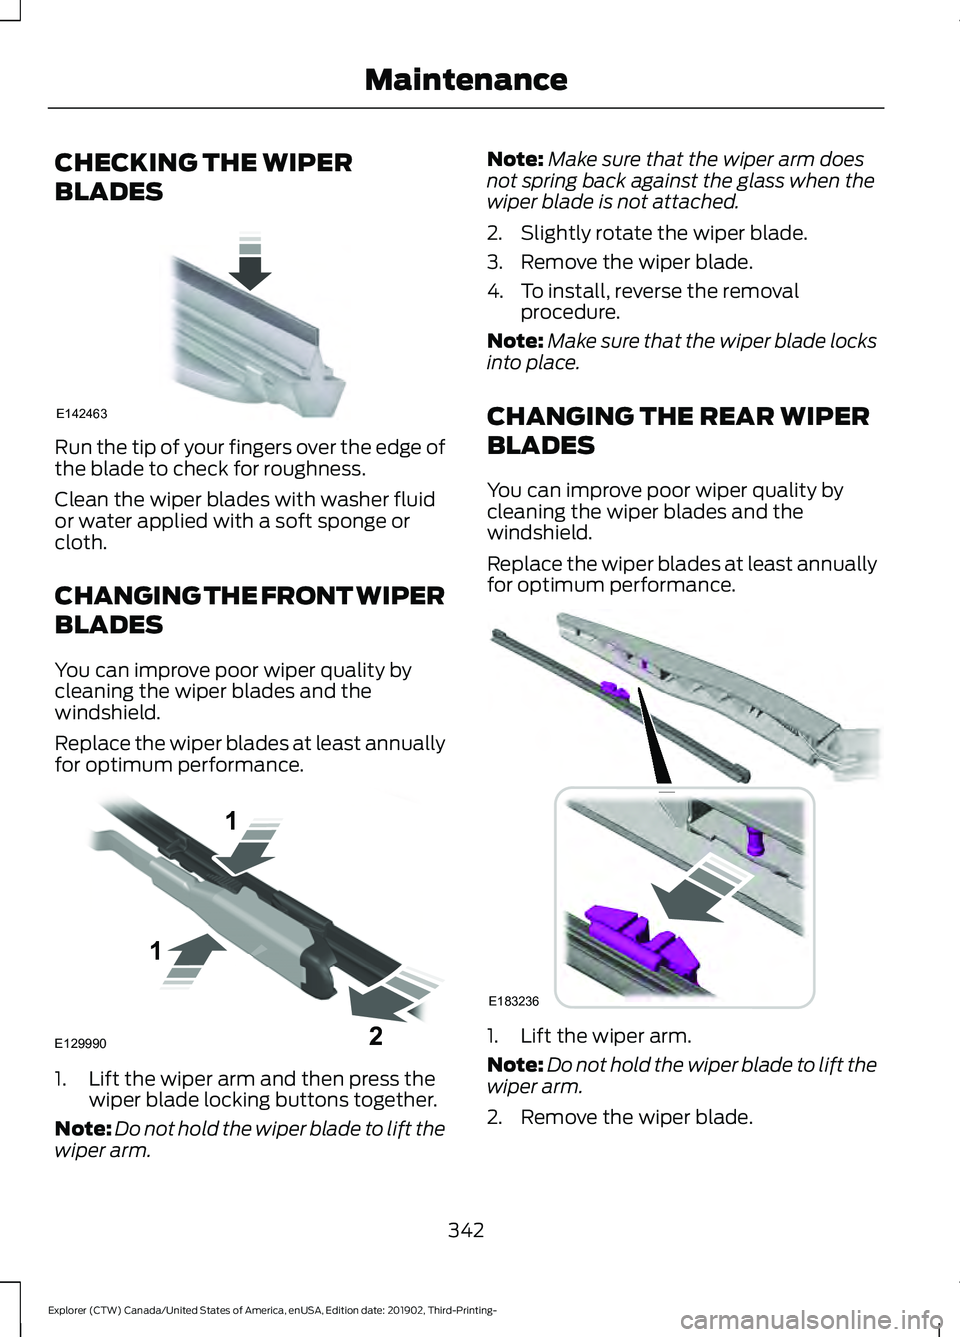
1. Lift the wiper arm and then press the
wiper blade locking buttons together.
Note: Do not hold the wiper blade to lift the
wiper arm. Note:
Make sure that the wiper arm does
not spring back against the glass when the
wiper blade is not attached.
2. Slightly rotate the wiper blade.
3. Remove the wiper blade.
4. To install, reverse the removal procedure.
Note: Make sure that the wiper blade locks
into place.
CHANGING THE REAR WIPER
BLADES
You can improve poor wiper quality by
cleaning the wiper blades and the
windshield.
Replace the wiper blades at least annually
for optimum performance. 1. Lift the wiper arm.
Note:
Do not hold the wiper blade to lift the
wiper arm.
2. Remove the wiper blade.
342
Explorer (CTW) Canada/United States of America, enUSA, Edition date: 201902, Third-Printing- MaintenanceE142463 E129990
1
1 2 E183236
Page 449 of 555
Voice Settings
Description
Voice Command
Go to the voice settings menu.
Voice Settings
Switch long voice prompts on.
Interaction Mode Novice
Switch short voice prompts on.
Interaction Mode Advanced
Switch call confirmation on. The system prompts
you to confirm before making a call.
Phone Confirmation On
Switch call confirmation off. The system does not
prompt you to confirm before making a call.
Phone Confirmation Off
Switch the display of voice commands on.
Voice Command Lists On
Switch the display of voice commands off.
Voice Command Lists Off
Automatic Blower Motor Speed
Reduction
If necessary, the system decreases the
blower motor speed when you are using
voice commands to reduce the amount of
background noise in your vehicle. It returns
to normal when you are done.
Switching Automatic Blower Motor
Speed Reduction Off
Simultaneously press the A/C and
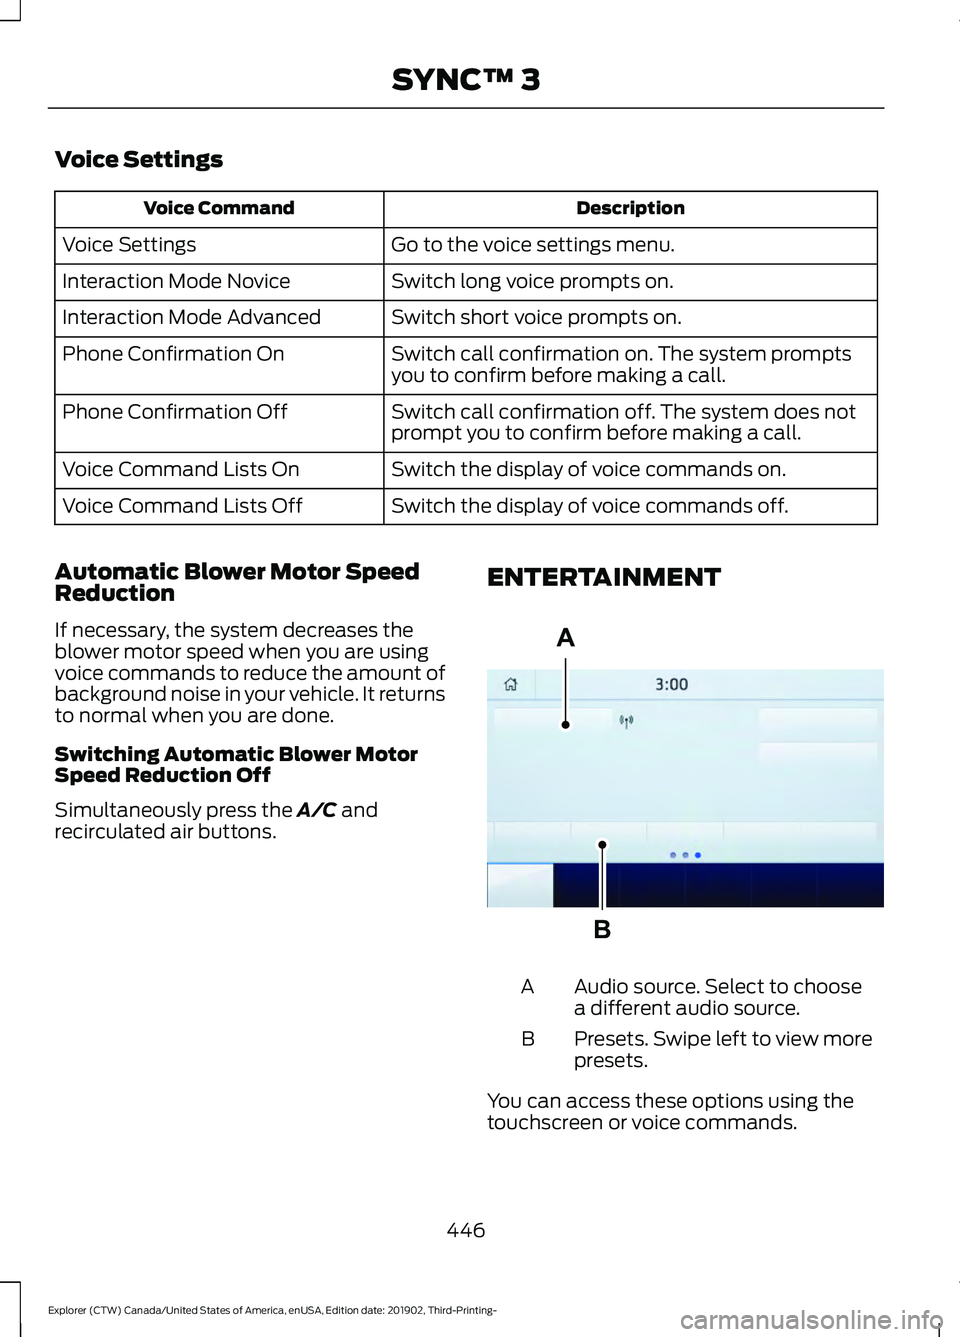
recirculated air buttons. ENTERTAINMENT Audio source. Select to choose
a different audio source.
A
Presets. Swipe left to view more
presets.
B
You can access these options using the
touchscreen or voice commands.
446
Explorer (CTW) Canada/United States of America, enUSA, Edition date: 201902, Third-Printing- SYNC™ 3A
BE293491
Page 450 of 555
Sources
Press this button to select the source of
media you want to listen to.Menu Item
AM
FM 1
SIRIUS
1
CD
The name of the USB that is plugged in displays here.
USB
Bluetooth Stereo
If you have SYNC 3 compatible apps on your connected smart phone, they
display here as individual source selections.
Apps
1 This feature may not be available in all markets and requires an active subscription.
AM/FM Radio
Tuning a Station
You can use the tune or seek controls on
the radio bezel to select a station.
To tune a station using the
touchscreen, select: Menu Item
Direct Tune
A pop up appears, allowing you to type in
the frequency of a station. You can only
enter a valid station for the source you are
currently listening to.
You can press the backspace button to
delete the previously entered number. Once you have entered the station's
call numbers, you can select: Action and Descrip-
tion
Menu Item
Press to begin
playing the station
you have entered.
Enter
Press to exit
without changing
the station.
Cancel
Presets
To set a new preset, tune to the station
and then press and hold one of the
memory preset buttons. The audio mutes
briefly while the system saves the station
and then returns.
You may be able to add additional preset
pages using the settings option on the
feature bar.
447
Explorer (CTW) Canada/United States of America, enUSA, Edition date: 201902, Third-Printing- SYNC™ 3