2020 FORD EXPLORER air filter
[x] Cancel search: air filterPage 329 of 555

UNDER HOOD OVERVIEW - 3.3L
Battery. See Changing the 12V Battery (page 338).
A.
Engine oil filler cap.
See Engine Oil Check (page 327).
B.
Engine oil dipstick.
See Engine Oil Dipstick (page 327).
C.
Brake fluid reservoir.
See Brake Fluid Check (page 337).
D.
Engine compartment fuse box.
See Fuses (page 313).
E.
Engine coolant reservoir cap.
See Engine Coolant Check (page 332).
F.
Air filter assembly. See
Changing the Engine Air Filter (page 329).
G.
Inverter system controller coolant reservoir cap- HEV only.
H.
Washer fluid reservoir. See
Washer Fluid Check (page 341).
I.
326
Explorer (CTW) Canada/United States of America, enUSA, Edition date: 201902, Third-Printing- MaintenanceE288595
Page 332 of 555

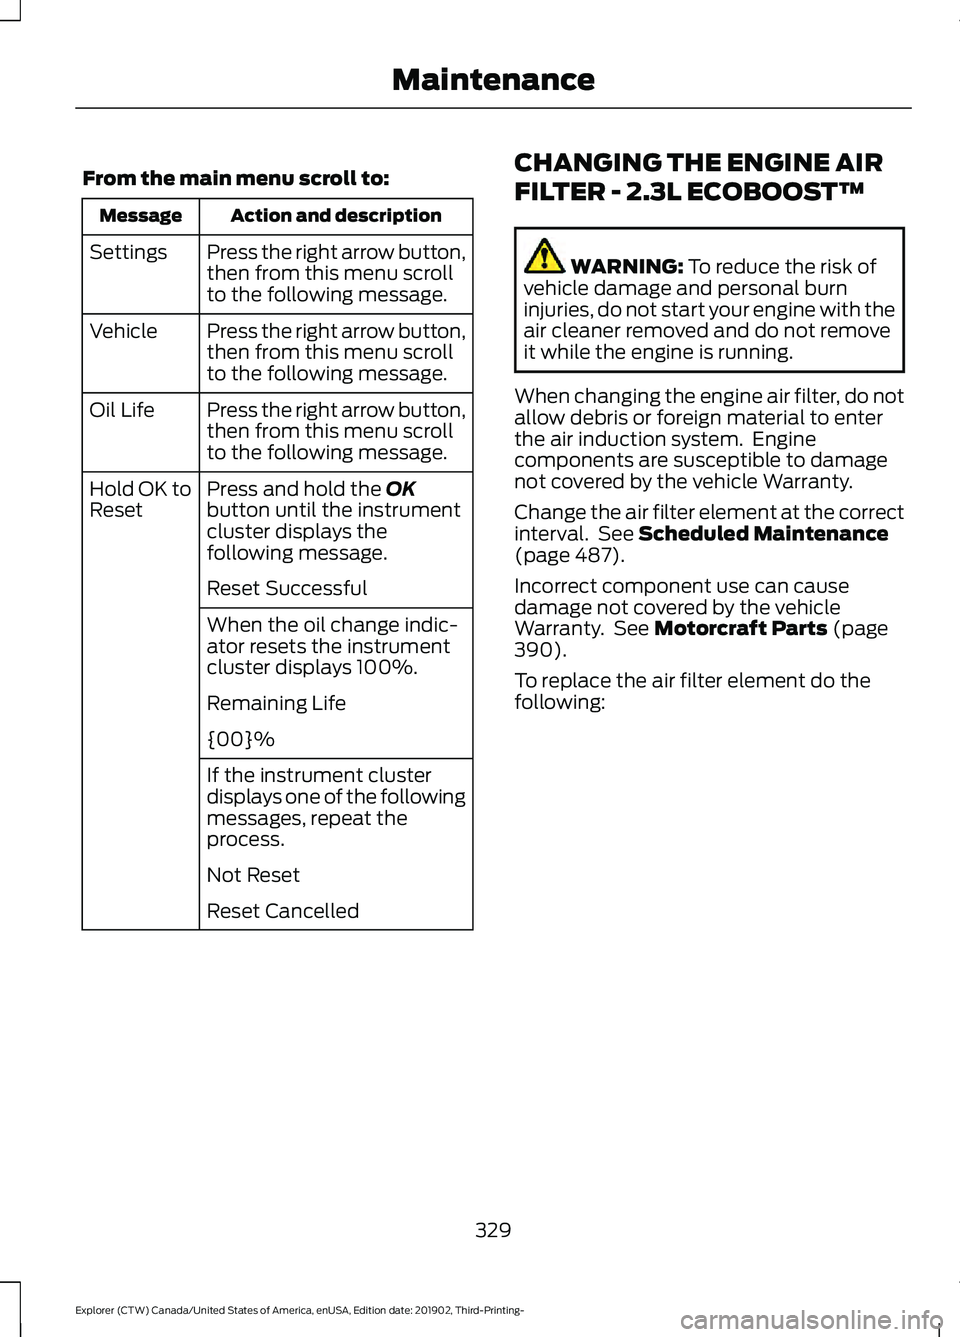
From the main menu scroll to:
Action and description
Message
Press the right arrow button,
then from this menu scroll
to the following message.
Settings
Press the right arrow button,
then from this menu scroll
to the following message.
Vehicle
Press the right arrow button,
then from this menu scroll
to the following message.
Oil Life
Press and hold the OK
button until the instrument
cluster displays the
following message.
Hold OK to
Reset
Reset Successful
When the oil change indic-
ator resets the instrument
cluster displays 100%.
Remaining Life
{00}%
If the instrument cluster
displays one of the following
messages, repeat the
process.
Not Reset
Reset Cancelled CHANGING THE ENGINE AIR
FILTER - 2.3L ECOBOOST™ WARNING:
To reduce the risk of
vehicle damage and personal burn
injuries, do not start your engine with the
air cleaner removed and do not remove
it while the engine is running.
When changing the engine air filter, do not
allow debris or foreign material to enter
the air induction system. Engine
components are susceptible to damage
not covered by the vehicle Warranty.
Change the air filter element at the correct
interval. See
Scheduled Maintenance
(page 487).
Incorrect component use can cause
damage not covered by the vehicle
Warranty. See
Motorcraft Parts (page
390).
To replace the air filter element do the
following:
329
Explorer (CTW) Canada/United States of America, enUSA, Edition date: 201902, Third-Printing- Maintenance
Page 333 of 555

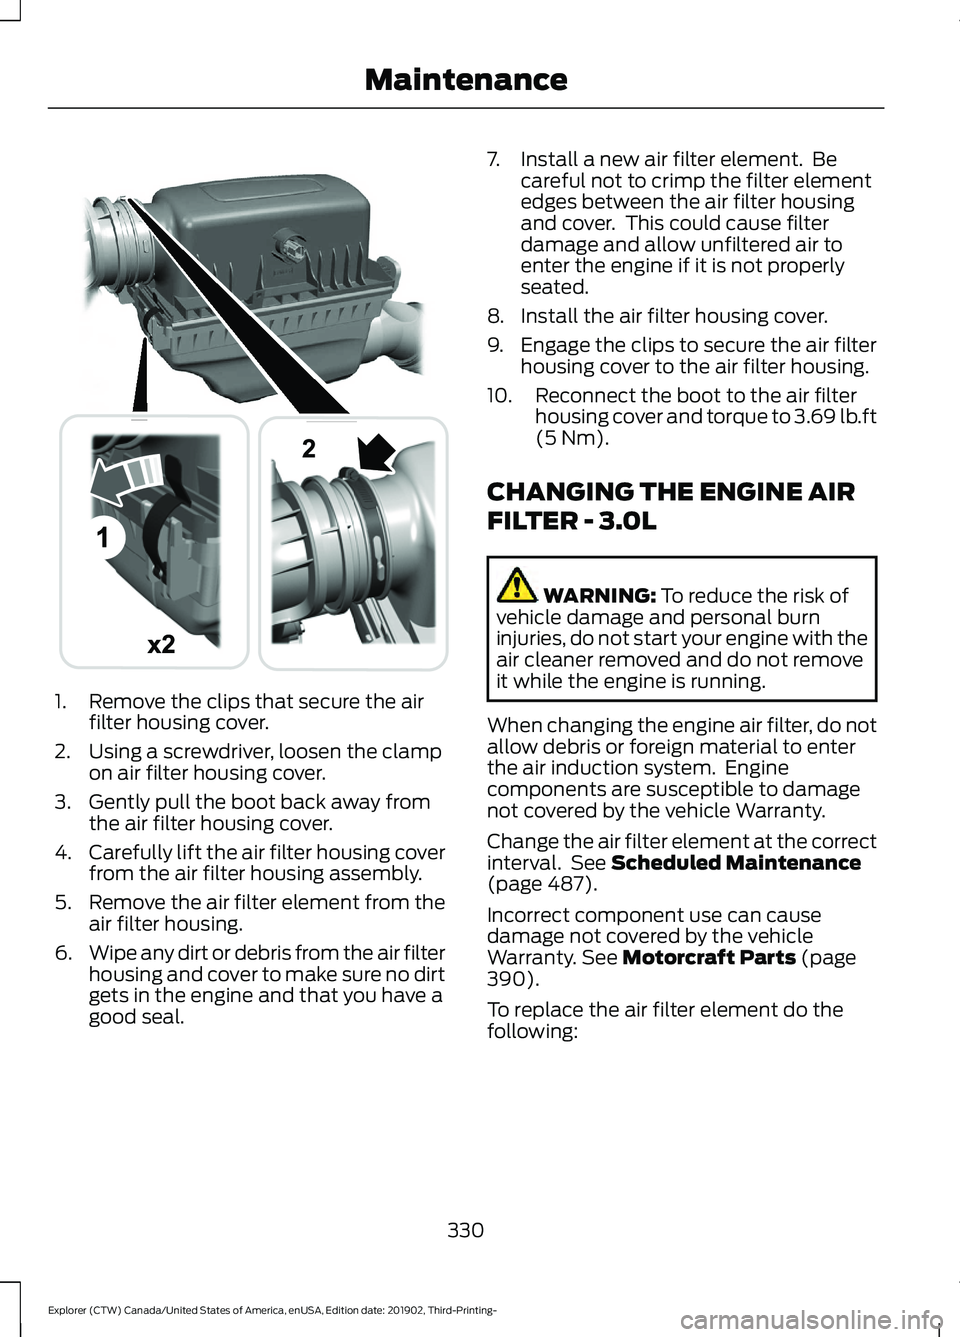
1. Remove the clips that secure the air
filter housing cover.
2. Using a screwdriver, loosen the clamp on air filter housing cover.
3. Gently pull the boot back away from the air filter housing cover.
4. Carefully lift the air filter housing cover
from the air filter housing assembly.
5. Remove the air filter element from the
air filter housing.
6. Wipe any dirt or debris from the air filter
housing and cover to make sure no dirt
gets in the engine and that you have a
good seal. 7. Install a new air filter element. Be
careful not to crimp the filter element
edges between the air filter housing
and cover. This could cause filter
damage and allow unfiltered air to
enter the engine if it is not properly
seated.
8. Install the air filter housing cover.
9. Engage the clips to secure the air filter housing cover to the air filter housing.
10. Reconnect the boot to the air filter housing cover and torque to 3.69 lb.ft
(5 Nm).
CHANGING THE ENGINE AIR
FILTER - 3.0L WARNING:
To reduce the risk of
vehicle damage and personal burn
injuries, do not start your engine with the
air cleaner removed and do not remove
it while the engine is running.
When changing the engine air filter, do not
allow debris or foreign material to enter
the air induction system. Engine
components are susceptible to damage
not covered by the vehicle Warranty.
Change the air filter element at the correct
interval. See
Scheduled Maintenance
(page 487).
Incorrect component use can cause
damage not covered by the vehicle
Warranty.
See Motorcraft Parts (page
390).
To replace the air filter element do the
following:
330
Explorer (CTW) Canada/United States of America, enUSA, Edition date: 201902, Third-Printing- MaintenanceE294782
Page 334 of 555

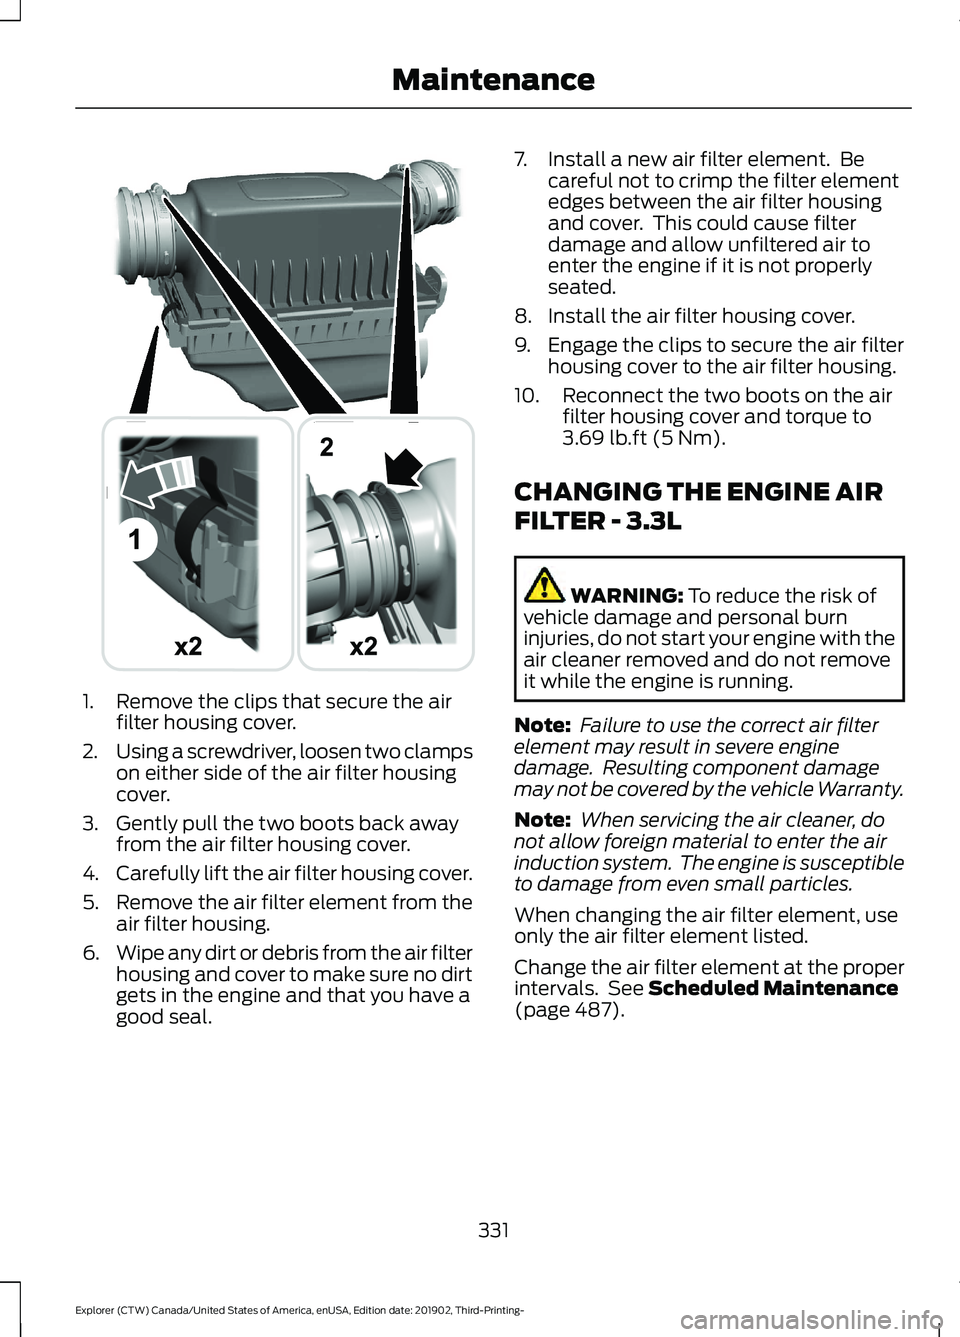
1. Remove the clips that secure the air
filter housing cover.
2. Using a screwdriver, loosen two clamps
on either side of the air filter housing
cover.
3. Gently pull the two boots back away from the air filter housing cover.
4. Carefully lift the air filter housing cover.
5. Remove the air filter element from the
air filter housing.
6. Wipe any dirt or debris from the air filter
housing and cover to make sure no dirt
gets in the engine and that you have a
good seal. 7. Install a new air filter element. Be
careful not to crimp the filter element
edges between the air filter housing
and cover. This could cause filter
damage and allow unfiltered air to
enter the engine if it is not properly
seated.
8. Install the air filter housing cover.
9. Engage the clips to secure the air filter housing cover to the air filter housing.
10. Reconnect the two boots on the air filter housing cover and torque to
3.69 lb.ft (5 Nm).
CHANGING THE ENGINE AIR
FILTER - 3.3L WARNING:
To reduce the risk of
vehicle damage and personal burn
injuries, do not start your engine with the
air cleaner removed and do not remove
it while the engine is running.
Note: Failure to use the correct air filter
element may result in severe engine
damage. Resulting component damage
may not be covered by the vehicle Warranty.
Note: When servicing the air cleaner, do
not allow foreign material to enter the air
induction system. The engine is susceptible
to damage from even small particles.
When changing the air filter element, use
only the air filter element listed.
Change the air filter element at the proper
intervals. See
Scheduled Maintenance
(page 487).
331
Explorer (CTW) Canada/United States of America, enUSA, Edition date: 201902, Third-Printing- MaintenanceE294778
Page 335 of 555

1.
Release the clamps that secure the air
filter cover to the housing.
2. Using a screwdriver, loosen the clamp on the air filter housing cover.
3. Gently pull the boot back away from the air filter housing cover.
4. Carefully lift the air filter housing cover.
5. Remove the air filter element from the
air filter housing.
6. Wipe any dirt or debris from the air filter
housing and cover to make sure no dirt
gets in the engine and that you have a
good seal.
7. Install a new air filter element. Be careful not to crimp the filter element
edges between the air filter housing
and cover. This could cause filter
damage and allow unfiltered air to
enter the engine if it is not properly
seated. 8. Install the air filter housing cover.
9. Engage the clips to secure the air filter
housing cover to the air filter housing.
10. Reconnect the boot to the air filter housing cover and torque to 3.69 lb.ft
(5 Nm).
ENGINE COOLANT CHECK WARNING:
Do not remove the
coolant reservoir cap when the engine is
on or the cooling system is hot. Wait 10
minutes for the cooling system to cool
down. Cover the coolant reservoir cap
with a thick cloth to prevent the
possibility of scalding and slowly remove
the cap. Failure to follow this instruction
could result in personal injury. WARNING:
Do not put coolant in
the windshield washer reservoir. If
sprayed on the windshield, coolant could
make it difficult to see through the
windshield. WARNING:
To reduce the risk of
personal injury, make sure the engine is
cool before unscrewing the coolant
pressure relief cap. The cooling system
is under pressure. Steam and hot liquid
can come out forcefully when you loosen
the cap slightly. WARNING:
Do not add coolant
further than the MAX mark.
When the engine is cold, check the
concentration and level of the coolant at
the intervals listed in the scheduled
maintenance information. See Scheduled
Maintenance
(page 487).
Note: Make sure that the coolant level is
between the
MIN and MAX marks on the
coolant reservoir.
332
Explorer (CTW) Canada/United States of America, enUSA, Edition date: 201902, Third-Printing- MaintenanceE295061
x2
Page 344 of 555

4. On the wall or screen you will observe
a flat zone of high intensity light
located at the top of the beam pattern.
If the top edge of the flat zone of high
intensity light is not on the horizontal
reference line, adjust the aim of the
headlamp beam. 5. Use a suitable tool, for example a
screwdriver or socket wrench, to turn
the adjuster clockwise or
counterclockwise to adjust the vertical
aim of the headlamp. The horizontal
edge of the brighter light should touch
the horizontal reference line.
6. Close the hood and switch off the lamps.
WASHER FLUID CHECK WARNING: If you operate your
vehicle in temperatures below 41.0°F
(5°C), use washer fluid with antifreeze
protection. Failure to use washer fluid
with antifreeze protection in cold
weather could result in impaired
windshield vision and increase the risk
of injury or accident.
Note: The front and rear washer systems
are supplied from the same reservoir.
Add fluid to fill the reservoir if the level is
low. Only use a washer fluid that meets
our specifications. See
Capacities and
Specifications (page 384).
State or local regulations on volatile
organic compounds may restrict the use
of methanol, a common windshield washer
antifreeze additive. Washer fluids
containing non-methanol antifreeze
agents should be used only if they provide
cold weather protection without damaging
the vehicle ’s paint finish, wiper blades or
washer system.
FUEL FILTER
Your vehicle is equipped with a lifetime
fuel filter that is integrated with the fuel
tank. Regular maintenance or replacement
is not needed.
341
Explorer (CTW) Canada/United States of America, enUSA, Edition date: 201902, Third-Printing- MaintenanceE142465 E292172
Page 350 of 555

Underbody
Regularly clean the underside of your
vehicle using water. Keep body and door
drain holes free of debris or foreign
material.
Under Hood
For removing black rubber marks from
under the hood we recommend Motorcraft
Wheel and Tire Cleaner or Motorcraft Bug
and Tar Remover.
WAXING
Regular waxing is necessary to protect your
car's paint from the elements. We
recommend that you wash and wax the
painted surface once or twice a year.
When washing and waxing, park your
vehicle in a shaded area out of direct
sunlight. Always wash your vehicle before
applying wax.
•
Use a quality wax that does not contain
abrasives.
• Follow the manufacturer ’s instructions
to apply and remove the wax.
• Apply a small amount of wax in a
back-and-forth motion, not in circles.
• Do not allow wax to come in contact
with any non-body (low-gloss black)
colored trim. The wax will discolor or
stain the parts over time.
•Roof racks.
• Bumpers.
• Grained door handles.
• Side moldings.
• Mirror housings.
• Windshield cowl area.
• Do not apply wax to glass areas.
• After waxing, your car's paint should
feel smooth, and be free of streaks and
smudges. CLEANING THE ENGINE
Engines are more efficient when they are
clean because grease and dirt buildup keep
the engine warmer than normal.
When washing:
•
Take care when using a power washer
to clean the engine. The high-pressure
fluid could penetrate the sealed parts
and cause damage.
• Do not spray a hot engine with cold
water to avoid cracking the engine
block or other engine components.
• Spray Motorcraft Engine Shampoo and
Degreaser on all parts that require
cleaning and pressure rinse clean. In
Canada, use Motorcraft Engine
Shampoo.
Note: If your vehicle has an engine cover
remove the cover before application of
Motorcraft Engine Shampoo and Degreaser.
Immediately rinse away any over spray.
• Never wash or rinse the engine while it
is hot or running; water in the running
engine may cause internal damage.
• Never wash or rinse any ignition coil,
spark plug wire or spark plug well, or
the area in and around these locations.
• Cover the battery, power distribution
box, and air filter assembly to prevent
water damage when cleaning the
engine.
CLEANING THE WINDOWS AND
WIPER BLADES
Car wash chemicals and environmental
fallout can result in windshield and wiper
blade contamination. Dirty windshield and
wipers will result in poor windshield wiper
operation. Keep the windshield and wiper
blades clean to maintain windshield wiper
performance.
347
Explorer (CTW) Canada/United States of America, enUSA, Edition date: 201902, Third-Printing- Vehicle Care
Page 354 of 555

•
Cover interior trim to prevent fading.
• Keep all rubber parts free from oil and
solvents.
Engine
• Change the engine oil and filter prior to
storage because used engine oil
contains contaminates which may
cause engine damage.
• Start the engine every 15 days for a
minimum of 15 minutes. Run at fast
idle with the climate controls set to
defrost until the engine reaches normal
operating temperature.
• With your foot on the brake, shift
through all the gears while the engine
is running.
• We recommend that you change the
engine oil before you use your vehicle
again.
Fuel system
• Fill the fuel tank with high-quality fuel
until the first automatic shutoff of the
fuel pump nozzle.
Cooling system
• Protect against freezing temperatures.
• When removing your vehicle from
storage, check coolant fluid level.
Confirm that there are no cooling
system leaks and that fluid is at the
recommended level.
Disconnecting Your 12 Volt Battery
• Check and recharge as necessary. Keep
connections clean.
• If storing your vehicle for more than 30
days without recharging the battery,
we recommend that you disconnect
the battery cables to maintain battery
charge for quick starting. Note:
It is necessary to reset memory
features if you disconnect the battery
cables.
Plugging in Your HYBRID
We recommend the following options for
your plug-in vehicle (PHEV) :
• Leave your vehicle plugged in. The 12
volt battery maintains power if left
plugged in. However, this periodically
uses electricity from the household
outlet.
• Connect a battery charger to your 12
volt battery and leave it on a
continuous, slow charge.
• Disconnect the 12 volt battery. If your
12 volt battery is located in the luggage
compartment, do not fully shut the
luggage compartment after
disconnecting the 12 volt battery. Only
leave the luggage compartment open
if your vehicle is stored in a locked
location.
Brakes
• Make sure the brakes and parking brake
release fully.
Tires
• Maintain recommended air pressure.
Miscellaneous
• Make sure all linkages, cables, levers
and pins under your vehicle are covered
with grease to prevent rust.
• Move vehicles at least 25 ft (7.5 m)
every 15 days to lubricate working parts
and prevent corrosion.
351
Explorer (CTW) Canada/United States of America, enUSA, Edition date: 201902, Third-Printing- Vehicle Care