2020 FORD EXPLORER automatic transmission
[x] Cancel search: automatic transmissionPage 7 of 555

Fuel Consumption
......................................195
Engine Emission Control
Emission Law ................................................
197
Catalytic Converter .....................................
198
High Voltage Battery
General Information ...................................
201
Transmission
Automatic Transmission ..........................
202
Four-Wheel Drive
Principle of Operation ..............................
208
Using Four-Wheel Drive ..........................
208
Brakes
General Information ...................................
214
Hints on Driving With Anti-Lock Brakes ........................................................................\
.
215
Electric Parking Brake ................................
215
Hill Start Assist ..............................................
217
Auto Hold ........................................................
218
Reverse Braking Assist
What Is Reverse Braking Assist .............
220
Reverse Braking Assist Precautions .....
220
Switching Reverse Braking Assist On and Off ..................................................................
221
Overriding Reverse Braking Assist .........
221
Reverse Braking Assist Indicators ..........
221
Reverse Braking Assist – Troubleshooting ......................................
222
Traction Control
Principle of Operation ...............................
224
Using Traction Control ..............................
224
Stability Control
Principle of Operation ...............................
225Using Stability Control
..............................
226
Hill Descent Control
What Is Hill Descent Control ..................
228
Switching Hill Descent Control On and Off ................................................................
228
Setting the Hill Descent Speed .............
228
Hill Descent Control Indicator ................
229
Parking Aids
Principle of Operation ...............................
230
Rear Parking Aid ..........................................
230
Front Parking Aid .........................................
232
Side Sensing System .................................
234
Active Park Assist .......................................
235
Rear View Camera ......................................
238
360 Degree Camera ...................................
241
Cruise Control
What Is Cruise Control ..............................
244
Switching Cruise Control On and Off ........................................................................\
244
Setting the Cruise Control Speed ........
244
Canceling the Set Speed .........................
245
Resuming the Set Speed .........................
245
Cruise Control Indicators .........................
245
Adaptive Cruise Control
How Does Adaptive Cruise Control With Stop and Go Work .................................
246
What Is Adaptive Cruise Control With Lane Centering ........................................
246
What Is Intelligent Adaptive Cruise Control ........................................................
246
Adaptive Cruise Control Precautions - Vehicles With: Adaptive Cruise Control
With Lane Centering .............................
246
Adaptive Cruise Control Precautions - Vehicles With: Adaptive Cruise Control
With Stop and Go ..................................
246
4
Explorer (CTW) Canada/United States of America, enUSA, Edition date: 201902, Third-Printing- Table of Contents
Page 9 of 555

The Better Business Bureau (BBB) Auto
Line Program (U.S. Only) ....................308
Utilizing the Mediation/Arbitration Program (Canada Only) .....................
309
Getting Assistance Outside the U.S. and Canada ......................................................
309
Ordering Additional Owner's Literature ........................................................................\
..
311
Reporting Safety Defects (U.S. Only) ........................................................................\
..
311
Reporting Safety Defects (Canada Only) ........................................................................\
..
311
Fuses
Fuse Specification Chart ...........................
313
Changing a Fuse ...........................................
321
Maintenance
General Information ..................................
323
Opening and Closing the Hood .............
323
Under Hood Overview - 2.3L EcoBoost™ ........................................................................\
324
Under Hood Overview - 3.0L ..................
325
Under Hood Overview - 3.3L ..................
326
Engine Oil Dipstick - 2.3L EcoBoost™ ........................................................................\
.
327
Engine Oil Dipstick - 3.0L .........................
327
Engine Oil Dipstick - 3.3L ..........................
327
Engine Oil Check ..........................................
327
Oil Change Indicator Reset .....................
328
Changing the Engine Air Filter - 2.3L EcoBoost™ ...............................................
329
Changing the Engine Air Filter - 3.0L ........................................................................\
330
Changing the Engine Air Filter - 3.3L .....
331
Engine Coolant Check ...............................
332
Automatic Transmission Fluid Check ........................................................................\
336
Brake Fluid Check ........................................
337
Power Steering Fluid Check ....................
338
Changing the 12V Battery ........................
338
Adjusting the Headlamps .......................
340Washer Fluid Check
....................................
341
Fuel Filter ........................................................
341
Checking the Wiper Blades .....................
342
Changing the Front Wiper Blades ........
342
Changing the Rear Wiper Blades ..........
342
Changing a Bulb ..........................................
343
Vehicle Care
General Information ..................................
345
Cleaning Products ......................................
345
Cleaning the Exterior .................................
346
Waxing ............................................................
347
Cleaning the Engine ...................................
347
Cleaning the Windows and Wiper Blades ........................................................................\
347
Cleaning the Interior ..................................
348
Cleaning the Instrument Panel and Instrument Cluster Lens ......................
348
Cleaning Leather Seats ............................
349
Repairing Minor Paint Damage .............
350
Cleaning the Wheels .................................
350
Vehicle Storage ...........................................
350
Wheels and Tires
General Information ..................................
353
Tire Care .........................................................
355
Using Summer Tires ..................................
368
Using Snow Chains ...................................
368
Tire Pressure Monitoring System ..........
370
Changing a Road Wheel ..........................
376
Technical Specifications ..........................
382
Capacities and Specifications
Engine Specifications - 2.3L EcoBoost™ ........................................................................\
384
Engine Specifications - 3.0L ..................
385
Engine Specifications - 3.0L, ST ...........
385
Engine Specifications - 3.3L, Gasoline ........................................................................\
387
6
Explorer (CTW) Canada/United States of America, enUSA, Edition date: 201902, Third-Printing- Table of Contents
Page 23 of 555

AT A GLANCE - ST
Exterior
•
Front and rear fascias feature unique
ST grille and unique finish.
• ST badging in front grille and on rear
liftgate.
• Trim features unique ST gloss black
finish.
• E-X-P-L-O-R-E-R lettering across
hood.
• Blackout treatment on headlight and
taillight lenses.
Interior
• Unique ST interior trim.
• Ford Performance sill plates.
• ST flat-bottom steering wheel with
integrated transmission shift paddle
controls.
• Selectable Drive Mode controller with
7 settings (Normal, Eco, Sport, Trail,
Slippery, Deep Snow/Sand and
Tow/Haul).
• Unique electronic sound enhancement
in Sport Selectable Drive Mode.
Chassis
• Unique ST-tuned suspension featuring
32 N/mm front coil springs and a 34
mm hollow front stabilizer bar and 106
N/mm rear coil springs and a 21.7 mm
hollow rear stabilizer bar.
• Standard ST brake system consists of
345 mm diameter vented front rotors
with two piston calipers and low-dust
linings; 326 mm solid rear rotors with
single-piston brake calipers and
electric integrated park brake with low
dust linings. •
Optional ST braking system includes
363 mm diameter vented front rotors
with heavy duty two-piston calipers
and low-dust linings; 350 mm diameter
vented rear rotors with heavy-duty
single-piston brake calipers and
electric integrated park brake with
low-dust linings; system requires 21 x
9-inch wheels and P275/45R21
all-season tires.
• Optional low-metallic brake linings are
included with optional P275/45R21
summer tire (late availability).
• ST-tuned electric power assist steering
rack and pinion.
• AdvanceTrac with stability
enhancement system with four modes:
Default, Traction Control Off, Sport and
Disabled.
• Aluminum ST 20 in (50.8 cm) x 8.5 in
(21.6 cm) wheels standard; 21 in
(53.3 cm) x 9 in (22.9 cm) wheels
optional.
• P255/55R20 all-season tires or
optional P275/45R21 all-season tires.
Powertrain
• 3.0L V6 DOHC GTDI engine, 400
horsepower, 415 lb-ft.
• 10R60 10-speed automatic
transmission with SelectShift manual
shift mode.
• 3.58 axle ratios.
• Unique transmission calibration in
Sport Selectable Drive Mode.
• Dual exhaust with quad-tip outlets.
20
Explorer (CTW) Canada/United States of America, enUSA, Edition date: 201902, Third-Printing- At a Glance
Page 65 of 555

Car Finder
Press the button twice within
three seconds. The horn sounds
and the direction indicators
flash. We recommend you use this method
to locate your vehicle, rather than using
the panic alarm.
Sounding the Panic Alarm
Note: The panic alarm only operates when
the ignition is off. Press the button to sound the
panic alarm. Press the button
again or switch the ignition on to
turn it off.
Remote Start (If Equipped) WARNING:
To avoid exhaust
fumes, do not use remote start if your
vehicle is parked indoors or in areas that
are not well ventilated.
Note: Do not use remote start if your fuel
level is low. The remote start button is on the
remote control.
This feature allows you to start your
vehicle from the outside. Your remote
control has an extended operating range.
If your vehicle has automatic climate
control, you can configure it to operate
when you remote start your vehicle.
See
Climate Control (page 137). A manual
climate control system runs at the setting
it was set to when you switched your
vehicle off.
Many states and provinces have
restrictions for the use of remote start. Check your local and state or provincial
laws for specific requirements regarding
remote start systems.
The system does not work if:
•
The ignition is on.
• The anti-theft alarm triggers.
• You disable the feature.
• The hood is open.
• The transmission is not in park (P).
• The battery voltage is below the
minimum operating voltage.
• The service engine soon light is on.
Remote Control Feedback (If
Equipped)
An LED on the remote control provides
status feedback of remote start or stop
commands. Status
LED
Remote startsuccessful
Solid green
Remote stopsuccessful
Solid red
Request failed or
status not received
Blinking red
Status incomplete
Blinking green
Remote Starting Your Vehicle
Note: You must press each button within
three seconds of each other. If you do not
follow this sequence, your vehicle does not
start remotely, the direction indicators do
not flash twice and the horn does not sound.
62
Explorer (CTW) Canada/United States of America, enUSA, Edition date: 201902, Third-Printing- Keys and Remote ControlsE138623 E138624 E138625
Page 93 of 555

DAYTIME RUNNING LAMPS -
VEHICLES WITH:
CONFIGURABLE DAYTIME
RUNNING LAMPS
WARNING: The daytime running
lamps system does not activate the rear
lamps and may not provide adequate
lighting during low visibility driving
conditions. Make sure you switch the
headlamps on, as appropriate, during all
low visibility conditions. Failure to do so
may result in a crash.
Switch the daytime running lamps on or
off using the touchscreen:
1. Select
Settings. See Settings (page
469).
2. Select
Vehicle.
3. Select
Lighting.
The daytime running lamps turn on when:
1. The lamps are on in the information display.
2. You switch the ignition on.
3. The transmission is not in park (P) for vehicles with automatic transmissions
or you release the parking brake for
vehicles with manual transmissions.
4. The lighting control is in the autolamps
position.
5. The headlamps are off.
The other lighting control switch positions
do not turn on the daytime running lamps.
If the daytime running lamps are off in the
information display, the lamps stay off in
all switch positions. DAYTIME RUNNING LAMPS -
VEHICLES WITH: DAYTIME
RUNNING LAMPS (DRL) WARNING:
The daytime running
lamps system does not activate the rear
lamps and may not provide adequate
lighting during low visibility driving
conditions. Make sure you switch the
headlamps on, as appropriate, during all
low visibility conditions. Failure to do so
may result in a crash.
The system turns the lamps on in daylight
conditions.
To switch the system on, switch the
lighting control to any position except
headlamps.
FRONT FOG LAMPS
(IF EQUIPPED)
Switching the Front Fog Lamps On
or Off
Only switch the front fog lamps on during
reduced visibility.
You can switch the front fog lamps on if
any of the following occur:
• You set the lighting control to the
parking lamps position.
• You set the lighting control to the
headlamps position.
• You set the lighting control to the
autolamps position and the headlamps
are on.
The front fog lamp button is on the lighting
control. Press the button to switch the
front fog lamps on or off.
90
Explorer (CTW) Canada/United States of America, enUSA, Edition date: 201902, Third-Printing- Lighting
Page 103 of 555

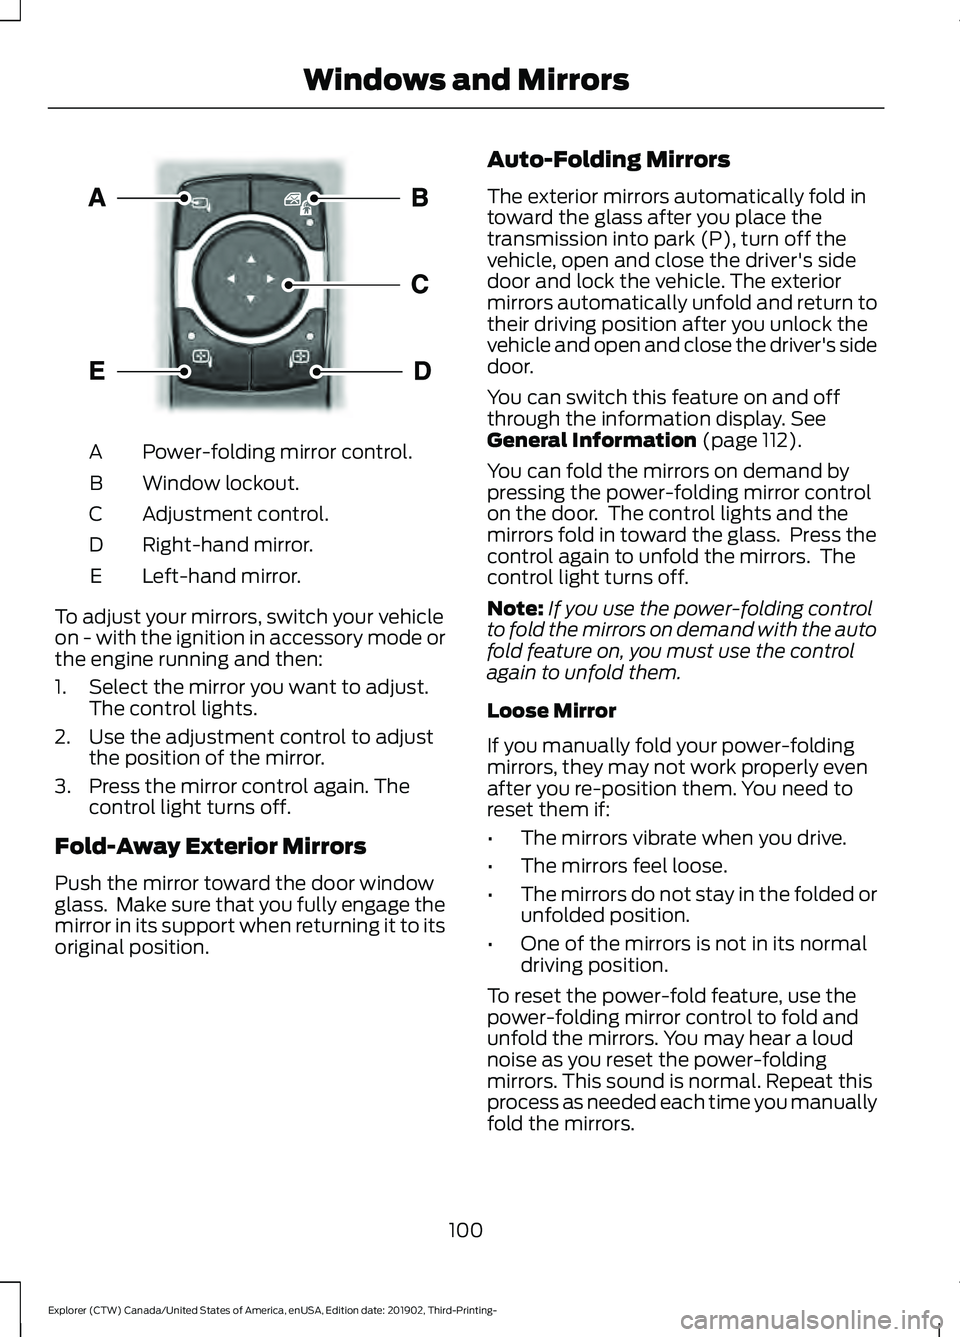
Power-folding mirror control.
A
Window lockout.
B
Adjustment control.
C
Right-hand mirror.
D
Left-hand mirror.
E
To adjust your mirrors, switch your vehicle
on - with the ignition in accessory mode or
the engine running and then:
1. Select the mirror you want to adjust. The control lights.
2. Use the adjustment control to adjust the position of the mirror.
3. Press the mirror control again. The control light turns off.
Fold-Away Exterior Mirrors
Push the mirror toward the door window
glass. Make sure that you fully engage the
mirror in its support when returning it to its
original position. Auto-Folding Mirrors
The exterior mirrors automatically fold in
toward the glass after you place the
transmission into park (P), turn off the
vehicle, open and close the driver's side
door and lock the vehicle. The exterior
mirrors automatically unfold and return to
their driving position after you unlock the
vehicle and open and close the driver's side
door.
You can switch this feature on and off
through the information display. See
General Information (page 112).
You can fold the mirrors on demand by
pressing the power-folding mirror control
on the door. The control lights and the
mirrors fold in toward the glass. Press the
control again to unfold the mirrors. The
control light turns off.
Note: If you use the power-folding control
to fold the mirrors on demand with the auto
fold feature on, you must use the control
again to unfold them.
Loose Mirror
If you manually fold your power-folding
mirrors, they may not work properly even
after you re-position them. You need to
reset them if:
• The mirrors vibrate when you drive.
• The mirrors feel loose.
• The mirrors do not stay in the folded or
unfolded position.
• One of the mirrors is not in its normal
driving position.
To reset the power-fold feature, use the
power-folding mirror control to fold and
unfold the mirrors. You may hear a loud
noise as you reset the power-folding
mirrors. This sound is normal. Repeat this
process as needed each time you manually
fold the mirrors.
100
Explorer (CTW) Canada/United States of America, enUSA, Edition date: 201902, Third-Printing- Windows and MirrorsE295322
Page 139 of 555

Action
Message
Reminder to remove park brake while in neutral tow.
Neutral Tow Remove
Park Brake for Towing
Displays when the neutral tow is off.
Neutral Tow Disengaged
Displays when neutral tow is on.
Neutral Tow Enabled
Leave Transmission in Neutral
4WD Action
Message
The four wheel drive system has automatically disabled itselfdue to the system overheating.
4WD Temporarily
Disabled
The four wheel drive system is locking up the torque transferclutch to help reduce clutch temperature.
4WD Temporarily
Locked
Displays when the system automatically disables to protect
itself. This may be caused by operating the vehicle with a mini spare tire installed, if the system detects dissimilar size tires,
or if there is an issue with another vehicle system preventing 4WD operation. The system resumes normal operation and
clears this message after you cycle the ignition on and off and drive a short distance with the road tire re-installed or after the other vehicle system issues are resolved.
4WD Off
Displays after the system cools and the four wheel drivesystem resumes normal function.
4WD Restored
The four wheel drive system is not operating properly and thepowertrain fault indicator illuminates. If the warning stays
illuminated or continues to illuminate, contact an authorized dealer as soon as possible.
4WD Fault Service
Required
Displayed when the transfer case fluid requires service.
Change 4WD Power
Transfer Unit Lube
Displayed when the transfer case fluid has been changed and reset to new.
4WD Power Transfer
Unit Lube Set to New
136
Explorer (CTW) Canada/United States of America, enUSA, Edition date: 201902, Third-Printing- Information Displays
Page 176 of 555

Ignition Modes
The keyless starting system has three
modes:
Off: Turns the ignition off.
• Without applying the brake pedal,
press and release the button once
when the ignition is in the on mode, or
when your vehicle is running but is not
moving.
On:
All electrical circuits are operational
and the warning lamps and indicators
illuminate.
• Without applying the brake pedal,
press and release the button once.
Start:
Starts your vehicle. The engine may
not start when your vehicle starts.
• Press the brake pedal, and then press
the button for any length of time. An
indicator light on the button illuminates
when the ignition is on and when your
vehicle starts.
STARTING A GASOLINE
ENGINE
When you start the engine, the idle speed
increases. This helps to warm up the
engine. If the engine idle speed does not
slow down automatically, have your
vehicle checked by an authorized dealer. Note:
You can crank the engine for a total
of 60 seconds without the engine starting
before the starting system temporarily
disables. The 60 seconds does not have to
be all at once. For example, if you crank the
engine three times for 20 seconds each
time, without the engine starting, you
reached the 60-second time limit. A
message appears in the information display
alerting you that you exceeded the cranking
time. You cannot attempt to start the
engine for at least 15 minutes. After 15
minutes, you are limited to a 15-second
engine cranking time. You need to wait 60
minutes before you can crank the engine for
60 seconds again.
Before starting your vehicle, check the
following:
• Make sure all occupants have fastened
their seatbelt.
• Make sure the headlamps and
electrical accessories are off.
• Make sure the parking brake is on.
• Make sure the transmission is in park
(P).
• Switch the ignition on. For vehicles with
a keyless ignition, see the following
instructions.
Vehicles with an Ignition Key
Note: Do not touch the accelerator pedal.
1. Fully depress the brake pedal.
2. Turn the key to the start position to start the engine.
Note: The engine may continue cranking
for up to 15 seconds or until it starts.
Note: If you cannot start the engine on the
first try, wait for a short period and try again.
Vehicles with Keyless Start
Note: Do not touch the accelerator pedal.
173
Explorer (CTW) Canada/United States of America, enUSA, Edition date: 201902, Third-Printing- Starting and Stopping the EngineE144447