2020 FORD EXPEDITION oil change
[x] Cancel search: oil changePage 8 of 542

Maintenance
General Information
..................................325
Opening and Closing the Hood .............
325
Under Hood Overview ..............................
326
Engine Oil Dipstick ......................................
327
Engine Oil Check ..........................................
327
Oil Change Indicator Reset .....................
328
Changing the Engine Air Filter ...............
329
Engine Coolant Check ..............................
329
Automatic Transmission Fluid Check ........................................................................\
333
Transfer Case Fluid Check .......................
334
Brake Fluid Check .......................................
334
Power Steering Fluid Check ....................
335
Changing the 12V Battery ........................
335
Adjusting the Headlamps ........................
337
Washer Fluid Check ...................................
338
Fuel Filter .......................................................
339
Checking the Wiper Blades ....................
339
Changing the Wiper Blades ....................
339
Removing a Headlamp ............................
340
Changing a Bulb .........................................
340
Vehicle Care
General Information ..................................
343
Cleaning Products ......................................
343
Cleaning the Exterior .................................
344
Waxing ............................................................
345
Cleaning the Engine ...................................
345
Cleaning the Windows and Wiper Blades ........................................................................\
345
Cleaning the Interior ..................................
346
Cleaning the Instrument Panel and Instrument Cluster Lens ......................
346
Cleaning Leather Seats .............................
347
Repairing Minor Paint Damage .............
348
Cleaning the Wheels .................................
348
Vehicle Storage ...........................................
348Wheels and Tires
General Information
...................................
351
Tire Care .........................................................
353
Using Snow Chains ....................................
367
Tire Pressure Monitoring System .........
368
Changing a Road Wheel ...........................
372
Technical Specifications ..........................
378
Capacities and Specifications
Engine Specifications ...............................
380
Motorcraft Parts .........................................
380
Vehicle Identification Number ...............
382
Vehicle Certification Label ......................
383
Transmission Code Designation ...........
383
Capacities and Specifications ...............
384
Bulb Specification Chart ..........................
392
Connected Vehicle
Connected Vehicle Requirements .......
394
Connected Vehicle Limitations .............
394
Connecting the Vehicle to a Mobile Network .....................................................
394
Connecting the Vehicle to a Wi-Fi Network .....................................................
394
Connected Vehicle – Troubleshooting ........................................................................\
395
Vehicle Wi-Fi Hotspot
Creating a Vehicle Wi-Fi Hotspot .........
397
Changing the Vehicle Wi-Fi Hotspot Name or Password .................................
397
Audio System
General Information ..................................
398
Audio Unit - Vehicles Without: Touchscreen Display .............................
398
Audio Unit - Vehicles With: Touchscreen Display .........................................................
401
Digital Radio .................................................
402
Satellite Radio .............................................
405
5
Expedition (TB8) Canada/United States of America, enUSA, Edition date: 201907, Third-Printing- Table of Contents
Page 112 of 542
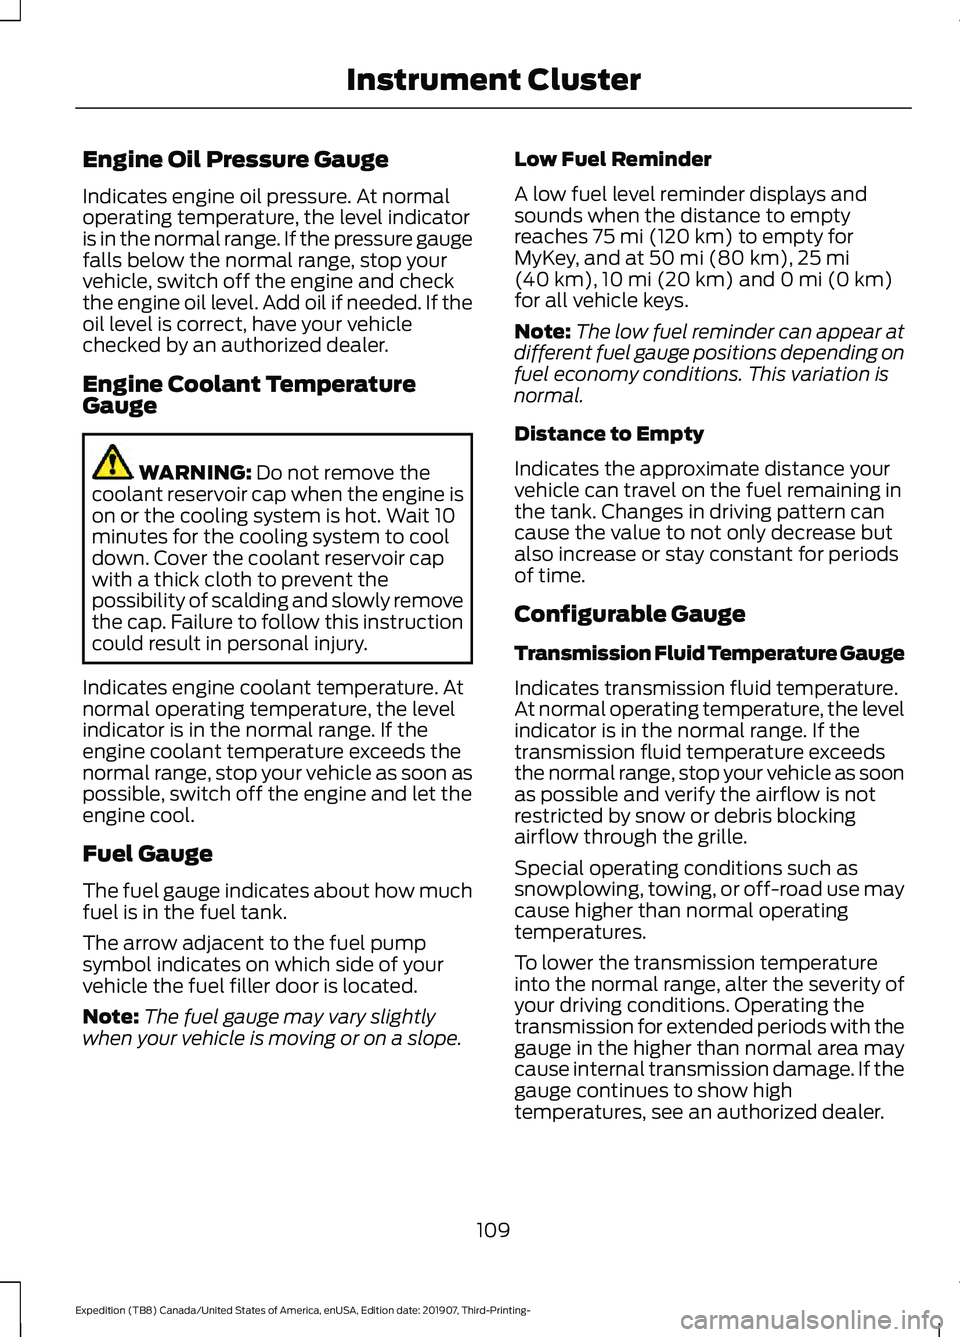
Engine Oil Pressure Gauge
Indicates engine oil pressure. At normal
operating temperature, the level indicator
is in the normal range. If the pressure gauge
falls below the normal range, stop your
vehicle, switch off the engine and check
the engine oil level. Add oil if needed. If the
oil level is correct, have your vehicle
checked by an authorized dealer.
Engine Coolant Temperature
Gauge
WARNING: Do not remove the
coolant reservoir cap when the engine is
on or the cooling system is hot. Wait 10
minutes for the cooling system to cool
down. Cover the coolant reservoir cap
with a thick cloth to prevent the
possibility of scalding and slowly remove
the cap. Failure to follow this instruction
could result in personal injury.
Indicates engine coolant temperature. At
normal operating temperature, the level
indicator is in the normal range. If the
engine coolant temperature exceeds the
normal range, stop your vehicle as soon as
possible, switch off the engine and let the
engine cool.
Fuel Gauge
The fuel gauge indicates about how much
fuel is in the fuel tank.
The arrow adjacent to the fuel pump
symbol indicates on which side of your
vehicle the fuel filler door is located.
Note: The fuel gauge may vary slightly
when your vehicle is moving or on a slope. Low Fuel Reminder
A low fuel level reminder displays and
sounds when the distance to empty
reaches
75 mi (120 km) to empty for
MyKey, and at 50 mi (80 km), 25 mi
(40 km), 10 mi (20 km) and 0 mi (0 km)
for all vehicle keys.
Note: The low fuel reminder can appear at
different fuel gauge positions depending on
fuel economy conditions. This variation is
normal.
Distance to Empty
Indicates the approximate distance your
vehicle can travel on the fuel remaining in
the tank. Changes in driving pattern can
cause the value to not only decrease but
also increase or stay constant for periods
of time.
Configurable Gauge
Transmission Fluid Temperature Gauge
Indicates transmission fluid temperature.
At normal operating temperature, the level
indicator is in the normal range. If the
transmission fluid temperature exceeds
the normal range, stop your vehicle as soon
as possible and verify the airflow is not
restricted by snow or debris blocking
airflow through the grille.
Special operating conditions such as
snowplowing, towing, or off-road use may
cause higher than normal operating
temperatures.
To lower the transmission temperature
into the normal range, alter the severity of
your driving conditions. Operating the
transmission for extended periods with the
gauge in the higher than normal area may
cause internal transmission damage. If the
gauge continues to show high
temperatures, see an authorized dealer.
109
Expedition (TB8) Canada/United States of America, enUSA, Edition date: 201907, Third-Printing- Instrument Cluster
Page 124 of 542
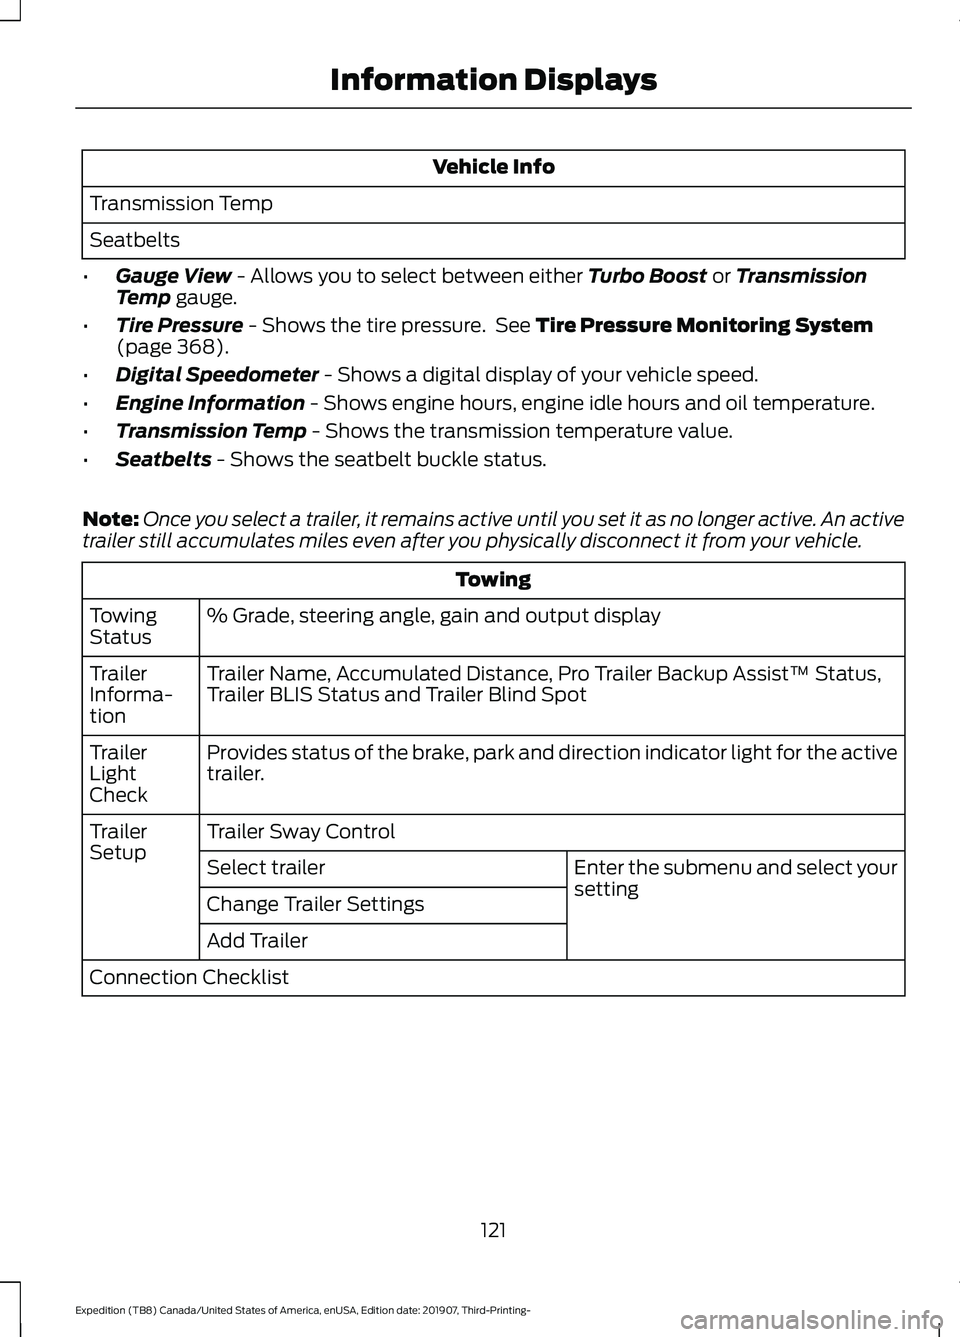
Vehicle Info
Transmission Temp
Seatbelts
• Gauge View - Allows you to select between either Turbo Boost or Transmission
Temp gauge.
• Tire Pressure
- Shows the tire pressure. See Tire Pressure Monitoring System
(page 368).
• Digital Speedometer
- Shows a digital display of your vehicle speed.
• Engine Information
- Shows engine hours, engine idle hours and oil temperature.
• Transmission Temp
- Shows the transmission temperature value.
• Seatbelts
- Shows the seatbelt buckle status.
Note: Once you select a trailer, it remains active until you set it as no longer active. An active
trailer still accumulates miles even after you physically disconnect it from your vehicle. Towing
% Grade, steering angle, gain and output display
Towing
Status
Trailer Name, Accumulated Distance, Pro Trailer Backup Assist™ Status,
Trailer BLIS Status and Trailer Blind Spot
Trailer
Informa-
tion
Provides status of the brake, park and direction indicator light for the active
trailer.
Trailer
Light
Check
Trailer Sway Control
Trailer
Setup
Enter the submenu and select your
setting
Select trailer
Change Trailer Settings
Add Trailer
Connection Checklist
121
Expedition (TB8) Canada/United States of America, enUSA, Edition date: 201907, Third-Printing- Information Displays
Page 134 of 542
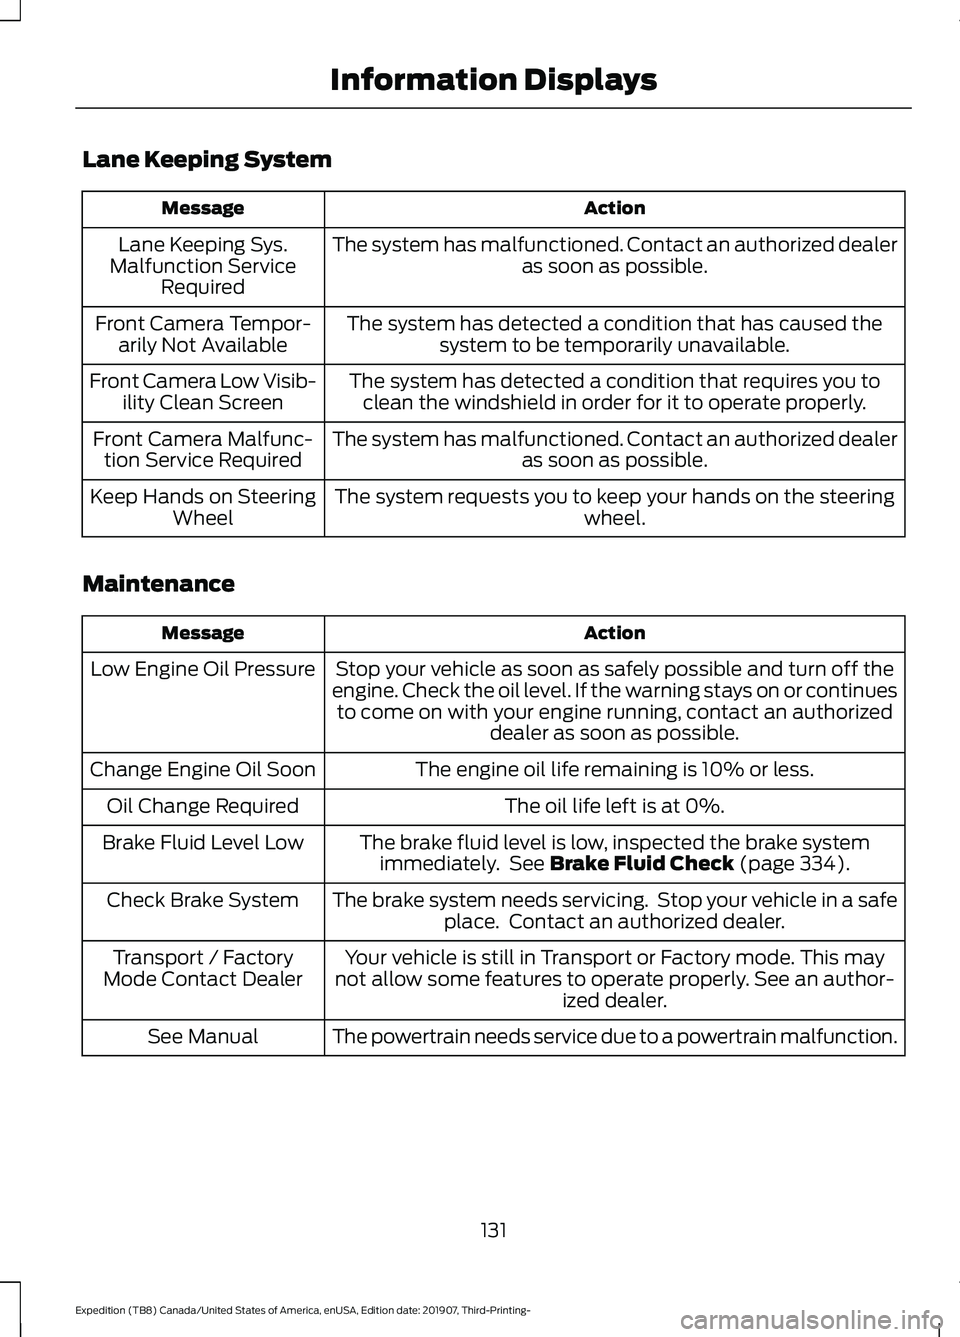
Lane Keeping System
Action
Message
The system has malfunctioned. Contact an authorized dealer as soon as possible.
Lane Keeping Sys.
Malfunction Service Required
The system has detected a condition that has caused thesystem to be temporarily unavailable.
Front Camera Tempor-
arily Not Available
The system has detected a condition that requires you toclean the windshield in order for it to operate properly.
Front Camera Low Visib-
ility Clean Screen
The system has malfunctioned. Contact an authorized dealeras soon as possible.
Front Camera Malfunc-
tion Service Required
The system requests you to keep your hands on the steering wheel.
Keep Hands on Steering
Wheel
Maintenance Action
Message
Stop your vehicle as soon as safely possible and turn off the
engine. Check the oil level. If the warning stays on or continues to come on with your engine running, contact an authorized dealer as soon as possible.
Low Engine Oil Pressure
The engine oil life remaining is 10% or less.
Change Engine Oil Soon
The oil life left is at 0%.
Oil Change Required
The brake fluid level is low, inspected the brake systemimmediately. See Brake Fluid Check (page 334).
Brake Fluid Level Low
The brake system needs servicing. Stop your vehicle in a safeplace. Contact an authorized dealer.
Check Brake System
Your vehicle is still in Transport or Factory mode. This may
not allow some features to operate properly. See an author- ized dealer.
Transport / Factory
Mode Contact Dealer
The powertrain needs service due to a powertrain malfunction.
See Manual
131
Expedition (TB8) Canada/United States of America, enUSA, Edition date: 201907, Third-Printing- Information Displays
Page 331 of 542
Do not use supplemental engine oil
additives because they are unnecessary
and could lead to engine damage that may
not be covered by the vehicle Warranty.
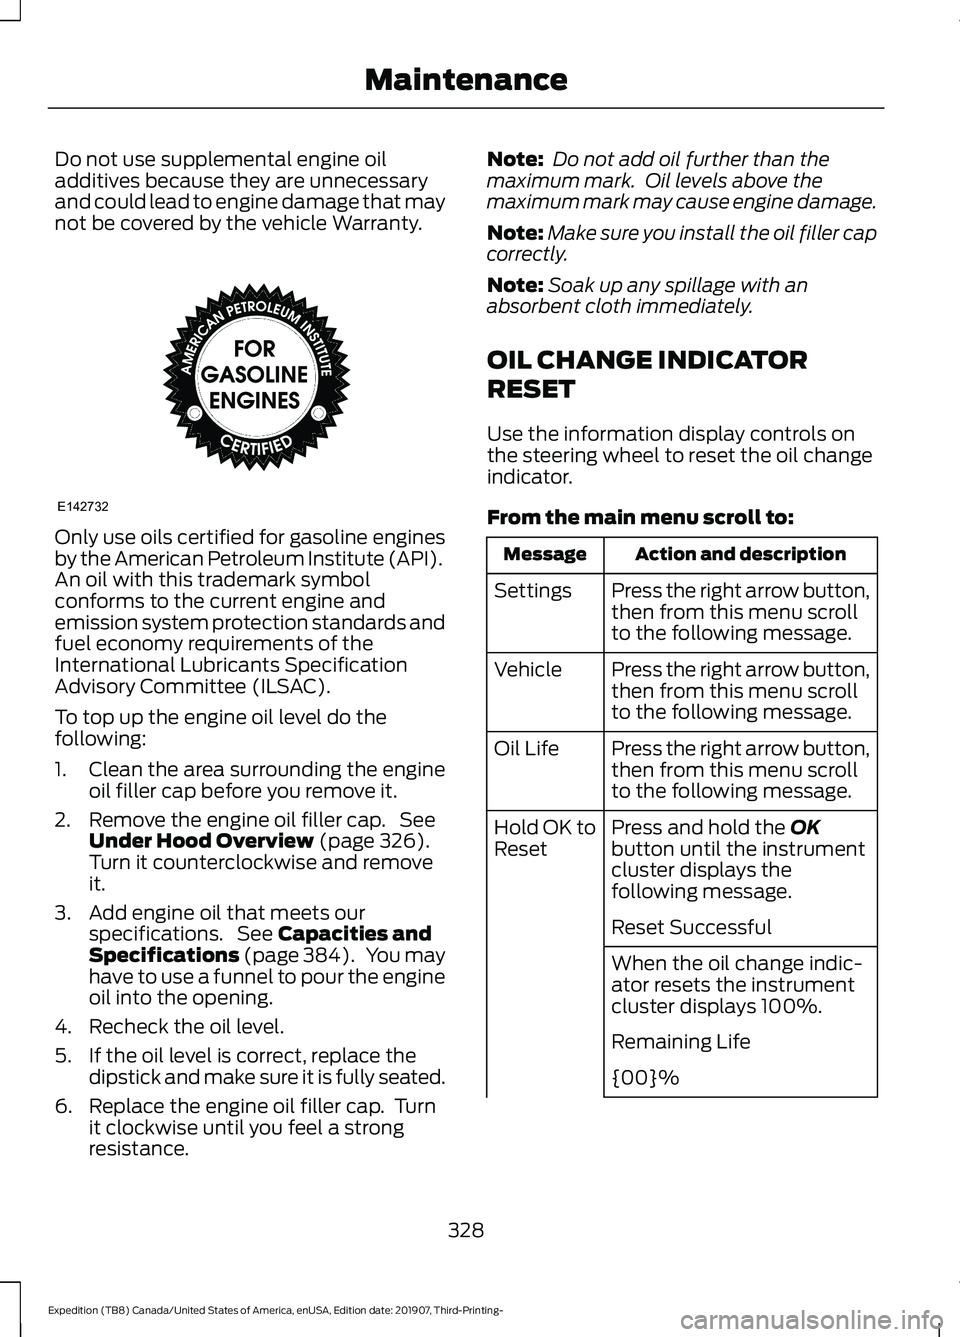
Only use oils certified for gasoline engines
by the American Petroleum Institute (API).
An oil with this trademark symbol
conforms to the current engine and
emission system protection standards and
fuel economy requirements of the
International Lubricants Specification
Advisory Committee (ILSAC).
To top up the engine oil level do the
following:
1. Clean the area surrounding the engine
oil filler cap before you remove it.
2. Remove the engine oil filler cap. See Under Hood Overview (page 326).
Turn it counterclockwise and remove
it.
3. Add engine oil that meets our specifications. See
Capacities and
Specifications (page 384). You may
have to use a funnel to pour the engine
oil into the opening.
4. Recheck the oil level.
5. If the oil level is correct, replace the dipstick and make sure it is fully seated.
6. Replace the engine oil filler cap. Turn it clockwise until you feel a strong
resistance. Note:
Do not add oil further than the
maximum mark. Oil levels above the
maximum mark may cause engine damage.
Note: Make sure you install the oil filler cap
correctly.
Note: Soak up any spillage with an
absorbent cloth immediately.
OIL CHANGE INDICATOR
RESET
Use the information display controls on
the steering wheel to reset the oil change
indicator.
From the main menu scroll to: Action and description
Message
Press the right arrow button,
then from this menu scroll
to the following message.
Settings
Press the right arrow button,
then from this menu scroll
to the following message.
Vehicle
Press the right arrow button,
then from this menu scroll
to the following message.
Oil Life
Press and hold the
OK
button until the instrument
cluster displays the
following message.
Hold OK to
Reset
Reset Successful
When the oil change indic-
ator resets the instrument
cluster displays 100%.
Remaining Life
{00}%
328
Expedition (TB8) Canada/United States of America, enUSA, Edition date: 201907, Third-Printing- MaintenanceE142732
Page 352 of 542
•
Cover interior trim to prevent fading.
• Keep all rubber parts free from oil and
solvents.
Engine
• Change the engine oil and filter prior to
storage because used engine oil
contains contaminates which may
cause engine damage.
• Start the engine every 15 days for a
minimum of 15 minutes. Run at fast
idle with the climate controls set to
defrost until the engine reaches normal
operating temperature.
• With your foot on the brake, shift
through all the gears while the engine
is running.
• We recommend that you change the
engine oil before you use your vehicle
again.
Fuel system
• Fill the fuel tank with high-quality fuel
until the first automatic shutoff of the
fuel pump nozzle.
Cooling system
• Protect against freezing temperatures.
• When removing your vehicle from
storage, check coolant fluid level.
Confirm that there are no cooling
system leaks and that fluid is at the
recommended level.
Disconnecting Your 12 Volt Battery
• Check and recharge as necessary. Keep
connections clean.
• If storing your vehicle for more than 30
days without recharging the battery,
we recommend that you disconnect
the battery cables to maintain battery
charge for quick starting. Note:
It is necessary to reset memory
features if you disconnect the battery
cables.
Brakes
• Make sure the brakes and parking brake
release fully.
Tires
• Maintain recommended air pressure.
Miscellaneous
• Make sure all linkages, cables, levers
and pins under your vehicle are covered
with grease to prevent rust.
• Move vehicles at least 25 ft (7.5 m)
every 15 days to lubricate working parts
and prevent corrosion.
Removing Vehicle From Storage
When your vehicle is ready to come out of
storage, do the following:
• Wash your vehicle to remove any dirt
or grease film build-up on window
surfaces.
• Check windshield wipers for any
deterioration.
• Check under the hood for any foreign
material that may have collected
during storage such as mice or squirrel
nests.
• Check the exhaust for any foreign
material that may have collected
during storage.
• Check tire pressures and set tire
inflation per the Tire Label.
• Check brake pedal operation. Drive
your vehicle
15 ft (4.5 m) back and
forth to remove rust build-up.
349
Expedition (TB8) Canada/United States of America, enUSA, Edition date: 201907, Third-Printing- Vehicle Care
Page 478 of 542
GENERAL MAINTENANCE
INFORMATION
Why Maintain Your Vehicle?
Carefully following the maintenance
schedule helps protect against major repair
expenses resulting from neglect or
inadequate maintenance and may help to
increase the value of your vehicle when
you sell or trade it. Keep all receipts for
completed maintenance with your vehicle.
We have established regular maintenance
intervals for your vehicle based upon
rigorous testing. It is important that you
have your vehicle serviced at the proper
times. These intervals serve two purposes;
one is to maintain the reliability of your
vehicle and the second is to keep your cost
of owning your vehicle down.
It is your responsibility to have all
scheduled maintenance performed and to
make sure that the materials used meet
the specifications identified in this owner's
manual. See Capacities and
Specifications (page 380).
Failure to perform scheduled maintenance
invalidates warranty coverage on parts
affected by the lack of maintenance.
Why Maintain Your Vehicle at Your
Dealership?
Factory-Trained Technicians
Service technicians participate in extensive
factory-sponsored certification training to
help them become experts on the
operation of your vehicle. Ask your
dealership about the training and
certification their technicians have
received. Genuine Ford and Motorcraft®
Replacement Parts
Dealerships stock Ford, Motorcraft and
Ford-authorized branded re-manufactured
replacement parts. These parts meet or
exceed our specifications. Parts installed
at your dealership carry a nationwide
24-month or unlimited mile (kilometer)
parts and labor limited warranty.
If you do not use our authorized parts they
may not meet our specifications and
depending on the part, it could affect
emissions compliance.
Convenience
Many dealerships have extended evening
and Saturday hours to make your service
visit more convenient and they offer one
stop shopping. They can perform any
services that are required on your vehicle,
from general maintenance to collision
repairs.
Note:
Not all dealers have extended hours
or body shops. Please contact your dealer
for details.
Protecting Your Investment
Maintenance is an investment that pays
dividends in the form of improved
reliability, durability and resale value. To
maintain the proper performance of your
vehicle and its emission control systems,
make sure you have scheduled
maintenance performed at the designated
intervals.
Your vehicle has an Intelligent Oil-Life
Monitor system, a message appears in the
information display at the proper oil
change interval. This interval may be up to
one year or 10,000 mi (16,000 km), hybrid
vehicles may exceed
10,000 mi
(16,000 km).
475
Expedition (TB8) Canada/United States of America, enUSA, Edition date: 201907, Third-Printing- Scheduled Maintenance
Page 479 of 542
When the oil change message appears in
the information display, it is time for an oil
change. Make sure you perform the oil
change within two weeks or 500 mi
(800 km) of the message appearing. Make
sure you reset the Intelligent Oil-Life
Monitor after each oil change. See
Oil
Change Indicator Reset (page 328).
If your information display resets
prematurely or becomes inoperative, you
should perform the oil change interval at
six months or
5,000 mi (8,000 km) from
your last oil change. Never exceed one year
or
10,000 mi (16,000 km) between oil
change intervals,
Your vehicle is very sophisticated and built
with multiple, complex, performance
systems. Every manufacturer develops
these systems using different
specifications and performance features.
That is why it is important to rely upon your
dealership to properly diagnose and repair
your vehicle.
We have recommended maintenance
intervals for various parts and component
systems based upon engineering testing.
We rely upon this testing to determine the
most appropriate mileage for replacement
of oils and fluids to protect your vehicle at
the lowest overall cost to you and
recommends against maintenance
schedules that deviate from the scheduled
maintenance information.
We strongly recommend the use of only
genuine Ford, Motorcraft or
Ford-authorized re-manufactured
replacement parts engineered for your
vehicle. Additives and Chemicals
This owner's manual and the our
Workshop Manual list the recommended
additives and chemicals for your vehicle.
We do not recommend using chemicals or
additives not approved by us as part of
your vehicle
’s normal maintenance. Please
consult your warranty information.
Oils, Fluids and Flushing
In many cases, fluid discoloration is a
normal operating characteristic and, by
itself, does not necessarily indicate a
concern or that the fluid needs to be
changed. However, a qualified expert, such
as the factory-trained technicians at your
dealership, should inspect discolored fluids
that also show signs of overheating or
foreign material contamination
immediately.
Make sure to change your vehicle ’s oils and
fluids at the specified intervals or in
conjunction with a repair. Flushing is a
viable way to change fluid for many vehicle
sub-systems during scheduled
maintenance. It is critical that systems are
flushed only with new fluid that is the same
as that required to fill and operate the
system or using a Ford-approved flushing
chemical.
Owner Checks and Services
Make sure you perform the following basic
maintenance checks and inspections every
month or at six-month intervals. Check Every Month
Engine oil level.
Function of all interior and exterior lights.
Tires (including spare) for wear and proper pressure.
476
Expedition (TB8) Canada/United States of America, enUSA, Edition date: 201907, Third-Printing- Scheduled Maintenance