2020 FORD EXPEDITION lights
[x] Cancel search: lightsPage 50 of 542

This system provides an improved overall
level of frontal crash protection to front
seat occupants and is designed to help
further reduce the risk of airbag-related
injuries. The system analyzes different
occupant conditions and crash severity
before activating the appropriate safety
devices to help better protect occupants
in a variety of frontal crash situations.
Your vehicle's Personal Safety System
consists of:
•
Driver and passenger dual-stage airbag
supplemental restraints.
• Front seat outermost seatbelts with
pretensioners, energy management
retractors and seatbelt usage sensors.
• Driver seat position sensor.
• Front passenger sensing system.
• Passenger airbag off and on indicators.
• Front crash severity sensors.
• Restraints control module with impact
and safing sensors.
• Restraint system warning light and
tone.
• The electrical wiring for the airbags,
crash sensors, seatbelt pretensioners,
front seatbelt usage sensors, driver
seat position sensor, front passenger
sensing system and indicator lights.
How Does the Personal Safety
System Work?
The Personal Safety System can adapt the
deployment strategy of the safety devices
according to crash severity and occupant
conditions. A collection of crash and
occupant sensors provides information to
the restraints control module. During a
crash, the restraints control module may
deploy the seatbelt pretensioners, one or
both stages of the dual-stage airbags
based on crash severity and occupant
conditions.
47
Expedition (TB8) Canada/United States of America, enUSA, Edition date: 201907, Third-Printing- Personal Safety System
™
Page 101 of 542
Interior Lamp Function
Press to switch the interior lamp
function on and off.
When the interior lamp function is off and
you open a door, the courtesy and door
lamps stay off.
When the interior lamp function is on and
you open a door, the courtesy and door
lamps turn on.
Note: The indicator lamp lights amber
when the door function is off.
Rear Interior Lamps
The rear interior lamps may be above the
rear seat or above the rear windows. Press to switch the lamps on or
off.
Note: If the rear lamps are switched on
through the overhead console, you cannot
turn them off with the rear lamp switch.
AMBIENT LIGHTING (IF EQUIPPED)
Use the touchscreen to select the
following: Select the settings option on the
feature bar.
Select
Vehicle.
Select
Ambient Light. Switching Ambient Lighting On
Drag the slider above zero brightness.
Adjusting the Brightness
Drag the slider left or right.
Switching Ambient Lighting Off
Drag the slider left to zero brightness.
98
Expedition (TB8) Canada/United States of America, enUSA, Edition date: 201907, Third-Printing- Lighting E280315 E306304
Page 105 of 542

Opening the Windows
You can only open the windows for a short
time after you unlock your vehicle with the
remote control. After you unlock your
vehicle, press and hold the remote control
unlock button to open the windows.
Release the button once movement starts.
Press the lock or unlock button to stop
movement.
Closing the Windows
WARNING: When closing the
power windows, verify they are free of
obstruction and make sure that children
and pets are not in the proximity of the
window openings.
To close the windows, press and hold the
remote control lock button. Release the
button once movement starts. Press the
lock or unlock button to stop movement.
EXTERIOR MIRRORS
Power Exterior Mirrors WARNING:
Do not adjust the
mirrors when your vehicle is moving. This
could result in the loss of control of your
vehicle, serious personal injury or death.
Note: Do not use an ice scraper on the
mirror glass or housing. Left-hand mirror.
A
Right-hand mirror.
B
Adjustment control.
C
Window lockout.
D
Power-folding mirror control.
E
To adjust a mirror:
1. Select the mirror you want to adjust. The control lights.
2. Adjust the position of the mirror.
3. Press the mirror control again.
Fold-Away Exterior Mirrors
Push the mirror toward the door window
glass. Make sure that you fully engage the
mirror in its support when returning it to its
original position.
Auto-Folding Mirrors
(If Equipped)
The exterior mirrors automatically fold in
toward the glass after you place the
transmission into park (P), switch off the
vehicle, open and close the driver-side door
and lock the vehicle. The exterior mirrors
automatically unfold and return to their
driving position after you unlock the vehicle
and open and close the driver-side door.
You can switch this feature on and off
through the information display. See
General Information
(page 114).
102
Expedition (TB8) Canada/United States of America, enUSA, Edition date: 201907, Third-Printing- Windows and MirrorsE176219
Page 106 of 542
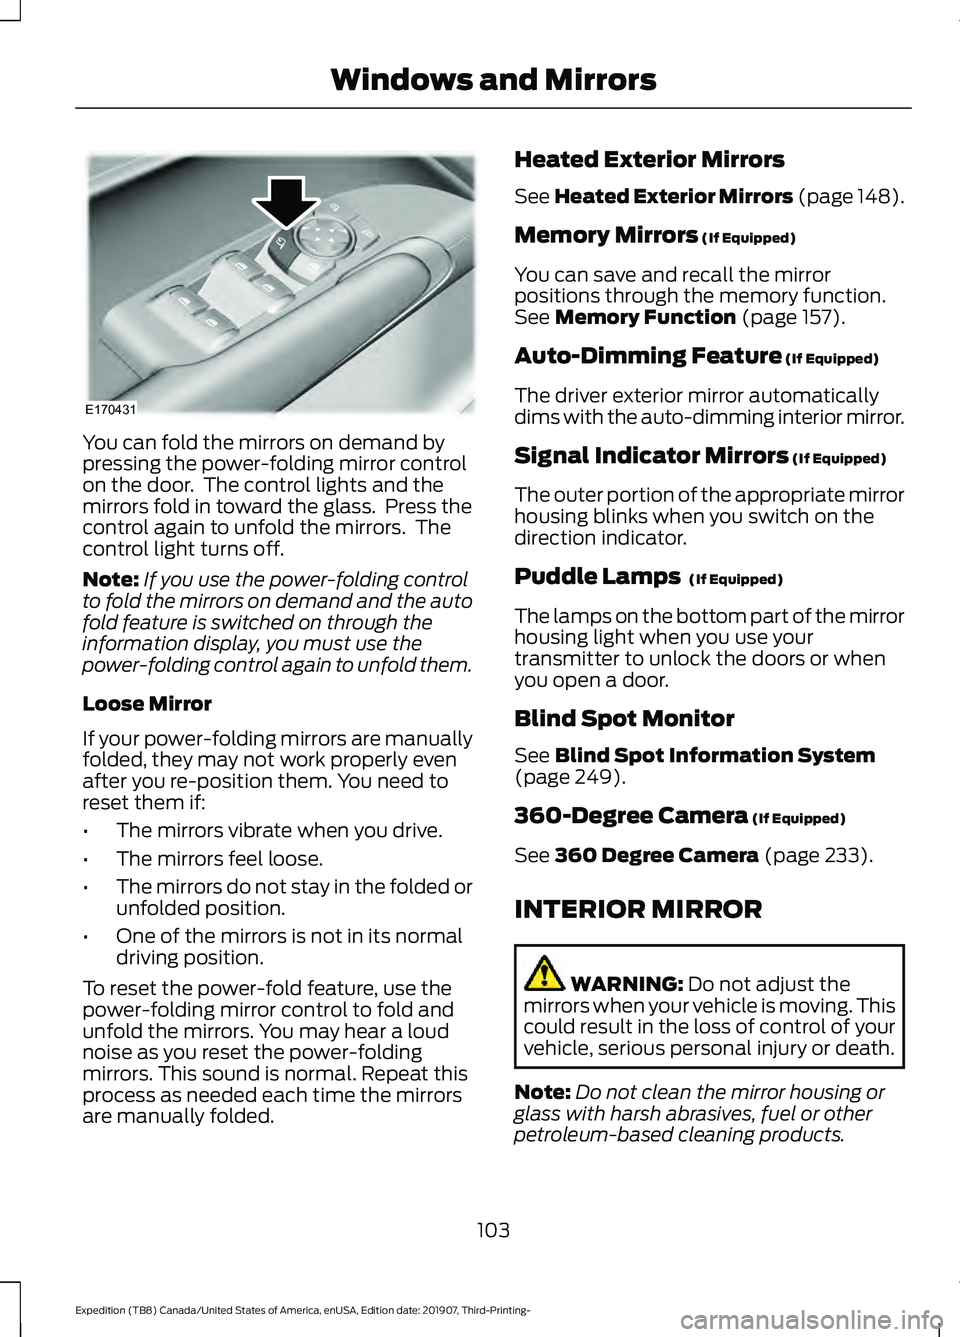
You can fold the mirrors on demand by
pressing the power-folding mirror control
on the door. The control lights and the
mirrors fold in toward the glass. Press the
control again to unfold the mirrors. The
control light turns off.
Note:
If you use the power-folding control
to fold the mirrors on demand and the auto
fold feature is switched on through the
information display, you must use the
power-folding control again to unfold them.
Loose Mirror
If your power-folding mirrors are manually
folded, they may not work properly even
after you re-position them. You need to
reset them if:
• The mirrors vibrate when you drive.
• The mirrors feel loose.
• The mirrors do not stay in the folded or
unfolded position.
• One of the mirrors is not in its normal
driving position.
To reset the power-fold feature, use the
power-folding mirror control to fold and
unfold the mirrors. You may hear a loud
noise as you reset the power-folding
mirrors. This sound is normal. Repeat this
process as needed each time the mirrors
are manually folded. Heated Exterior Mirrors
See Heated Exterior Mirrors (page 148).
Memory Mirrors
(If Equipped)
You can save and recall the mirror
positions through the memory function.
See
Memory Function (page 157).
Auto-Dimming Feature
(If Equipped)
The driver exterior mirror automatically
dims with the auto-dimming interior mirror.
Signal Indicator Mirrors
(If Equipped)
The outer portion of the appropriate mirror
housing blinks when you switch on the
direction indicator.
Puddle Lamps
(If Equipped)
The lamps on the bottom part of the mirror
housing light when you use your
transmitter to unlock the doors or when
you open a door.
Blind Spot Monitor
See
Blind Spot Information System
(page 249).
360-Degree Camera
(If Equipped)
See
360 Degree Camera (page 233).
INTERIOR MIRROR WARNING:
Do not adjust the
mirrors when your vehicle is moving. This
could result in the loss of control of your
vehicle, serious personal injury or death.
Note: Do not clean the mirror housing or
glass with harsh abrasives, fuel or other
petroleum-based cleaning products.
103
Expedition (TB8) Canada/United States of America, enUSA, Edition date: 201907, Third-Printing- Windows and MirrorsE170431
Page 166 of 542
CLIMATE CONTROLLED SEATS
(IF EQUIPPED)
Heated Seats
WARNING: Use caution when using
the heated seat if you are unable to feel
pain to your skin because of advanced
age, chronic illness, diabetes, spinal cord
injury, medication, alcohol use,
exhaustion or other physical conditions.
The heated seat could cause burns even
at low temperatures, especially if used
for long periods of time. Failure to follow
this instruction could result in personal
injury. WARNING: Do not poke sharp
objects into the seat cushion or seat
backrest. This could damage the heated
seat element and cause it to overheat.
Failure to follow this instruction could
result in personal injury. WARNING:
Do not place anything
on the seat that blocks the heat, for
example a seat cover or a cushion. This
could cause the seat to overheat. Failure
to follow this instruction could result in
personal injury.
Note: The heated seats switch on during a
remote start if they are enabled. See
Remote Start
(page 148).
Note: The heated seats may also switch
on when you start your vehicle if they were
on when you previously switched your
vehicle off.
Note: Do not do the following:
• Place heavy objects on the seat.
• Operate the seat heater if water or any
other liquid spills on the seat. Allow the
seat to dry thoroughly. Press this symbol to cycle through the
various heat settings and off. More
indicator lights indicate warmer settings.
Rear Heated Seats (If Equipped)
The rear heated seat controls are on the
rear of the center console.
Automatic Climate Controlled
Seats
(If Equipped)
When you switch the auto setting on, the
climate controlled seats switch between
the heated seats and ventilated seats to
match your climate control setting.
Ventilated Seats
Note: The ventilated seats switch on during
a remote start if they are enabled. See
Remote Start
(page 148).
Note: The ventilated seats may also switch
on when you start your vehicle if they were
on when you previously switched your
vehicle off.
Note: Do not do the following:
• Spill liquid on the front seats. This may
cause the air vent holes to become
blocked and not work properly.
• Place cargo or objects under the seats.
They may block the air intake causing
the air vents to not work properly.
The ventilated seats only function when
the engine is running.
163
Expedition (TB8) Canada/United States of America, enUSA, Edition date: 201907, Third-Printing- SeatsE146322
Page 167 of 542
Press this symbol to cycle through the
various ventilation settings and off. More
indicator lights indicate higher fan speeds.
If the engine falls below 350 RPM while
the ventilated seats are on, the feature
turns itself off. You need to reactivate it.
Automatic Climate Controlled
Seats (If Equipped)
When you switch the auto setting on, the
climate controlled seats switch between
the heated seats and ventilated seats to
match your climate control setting.
164
Expedition (TB8) Canada/United States of America, enUSA, Edition date: 201907, Third-Printing- SeatsE224689
Page 203 of 542
USING FOUR-WHEEL DRIVE
Note:
For important information regarding
safe operation of this type of vehicle, see
General Information in the Wheels and Tires
chapter.
Note: Do not use 4H or 4L mode on dry,
hard surfaced roads. Doing so can produce
excessive noise, increase tire wear and may
damage drive components. 4H and 4L mode
is only intended for consistently slippery or
loose surfaces. Use of 4L mode on these
surfaces may produce some noise, such as
occasional clunks, but does not damage
drive components.
Note: If 4L mode is selected when your
vehicle is moving above 3 mph (5 km/h),
the 4WD system does not perform a shift.
This is normal and should be no reason for
concern. Refer to Shifting to or from 4L for
proper operation.
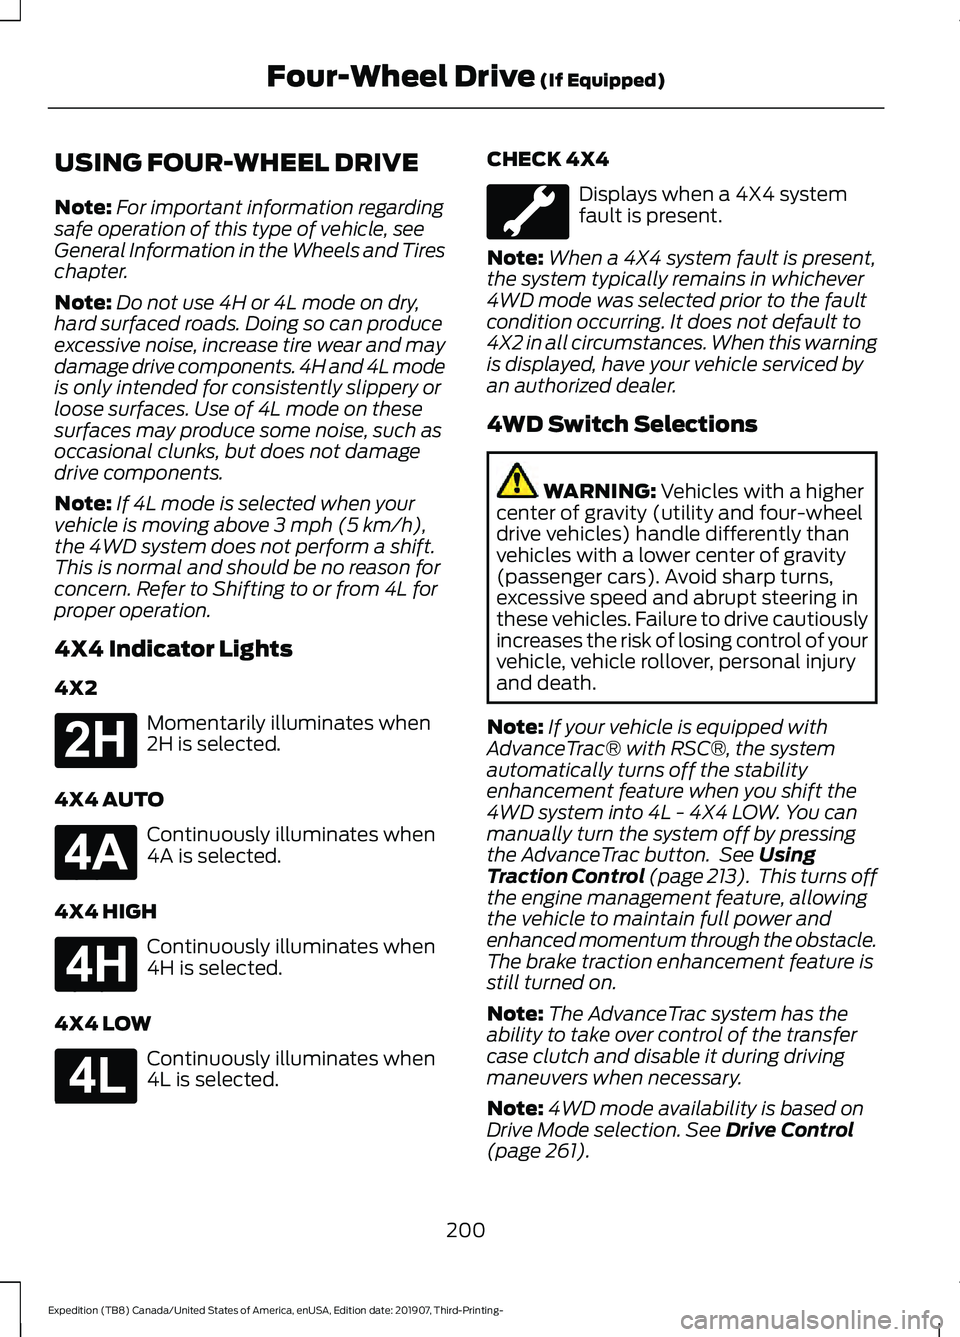
4X4 Indicator Lights
4X2 Momentarily illuminates when
2H is selected.
4X4 AUTO Continuously illuminates when
4A is selected.
4X4 HIGH Continuously illuminates when
4H is selected.
4X4 LOW Continuously illuminates when
4L is selected. CHECK 4X4 Displays when a 4X4 system
fault is present.
Note: When a 4X4 system fault is present,
the system typically remains in whichever
4WD mode was selected prior to the fault
condition occurring. It does not default to
4X2 in all circumstances. When this warning
is displayed, have your vehicle serviced by
an authorized dealer.
4WD Switch Selections WARNING:
Vehicles with a higher
center of gravity (utility and four-wheel
drive vehicles) handle differently than
vehicles with a lower center of gravity
(passenger cars). Avoid sharp turns,
excessive speed and abrupt steering in
these vehicles. Failure to drive cautiously
increases the risk of losing control of your
vehicle, vehicle rollover, personal injury
and death.
Note: If your vehicle is equipped with
AdvanceTrac® with RSC®, the system
automatically turns off the stability
enhancement feature when you shift the
4WD system into 4L - 4X4 LOW. You can
manually turn the system off by pressing
the AdvanceTrac button. See
Using
Traction Control (page 213). This turns off
the engine management feature, allowing
the vehicle to maintain full power and
enhanced momentum through the obstacle.
The brake traction enhancement feature is
still turned on.
Note: The AdvanceTrac system has the
ability to take over control of the transfer
case clutch and disable it during driving
maneuvers when necessary.
Note: 4WD mode availability is based on
Drive Mode selection.
See Drive Control
(page 261).
200
Expedition (TB8) Canada/United States of America, enUSA, Edition date: 201907, Third-Printing- Four-Wheel Drive
(If Equipped)E181778 E181781 E181779 E181780
Page 215 of 542
developed sufficient torque to prevent your
vehicle from rolling down the slope. This
is an advantage when pulling away on a
slope, for example from a car park ramp,
traffic lights or when reversing uphill into
a parking space.
The system activates on any slope that
causes your vehicle to roll.
Note:
There is no warning light to indicate
the system is either on or off.
Using Hill Start Assist
1. Press the brake pedal to bring your vehicle to a complete standstill. Keep
the brake pedal pressed and shift into
first gear when facing uphill or reverse
(R) when facing downhill.
2. If the sensors detect that your vehicle is on a slope, the system activates
automatically.
3. When you remove your foot from the brake pedal, your vehicle remains on
the slope without rolling away for
about two to three seconds. This hold
time automatically extends if you are
in the process of driving off.
4. Drive off in the normal manner. The system releases the brakes
automatically.
Note: When you remove your foot from the
brake pedal and press the pedal again when
the system is active, you will experience
significantly reduced brake pedal travel. This
is normal.
Switching the System On and Off
Vehicles with Manual Transmission
You can switch this feature on or off in the
information display. The system
remembers the last setting when you start
your vehicle. Vehicles with Automatic Transmission
You cannot turn the system on or off.
When you switch the ignition on, the
system automatically turns on.
212
Expedition (TB8) Canada/United States of America, enUSA, Edition date: 201907, Third-Printing- Brakes