Page 269 of 396
MULTIMEDIA 267
Display
After pressing the Display button on the touchscreen, the following settings will be available:
Clock
After pressing the Clock button on the touchscreen, the following settings will be available:
Setting Name Selectable Options
Brightness+ –
NOTE:
The “Brightness” setting can also be adjusted by selecting any point on the scale between the + and – buttons on the touchscreen.
Mode DayNight Auto
Language EnglishFrançais Español
NOTE:
When in the “Language” feature, you may select one of three languages for all display nomenclature.
Units US Metric
Voice Response Brief Long
Touchscreen Beep On Off
Setting NameSelectable Options
Set Time and Format12 hr
24 hr
AM PM
NOTE:
Within the “Set Time and Format” setting, press the corresponding Arrow buttons on the touchscreen to adjust to the correct time.
9
Page 270 of 396
268 MULTIMEDIA
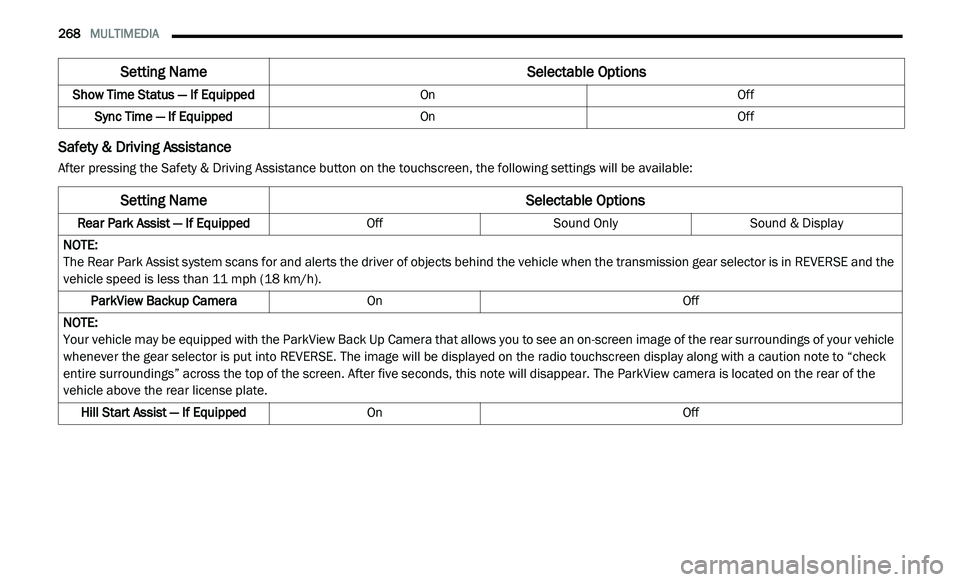
Safety & Driving Assistance
After pressing the Safety & Driving Assistance button on the touchscreen, the following settings will be available:Show Time Status — If Equipped
OnOff
Sync Time — If Equipped OnOff
Setting Name Selectable Options
Setting NameSelectable Options
Rear Park Assist — If EquippedOffSound Only Sound & Display
NOTE:
The Rear Park Assist system scans for and alerts the driver of objects behind the vehicle when the transmission gear selector is in REVERSE and the
v e
hicle speed is less than 11 mph (18 km/h).
ParkView Backup Camera On Off
NOTE:
Your vehicle may be equipped with the ParkView Back Up Camera that allows you to see an on-screen image of the rear surroundings of your vehicle
w h
enever the gear selector is put into REVERSE. The image will be displayed on the radio touchscreen display along with a caution note to “check
entire surroundings” across the top of the screen. After five seconds, this note will disappear. The ParkView camera is located on the rear of the
vehicle above the rear license plate.
Hill Start Assist — If Equipped On Off
Page 274 of 396
272 MULTIMEDIA
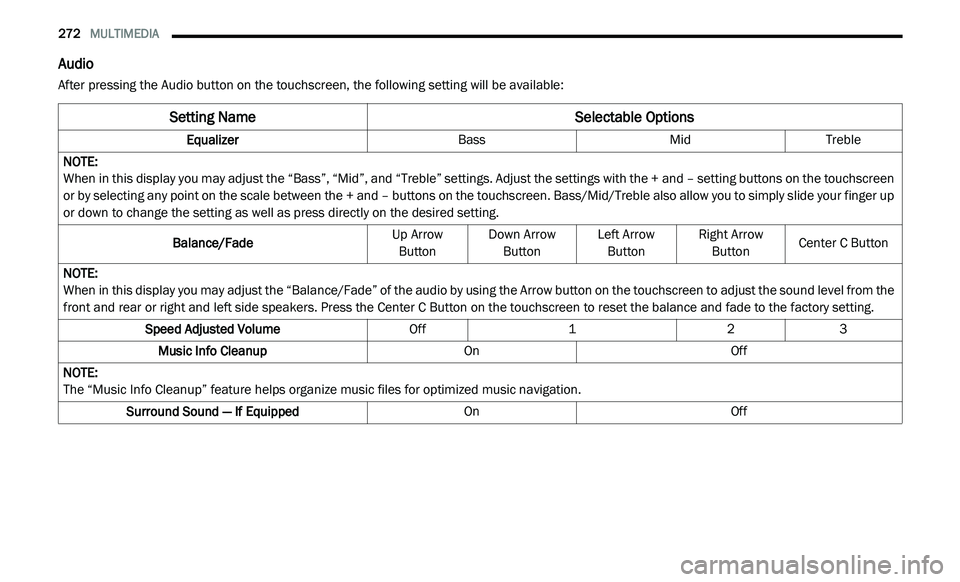
Audio
After pressing the Audio button on the touchscreen, the following setting will be available:
Setting Name Selectable Options
EqualizerBassMidTreble
NOTE:
When in this display you may adjust the “Bass”, “Mid”, and “Treble” settings. Adjust the settings with the + and – setting buttons on the touchscreen
o r
by selecting any point on the scale between the + and – buttons on the touchscreen. Bass/Mid/Treble also allow you to simply slide your finger up
or down to change the setting as well as press directly on the desired setting.
Balance/Fade Up Arrow
B u
tton Down Arrow
Bu tton Left Arrow
Bu tton Right Arrow
Bu tton Center C Button
NOTE:
When in this display you may adjust the “Balance/Fade” of the audio by using the Arrow button on the touchscreen to adjust the sound level from the
f r
ont and rear or right and left side speakers. Press the Center C Button on the touchscreen to reset the balance and fade to the factory setting.
Speed Adjusted Volume Off123
Music Info Cleanup OnOff
NOTE:
The “Music Info Cleanup” feature helps organize music files for optimized music navigation.
Surround Sound — If Equipped OnOff
Page 276 of 396
274 MULTIMEDIA
CUSTOMER PROGRAMMABLE FEATURES —
U
CONNECT 3/ 3 NAV SETTINGS
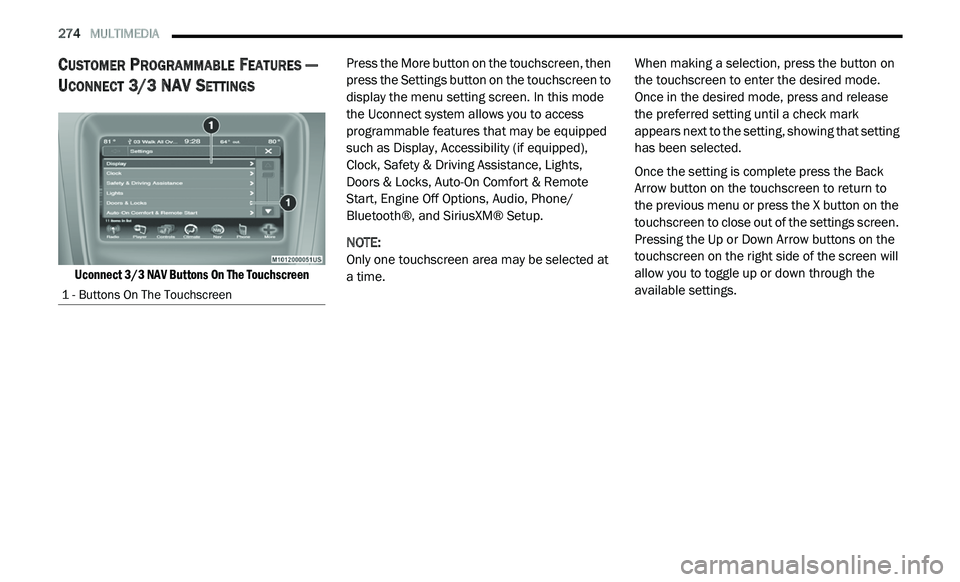
Uconnect 3/3 NAV Buttons On The Touchscreen
Press the More button on the touchscreen, then
p
r
ess the Settings button on the touchscreen to
display the menu setting screen. In this mode
the Uconnect system allows you to access
programmable features that may be equipped
such as Display, Accessibility (if equipped),
Clock, Safety & Driving Assistance, Lights,
Doors & Locks, Auto-On Comfort & Remote
Start, Engine Off Options, Audio, Phone/
Bluetooth®, and SiriusXM® Setup.
NOTE:
Only one touchscreen area may be selected at
a
time. When making a selection, press the button on
t
h
e touchscreen to enter the desired mode.
Once in the desired mode, press and release
the preferred setting until a check mark
appears next to the setting, showing that setting
has been selected.
Once the setting is complete press the Back
A r
row button on the touchscreen to return to
the previous menu or press the X button on the
touchscreen to close out of the settings screen.
Pressing the Up or Down Arrow buttons on the
touchscreen on the right side of the screen will
allow you to toggle up or down through the
available settings.
1 - Buttons On The Touchscreen
Page 277 of 396
MULTIMEDIA 275
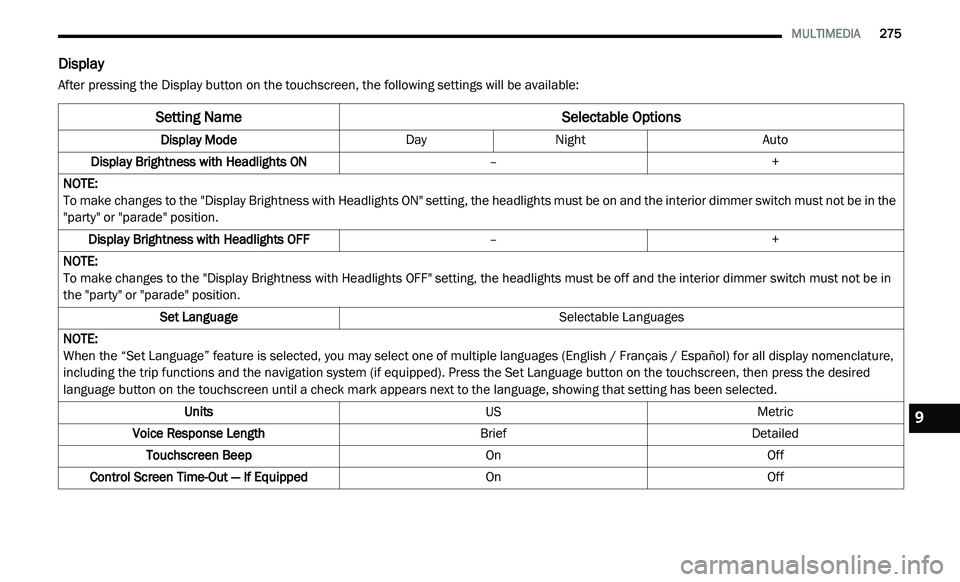
Display
After pressing the Display button on the touchscreen, the following settings will be available:
Setting Name Selectable Options
Display ModeDayNight Auto
Display Brightness with Headlights ON –+
NOTE:
To make changes to the "Display Brightness with Headlights ON" setting, the headlights must be on and the interior dimmer switch must not be in the
" p
arty" or "parade" position.
Display Brightness with Headlights OFF –+
NOTE:
To make changes to the "Display Brightness with Headlights OFF" setting, the headlights must be off and the interior dimmer switch must not be in
th
e "party" or "parade" position.
Set Language Selectable Languages
NOTE:
When the “Set Language” feature is selected, you may select one of multiple languages (English / Français / Español) for all display nomenclature,
in
cluding the trip functions and the navigation system (if equipped). Press the Set Language button on the touchscreen, then press the desired
language button on the touchscreen until a check mark appears next to the language, showing that setting has been selected.
Units USMetric
Voice Response Length BriefDetailed
Touchscreen Beep OnOff
Control Screen Time-Out — If Equipped OnOff
9
Page 278 of 396
276 MULTIMEDIA
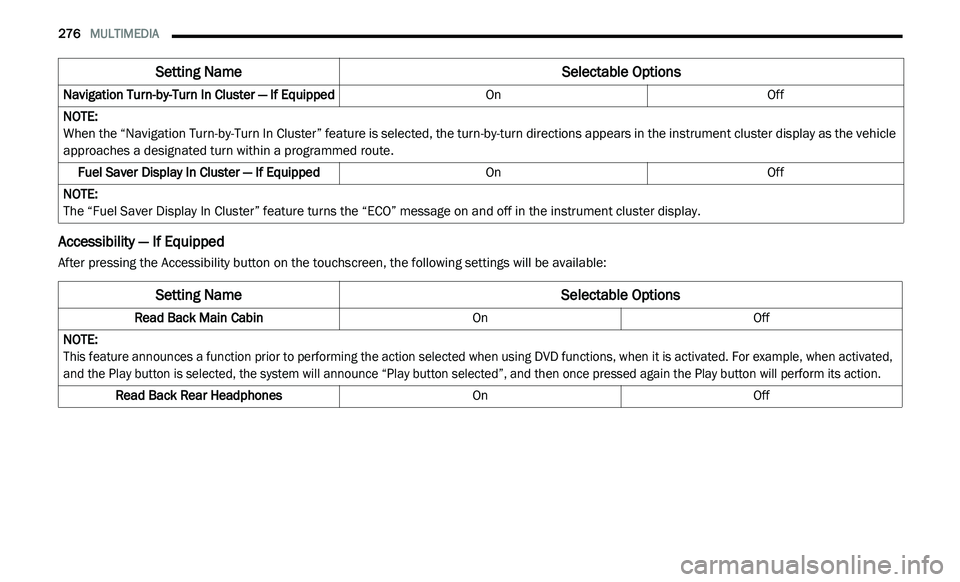
Accessibility — If Equipped
After pressing the Accessibility button on the touchscreen, the following settings will be available:Navigation Turn-by-Turn In Cluster — If Equipped
OnOff
NOTE:
When the “Navigation Turn-by-Turn In Cluster” feature is selected, the turn-by-turn directions appears in the instrument cluster display as the vehicle
a p
proaches a designated turn within a programmed route.
Fuel Saver Display In Cluster — If Equipped OnOff
NOTE:
The “Fuel Saver Display In Cluster” feature turns the “ECO” message on and off in the instrument cluster display.
Setting Name Selectable Options
Setting NameSelectable Options
Read Back Main CabinOnOff
NOTE:
This feature announces a function prior to performing the action selected when using DVD functions, when it is activated. For example, when activated,
a n
d the Play button is selected, the system will announce “Play button selected”, and then once pressed again the Play button will perform its action.
Read Back Rear Headphones OnOff
Page 279 of 396
MULTIMEDIA 277
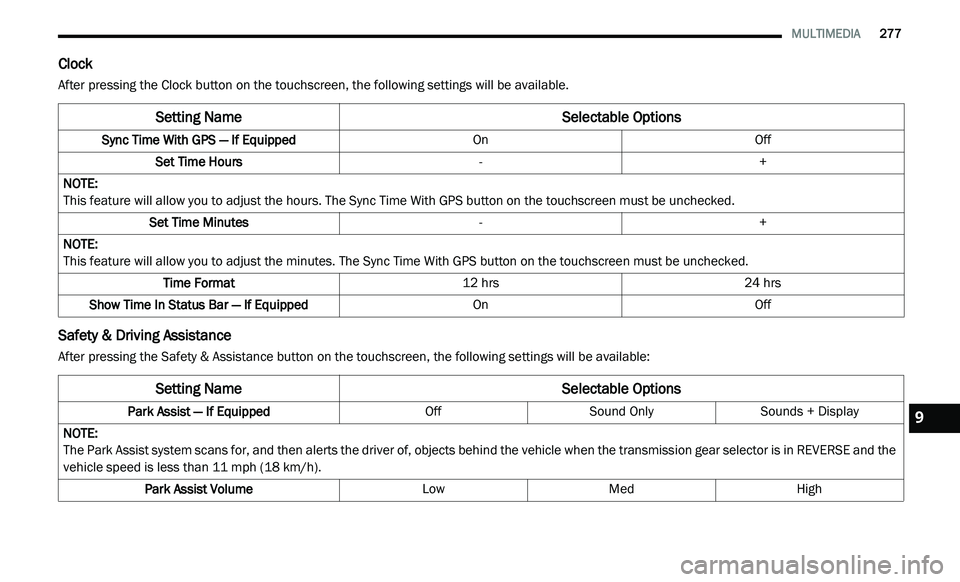
Clock
After pressing the Clock button on the touchscreen, the following settings will be available.
Safety & Driving Assistance
After pressing the Safety & Assistance button on the touchscreen, the following settings will be available:
Setting Name Selectable Options
Sync Time With GPS — If Equipped OnOff
Set Time Hours -+
NOTE:
This feature will allow you to adjust the hours. The Sync Time With GPS button on the touchscreen must be unchecked.
Set Time Minutes -+
NOTE:
This feature will allow you to adjust the minutes. The Sync Time With GPS button on the touchscreen must be unchecked.
Time Format 12 hrs24 hrs
Show Time In Status Bar — If Equipped OnOff
Setting NameSelectable Options
Park Assist — If Equipped OffSound Only Sounds + Display
NOTE:
The Park Assist system scans for, and then alerts the driver of, objects behind the vehicle when the transmission gear selector is in REVERSE and the
v e
hicle speed is less than 11 mph (18 km/h).
Park Assist Volume LowMed High
9
Page 280 of 396
278 MULTIMEDIA
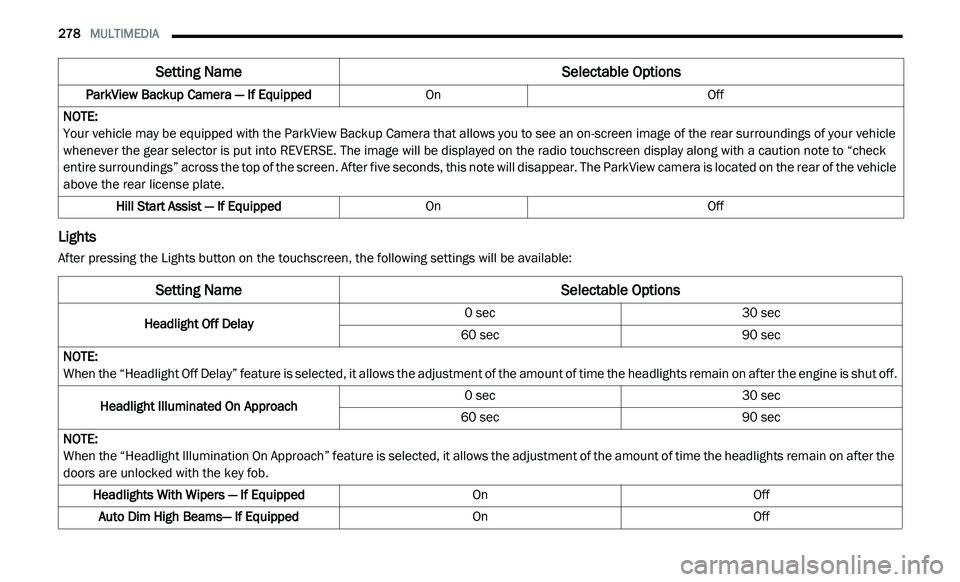
Lights
After pressing the Lights button on the touchscreen, the following settings will be available:ParkView Backup Camera — If Equipped
OnOff
NOTE:
Your vehicle may be equipped with the ParkView Backup Camera that allows you to see an on-screen image of the rear surroundings of your vehicle
w h
enever the gear selector is put into REVERSE. The image will be displayed on the radio touchscreen display along with a caution note to “check
entire surroundings” across the top of the screen. After five seconds, this note will disappear. The ParkView camera is located on the rear of the vehicle
above the rear license plate.
Hill Start Assist — If Equipped OnOff
Setting Name Selectable Options
Setting NameSelectable Options
Headlight Off Delay0 sec
30 sec
60 sec 90 sec
NOTE:
When the “Headlight Off Delay” feature is selected, it allows the adjustment of the amount of time the headlights remain on after the engine is shut off.
Headlight Illuminated On Approach 0 sec
30 sec
60 sec 90 sec
NOTE:
When the “Headlight Illumination On Approach” feature is selected, it allows the adjustment of the amount of time the headlights remain on after the
d o
ors are unlocked with the key fob.
Headlights With Wipers — If Equipped OnOff
Auto Dim High Beams— If Equipped OnOff