2020 DODGE JOURNEY check engine
[x] Cancel search: check enginePage 232 of 396

230 SERVICING AND MAINTENANCE
Please review these recommendations for
using Organic Additive Technology (OAT)
engine coolant (antifreeze) that meets the
r e
quirements of FCA Material Standard
MS.90032. When adding engine coolant
(antifreeze):
We recommend using Mopar Antifreeze/
Coolant 10 Year/150,000 Mile (240,000 km)
F o
rmula OAT (Organic Additive Technology)
that meets the requirements of FCA Material
Standard MS.90032.
Mix a minimum solution of 50% OAT engine
coolant that meets the requirements of FCA
Material Standard MS.90032 and distilled
water. Use higher concentrations (not to
exceed 70%) if temperatures below −34°F
(−37°C) are anticipated. Please contact an
authorized dealer for assistance.
Use only high purity water such as distilled or
deionized water when mixing the water/
engine coolant (antifreeze) solution. The use
of lower quality water will reduce the amount
of corrosion protection in the engine cooling
system. NOTE:
It is the owner's responsibility to maintain the
proper level of protection against freezing
according to the temperatures occurring in
the area where the vehicle is operated.
Some vehicles require special tools to add
coolant properly. Failure to fill these systems
properly could lead to severe internal engine
damage. If any coolant is needed to be added
to the system, please contact a local autho
-
rized dealer.
Mixing engine coolant (antifreeze) types is
not recommended and can result in cooling
system damage. If HOAT and OAT coolant are
mixed in an emergency, have a authorized
dealer drain, flush, and refill with OAT coolant
(conforming to MS.90032) as soon as
possible.
Cooling System Pressure Cap
The cap must be fully tightened to prevent loss
of engine coolant (antifreeze), and to ensure
that engine coolant (antifreeze) will return to
the radiator from the coolant recovery bottle.
The cap should be inspected and cleaned if
t h
ere is any accumulation of foreign material on
the sealing surfaces.
Disposal Of Used Coolant
Used ethylene glycol-based coolant (antifreeze) is
a regulated substance requiring proper disposal.
Check with your local authorities to determine the
disposal rules for your community. To prevent
ingestion by animals or children, do not store
ethylene glycol-based coolant in open containers
or allow it to remain in puddles on the ground.
If ingested by a child or pet, seek emergency
as
sistance immediately. Clean up any ground
spills immediately.
WARNING!
The warning words “DO NOT OPEN HOT” on
the cooling system pressure cap are a
safety precaution. Never add engine
coolant (antifreeze) when the engine is
overheated. Do not loosen or remove the
cap to cool an overheated engine. Heat
causes pressure to build up in the cooling
system. To prevent scalding or injury, do not
remove the pressure cap while the system
is hot or under pressure.
Do not use a pressure cap other than the
one specified for your vehicle. Personal
injury or engine damage may result.
Page 233 of 396

SERVICING AND MAINTENANCE 231
Coolant Level
The coolant bottle provides a quick visual
method for determining that the coolant level is
adequate. With the engine idling and warm to
normal operating temperature, the level of the
coolant in the bottle should be between the
“ADD” and “FULL” lines, shown on the bottle.
The radiator normally remains completely full,
so
there is no need to remove the radiator cap
unless checking for coolant freeze point or
replacing engine coolant (antifreeze). Advise
your service attendant of this. As long as the
engine operating temperature is satisfactory,
the coolant bottle need only be checked once a
month. When additional engine coolant
(antifreeze) is needed to maintain the proper
level, it should be added to the coolant bottle.
Do not overfill. See “Adding Coolant” in
“Servicing and Maintenance” for further
information.
Points To Remember
NOTE:
When the vehicle is stopped after a few miles/
k i
lometers of operation, you may observe vapor
coming from the front of the engine compart -
ment. This is normally a result of moisture from
r a
in, snow, or high humidity accumulating on
the radiator and being vaporized when the ther -
mostat opens, allowing hot engine coolant (anti -
freeze) to enter the radiator.
If an examination of your engine compartment
s h
ows no evidence of radiator or hose leaks,
the vehicle may be safely driven. The vapor will
soon dissipate.
Do not overfill the coolant expansion bottle.
Check the coolant freeze point in the radiator
and in the coolant expansion bottle. If engine
coolant (antifreeze) needs to be added, the
contents of the coolant expansion bottle
must also be protected against freezing.
If frequent engine coolant (antifreeze) addi-
tions are required, the cooling system should
b e
pressure tested for leaks.
Maintain engine coolant (antifreeze) concen -
tration at a minimum of 50% OAT coolant
( c
onforming to MS.90032) and distilled water
for proper corrosion protection of your engine
which contains aluminum components.
Make sure that the coolant expansion bottle
overflow hoses are not kinked or obstructed.
Keep the front of the radiator clean. If your
vehicle is equipped with air conditioning,
keep the front of the condenser clean.
Do not change the thermostat for Summer or
Winter operation. If replacement is ever
necessary, install ONLY the correct type ther -
mostat. Other designs may result in unsatis -
factory engine coolant (antifreeze)
p e
rformance, poor gas mileage, and
increased emissions.
7
Page 234 of 396

232 SERVICING AND MAINTENANCE
(Continued)
BRAKE SYSTEM
In order to ensure brake system performance, all
brake system components should be inspected
periodically. Refer to the “Maintenance Plan” in
“Servicing and Maintenance” for the proper
maintenance intervals.
Master Cylinder — Brake Fluid Level Check
Check the fluid level in the master cylinder
immediately if the “Brake Warning Light”
indicates system failure.
Check the fluid level in the master cylinder
wh
en performing underhood services.
Clean the top of the master cylinder area before
r e
moving the cap. If necessary, add fluid to
bring the fluid level up to the requirements
described on the brake fluid reservoir. Overfilling of fluid is not recommended because
i
t
may cause leaking in the system.
Fluid level can be expected to fall as the brake
p a
ds wear. Brake fluid level should be checked
when pads are replaced. However, low fluid
level may be caused by a leak and a checkup
may be needed.
Use only manufacturer's recommended brake
fl
uid. Refer to “Fluids And Lubricants” in
“Technical Specifications” for further
information.WARNING!
Riding the brakes can lead to brake failure
and possibly a collision. Driving with your foot
resting or riding on the brake pedal can result
in abnormally high brake temperatures,
excessive lining wear, and possible brake
damage. You would not have your full braking
capacity in an emergency.
WARNING!
Use only manufacturer's recommended
brake fluid. Refer to “Fluids And Lubricants”
in “Technical Specifications” for further infor-
mation. Using the wrong type of brake fluid
c a
n severely damage your brake system
and/or impair its performance. The proper
type of brake fluid for your vehicle is also
identified on the original factory installed
hydraulic master cylinder reservoir.
To avoid contamination from foreign matter
or moisture, use only new brake fluid or
fluid that has been in a tightly closed
container. Keep the master cylinder reser -
voir cap secured at all times. Brake fluid in
a
open container absorbs moisture from
the air resulting in a lower boiling point.
This may cause it to boil unexpectedly
d u
ring hard or prolonged braking, resulting
in sudden brake failure. This could result in
a collision.
Overfilling the brake fluid reservoir can
result in spilling brake fluid on hot engine
parts, causing the brake fluid to catch fire.
Brake fluid can also damage painted and
vinyl surfaces, care should be taken to
avoid its contact with these surfaces.
Do not allow petroleum based fluid to
contaminate the brake fluid. Brake seal
components could be damaged, causing
partial or complete brake failure. This could
result in a collision.
WARNING! (Continued)
Page 235 of 396

SERVICING AND MAINTENANCE 233
AUTOMATIC TRANSMISSION
Selection Of Lubricant
It is important to use the proper transmission
fluid to ensure optimum transmission
performance and life. Use only the
manufacturer's specified transmission fluid.
Refer to “Fluids And Lubricants” in “Technical
Specifications” for fluid specifications. It is
important to maintain the transmission fluid at
the correct level using the recommended fluid.
NOTE:
No chemical flushes should be used in any
t r
ansmission; only the approved lubricant
should be used.
Special Additives
The manufacturer strongly recommends against
using any special additives in the transmission.
Automatic Transmission Fluid (ATF) is an
engineered product and its performance
may be impaired by supplemental additives.
T h
erefore, do not add any fluid additives to the
transmission. The only exception to this policy is
the use of special dyes for diagnosing fluid leaks.
Avoid using transmission sealers as they may
adversely affect seals.
Fluid Level Check
Use the following procedure to check the
transmission fluid level properly:
1. P ark the vehicle on level ground.
2
. R un the engine at normal idle speed for at
l
east 60 seconds, and leave the engine
running for the rest of this procedure. 3. F
ully apply the parking brake, and press the
b
rake pedal.
4. P lace the gear selector momentarily into
e
ach gear position (allowing time for the
transmission to fully engage in each
position), ending with the transmission in
PARK.
5. W ipe the area around the dipstick clean to
p
revent dirt from entering the transmission.
6. R emove the dipstick and determine if the
f
luid is hot or cold. You can also read the
transmission fluid temperature using the
instrument cluster. Refer to "Instrument
Cluster Display" in "Getting To Know Your
Instrument Panel" for further information.
Hot fluid is approximately 180°F (82°C),
which is the normal operating temperature
after the vehicle is driven at least 15 miles
( 2
4 km). Hot fluid cannot be held
c o
mfortably between the fingertips. Cold
fluid is at a temperature of approximately
80°F (27°C).
CAUTION!
Using a transmission fluid other than the
manufacturer’s recommended fluid may cause
deterioration in transmission shift quality and/
or torque converter shudder, and will require
more frequent fluid and filter changes. Refer to
“Fluids And Lubricants” in “Technical
Specifications” for fluid specifications.
CAUTION!
Do not use chemical flushes in your
transmission as the chemicals can damage
your transmission components. Such damage
is not covered by the New Vehicle Limited
Warranty.
7
Page 258 of 396

256
TECHNICAL SPECIFICATIONS
IDENTIFICATION DATA
VEHICLE IDENTIFICATION NUMBER
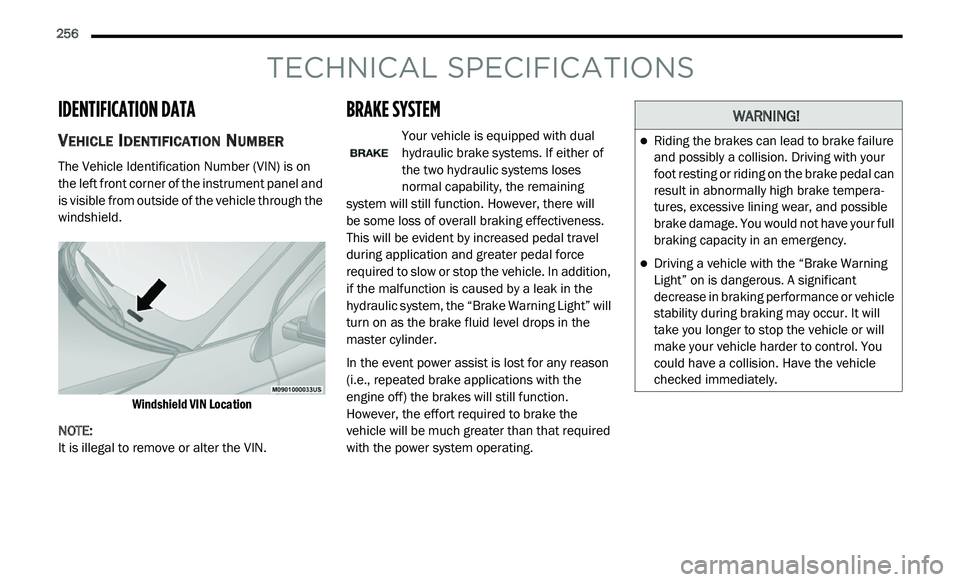
The Vehicle Identification Number (VIN) is on
the left front corner of the instrument panel and
is visible from outside of the vehicle through the
windshield.
Windshield VIN Location
NOTE:
It is illegal to remove or alter the VIN.
BRAKE SYSTEM
Your vehicle is equipped with dual
hydraulic brake systems. If either of
t h
e two hydraulic systems loses
normal capability, the remaining
system will still function. However, there will
be some loss of overall braking effectiveness.
T h
is will be evident by increased pedal travel
during application and greater pedal force
required to slow or stop the vehicle. In addition,
if the malfunction is caused by a leak in the
hydraulic system, the “Brake Warning Light” will
turn on as the brake fluid level drops in the
master cylinder.
In the event power assist is lost for any reason
( i
.e., repeated brake applications with the
engine off) the brakes will still function.
However, the effort required to brake the
vehicle will be much greater than that required
with the power system operating.
WARNING!
Riding the brakes can lead to brake failure
and possibly a collision. Driving with your
foot resting or riding on the brake pedal can
result in abnormally high brake tempera -
tures, excessive lining wear, and possible
b r
ake damage. You would not have your full
braking capacity in an emergency.
Driving a vehicle with the “Brake Warning
Light” on is dangerous. A significant
decrease in braking performance or vehicle
stability during braking may occur. It will
take you longer to stop the vehicle or will
make your vehicle harder to control. You
could have a collision. Have the vehicle
checked immediately.
Page 259 of 396

TECHNICAL SPECIFICATIONS 257
WHEEL AND TIRE TORQUE SPECIFICATIONS
Proper lug nut/bolt torque is very important to
ensure that the wheel is properly mounted to
the vehicle. Any time a wheel has been removed
and reinstalled on the vehicle, the lug nuts/
bolts should be torqued using a properly
calibrated torque wrench using a high quality six
sided (hex) deep wall socket.
TORQUE SPECIFICATIONS
**Use only authorized dealer recommended
lug nuts/bolts and clean or remove any dirt or
oil before tightening.
Inspect the wheel mounting surface prior to
mo
unting the tire and remove any corrosion or
loose particles.
Wheel Mounting Surface
Tighten the lug nuts/bolts in a star pattern until
ea
ch nut/bolt has been tightened twice. Ensure
that the socket is fully engaged on the lug nut/
bolt (do not insert it halfway).
Torque Patterns
After 25
miles (40 km), check the lug nut/bolt
t o
rque to be sure that all the lug nuts/bolts are
properly seated against the wheel.
FUEL REQUIREMENTS
This engine is designed to meet all
emissions regulations and provide
o p
timum fuel economy and
performance when using high quality
unleaded “Regular” gasoline having a posted
octane number of 87 as specified by the (R+M)/
2 method. The use of higher octane “Premium”
g a
soline is not required, as it will not provide
any benefit over “Regular” gasoline in these
engines.
Lug Nut/Bolt
T
o
rque **Lug Nut/
Bo
lt Size Lug Nut/Bolt
So
cket Size
100 Ft-Lbs
( 1
35 N·m) M12 x 1.5
19 mm
WARNING!
To avoid the risk of forcing the vehicle off the
jack, do not tighten the lug nuts/bolts fully
until the vehicle has been lowered. Failure to
follow this warning may result in personal
injury.
8
Page 276 of 396

274 MULTIMEDIA
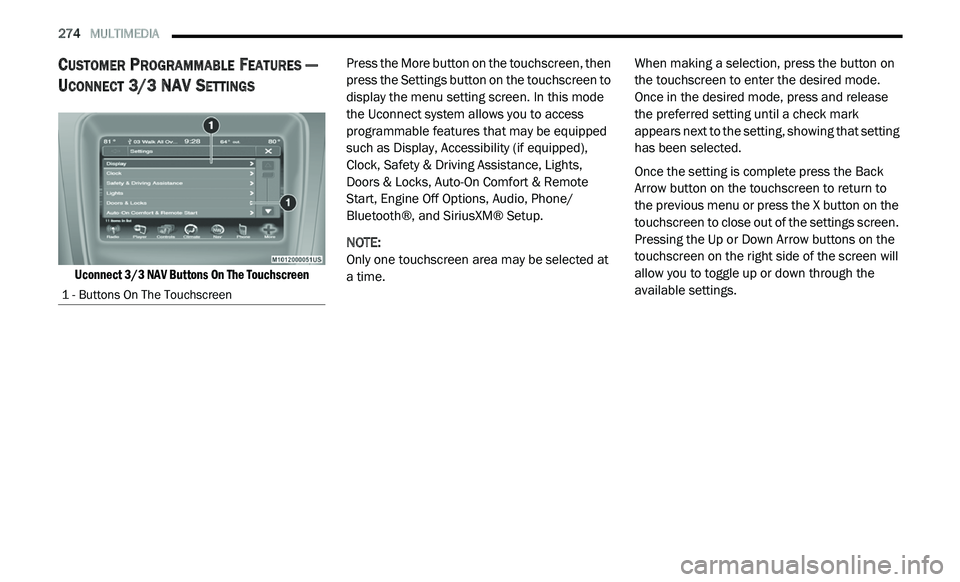
CUSTOMER PROGRAMMABLE FEATURES —
U
CONNECT 3/ 3 NAV SETTINGS
Uconnect 3/3 NAV Buttons On The Touchscreen
Press the More button on the touchscreen, then
p
r
ess the Settings button on the touchscreen to
display the menu setting screen. In this mode
the Uconnect system allows you to access
programmable features that may be equipped
such as Display, Accessibility (if equipped),
Clock, Safety & Driving Assistance, Lights,
Doors & Locks, Auto-On Comfort & Remote
Start, Engine Off Options, Audio, Phone/
Bluetooth®, and SiriusXM® Setup.
NOTE:
Only one touchscreen area may be selected at
a
time. When making a selection, press the button on
t
h
e touchscreen to enter the desired mode.
Once in the desired mode, press and release
the preferred setting until a check mark
appears next to the setting, showing that setting
has been selected.
Once the setting is complete press the Back
A r
row button on the touchscreen to return to
the previous menu or press the X button on the
touchscreen to close out of the settings screen.
Pressing the Up or Down Arrow buttons on the
touchscreen on the right side of the screen will
allow you to toggle up or down through the
available settings.
1 - Buttons On The Touchscreen
Page 280 of 396

278 MULTIMEDIA
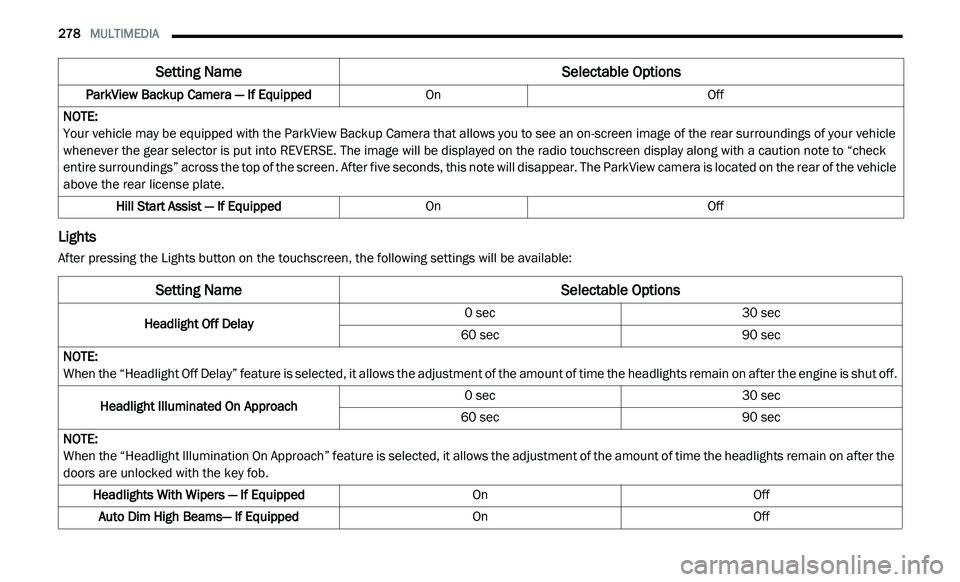
Lights
After pressing the Lights button on the touchscreen, the following settings will be available:ParkView Backup Camera — If Equipped
OnOff
NOTE:
Your vehicle may be equipped with the ParkView Backup Camera that allows you to see an on-screen image of the rear surroundings of your vehicle
w h
enever the gear selector is put into REVERSE. The image will be displayed on the radio touchscreen display along with a caution note to “check
entire surroundings” across the top of the screen. After five seconds, this note will disappear. The ParkView camera is located on the rear of the vehicle
above the rear license plate.
Hill Start Assist — If Equipped OnOff
Setting Name Selectable Options
Setting NameSelectable Options
Headlight Off Delay0 sec
30 sec
60 sec 90 sec
NOTE:
When the “Headlight Off Delay” feature is selected, it allows the adjustment of the amount of time the headlights remain on after the engine is shut off.
Headlight Illuminated On Approach 0 sec
30 sec
60 sec 90 sec
NOTE:
When the “Headlight Illumination On Approach” feature is selected, it allows the adjustment of the amount of time the headlights remain on after the
d o
ors are unlocked with the key fob.
Headlights With Wipers — If Equipped OnOff
Auto Dim High Beams— If Equipped OnOff