Page 268 of 396

266 MULTIMEDIA
UCONNECT SETTINGS
The Uconnect system uses a combination of
buttons on the touchscreen and buttons on
the faceplate located on the center of the
i n
strument panel that allows you to access and
change the Customer Programmable Features.
CUSTOMER PROGRAMMABLE
F
EATURES — RADIO 4.3 SETTINGS
In this mode the Uconnect system allows you to
access programmable features that may be
equipped such as Display, Clock, Safety &
Driving Assistance, Lights, Doors & Locks,
Auto-On Comfort & Remote Start, Engine Off
Options, Audio, Phone/Bluetooth®, and
SiriusXM® Setup through buttons on the
faceplate and touchscreen. NOTE:
Only one touchscreen area may be selected at
a
time.
Radio 4.3 Buttons On The Faceplate and Touchscreen
Push the SETTINGS button on the faceplate to
a
c
cess the Settings screen, use the Page Up or
Page Down buttons on the touchscreen to scroll
through the following settings. Press the
desired setting button on the touchscreen to
change the setting using the description shown
on the following pages for each setting.
1 — Uconnect Buttons On The Faceplate
2 — Uconnect Buttons On The Touchscreen
Page 269 of 396
MULTIMEDIA 267
Display
After pressing the Display button on the touchscreen, the following settings will be available:
Clock
After pressing the Clock button on the touchscreen, the following settings will be available:
Setting Name Selectable Options
Brightness+ –
NOTE:
The “Brightness” setting can also be adjusted by selecting any point on the scale between the + and – buttons on the touchscreen.
Mode DayNight Auto
Language EnglishFrançais Español
NOTE:
When in the “Language” feature, you may select one of three languages for all display nomenclature.
Units US Metric
Voice Response Brief Long
Touchscreen Beep On Off
Setting NameSelectable Options
Set Time and Format12 hr
24 hr
AM PM
NOTE:
Within the “Set Time and Format” setting, press the corresponding Arrow buttons on the touchscreen to adjust to the correct time.
9
Page 274 of 396

272 MULTIMEDIA
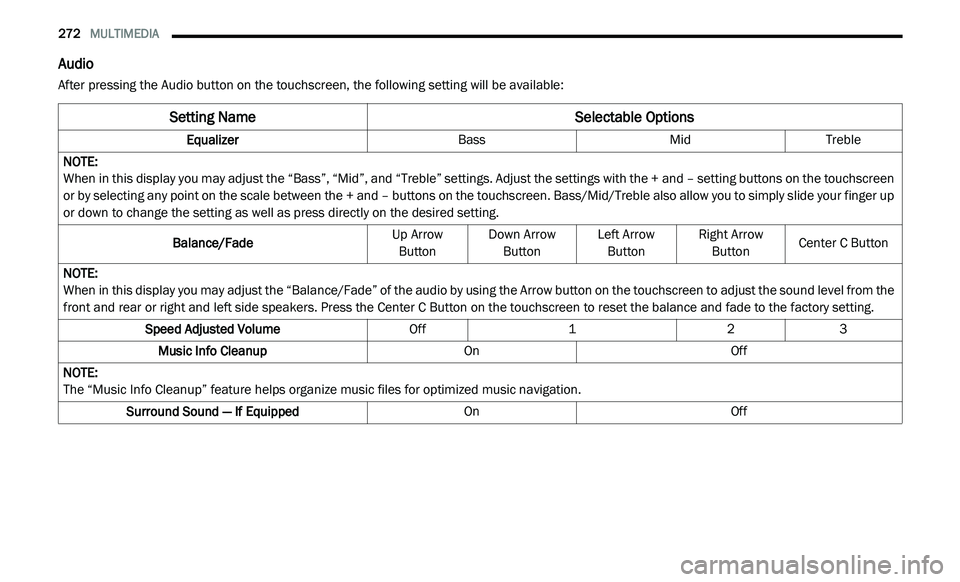
Audio
After pressing the Audio button on the touchscreen, the following setting will be available:
Setting Name Selectable Options
EqualizerBassMidTreble
NOTE:
When in this display you may adjust the “Bass”, “Mid”, and “Treble” settings. Adjust the settings with the + and – setting buttons on the touchscreen
o r
by selecting any point on the scale between the + and – buttons on the touchscreen. Bass/Mid/Treble also allow you to simply slide your finger up
or down to change the setting as well as press directly on the desired setting.
Balance/Fade Up Arrow
B u
tton Down Arrow
Bu tton Left Arrow
Bu tton Right Arrow
Bu tton Center C Button
NOTE:
When in this display you may adjust the “Balance/Fade” of the audio by using the Arrow button on the touchscreen to adjust the sound level from the
f r
ont and rear or right and left side speakers. Press the Center C Button on the touchscreen to reset the balance and fade to the factory setting.
Speed Adjusted Volume Off123
Music Info Cleanup OnOff
NOTE:
The “Music Info Cleanup” feature helps organize music files for optimized music navigation.
Surround Sound — If Equipped OnOff
Page 276 of 396

274 MULTIMEDIA
CUSTOMER PROGRAMMABLE FEATURES —
U
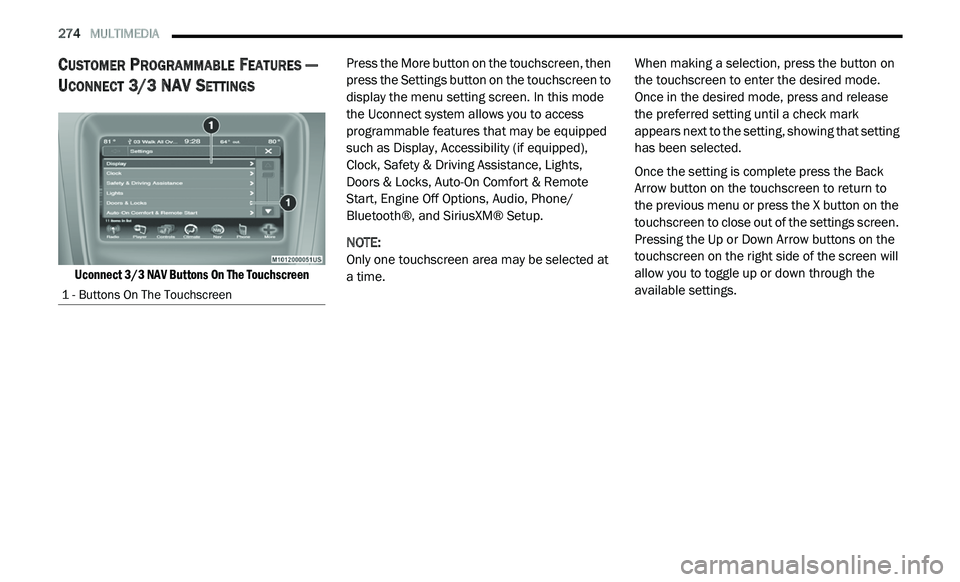
CONNECT 3/ 3 NAV SETTINGS
Uconnect 3/3 NAV Buttons On The Touchscreen
Press the More button on the touchscreen, then
p
r
ess the Settings button on the touchscreen to
display the menu setting screen. In this mode
the Uconnect system allows you to access
programmable features that may be equipped
such as Display, Accessibility (if equipped),
Clock, Safety & Driving Assistance, Lights,
Doors & Locks, Auto-On Comfort & Remote
Start, Engine Off Options, Audio, Phone/
Bluetooth®, and SiriusXM® Setup.
NOTE:
Only one touchscreen area may be selected at
a
time. When making a selection, press the button on
t
h
e touchscreen to enter the desired mode.
Once in the desired mode, press and release
the preferred setting until a check mark
appears next to the setting, showing that setting
has been selected.
Once the setting is complete press the Back
A r
row button on the touchscreen to return to
the previous menu or press the X button on the
touchscreen to close out of the settings screen.
Pressing the Up or Down Arrow buttons on the
touchscreen on the right side of the screen will
allow you to toggle up or down through the
available settings.
1 - Buttons On The Touchscreen
Page 282 of 396

280 MULTIMEDIA
Auto-On Comfort & Remote Start
After pressing the Auto-On Comfort & Remote Start button on the touchscreen, the following settings will be available:Sound Horn With Lock
OnOff
Sound Horn With Remote Start OnOff
1st Press Of Key Fob Unlocks Driver Door All Doors
NOTE:
When "Driver Door" is programmed with 1st Press Of Key Fob Unlocks, only the driver's door will unlock with the first press of the key fob unlock button.
Y o
u must press the key fob unlock button twice to unlock the passengers’ doors. When "All Doors" is programmed for 1st Press Of Key Fob Unlocks,
all doors will unlock on the first press of the key fob unlock button. If the vehicle is programmed 1st Press Of Key Fob Unlocks “All Doors,” all doors
will unlock no matter which Passive Entry equipped door handle is grasped. If 1st Press Of Key Fob Unlocks “Driver Door” is programmed, only the
driver’s door will unlock when the driver’s door is grasped. With Passive Entry, if 1st Press Of Key Fob Unlocks “Driver Door” is programmed, touching
the handle more than once will result in only the driver’s door opening. If “Driver Door” is selected, once the driver door is opened, the interior door
lock/unlock switch can be used to unlock all doors (or use key fob).
Passive Entry — If Equipped OnOff
NOTE:
The “Passive Entry” feature allows you to lock and unlock the vehicle’s door(s) without having to push the key fob lock or unlock buttons.
Setting Name Selectable Options
Setting NameSelectable Options
Sound Horn With Remote StartOnOff
Auto-On Driver Heated Seat & Steering Wheel Wi
th Vehicle Start — If Equipped On
Off
Page 283 of 396

MULTIMEDIA 281
Engine Off Options
After pressing the “Engine Off Options” button on the touchscreen, the following settings will be available:NOTE:
When this feature is selected the driver’s heated seat and heated steering wheel (if equipped) will automatically turn on when temperatures are below
40
°F (4.4°C).
Setting Name Selectable Options
Setting NameSelectable Options
Engine Off Power Delay0 sec
45 sec
5 mins 10 mins
NOTE:
When the “Engine Off Power Delay” feature is selected, the power window switches, radio, Uconnect phone system (if equipped), DVD video system
( i
f equipped), power sunroof (if equipped), and power outlets will remain active for up to 10 minutes after the ignition is cycled to OFF. Opening either
f r
ont door will cancel this feature.
Headlight Off Delay -+
NOTE:
When the “Headlight Off Delay” feature is selected, it allows the adjustment of the amount of time the headlights remain on after the engine is shut
of
f. Press the + or - buttons to transition from 0 seconds to 30, 60, or 90 seconds.
9
Page 284 of 396

282 MULTIMEDIA
Audio
After pressing the Audio button on the touchscreen, the following settings will be available.
Setting Name Selectable Options
Balance/FadeFront ButtonRear Arrow
Bu
tton Left Arrow
Bu tton Right Arrow
Bu tton Center C Button
NOTE:
When in this display you may adjust the “Balance/Fade” of the audio by using the Arrow button on the touchscreen to adjust the sound level from the
f r
ont and rear or right and left side speakers. Press the Center C button on the touchscreen to reset the balance and fade to the factory setting.
Equalizer BassMidTreble
NOTE:
When in this display you may adjust the “Bass”, “Mid”, and “Treble” settings. Adjust the settings with the + and – setting buttons on the touchscreen
or
by selecting any point on the scale between the + and – buttons on the touchscreen. Bass/Mid/Treble also allow you to simply slide your finger up
or down to change the setting as well as press directly on the desired setting.
Speed Adjusted Volume Off123
Music Info Cleanup OnOff
NOTE:
The “Music Info Cleanup” feature helps organize music files for optimized music navigation.
Auto Play OnOff
NOTE:
When the “Auto Play” feature is on, music will begin playing music automatically whenever an audio device is connected and recognized.
Page 288 of 396

286 MULTIMEDIA
Care And Maintenance
Touchscreen
Do not press the touchscreen with any hard
or sharp objects (pen, USB stick, jewelry,
etc.), which could scratch the touchscreen
surface!
Do not spray any liquid or caustic chemicals
directly on the screen! Use a clean and dry
microfiber lens cleaning cloth in order to
clean the touchscreen.
If necessary, use a lint-free cloth dampened
with a cleaning solution, such as isopropyl
alcohol or an isopropyl alcohol and water
solution ratio of 50:50. Be sure to follow the
solvent manufacturer's precautions and
directions.
RADIO 4.3
INTRODUCTION
Radio 4.3 System
Radio 4.3
1 — RADIO
Push the RADIO button, located on the
f
a
ceplate, to enter the Radio Mode. The
different tuner modes: AM, FM, and SAT can be
selected by pushing the corresponding buttons
in the Radio Mode.
2 — SETTINGS
Push the SETTINGS button, on the faceplate, to
a c
cess the Settings list. Clock, Display, Audio,
Bluetooth®, and SiriusXM® Settings are
described in this manual. See your vehicle’s
Owner's Manual for more details.
3 — MORE
Push the MORE button, located on the
f a
ceplate, to access additional options. Options
available such as Uconnect Phone (if equipped)
and Compass can be accessed by pushing the
corresponding buttons in the More Menu.
4 — SCREEN OFF
Push the SCREEN OFF button, on the faceplate,
t o
turn the touchscreen OFF. To turn the screen
back ON, just press the touchscreen.
WARNING!
ALWAYS drive safely with your hands on the
steering wheel. You have full responsibility
and assume all risks related to the use of the
Uconnect features and applications in this
vehicle. Only use Uconnect when it is safe to
do so. Failure to do so may result in an
accident involving serious injury or death.