2020 DODGE GRAND CARAVAN change time
[x] Cancel search: change timePage 285 of 380
MULTIMEDIA283
Favorite Songs & Artists
The SAT mode Favorites list allows you to tag
particular artists or songs so you will be notified
each time that artist or song is playing on
another SiriusXM® channel.
To tag an artist or song, press the
Favorites button while the song is
playing.
NOTE:
Not all SiriusXM® stations allow a song or artist
to be tagged.
When one of your favorite artists or songs
begins playing on another SiriusXM® channel a
message appears (depending on the Song
Alerts setting) that allows you to tune to the
station where your favorite is playing.
The Song Alerts setting is accessed in the SAT
Menu, Favorites screen.
Any time a favorite artist or song is playing, the
Favorite icon appears in the bottom bar.
If you have set up favorite sports teams and one
of those teams has a game being broadcast on
SiriusXM®, the Favorite Sport icon appears in
the bottom bar anytime the game starts or when
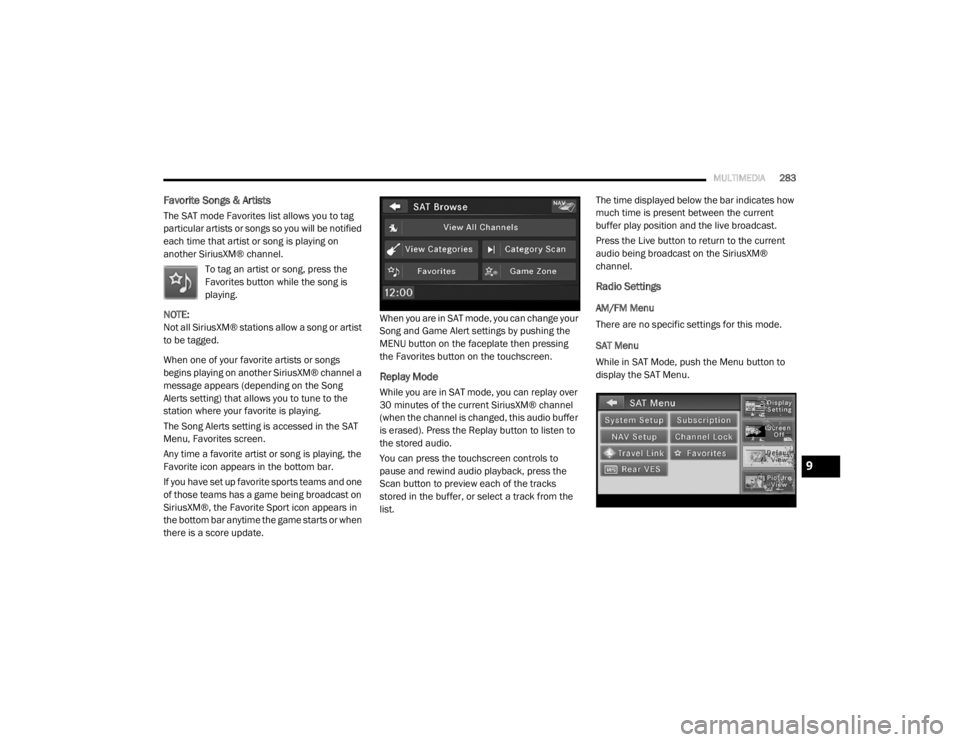
there is a score update. When you are in SAT mode, you can change your
Song and Game Alert settings by pushing the
MENU button on the faceplate then pressing
the Favorites button on the touchscreen.
Replay Mode
While you are in SAT mode, you can replay over
30 minutes of the current SiriusXM® channel
(when the channel is changed, this audio buffer
is erased). Press the Replay button to listen to
the stored audio.
You can press the touchscreen controls to
pause and rewind audio playback, press the
Scan button to preview each of the tracks
stored in the buffer, or select a track from the
list.The time displayed below the bar indicates how
much time is present between the current
buffer play position and the live broadcast.
Press the Live button to return to the current
audio being broadcast on the SiriusXM®
channel.
Radio Settings
AM/FM Menu
There are no specific settings for this mode.
SAT Menu
While in SAT Mode, push the Menu button to
display the SAT Menu.
9
20_RT_OM_EN_USC_t.book Page 283
Page 286 of 380
284MULTIMEDIA
Channel Lock
Select Channel Lock to enable and/or disable
desired channels. The Seek and Scan function
will then only display channels without parental
lock.
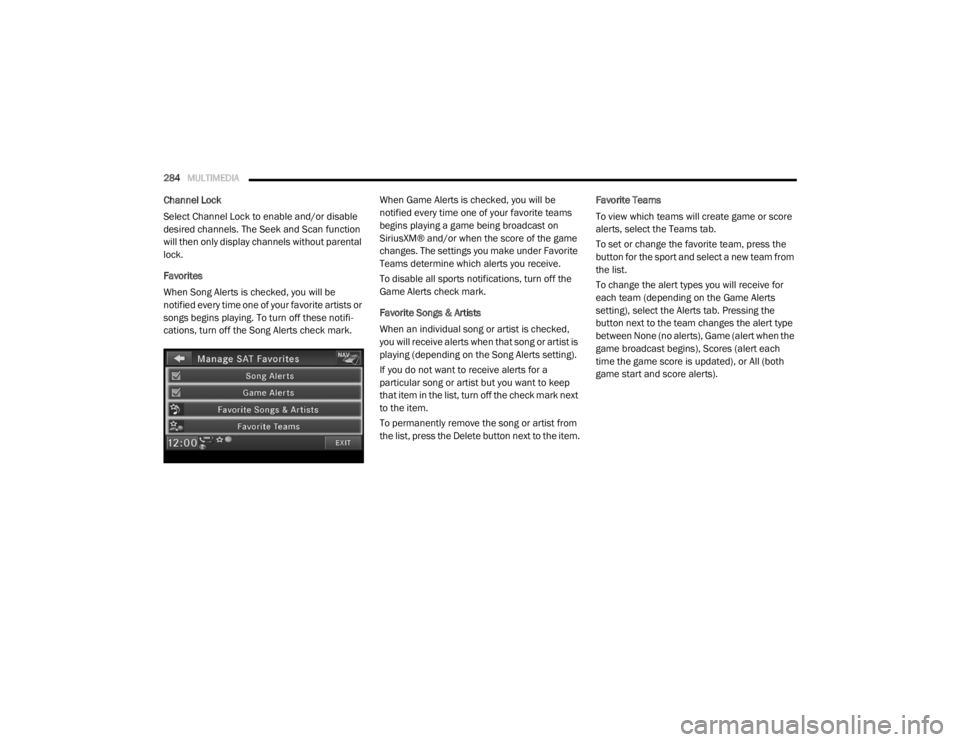
Favorites
When Song Alerts is checked, you will be
notified every time one of your favorite artists or
songs begins playing. To turn off these notifi -
cations, turn off the Song Alerts check mark. When Game Alerts is checked, you will be
notified every time one of your favorite teams
begins playing a game being broadcast on
SiriusXM® and/or when the score of the game
changes. The settings you make under Favorite
Teams determine which alerts you receive.
To disable all sports notifications, turn off the
Game Alerts check mark.
Favorite Songs & Artists
When an individual song or artist is checked,
you will receive alerts when that song or artist is
playing (depending on the Song Alerts setting).
If you do not want to receive alerts for a
particular song or artist but you want to keep
that item in the list, turn off the check mark next
to the item.
To permanently remove the song or artist from
the list, press the Delete button next to the item.Favorite Teams
To view which teams will create game or score
alerts, select the Teams tab.
To set or change the favorite team, press the
button for the sport and select a new team from
the list.
To change the alert types you will receive for
each team (depending on the Game Alerts
setting), select the Alerts tab. Pressing the
button next to the team changes the alert type
between None (no alerts), Game (alert when the
game broadcast begins), Scores (alert each
time the game score is updated), or All (both
game start and score alerts).
20_RT_OM_EN_USC_t.book Page 284
Page 290 of 380
288MULTIMEDIA
Change A Track
Press the Forward Arrow button to select the
next track on the disc.
Press and hold the Forward Arrow button to
fast forward through the track.
Press the Back Arrow button to select the
start of the current track (while the track is
playing) or the previous track (if the current
track has just started).
Press and hold the Back Arrow button to fast
rewind through the track.
Press the Pause button to pause the playback
of the disc.
Press the Play button to resume playback of the
disc.
Displaying The Elapsed Title Time
The elapsed title time of the currently playing
track displays in the left center of the screen.
Select Title From List
Press the Tracks button to display a list of the
titles of the currently playing disc. Select the
desired track you wish to play.
Press the Tracks button a second time to hide
the list. Disc Info
Press the Info button to display the
cover art (if available) and track title.
Press the Info button a second time to
display the track title, artist, album,
and genre.
Press the Info button to close the Info panel.
Gracenote® End User License Agreement
This application or device contains software
from Gracenote®, Inc. of Emeryville, California
(“Gracenote®”). The software from Gracenote®
(the “Gracenote® Software”) enables this
application to perform disc and/or file identifi -
cation and obtain music-related information,
including name, artist, track, and title
information (“Gracenote® Data”) from online
servers or embedded databases (collectively,
“Gracenote® Servers”) and to perform other
functions. You may use Gracenote® Data only
by means of the intended End-User functions of
this application or device. You agree that you will use Gracenote® Data,
the Gracenote® Software, and Gracenote®
Servers for your own personal non-commercial
use only. You agree not to assign, copy, transfer
or transmit the Gracenote® Software or any
Gracenote® Data to any third party. YOU AGREE
NOT TO USE OR EXPLOIT GRACENOTE DATA,
THE GRACENOTE SOFTWARE, OR GRACENOTE
SERVERS, EXCEPT AS EXPRESSLY PERMITTED
HEREIN.
You agree that your non-exclusive license to use
the Gracenote® Data, the Gracenote®
Software, and Gracenote® Servers will
terminate if you violate these restrictions. If your
license terminates, you agree to cease any and
all use of the Gracenote® Data, the
Gracenote® Software, and Gracenote®
Servers. Gracenote® reserves all rights in
Gracenote® Data, the Gracenote® Software,
and the Gracenote® Servers, including all
ownership rights. Under no circumstances will
Gracenote® become liable for any payment to
you for any information that you provide. You
agree that Gracenote®, Inc. may enforce its
rights under this Agreement against you directly
in its own name.
20_RT_OM_EN_USC_t.book Page 288
Page 291 of 380

MULTIMEDIA289
The Gracenote® service uses a unique
identifier to track queries for statistical
purposes. The purpose of a randomly assigned
numeric identifier is to allow the Gracenote®
service to count queries without knowing
anything about who you are. For more
information, see the web page for the
Gracenote® Privacy Policy for the Gracenote®
service.
The Gracenote® Software and each item of
Gracenote® Data are licensed to you “AS IS.”
Gracenote® makes no representations or
warranties, express or implied, regarding the
accuracy of any Gracenote® Data from in the
Gracenote® Servers. Gracenote® reserves the
right to delete data from the Gracenote®
Servers or to change data categories for any
cause that Gracenote® deems sufficient. No
warranty is made that the Gracenote® Software
or Gracenote® Servers are error-free or that
functioning of Gracenote® Software or
Gracenote® Servers will be uninterrupted.
Gracenote® is not obligated to provide you with
new enhanced or additional data types or
categories that Gracenote® may provide in the
future and is free to discontinue its services at
any time. GRACENOTE DISCLAIMS ALL WARRANTIES
EXPRESS OR IMPLIED, INCLUDING, BUT NOT
LIMITED TO, IMPLIED WARRANTIES OF
MERCHANTABILITY, FITNESS FOR A
PARTICULAR PURPOSE, TITLE, AND
NON-INFRINGEMENT. GRACENOTE DOES NOT
WARRANT THE RESULTS THAT WILL BE
OBTAINED BY YOUR USE OF THE GRACENOTE
SOFTWARE OR ANY GRACENOTE SERVER. IN
NO CASE WILL GRACENOTE BE LIABLE FOR ANY
CONSEQUENTIAL OR INCIDENTAL DAMAGES OR
FOR ANY LOST PROFITS OR LOST REVENUES.
© Gracenote®, Inc. 2010
Portions of the content is copyright ©Muze or its
providers.
NOTE:
Visit
DriveUconnect.com (U.S. Residents) or
DriveUconnect.ca (Canadian Residents) for
update information.
Copy Disc To Hard-Drive
Press the Copy button to copy the
current disc to the Hard Disc Drive. Disc Menu
While in disc mode with inserted audio disc,
push the Menu button to access the Disc Menu.
Press the Random button to play the titles on
the disc in random order. Press the Random
button a second time to turn Random off.
Press the Repeat Folder button to repeat all
songs in the currently playing folder (MP3/WMA
disc only). Press the Repeat Folder button a
second time to stop the repeat mode.
Playing A MP3/WMA Disc
1. Push the Load button once.
2. With the printed side upwards, insert the
disc into the disc slot of the radio. The radio
pulls the disc automatically and closes the
flip screen. The radio selects the
appropriate mode after the disc is
recognized, and starts playing the first
track. The display shows “Reading...” during
this process.
A MP3/WMA disc may contain audio files in
a folder structure. The folder, if any, is
shown in the list view.
Press the Tracks button if the list is not dis -
played.
9
20_RT_OM_EN_USC_t.book Page 289
Page 294 of 380

292MULTIMEDIA
After a short pause, the copy process begins
and the audio resumes playback from the start
of the track. The copy process continues in the
background while the audio plays. The progress
is shown in the display. Even if you change to
another mode (radio, AUX, etc.) or turn the radio
Off (ignition ON/RUN), the copy process will
continue in the background.
It is also possible to listen to radio modes during
this process. Copying time is greater than 4x the
normal playback rate.
NOTE:
When copying CD-Audio to HDD, audio files are
converted from CD-Audio to AAC. If available,
the artist name, album name, cover art, track
names and genres are stored with the tracks on
the HDD. DVD-Audio cannot be copied to the
HDD. If the CD-Audio disc is not recognized by
the Gracenote® Music Recognition Service, you
can rip the CD-Audio disc on your
internet-equipped computer first, then copy the
resulting compressed audio files to a USB
memory stick. Then insert the USB memory
stick in the radio and copy the audio files to the
HDD mode. Copy WMA/MP3 Files To Hard-Drive
MP3 and WMA formatted compressed audio
files from a disc or via USB (e.g., USB stick) can
be copied to the Hard Disc Drive.
It is recommended to sort music files into
folders.
Songs located in the root level (top level) of the
disc or USB device are saved on the Hard Disk
Drive in a root folder. Songs that are stored in
folders on the disc or USB devices are saved to
the same folder name on the Hard Disk Drive.
Only folders that contain song files are copied to
the Hard Disk Drive.
For the example above, the list on the HDD will
show the following:
Disc_Root_Level Songs (Playlist 1)
Song 1.mp3 (First song in playlist 1)
Song 2.mp3 (Second song in playlist 1)
Song 3.wma (Third song in playlist 1)
My Playlist Folder 1 (Playlist 2)
01 Song.mp3 (First song in playlist 2)
02 Song.mp3 (Second song in playlist 2)
03 Song.mp3 (Third song in playlist 2)
Copying Complete Disc
You can copy a complete music disc using the
following procedure:
1. Insert a disc with MP3/WMA files.
2. Press the Copy button to copy music files of the inserted disc to the hard disk drive.
The copy progress is shown in the display.
You can continue listening to any audio source
during the copy process.
20_RT_OM_EN_USC_t.book Page 292
Page 297 of 380
MULTIMEDIA295
Change A Track
Press the Forward Arrow button to select the
next track on the disc.
Press and hold the Forward Arrow button to
fast forward through the track.
Press the Back Arrow button to select the
start of the current track (while the track is
playing) or the previous track (if the current
track has just started).
Press and hold the Back Arrow button to fast
rewind through the track.
Press the Pause button to pause the playback
of the disc.
Press the Play button to resume playback of the
disc.
Tagging Favorite HDD Songs
When a song is playing that you want
to add to the Favorite Songs list, press
the Favorites button.
To view the Favorite Songs list, press
the Browse button, then press the Favorites
button, next press the Favorite Songs button. Press the All button on the touchscreen to
play all favorite songs from the top of the list.
Displaying The Elapsed Time
The elapsed time of the current playing track is
displayed in the left center of the screen.
HDD Menu
While in HDD mode, push the Menu button
located on the faceplate to access the HDD
Menu.
Random Playback
The random play function plays random tracks
from the hard disk drive. Press the Random
button to switch the random play function on or
off.
A red check mark indicates the random play
function is active.
Repeat Track
The repeat track function repeats the currently
played track. Press the Rpt. TRK button to
switch the repeat track function on or off.
A red check mark indicates the repeat track
function is active.Favorite Playlists On The Hard Disk Drive
You may save links to favorite
playlists in the Favorite Playlists list.
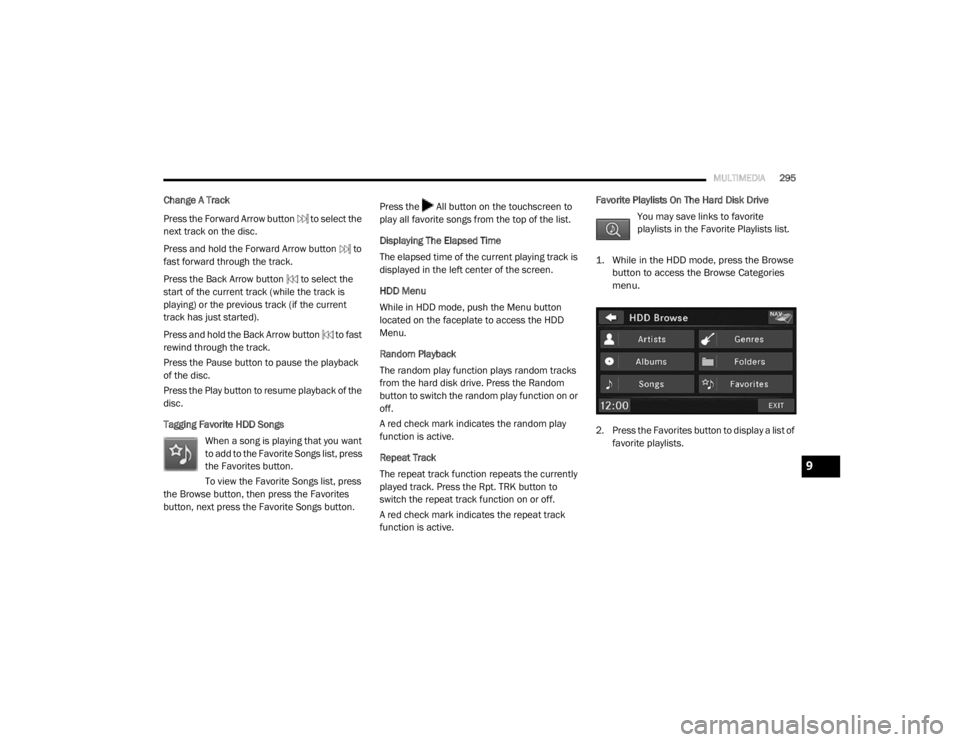
1. While in the HDD mode, press the Browse button to access the Browse Categories
menu.
2. Press the Favorites button to display a list of favorite playlists.
9
20_RT_OM_EN_USC_t.book Page 295
Page 298 of 380
296MULTIMEDIA
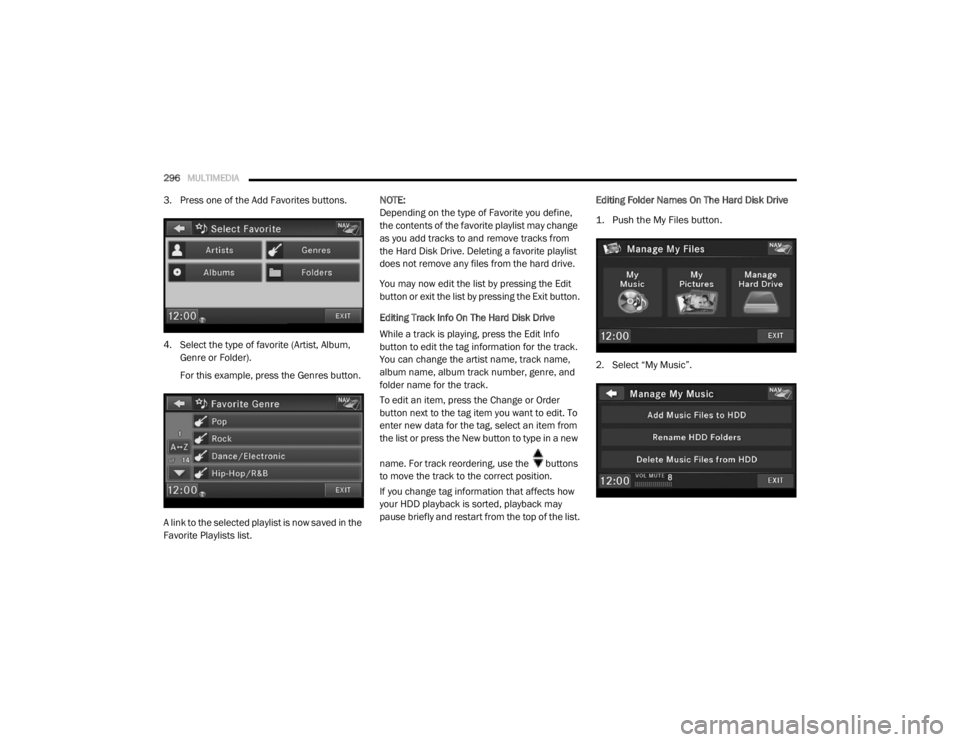
3. Press one of the Add Favorites buttons.
4. Select the type of favorite (Artist, Album,
Genre or Folder).
For this example, press the Genres button.
A link to the selected playlist is now saved in the
Favorite Playlists list. NOTE:
Depending on the type of Favorite you define,
the contents of the favorite playlist may change
as you add tracks to and remove tracks from
the Hard Disk Drive. Deleting a favorite playlist
does not remove any files from the hard drive.
You may now edit the list by pressing the Edit
button or exit the list by pressing the Exit button.
Editing Track Info On The Hard Disk Drive
While a track is playing, press the Edit Info
button to edit the tag information for the track.
You can change the artist name, track name,
album name, album track number, genre, and
folder name for the track.
To edit an item, press the Change or Order
button next to the tag item you want to edit. To
enter new data for the tag, select an item from
the list or press the New button to type in a new
name. For track reordering, use the buttons
to move the track to the correct position.
If you change tag information that affects how
your HDD playback is sorted, playback may
pause briefly and restart from the top of the list.
Editing Folder Names On The Hard Disk Drive
1. Push the My Files button.
2. Select “My Music”.
20_RT_OM_EN_USC_t.book Page 296
Page 300 of 380

298MULTIMEDIA
Importing Pictures
It is possible to import display pictures to the
internal Hard Disk Drive. The pictures can be
displayed on the right half of the radio screen.
In the default mode, the vehicle brand logo is
displayed in the right half of the screen. Push
the Menu button on the right side of the radio to
access one of the setting menus.
It is recommended to change the picture
dimensions on a PC or Digital Camera to 240 by
158 pixels before the import.
NOTE:
USB devices (e.g., camera memory USB
adaptors, etc.) must comply with the MSD
(Mass Storage Device) standard. This USB terminal can provide power to the inserted
device. The device's current limitation must be
less or equal to 500mA.
1. Push the My Files button located on the
faceplate to go to the Manage My Files
screen.
2. Insert either a CD or a USB Stick containing your pictures.
3. Press the My Pictures button to get an overview of the images currently stored on
the Hard Disk Drive.
The radio can store 23 user pictures.
4. Press the Add button to view the pictures stored on the CD or USB memory stick. NOTE:
Depending on the file size of each picture on the
CD or USB memory stick, loading the images in
the screen may take time.
5. Select the type of media inserted.
6. Use the Page Up or Down buttons to page
through a list of pictures and press the
picture you would like to import.
7. Select which pictures you want to copy. The red check mark indicates a picture file to
copy.
The imported picture is now available in the
Manage My Pictures screen.
20_RT_OM_EN_USC_t.book Page 298