2020 DODGE DURANGO buttons
[x] Cancel search: buttonsPage 368 of 464

366MULTIMEDIA
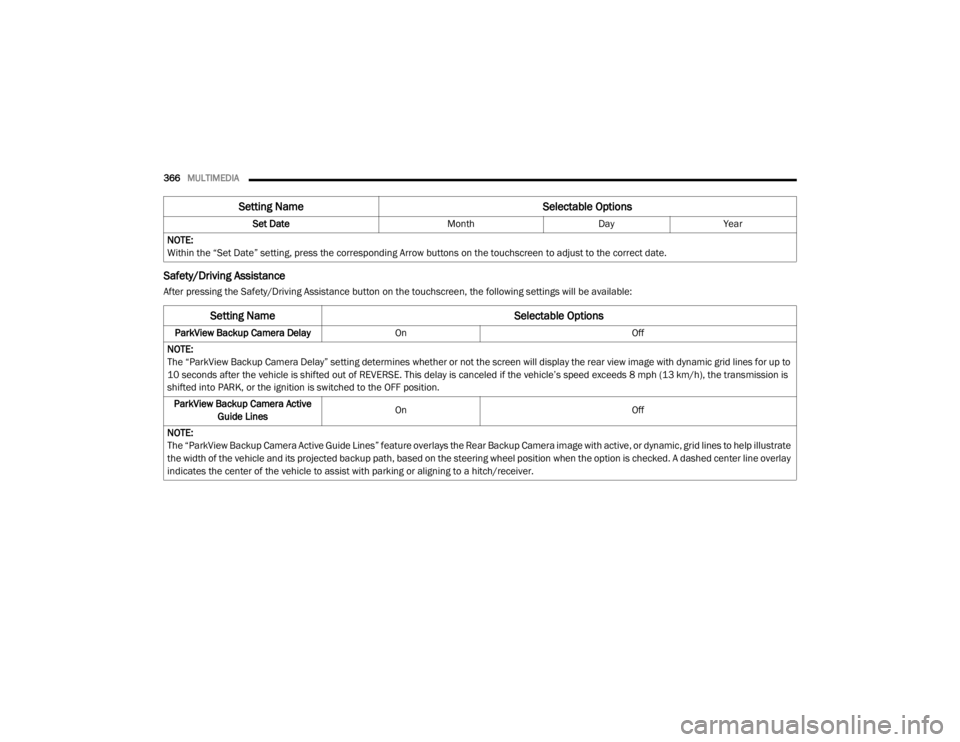
Safety/Driving Assistance
After pressing the Safety/Driving Assistance button on the touchscreen, the following settings will be available: Set Date
MonthDayYear
NOTE:
Within the “Set Date” setting, press the corresponding Arrow buttons on the touchscreen to adjust to the correct date.
Setting Name Selectable Options
Setting NameSelectable Options
ParkView Backup Camera DelayOn Off
NOTE:
The “ParkView Backup Camera Delay” setting determines whether or not the screen will display the rear view image with dynamic grid lines for up to
10 seconds after the vehicle is shifted out of REVERSE. This delay is canceled if the vehicle’s speed exceeds 8 mph (13 km/h), the transmission is
shifted into PARK, or the ignition is switched to the OFF position. ParkView Backup Camera Active Guide Lines On
Off
NOTE:
The “ParkView Backup Camera Active Guide Lines” feature overlays the Rear Backup Camera image with active, or dynamic, grid lines to help illustrate
the width of the vehicle and its projected backup path, based on the steering wheel position when the option is checked. A dashed center line overlay
indicates the center of the vehicle to assist with parking or aligning to a hitch/receiver.
20_WD_OM_EN_USC_t.book Page 366
Page 376 of 464

374MULTIMEDIA
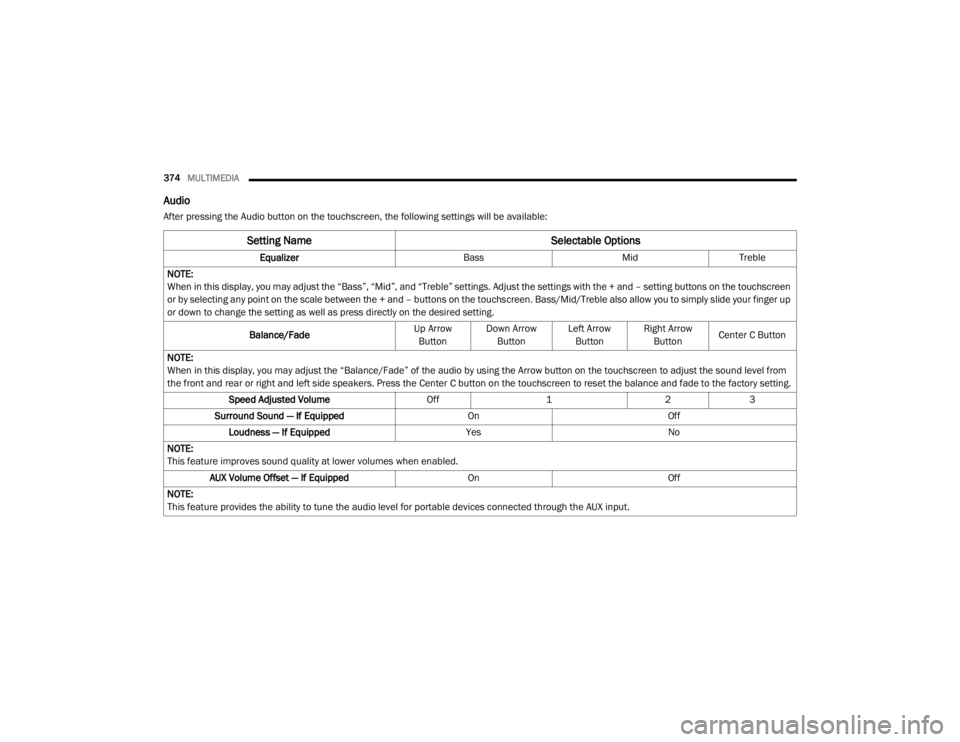
Audio
After pressing the Audio button on the touchscreen, the following settings will be available:
Setting Name Selectable Options
EqualizerBassMidTreble
NOTE:
When in this display, you may adjust the “Bass”, “Mid”, and “Treble” settings. Adjust the settings with the + and – setting buttons on the touchscreen
or by selecting any point on the scale between the + and – buttons on the touchscreen. Bass/Mid/Treble also allow you to simply slide your finger up
or down to change the setting as well as press directly on the desired setting.
Balance/Fade Up Arrow
Button Down Arrow
Button Left Arrow
Button Right Arrow
Button Center C Button
NOTE:
When in this display, you may adjust the “Balance/Fade” of the audio by using the Arrow button on the touchscreen to adjust the sound level from
the front and rear or right and left side speakers. Press the Center C button on the touchscreen to reset the balance and fade to the factory setting. Speed Adjusted Volume Off123
Surround Sound — If Equipped OnOff
Loudness — If Equipped YesNo
NOTE:
This feature improves sound quality at lower volumes when enabled. AUX Volume Offset — If Equipped OnOff
NOTE:
This feature provides the ability to tune the audio level for portable devices connected through the AUX input.
20_WD_OM_EN_USC_t.book Page 374
Page 379 of 464

MULTIMEDIA377
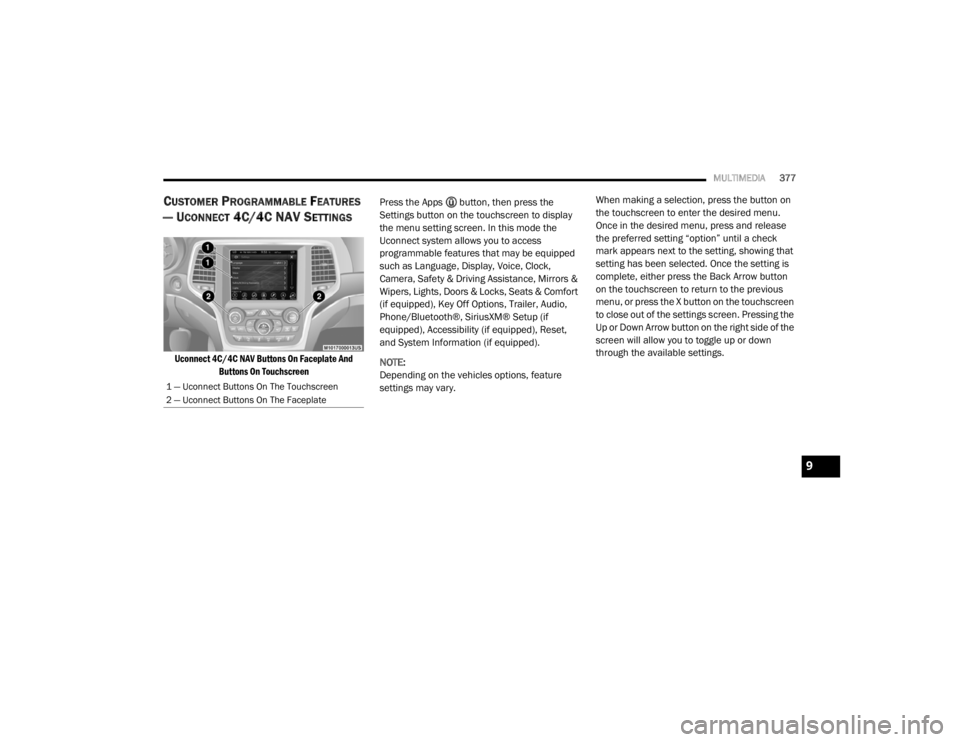
CUSTOMER PROGRAMMABLE FEATURES
— U
CONNECT 4C/4C NAV SETTINGS
Uconnect 4C/4C NAV Buttons On Faceplate And
Buttons On Touchscreen
Press the Apps button, then press the
Settings button on the touchscreen to display
the menu setting screen. In this mode the
Uconnect system allows you to access
programmable features that may be equipped
such as Language, Display, Voice, Clock,
Camera, Safety & Driving Assistance, Mirrors &
Wipers, Lights, Doors & Locks, Seats & Comfort
(if equipped), Key Off Options, Trailer, Audio,
Phone/Bluetooth®, SiriusXM® Setup (if
equipped), Accessibility (if equipped), Reset,
and System Information (if equipped).
NOTE:
Depending on the vehicles options, feature
settings may vary. When making a selection, press the button on
the touchscreen to enter the desired menu.
Once in the desired menu, press and release
the preferred setting “option” until a check
mark appears next to the setting, showing that
setting has been selected. Once the setting is
complete, either press the Back Arrow button
on the touchscreen to return to the previous
menu, or press the X button on the touchscreen
to close out of the settings screen. Pressing the
Up or Down Arrow button on the right side of the
screen will allow you to toggle up or down
through the available settings.
1 — Uconnect Buttons On The Touchscreen
2 — Uconnect Buttons On The Faceplate
9
20_WD_OM_EN_USC_t.book Page 377
Page 388 of 464

386MULTIMEDIA
1st Press Of Key Fob Unlocks Driver Door All Doors
NOTE:
When "Driver Door" is programmed with 1st Press Of Key Fob Unlocks, only the driver's door will unlock with the first press of the key fob unlock button.
You must push the key fob unlock button twice to unlock the passengers’ doors. When "All Doors" is programmed for 1st Press Of Key Fob Unlocks,
all doors will unlock on the first push of the key fob unlock button. If the vehicle is programmed 1st Press Of Key Fob Unlocks “All Doors”, all doors
will unlock no matter which Passive Entry equipped door handle is grasped. If 1st Press Of Key Fob Unlocks “Driver Door” is programmed, only the
driver’s door will unlock when the driver’s door is grasped. With Passive Entry, if 1st Press Of Key Fob Unlocks “Driver Door” is programmed, touching
the handle more than once will result in only the driver’s door opening. If “Driver Door” is selected, once the driver door is opened, the interior door
lock/unlock switch can be used to unlock all doors (or use the key fob). Passive Entry — If Equipped On Off
NOTE:
This feature allows you to lock and unlock the vehicle’s door(s) without having to push the key fob lock or unlock buttons.
Personal Settings Linked to Key Fob — If Equipped On
Off
NOTE:
This feature provides automatic recall of all settings stored to a memory location (driver’s seat, exterior mirrors, steering column position, and radio
station presets) to enhance driver mobility when entering and exiting the vehicle. Power Liftgate Alert — If Equipped On Off
Setting Name Selectable Options
20_WD_OM_EN_USC_t.book Page 386
Page 391 of 464

MULTIMEDIA389
Audio
After pressing the Audio button on the touchscreen, the following settings will be available: Trailer Name
List of Trailer Names
NOTE:
You can select and personalize your trailer name depending on the type of trailer you are hauling. Select the trailer name from the following list: trailer,
boat, car, cargo, equipment, flat, livestock, horse, motorcycle, snowmobile, travel, and utility.
Setting Name Selectable Options
Setting NameSelectable Options
Balance/Fade Speaker Icon
NOTE:
When in this display, you may adjust the “Balance/Fade” of the audio by pressing and dragging the Speaker Icon toward any location in the box. Equalizer BassMid Treble
NOTE:
When in this display, you may adjust the “Bass”, “Mid”, and “Treble” settings. Adjust the settings with the + and – setting buttons on the touchscreen
or by selecting any point on the scale between the + and – buttons on the touchscreen. Bass/Mid/Treble also allow you to simply slide your finger up
or down to change the setting as well as press directly on the desired setting. Speed Adjusted Volume Off123
Surround Sound — If Equipped On
Off
AUX Volume Offset — If Equipped +
-
NOTE:
This feature provides the ability to tune the audio level for portable devices connected through the AUX input.
9
20_WD_OM_EN_USC_t.book Page 389
Page 397 of 464

MULTIMEDIA395
Care And Maintenance
Touchscreen
Do not press the touchscreen with any hard
or sharp objects (pen, USB stick, jewelry,
etc.), which could scratch the touchscreen
surface!
Do not spray any liquid or caustic chemicals
directly on the screen! Use a clean and dry
microfiber lens cleaning cloth in order to
clean the touchscreen.
If necessary, use a lint-free cloth dampened
with a cleaning solution, such as isopropyl
alcohol or an isopropyl alcohol and water
solution ratio of 50:50. Be sure to follow the
solvent manufacturer's precautions and
directions.
UCONNECT 4 WITH 7-INCH DISPLAY
INTRODUCTION
Uconnect 4 With 7-inch Display
Uconnect 4 With 7-inch Display
NOTE:
Uconnect screen images are for illustration
purposes only and may not reflect exact soft -
ware for your vehicle.
1.
Radio
Press the Radio button on the touchscreen
to enter Radio Mode. The different tuner
modes, AM, FM, and SXM, can be selected
by pressing the corresponding buttons on
the touchscreen in Radio Mode.
2. Media Press the Media button on the touchscreen
to access media sources such as USB De -
vice, AUX, and Bluetooth® as long as the re -
quested media is present.
3. Climate Refer to “Climate Controls” in “Getting To
Know Your Vehicle” for further details.
4. Apps Press the Apps button on the touchscreen
to access Smartphone and Connected vehi -
cle options.
5. Controls Press the Controls button on the touch -
screen to adjust the heated and vented
seats or heated steering wheel
(if equipped).
9
20_WD_OM_EN_USC_t.book Page 395
Page 398 of 464

396MULTIMEDIA
6. Phone
Press the Phone button on the touchscreen
to access the Uconnect Phone feature.
7. Settings Press the Settings button on the touch -
screen to access the Uconnect Settings
menu.
Drag & Drop Menu Bar
The Uconnect features and services in the main
menu bar are easily changed for your
convenience. Simply follow these steps:
Uconnect 4 Main Menu
1. Press the Apps button to open the App
screen.
2. Press and hold, then drag the selected App to replace an existing shortcut in the main
menu bar.
The new app shortcut, that was dragged down
onto the main menu bar, will now be an active
App/shortcut.
NOTE:
This feature is only available if the vehicle is in
PARK.
RADIO MODE
Radio Controls
The radio is equipped with the following modes:
AM
FM
SiriusXM® Satellite Radio – If Equipped
Press the Radio button on the touchscreen,
bottom left corner, to enter the Radio Mode. The
different tuner modes, AM, FM, and SXM, can
then be selected by pressing the corresponding
buttons in the Radio mode. Volume/Power Control
Push the Volume/Power control knob to turn off
the screen and mute the radio. Push the
Volume/Power control knob a second time to
turn the screen back on and unmute the radio.
The electronic volume control turns
continuously (360 degrees) in either direction,
without stopping. Turning the Volume/Power
control knob clockwise increases the volume,
and counterclockwise decreases it.
Tune/Scroll Control
When the audio system is turned on, the sound
will be set at the same volume level as last
played.
Turn the rotary Tune/Scroll control knob
clockwise to increase or counterclockwise to
decrease the radio station frequency. Push the
Enter/Browse button to choose a selection.
Screen Close
The X button on the touchscreen at the top right,
provides a means to close the Direct Tune
Screen. The Direct Tune Screen also auto
closes if no activity occurs within a few seconds.
20_WD_OM_EN_USC_t.book Page 396
Page 399 of 464

MULTIMEDIA397
Seek And Direct Tune Functions
The Seek Up and Down functions are activated
by pressing the double arrow buttons on the
touchscreen to the right and left of the radio
station display or by pushing the left Steering
Wheel Audio Control up or down.
Seek Up
Press and release the Seek Up button on the
touchscreen to tune the radio to the next
listenable station or channel. During a Seek Up
function, if the radio reaches the starting
station after passing through the entire band
two times, the radio will stop at the station
where it began.
Fast Seek Up
Press and hold the Seek Up button on the
touchscreen to advance the radio through the
available stations or channels at a faster rate.
The radio stops at the next available station or
channel when the button on the touchscreen is
released. Seek Down
Press and release the Seek Down button on the
touchscreen to tune the radio to the next
listenable station or channel. During a Seek
Down function, if the radio reaches the starting
station after passing through the entire band
two times, the radio will stop at the station
where it began.
Fast Seek Down
Press and hold the Seek Down button on the
touchscreen to advance the radio through the
available stations or channel at a faster rate.
The radio stops at the next available station or
channel when the button on the touchscreen is
released.
Direct Tune
Press the Tune button on the touchscreen
located at the bottom of the radio screen. The
Direct Tune button on the touchscreen is
available in AM, FM, and SXM radio modes and
can be used to direct tune the radio to a desired
station or channel.Press the available number button on the
touchscreen to begin selecting a desired
station. Once a number has been entered, any
numbers that are no longer possible (stations
that cannot be reached) will become
deactivated/grayed out.
Undo
You can backspace an entry by pressing the
bottom left on the touchscreen.
OK
Once the last digit of a station has been
entered, press the OK button, and the Direct
Tune screen will close. The system will
automatically tune to that station.
The selected Station or Channel number is
displayed in the Direct Tune text box.
Setting Presets
The Presets are available for all Radio Modes,
and are activated by pressing any of the six
Preset buttons on the touchscreen, located at
the top of the screen.
9
20_WD_OM_EN_USC_t.book Page 397