2020 DODGE CHARGER steering
[x] Cancel search: steeringPage 296 of 412

294SERVICING AND MAINTENANCE
Both underinflation and overinflation affect the
stability of the vehicle and can produce a feeling
of sluggish response or over responsiveness in
the steering. NOTE:
Unequal tire pressures from side to side may
cause erratic and unpredictable steering
response.
Unequal tire pressure from side to side may
cause the vehicle to drift left or right.
Fuel Economy
Underinflated tires will increase tire rolling
resistance resulting in higher fuel consumption.
Tread Wear
Improper cold tire inflation pressures can cause
abnormal wear patterns and reduced tread life,
resulting in the need for earlier tire
replacement.
Ride Comfort And Vehicle Stability
Proper tire inflation contributes to a
comfortable ride. Overinflation produces a
jarring and uncomfortable ride.
Tire Inflation Pressures
The proper cold tire inflation pressure is listed
on the driver's side B-pillar or rear edge of the
driver's side door. At least once a month:
Check and adjust tire pressure with a good
quality pocket-type pressure gauge. Do not
make a visual judgment when determining
proper inflation. Tires may look properly
inflated even when they are under-inflated.
Inspect tires for signs of tire wear or visible
damage.
Inflation pressures specified on the placard are
always “cold tire inflation pressure”. Cold tire
inflation pressure is defined as the tire pressure
after the vehicle has not been driven for at least
3 hours, or driven less than 1 mile (1.6 km)
after sitting for a minimum of 3 hours. The cold
tire inflation pressure must not exceed the
maximum inflation pressure molded into the
tire sidewall.
Overinflation reduces a tire's ability to
cushion shock. Objects on the road and
chuckholes can cause damage that result
in tire failure.
Overinflated or underinflated tires can affect
vehicle handling and can fail suddenly,
resulting in loss of vehicle control.
Unequal tire pressures can cause steering
problems. You could lose control of your
vehicle.
Unequal tire pressures from one side of the
vehicle to the other can cause the vehicle
to drift to the right or left.
Always drive with each tire inflated to the
recommended cold tire inflation pressure.
WARNING! (Continued)
CAUTION!
After inspecting or adjusting the tire pressure,
always reinstall the valve stem cap. This will
prevent moisture and dirt from entering the
valve stem, which could damage the valve
stem.
20_LD_OM_EN_USC_t.book Page 294
Page 299 of 412

SERVICING AND MAINTENANCE297
NOTE:
Wheel valve stem must be replaced as well
when installing new tires due to wear and tear
in existing tires.
Keep dismounted tires in a cool, dry place with
as little exposure to light as possible. Protect
tires from contact with oil, grease, and gasoline.
Replacement Tires
The tires on your new vehicle provide a balance
of many characteristics. They should be
inspected regularly for wear and correct cold
tire inflation pressures. The manufacturer
strongly recommends that you use tires
equivalent to the originals in size, quality and
performance when replacement is needed. Refer to the paragraph on “Tread Wear
Indicators” in this section. Refer to the Tire and
Loading Information placard or the Vehicle
Certification Label for the size designation of
your tire. The Load Index and Speed Symbol for
your tire will be found on the original equipment
tire sidewall.
See the Tire Sizing Chart example found in the
“Tire Safety Information” section of this manual
for more information relating to the Load Index
and Speed Symbol of a tire.
It is recommended to replace the two front tires
or two rear tires as a pair. Replacing just one tire
can seriously affect your vehicle’s handling. If
you ever replace a wheel, make sure that the
wheel’s specifications match those of the
original wheels.
It is recommended you contact an authorized
tire dealer or original equipment dealer with any
questions you may have on tire specifications or
capability. Failure to use equivalent
replacement tires may adversely affect the
safety, handling, and ride of your vehicle.
WARNING!
Tires and the spare tire should be replaced
after six years, regardless of the remaining
tread. Failure to follow this warning can result
in sudden tire failure. You could lose control
and have a collision resulting in serious injury
or death.
WARNING!
Do not use a tire, wheel size, load rating, or
speed rating other than that specified for
your vehicle. Some combinations of unap
-
proved tires and wheels may change suspen -
sion dimensions and performance
characteristics, resulting in changes to
steering, handling, and braking of your
vehicle. This can cause unpredictable
handling and stress to steering and suspen -
sion components. You could lose control and
have a collision resulting in serious injury or
death. Use only the tire and wheel sizes with
load ratings approved for your vehicle.
Never use a tire with a smaller load index or
capacity, other than what was originally
equipped on your vehicle. Using a tire with
a smaller load index could result in tire
overloading and failure. You could lose
control and have a collision.
Failure to equip your vehicle with tires
having adequate speed capability can
result in sudden tire failure and loss of
vehicle control.
7
20_LD_OM_EN_USC_t.book Page 297
Page 304 of 412

302SERVICING AND MAINTENANCE
(Continued)
TIRE CHAINS AND TRACTION DEVICES —
SRT
Due to limited clearance, tire chains or traction
devices are not recommended.
TIRE ROTATION RECOMMENDATIONS —
N
ON-SRT
Tires on the front and rear axles of vehicles
operate at different loads and perform different
steering, driving, and braking functions. For
these reasons, they wear at unequal rates.
These effects can be reduced by timely rotation
of tires. The benefits of rotation are especially
worthwhile with aggressive tread designs such
as those on all season type tires. Rotation will increase tread life, help to maintain mud, snow
and wet traction levels, and contribute to a
smooth, quiet ride.
Refer to “Scheduled Servicing” in “Servicing
And Maintenance” for the proper maintenance
intervals. The reasons for any rapid or unusual
wear should be corrected prior to rotation being
performed.
The suggested rotation method is the “rearward
cross” shown in the following diagram. This
rotation pattern does not apply to some
directional tires that must not be reversed.
Tire Rotation (Rearward Cross)
CAUTION!
To avoid damage to your vehicle or tires,
observe the following precautions:
Because of restricted traction device clear -
ance between tires and other suspension
components, it is important that only trac-
tion devices in good condition are used.
Broken devices can cause serious damage.
Stop the vehicle immediately if noise
occurs that could indicate device breakage.
Remove the damaged parts of the device
before further use.
Install device as tightly as possible and
then retighten after driving about ½ mile
(0.8 km). Autosock traction devices do not
require retightening.
Do not exceed 30 mph (48 km/h).
Drive cautiously and avoid severe turns and
large bumps, especially with a loaded
vehicle.
Do not drive for prolonged period on dry
pavement.
Observe the traction device manufacturer’s
instructions on the method of installation,
operating speed, and conditions for use.
Always use the suggested operating speed
of the device manufacturer’s if it is less
than 30 mph (48 km/h).
Do not use traction devices on a compact
spare tire.
CAUTION! (Continued)
20_LD_OM_EN_USC_t.book Page 302
Page 305 of 412

SERVICING AND MAINTENANCE303
TIRE ROTATION RECOMMENDATIONS —
SRT
Tires on the front and rear axles of vehicles
operate at different loads and perform different
steering, driving, and braking functions. For
these reasons, they wear at unequal rates.
These effects can be reduced by timely rotation
of tires. The benefits of rotation are especially
worthwhile with aggressive tread designs such
as those on all season type tires. Rotation will
increase tread life, help to maintain mud, snow
and wet traction levels, and contribute to a
smooth, quiet ride.
Refer to “Scheduled Servicing” in “Servicing
And Maintenance” for the proper maintenance
intervals. The reasons for any rapid or unusual
wear should be corrected prior to rotation being
performed.
Tire Rotation — Same Tire Size On Front And
Rear Axle
The suggested rotation method for vehicles
equipped with non directional three season and
all season tires is the “forward cross” as shown
in the following diagram.
Tire Rotation (Forward Cross)
DEPARTMENT OF TRANSPORTATION
UNIFORM TIRE QUALITY GRADES
The following tire grading categories
were established by the National
Highway Traffic Safety Administration.
The specific grade rating assigned by the
tire's manufacturer in each category is
shown on the sidewall of the tires on
your vehicle.
All passenger vehicle tires must conform
to Federal safety requirements in
addition to these grades.
TREADWEAR
The Treadwear grade is a comparative
rating, based on the wear rate of the tire
when tested under controlled conditions
on a specified government test course.
For example, a tire graded 150 would
wear one and one-half times as well on
the government course as a tire graded
100. The relative performance of tires
depends upon the actual conditions of
their use, however, and may depart
significantly from the norm due to
variations in driving habits, service
practices, and differences in road
characteristics and climate.
TRACTION GRADES
The Traction grades, from highest to
lowest, are AA, A, B, and C. These grades
represent the tire's ability to stop on wet
pavement, as measured under controlled
conditions on specified government test
surfaces of asphalt and concrete. A tire
marked C may have poor traction
performance.
7
20_LD_OM_EN_USC_t.book Page 303
Page 322 of 412

320TECHNICAL SPECIFICATIONS
CHASSIS
Component Fluid, Lubricant, or Genuine Part
Automatic Transmission Use only Mopar ZF 8&9 Speed ATF Automatic Transmission Fluid, or
equivalent. Failure to use the correct fluid may affect the function or
performance of your transmission.
Brake Master Cylinder We recommend you use Mopar DOT 3 brake fluid. If DOT 3 brake fluid is
not available, then DOT 4 is acceptable.
DOT 4 brake fluid must be changed every 24 months. This interval is time
based only, mileage intervals do not apply.
Hydraulic Power Steering Reservoir — If Equipped We recommend you use Mopar Hydraulic System Power Steering Fluid or
equivalent meeting the requirements of FCA Material Standard
MS-10838.
Rear Axle We recommend you use Mopar LSD Synthetic Gear Lubricant SAE
75W85 (API GL-5).
20_LD_OM_EN_USC_t.book Page 320
Page 329 of 412

MULTIMEDIA327
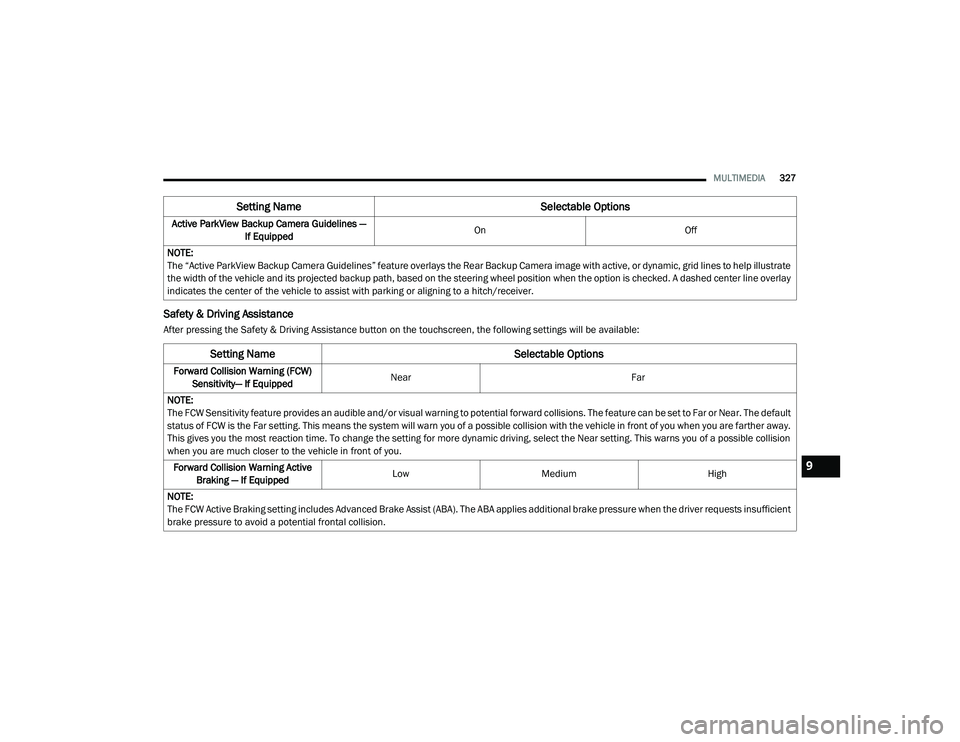
Safety & Driving Assistance
After pressing the Safety & Driving Assistance button on the touchscreen, the following settings will be available:Active ParkView Backup Camera Guidelines —
If Equipped On
Off
NOTE:
The “Active ParkView Backup Camera Guidelines” feature overlays the Rear Backup Camera image with active, or dynamic, grid lines to help illustrate
the width of the vehicle and its projected backup path, based on the steering wheel position when the option is checked. A dashed center line overlay
indicates the center of the vehicle to assist with parking or aligning to a hitch/receiver.
Setting Name Selectable Options
Setting NameSelectable Options
Forward Collision Warning (FCW)
Sensitivity— If Equipped Near
Far
NOTE:
The FCW Sensitivity feature provides an audible and/or visual warning to potential forward collisions. The feature can be set to Far or Near. The default
status of FCW is the Far setting. This means the system will warn you of a possible collision with the vehicle in front of you when you are farther away.
This gives you the most reaction time. To change the setting for more dynamic driving, select the Near setting. This warns you of a possible collision
when you are much closer to the vehicle in front of you. Forward Collision Warning Active Braking — If Equipped Low
Medium High
NOTE:
The FCW Active Braking setting includes Advanced Brake Assist (ABA). The ABA applies additional brake pressure when the driver requests insufficient
brake pressure to avoid a potential frontal collision.
9
20_LD_OM_EN_USC_t.book Page 327
Page 330 of 412

328MULTIMEDIA
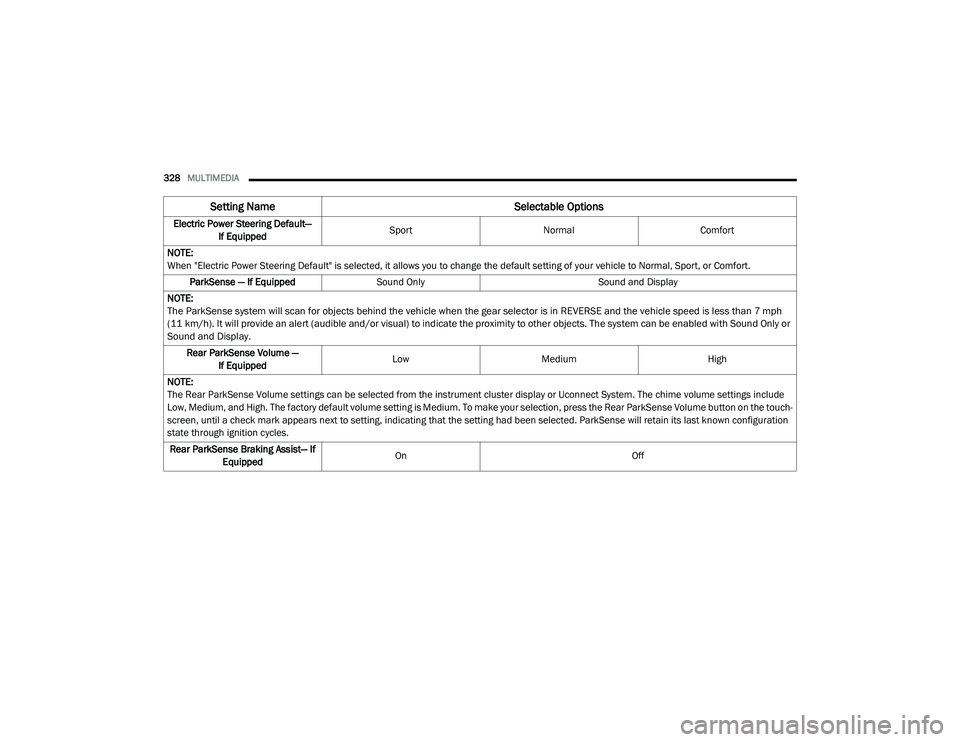
Electric Power Steering Default—
If Equipped Sport
Normal Comfort
NOTE:
When "Electric Power Steering Default" is selected, it allows you to change the default setting of your vehicle to Normal, Sport, or Comfort. ParkSense — If Equipped Sound Only Sound and Display
NOTE:
The ParkSense system will scan for objects behind the vehicle when the gear selector is in REVERSE and the vehicle speed is less than 7 mph
(11 km/h). It will provide an alert (audible and/or visual) to indicate the proximity to other objects. The system can be enabled with Sound Only or
Sound and Display.
Rear ParkSense Volume — If Equipped Low
Medium High
NOTE:
The Rear ParkSense Volume settings can be selected from the instrument cluster display or Uconnect System. The chime volume settings include
Low, Medium, and High. The factory default volume setting is Medium. To make your selection, press the Rear ParkSense Volume button on the touch -
screen, until a check mark appears next to setting, indicating that the setting had been selected. ParkSense will retain its last known configuration
state through ignition cycles.
Rear ParkSense Braking Assist— If Equipped On
Off
Setting Name Selectable Options
20_LD_OM_EN_USC_t.book Page 328
Page 333 of 412

MULTIMEDIA331
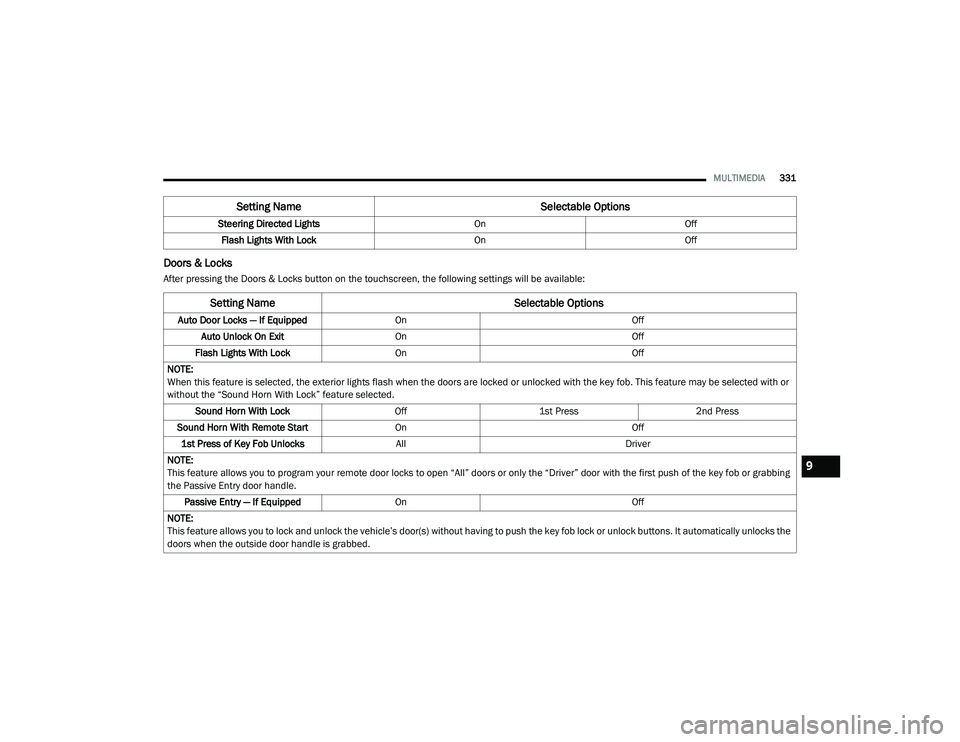
Doors & Locks
After pressing the Doors & Locks button on the touchscreen, the following settings will be available:Steering Directed Lights
OnOff
Flash Lights With Lock OnOff
Setting Name Selectable Options
Setting NameSelectable Options
Auto Door Locks — If EquippedOn Off
Auto Unlock On Exit On Off
Flash Lights With Lock On Off
NOTE:
When this feature is selected, the exterior lights flash when the doors are locked or unlocked with the key fob. This feature may be selected with or
without the “Sound Horn With Lock” feature selected. Sound Horn With Lock Off1st Press 2nd Press
Sound Horn With Remote Start On Off
1st Press of Key Fob Unlocks All Driver
NOTE:
This feature allows you to program your remote door locks to open “All” doors or only the “Driver” door with the first push of the key fob or grabbing
the Passive Entry door handle. Passive Entry — If Equipped On Off
NOTE:
This feature allows you to lock and unlock the vehicle’s door(s) without having to push the key fob lock or unlock buttons. It automatically unlocks the
doors when the outside door handle is grabbed.
9
20_LD_OM_EN_USC_t.book Page 331