Page 325 of 412

MULTIMEDIA323
When making a selection, press the button on
the touchscreen to enter the desired menu.
Once in the desired menu, press and release
the preferred setting “option” until a check
mark appears next to the setting, showing that
setting has been selected. Once the setting is complete, press the X button on the
touchscreen to close out of the settings screen.
Pressing the Up or Down Arrow button on the
right side of the screen will allow you to toggle
up or down through the available settings.
The following tables list the settings that may be
found within the Uconnect 4 with 7-inch display
radio, along with the selectable options
pertaining to each setting.
Language
After pressing the Language button on the touchscreen, the following setting will be available:
Display
After pressing the Display button on the touchscreen, the following settings will be available:
Setting Name
Selectable Options
LanguageEnglishFrançais Español
Setting Name Selectable Options
Display ModeManual Auto
Display Brightness With Headlights ON +
–
NOTE:
When in the “Display Brightness With Headlights ON” display, you may select the brightness with the headlights on. Adjust the brightness from
(1–10) with the + and – buttons on the touchscreen.
To make changes to the "Display Brightness With Headlights ON" setting, the headlights must be on and the interior dimmer switch must not be in
the "party" or "parade" position.
9
20_LD_OM_EN_USC_t.book Page 323
Page 326 of 412

324MULTIMEDIA
Display Brightness With Headlights
OFF +
–
NOTE:
When in the “Display Brightness With Headlights OFF” display, you may select the brightness with the headlights off. Adjust the brightness from
(1–10) with the + and – buttons on the touchscreen.
To make changes to the "Display Brightness With Headlights OFF" setting, the headlights must be off and the interior dimmer switch must not be
in the "party" or "parade" position. Set Theme On Off
NOTE:
When in the “Set Theme” display, you may select the theme for the display screen. To make your selection, press the Set Theme button on the touch -
screen, then select the desired theme option button until a check mark appears showing that the setting has been selected.
Touchscreen Beep On Off
Controls Screen Time-Out — If Equipped On
Off
NOTE:
When the “Controls Screen Time-Out” feature is selected, the Controls Screen will stay open for five seconds before the screen times out. With the
feature deselected, the screen will stay open until it is manually closed.
Setting Name Selectable Options
20_LD_OM_EN_USC_t.book Page 324
Page 329 of 412
MULTIMEDIA327
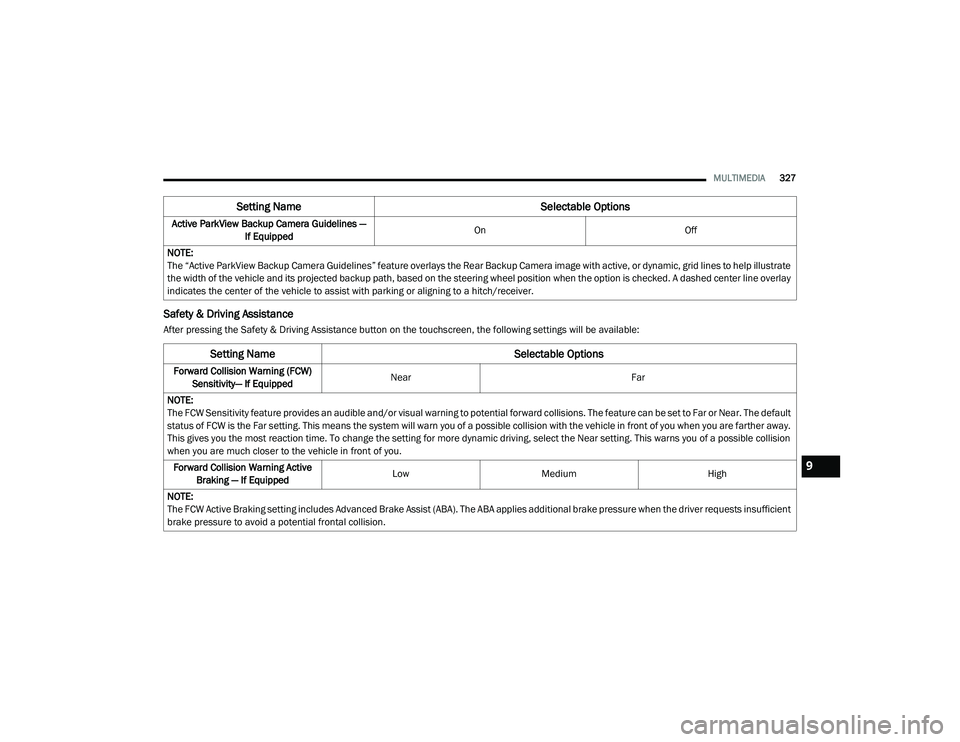
Safety & Driving Assistance
After pressing the Safety & Driving Assistance button on the touchscreen, the following settings will be available:Active ParkView Backup Camera Guidelines —
If Equipped On
Off
NOTE:
The “Active ParkView Backup Camera Guidelines” feature overlays the Rear Backup Camera image with active, or dynamic, grid lines to help illustrate
the width of the vehicle and its projected backup path, based on the steering wheel position when the option is checked. A dashed center line overlay
indicates the center of the vehicle to assist with parking or aligning to a hitch/receiver.
Setting Name Selectable Options
Setting NameSelectable Options
Forward Collision Warning (FCW)
Sensitivity— If Equipped Near
Far
NOTE:
The FCW Sensitivity feature provides an audible and/or visual warning to potential forward collisions. The feature can be set to Far or Near. The default
status of FCW is the Far setting. This means the system will warn you of a possible collision with the vehicle in front of you when you are farther away.
This gives you the most reaction time. To change the setting for more dynamic driving, select the Near setting. This warns you of a possible collision
when you are much closer to the vehicle in front of you. Forward Collision Warning Active Braking — If Equipped Low
Medium High
NOTE:
The FCW Active Braking setting includes Advanced Brake Assist (ABA). The ABA applies additional brake pressure when the driver requests insufficient
brake pressure to avoid a potential frontal collision.
9
20_LD_OM_EN_USC_t.book Page 327
Page 330 of 412
328MULTIMEDIA
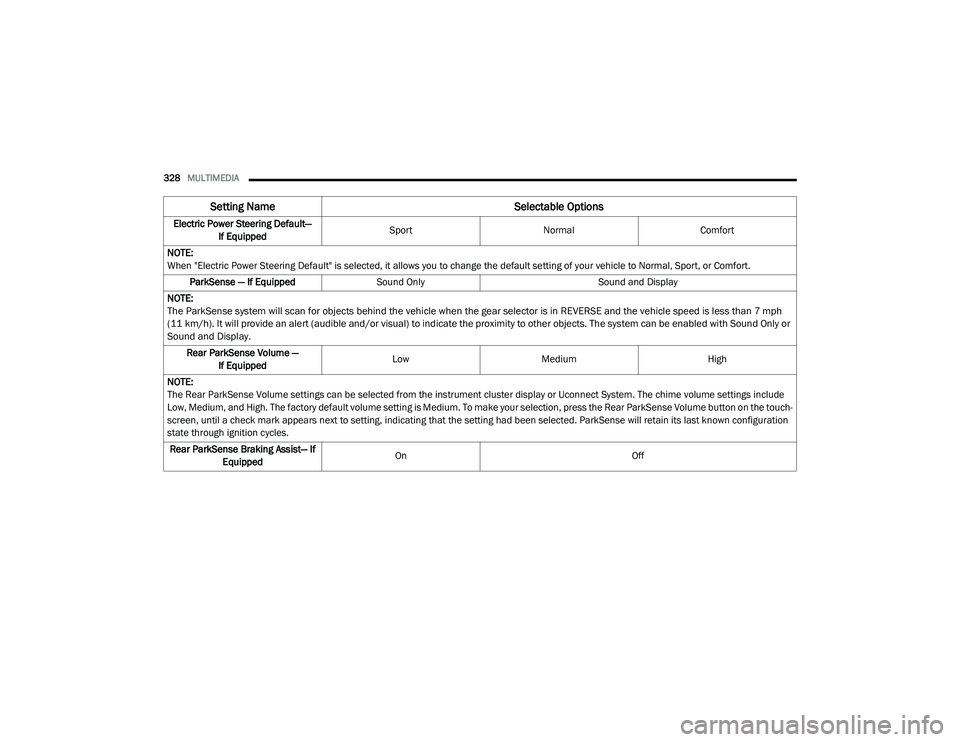
Electric Power Steering Default—
If Equipped Sport
Normal Comfort
NOTE:
When "Electric Power Steering Default" is selected, it allows you to change the default setting of your vehicle to Normal, Sport, or Comfort. ParkSense — If Equipped Sound Only Sound and Display
NOTE:
The ParkSense system will scan for objects behind the vehicle when the gear selector is in REVERSE and the vehicle speed is less than 7 mph
(11 km/h). It will provide an alert (audible and/or visual) to indicate the proximity to other objects. The system can be enabled with Sound Only or
Sound and Display.
Rear ParkSense Volume — If Equipped Low
Medium High
NOTE:
The Rear ParkSense Volume settings can be selected from the instrument cluster display or Uconnect System. The chime volume settings include
Low, Medium, and High. The factory default volume setting is Medium. To make your selection, press the Rear ParkSense Volume button on the touch -
screen, until a check mark appears next to setting, indicating that the setting had been selected. ParkSense will retain its last known configuration
state through ignition cycles.
Rear ParkSense Braking Assist— If Equipped On
Off
Setting Name Selectable Options
20_LD_OM_EN_USC_t.book Page 328
Page 335 of 412
MULTIMEDIA333
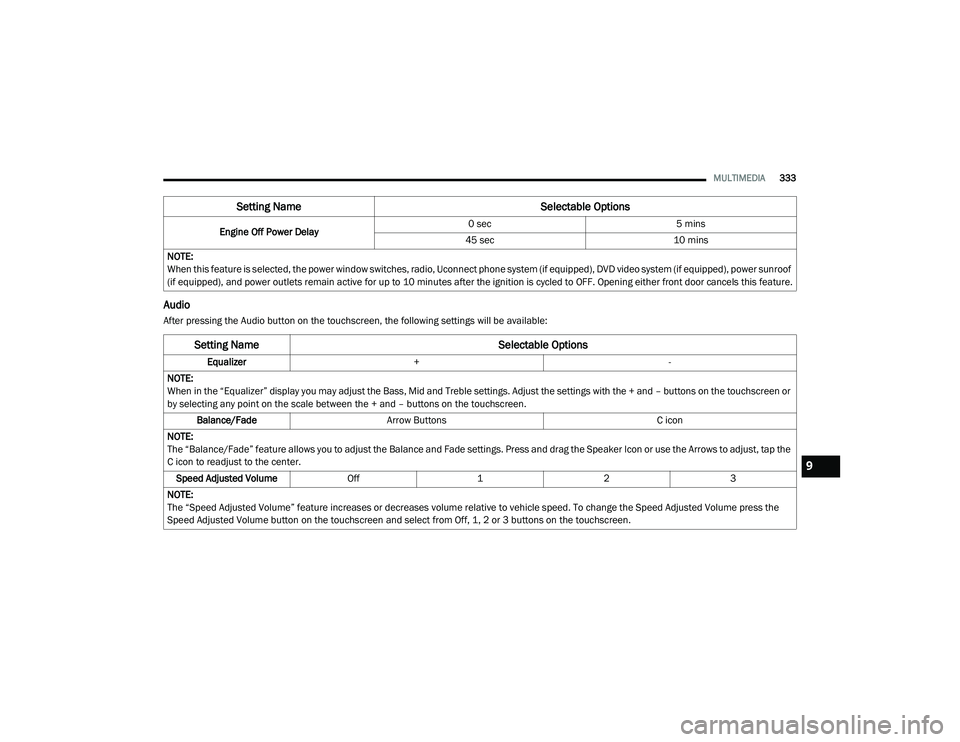
Audio
After pressing the Audio button on the touchscreen, the following settings will be available:Engine Off Power Delay
0 sec
5 mins
45 sec 10 mins
NOTE:
When this feature is selected, the power window switches, radio, Uconnect phone system (if equipped), DVD video system (if equipped), power sunroof
(if equipped), and power outlets remain active for up to 10 minutes after the ignition is cycled to OFF. Opening either front door cancels this feature.
Setting Name Selectable Options
Setting NameSelectable Options
Equalizer+ -
NOTE:
When in the “Equalizer” display you may adjust the Bass, Mid and Treble settings. Adjust the settings with the + and – buttons on the touchscreen or
by selecting any point on the scale between the + and – buttons on the touchscreen. Balance/Fade Arrow Buttons C icon
NOTE:
The “Balance/Fade” feature allows you to adjust the Balance and Fade settings. Press and drag the Speaker Icon or use the Arrows to adjust, tap the
C icon to readjust to the center. Speed Adjusted Volume Off123
NOTE:
The “Speed Adjusted Volume” feature increases or decreases volume relative to vehicle speed. To change the Speed Adjusted Volume press the
Speed Adjusted Volume button on the touchscreen and select from Off, 1, 2 or 3 buttons on the touchscreen.
9
20_LD_OM_EN_USC_t.book Page 333
Page 340 of 412

338MULTIMEDIA
Language
After pressing the Language button on the touchscreen, the following setting will be available:
Display
After pressing the Display button on the touchscreen, the following settings will be available:
Setting Name Selectable Options
LanguageEnglishFrançais Español
Setting Name Selectable Options
Display ModeAutoManual
Display Brightness With Headlights On +–
NOTE:
When in the “Display Brightness With Headlights On” display, you may select the brightness with the headlights on.
To make changes to the "Display Brightness With Headlights On" setting, the headlights must be on and the interior dimmer switch must not be in
the "party" or "parade" position. Display Brightness With Headlights Off +–
NOTE:
When in the “Display Brightness With Headlights Off” display, you may select the brightness with the headlights off. Adjust the brightness from
(1–10) with the + and – buttons on the touchscreen.
To make changes to the "Display Brightness With Headlights Off" setting, the headlights must be off and the interior dimmer switch must not be in
the "party" or "parade" position.
20_LD_OM_EN_USC_t.book Page 338
Page 345 of 412
MULTIMEDIA343
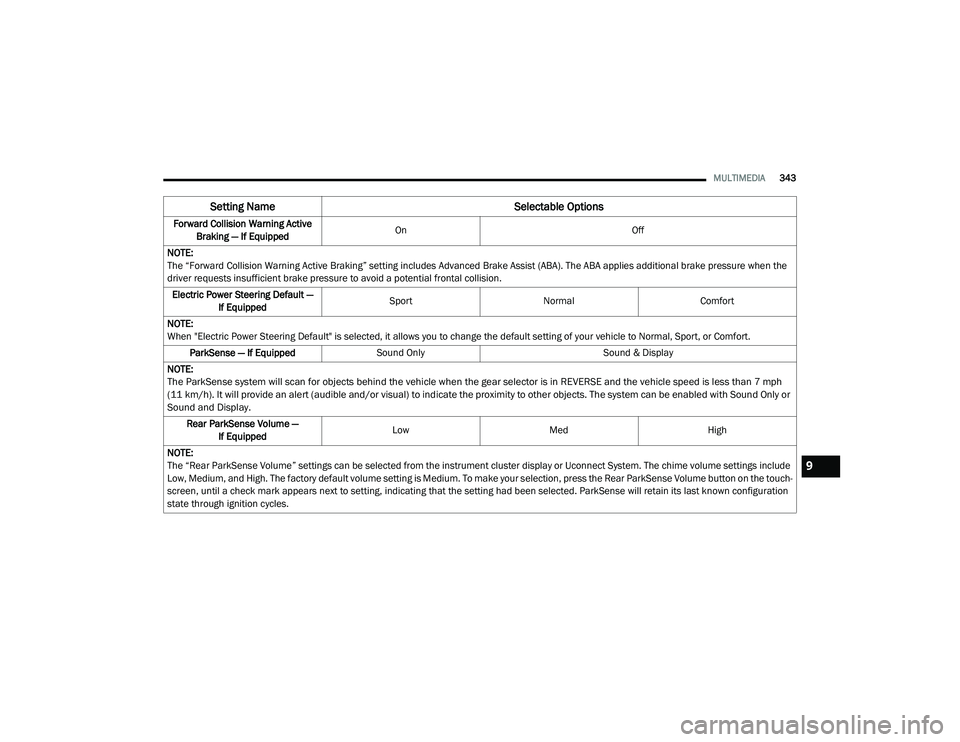
Forward Collision Warning Active
Braking — If Equipped On
Off
NOTE:
The “Forward Collision Warning Active Braking” setting includes Advanced Brake Assist (ABA). The ABA applies additional brake pressure when the
driver requests insufficient brake pressure to avoid a potential frontal collision. Electric Power Steering Default — If Equipped Sport
Normal Comfort
NOTE:
When "Electric Power Steering Default" is selected, it allows you to change the default setting of your vehicle to Normal, Sport, or Comfort. ParkSense — If Equipped Sound Only Sound & Display
NOTE:
The ParkSense system will scan for objects behind the vehicle when the gear selector is in REVERSE and the vehicle speed is less than 7 mph
(11 km/h). It will provide an alert (audible and/or visual) to indicate the proximity to other objects. The system can be enabled with Sound Only or
Sound and Display.
Rear ParkSense Volume — If Equipped Low
Med High
NOTE:
The “Rear ParkSense Volume” settings can be selected from the instrument cluster display or Uconnect System. The chime volume settings include
Low, Medium, and High. The factory default volume setting is Medium. To make your selection, press the Rear ParkSense Volume button on the touch -
screen, until a check mark appears next to setting, indicating that the setting had been selected. ParkSense will retain its last known configuration
state through ignition cycles.
Setting Name Selectable Options
9
20_LD_OM_EN_USC_t.book Page 343
Page 350 of 412
348MULTIMEDIA
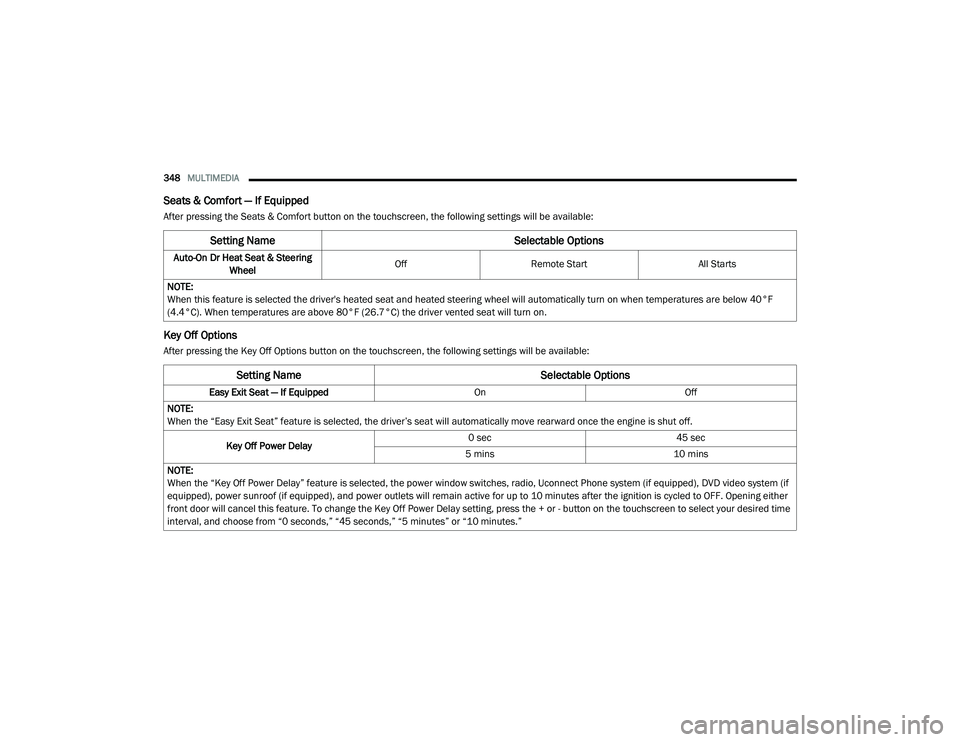
Seats & Comfort — If Equipped
After pressing the Seats & Comfort button on the touchscreen, the following settings will be available:
Key Off Options
After pressing the Key Off Options button on the touchscreen, the following settings will be available:
Setting Name Selectable Options
Auto-On Dr Heat Seat & Steering
Wheel Off
Remote Start All Starts
NOTE:
When this feature is selected the driver's heated seat and heated steering wheel will automatically turn on when temperatures are below 40°F
(4.4°C). When temperatures are above 80°F (26.7°C) the driver vented seat will turn on.
Setting Name Selectable Options
Easy Exit Seat — If EquippedOnOff
NOTE:
When the “Easy Exit Seat” feature is selected, the driver’s seat will automatically move rearward once the engine is shut off.
Key Off Power Delay 0 sec
45 sec
5 mins 10 mins
NOTE:
When the “Key Off Power Delay” feature is selected, the power window switches, radio, Uconnect Phone system (if equipped), DVD video system (if
equipped), power sunroof (if equipped), and power outlets will remain active for up to 10 minutes after the ignition is cycled to OFF. Opening either
front door will cancel this feature. To change the Key Off Power Delay setting, press the + or - button on the touchscreen to select your desired time
interval, and choose from “0 seconds,” “45 seconds,” “5 minutes” or “10 minutes.”
20_LD_OM_EN_USC_t.book Page 348