2020 DODGE CHARGER lights
[x] Cancel search: lightsPage 307 of 412

SERVICING AND MAINTENANCE305
(Continued)
The most common causes are:
Road salt, dirt and moisture accumulation.
Stone and gravel impact.
Insects, tree sap and tar.
Salt in the air near seacoast localities.
Atmospheric fallout/industrial pollutants.
BODY AND UNDERBODY MAINTENANCE
Cleaning Headlights
Your vehicle is equipped with plastic headlights
and fog lights that are lighter and less
susceptible to stone breakage than glass
headlights.
Plastic is not as scratch resistant as glass and
therefore different lens cleaning procedures
must be followed.
To minimize the possibility of scratching the
lenses and reducing light output, avoid wiping
with a dry cloth. To remove road dirt, wash with
a mild soap solution followed by rinsing.
Do not use abrasive cleaning components,
solvents, steel wool or other aggressive
material to clean the lenses.
PRESERVING THE BODYWORK
Washing
Wash your vehicle regularly. Always wash
your vehicle in the shade using Mopar Car
Wash, or a mild car wash soap, and rinse the
panels completely with clear water.
If insects, tar, or other similar deposits have
accumulated on your vehicle, use Mopar
Super Kleen Bug and Tar Remover to
remove.
Use a high quality cleaner wax, such as
Mopar Cleaner Wax to remove road film,
stains and to protect your paint finish. Take
care never to scratch the paint.
Avoid using abrasive compounds and power
buffing that may diminish the gloss or thin
out the paint finish.
Special Care
If you drive on salted or dusty roads or if you
drive near the ocean, hose off the undercar -
riage at least once a month.
It is important that the drain holes in the
lower edges of the doors, rocker panels, and
trunk be kept clear and open.
If you detect any stone chips or scratches in
the paint, touch them up immediately. The
cost of such repairs is considered the respon -
sibility of the owner.
If your vehicle is damaged due to a collision
or similar cause that destroys the paint and
protective coating, have your vehicle repaired
as soon as possible. The cost of such repairs
is considered the responsibility of the owner.
If you carry special cargo such as chemicals,
fertilizers, de-icer salt, etc., be sure that such
materials are well packaged and sealed.
CAUTION!
Do not use abrasive or strong cleaning
materials such as steel wool or scouring
powder that will scratch metal and painted
surfaces.
Use of power washers exceeding 1,200 psi
(8,274 kPa) can result in damage or
removal of paint and decals.
CAUTION! (Continued)
7
20_LD_OM_EN_USC_t.book Page 305
Page 325 of 412

MULTIMEDIA323
When making a selection, press the button on
the touchscreen to enter the desired menu.
Once in the desired menu, press and release
the preferred setting “option” until a check
mark appears next to the setting, showing that
setting has been selected. Once the setting is complete, press the X button on the
touchscreen to close out of the settings screen.
Pressing the Up or Down Arrow button on the
right side of the screen will allow you to toggle
up or down through the available settings.
The following tables list the settings that may be
found within the Uconnect 4 with 7-inch display
radio, along with the selectable options
pertaining to each setting.
Language
After pressing the Language button on the touchscreen, the following setting will be available:
Display
After pressing the Display button on the touchscreen, the following settings will be available:
Setting Name
Selectable Options
LanguageEnglishFrançais Español
Setting Name Selectable Options
Display ModeManual Auto
Display Brightness With Headlights ON +
–
NOTE:
When in the “Display Brightness With Headlights ON” display, you may select the brightness with the headlights on. Adjust the brightness from
(1–10) with the + and – buttons on the touchscreen.
To make changes to the "Display Brightness With Headlights ON" setting, the headlights must be on and the interior dimmer switch must not be in
the "party" or "parade" position.
9
20_LD_OM_EN_USC_t.book Page 323
Page 326 of 412

324MULTIMEDIA
Display Brightness With Headlights
OFF +
–
NOTE:
When in the “Display Brightness With Headlights OFF” display, you may select the brightness with the headlights off. Adjust the brightness from
(1–10) with the + and – buttons on the touchscreen.
To make changes to the "Display Brightness With Headlights OFF" setting, the headlights must be off and the interior dimmer switch must not be
in the "party" or "parade" position. Set Theme On Off
NOTE:
When in the “Set Theme” display, you may select the theme for the display screen. To make your selection, press the Set Theme button on the touch -
screen, then select the desired theme option button until a check mark appears showing that the setting has been selected.
Touchscreen Beep On Off
Controls Screen Time-Out — If Equipped On
Off
NOTE:
When the “Controls Screen Time-Out” feature is selected, the Controls Screen will stay open for five seconds before the screen times out. With the
feature deselected, the screen will stay open until it is manually closed.
Setting Name Selectable Options
20_LD_OM_EN_USC_t.book Page 324
Page 331 of 412

MULTIMEDIA329
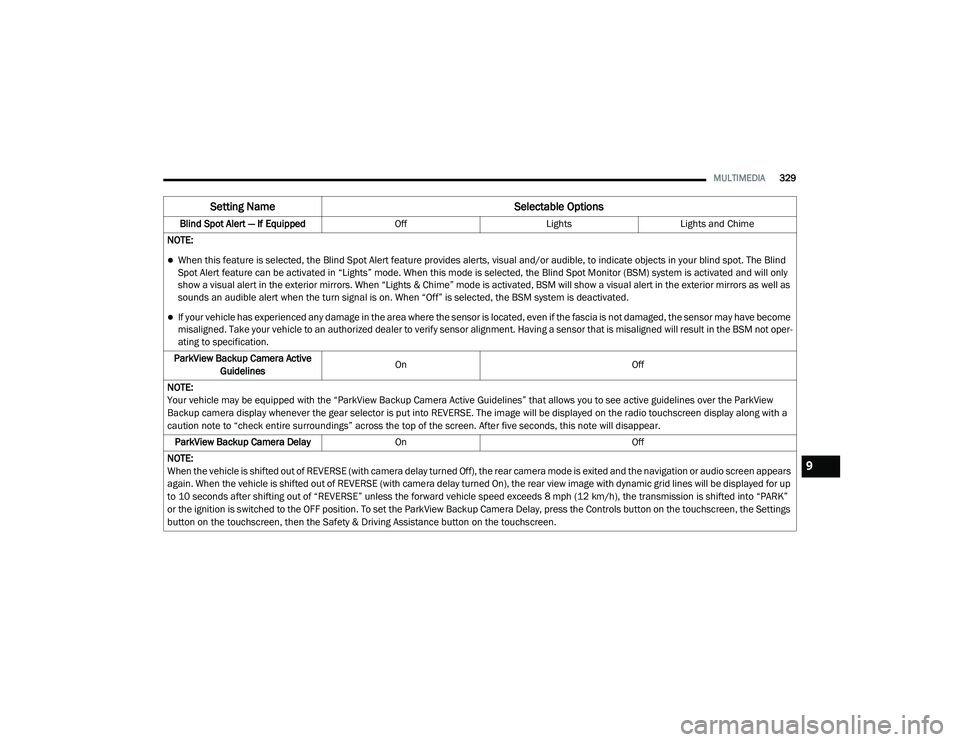
Blind Spot Alert — If Equipped OffLightsLights and Chime
NOTE:
When this feature is selected, the Blind Spot Alert feature provides alerts, visual and/or audible, to indicate objects in your blind spot. The Blind
Spot Alert feature can be activated in “Lights” mode. When this mode is selected, the Blind Spot Monitor (BSM) system is activated and will only
show a visual alert in the exterior mirrors. When “Lights & Chime” mode is activated, BSM will show a visual alert in the exterior mirrors as well as
sounds an audible alert when the turn signal is on. When “Off” is selected, the BSM system is deactivated.
If your vehicle has experienced any damage in the area where the sensor is located, even if the fascia is not damaged, the sensor may have become
misaligned. Take your vehicle to an authorized dealer to verify sensor alignment. Having a sensor that is misaligned will result in the BSM not oper -
ating to specification.
ParkView Backup Camera Active Guidelines On
Off
NOTE:
Your vehicle may be equipped with the “ParkView Backup Camera Active Guidelines” that allows you to see active guidelines over the ParkView
Backup camera display whenever the gear selector is put into REVERSE. The image will be displayed on the radio touchscreen display along with a
caution note to “check entire surroundings” across the top of the screen. After five seconds, this note will disappear. ParkView Backup Camera Delay On Off
NOTE:
When the vehicle is shifted out of REVERSE (with camera delay turned Off), the rear camera mode is exited and the navigation or audio screen appears
again. When the vehicle is shifted out of REVERSE (with camera delay turned On), the rear view image with dynamic grid lines will be displayed for up
to 10 seconds after shifting out of “REVERSE” unless the forward vehicle speed exceeds 8 mph (12 km/h), the transmission is shifted into “PARK”
or the ignition is switched to the OFF position. To set the ParkView Backup Camera Delay, press the Controls button on the touchscreen, the Settings
button on the touchscreen, then the Safety & Driving Assistance button on the touchscreen.
Setting Name Selectable Options
9
20_LD_OM_EN_USC_t.book Page 329
Page 332 of 412

330MULTIMEDIA
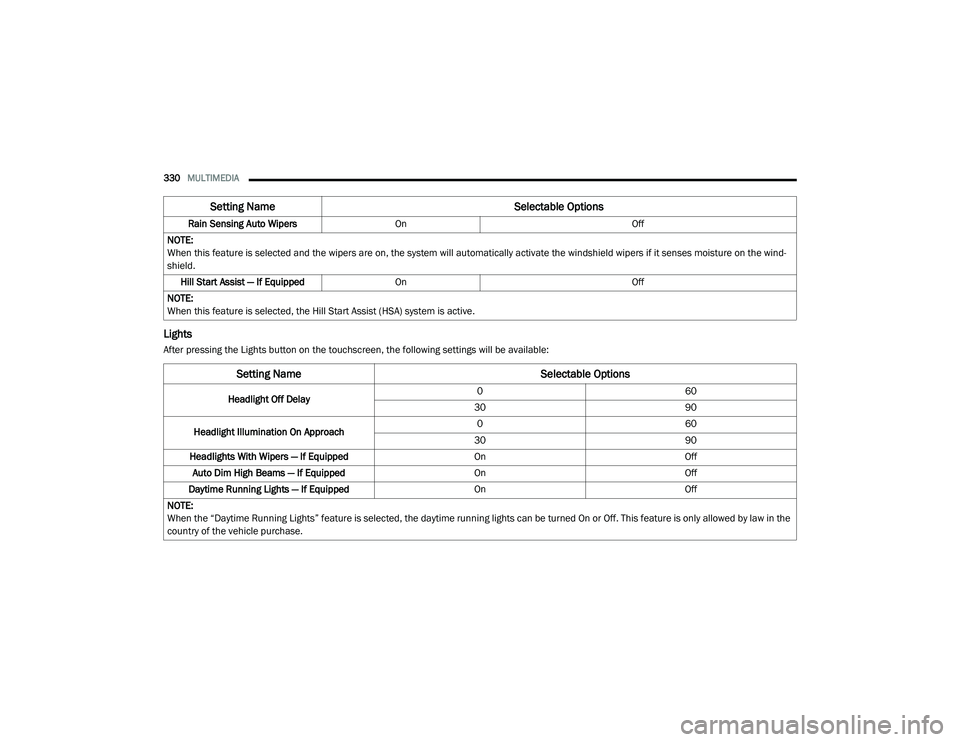
Lights
After pressing the Lights button on the touchscreen, the following settings will be available:Rain Sensing Auto Wipers
On Off
NOTE:
When this feature is selected and the wipers are on, the system will automatically activate the windshield wipers if it senses moisture on the wind -
shield.
Hill Start Assist — If Equipped On Off
NOTE:
When this feature is selected, the Hill Start Assist (HSA) system is active.
Setting Name Selectable Options
Setting NameSelectable Options
Headlight Off Delay0
60
30 90
Headlight Illumination On Approach 0
60
30 90
Headlights With Wipers — If Equipped OnOff
Auto Dim High Beams — If Equipped OnOff
Daytime Running Lights — If Equipped OnOff
NOTE:
When the “Daytime Running Lights” feature is selected, the daytime running lights can be turned On or Off. This feature is only allowed by law in the
country of the vehicle purchase.
20_LD_OM_EN_USC_t.book Page 330
Page 333 of 412

MULTIMEDIA331
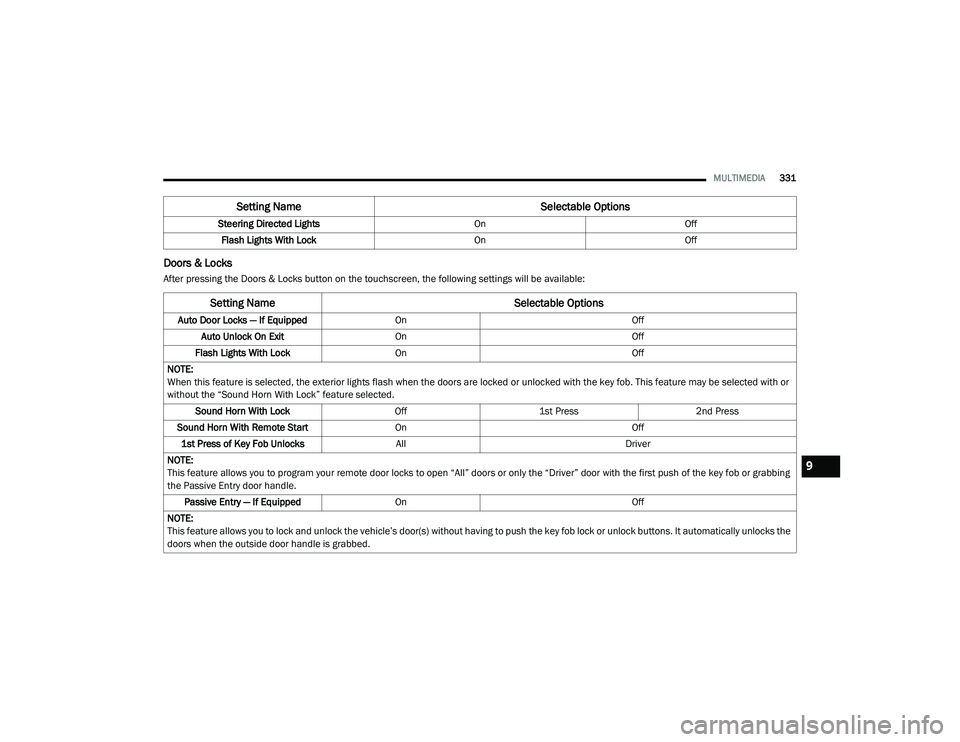
Doors & Locks
After pressing the Doors & Locks button on the touchscreen, the following settings will be available:Steering Directed Lights
OnOff
Flash Lights With Lock OnOff
Setting Name Selectable Options
Setting NameSelectable Options
Auto Door Locks — If EquippedOn Off
Auto Unlock On Exit On Off
Flash Lights With Lock On Off
NOTE:
When this feature is selected, the exterior lights flash when the doors are locked or unlocked with the key fob. This feature may be selected with or
without the “Sound Horn With Lock” feature selected. Sound Horn With Lock Off1st Press 2nd Press
Sound Horn With Remote Start On Off
1st Press of Key Fob Unlocks All Driver
NOTE:
This feature allows you to program your remote door locks to open “All” doors or only the “Driver” door with the first push of the key fob or grabbing
the Passive Entry door handle. Passive Entry — If Equipped On Off
NOTE:
This feature allows you to lock and unlock the vehicle’s door(s) without having to push the key fob lock or unlock buttons. It automatically unlocks the
doors when the outside door handle is grabbed.
9
20_LD_OM_EN_USC_t.book Page 331
Page 339 of 412

MULTIMEDIA337
Clear Personal Data
After pressing the Clear Personal Data button on the touchscreen, the following setting will be available:
CUSTOMER PROGRAMMABLE FEATURES
— U
CONNECT 4C/4C NAV SETTINGS
Uconnect 4C/4C NAV With 8.4-inch Display Buttons
On The Touchscreen And Buttons On The Faceplate
Press the Apps button, then press the
Settings button on the touchscreen to
display the menu setting screen. In this mode,
the Uconnect system allows you to access
programmable features that may be equipped
such as Language, Display, Units, Voice, Clock
& Date , Camera, Safety & Driving Assistance,
Mirrors & Wipers (if equipped), Lights, Doors &
Locks, Seats & Comfort (if equipped), Key Off
Options, Audio, Phone/Bluetooth® Settings,
SiriusXM® Setup (if equipped), Reset, and
System Information (if equipped).
NOTE:
Depending on the vehicle’s options, feature
settings may vary. When making a selection, press the button on
the touchscreen to enter the desired menu.
Once in the desired menu, press and release
the preferred setting “option” until a check
mark appears next to the setting, showing that
setting has been selected. Once the setting is
complete, press the X button on the
touchscreen to close out of the settings screen.
Pressing the Up or Down Arrow button on the
right side of the screen will allow you to toggle
up or down through the available settings.
The following tables list the settings that may be
found within the Uconnect 4C/4C NAV radio,
along with the selectable options pertaining to
each setting.
Setting Name
Selectable Options
Clear Personal DataYesCancel
NOTE:
When this feature is selected it will remove all personal data including Bluetooth® devices and presets. If “Yes” is selected a pop-up will appear asking
"Are you sure you want to clear all personal data?” select “Yes” to Clear, or “Cancel” to exit.
1 — Uconnect Buttons On The Touchscreen
2 — Uconnect Buttons On The Faceplate
9
20_LD_OM_EN_USC_t.book Page 337
Page 340 of 412

338MULTIMEDIA
Language
After pressing the Language button on the touchscreen, the following setting will be available:
Display
After pressing the Display button on the touchscreen, the following settings will be available:
Setting Name Selectable Options
LanguageEnglishFrançais Español
Setting Name Selectable Options
Display ModeAutoManual
Display Brightness With Headlights On +–
NOTE:
When in the “Display Brightness With Headlights On” display, you may select the brightness with the headlights on.
To make changes to the "Display Brightness With Headlights On" setting, the headlights must be on and the interior dimmer switch must not be in
the "party" or "parade" position. Display Brightness With Headlights Off +–
NOTE:
When in the “Display Brightness With Headlights Off” display, you may select the brightness with the headlights off. Adjust the brightness from
(1–10) with the + and – buttons on the touchscreen.
To make changes to the "Display Brightness With Headlights Off" setting, the headlights must be off and the interior dimmer switch must not be in
the "party" or "parade" position.
20_LD_OM_EN_USC_t.book Page 338