2020 DODGE CHARGER change wheel
[x] Cancel search: change wheelPage 232 of 412
230IN CASE OF EMERGENCY
JACK LOCATION/SPARE TIRE STOWAGE
The jack and spare tire are both stowed under
an access cover in the trunk. Follow these steps
to access the jack and spare tire.
NOTE:
The spare tire must be removed in order to
access the jack.
1. Open the trunk.
2. Lift the access cover using the pull strap.
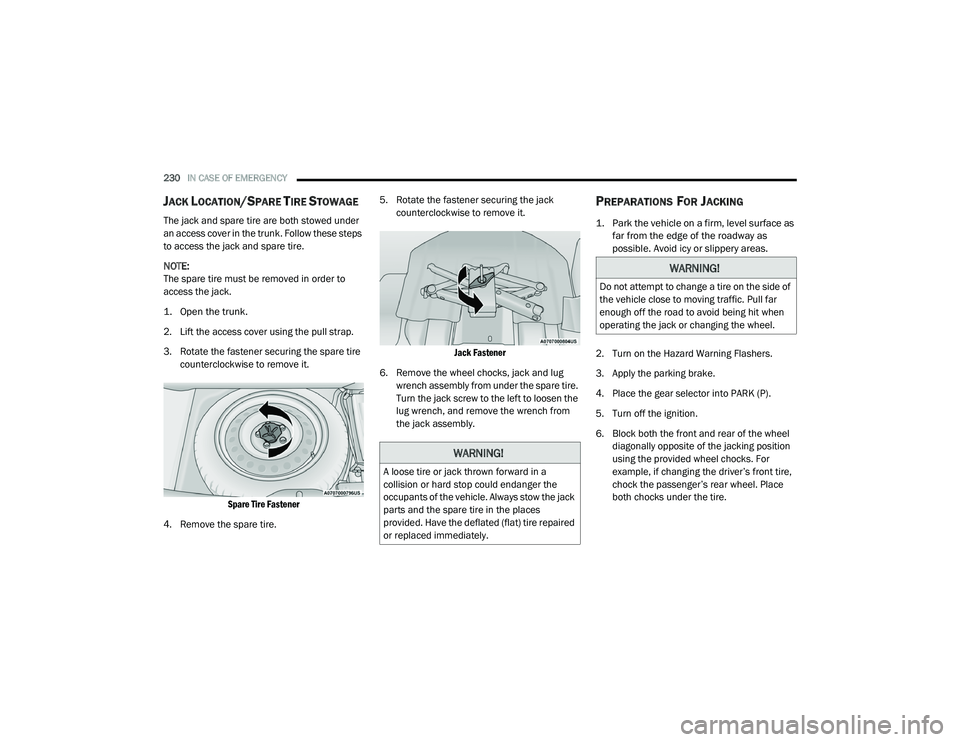
3. Rotate the fastener securing the spare tire
counterclockwise to remove it.
Spare Tire Fastener
4. Remove the spare tire. 5. Rotate the fastener securing the jack
counterclockwise to remove it.
Jack Fastener
6. Remove the wheel chocks, jack and lug wrench assembly from under the spare tire.
Turn the jack screw to the left to loosen the
lug wrench, and remove the wrench from
the jack assembly.
PREPARATIONS FOR JACKING
1. Park the vehicle on a firm, level surface as far from the edge of the roadway as
possible. Avoid icy or slippery areas.
2. Turn on the Hazard Warning Flashers.
3. Apply the parking brake.
4. Place the gear selector into PARK (P).
5. Turn off the ignition.
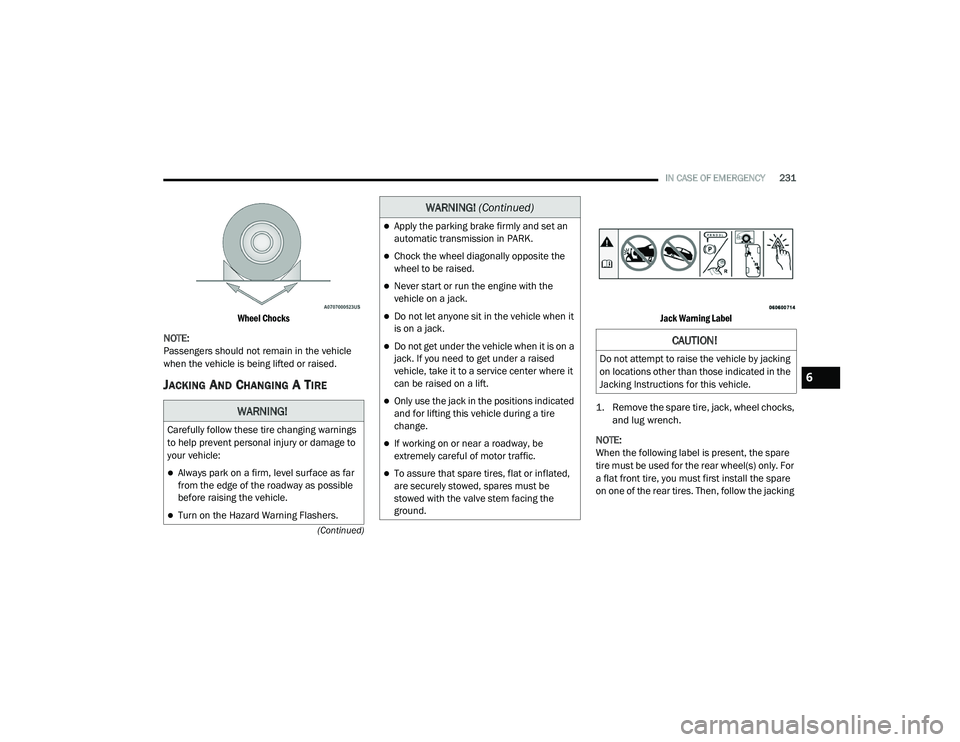
6. Block both the front and rear of the wheel diagonally opposite of the jacking position
using the provided wheel chocks. For
example, if changing the driver’s front tire,
chock the passenger’s rear wheel. Place
both chocks under the tire.
WARNING!
A loose tire or jack thrown forward in a
collision or hard stop could endanger the
occupants of the vehicle. Always stow the jack
parts and the spare tire in the places
provided. Have the deflated (flat) tire repaired
or replaced immediately.
WARNING!
Do not attempt to change a tire on the side of
the vehicle close to moving traffic. Pull far
enough off the road to avoid being hit when
operating the jack or changing the wheel.
20_LD_OM_EN_USC_t.book Page 230
Page 233 of 412
IN CASE OF EMERGENCY231
(Continued)
Wheel Chocks
NOTE:
Passengers should not remain in the vehicle
when the vehicle is being lifted or raised.
JACKING AND CHANGING A TIRE
Jack Warning Label
1. Remove the spare tire, jack, wheel chocks, and lug wrench.
NOTE:
When the following label is present, the spare
tire must be used for the rear wheel(s) only. For
a flat front tire, you must first install the spare
on one of the rear tires. Then, follow the jacking
WARNING!
Carefully follow these tire changing warnings
to help prevent personal injury or damage to
your vehicle:
Always park on a firm, level surface as far
from the edge of the roadway as possible
before raising the vehicle.
Turn on the Hazard Warning Flashers.
Apply the parking brake firmly and set an
automatic transmission in PARK.
Chock the wheel diagonally opposite the
wheel to be raised.
Never start or run the engine with the
vehicle on a jack.
Do not let anyone sit in the vehicle when it
is on a jack.
Do not get under the vehicle when it is on a
jack. If you need to get under a raised
vehicle, take it to a service center where it
can be raised on a lift.
Only use the jack in the positions indicated
and for lifting this vehicle during a tire
change.
If working on or near a roadway, be
extremely careful of motor traffic.
To assure that spare tires, flat or inflated,
are securely stowed, spares must be
stowed with the valve stem facing the
ground.
WARNING! (Continued)
CAUTION!
Do not attempt to raise the vehicle by jacking
on locations other than those indicated in the
Jacking Instructions for this vehicle.
6
20_LD_OM_EN_USC_t.book Page 231
Page 238 of 412
236IN CASE OF EMERGENCY
(Continued)
When the Tire Service Kit sealant is in a liquid
form, clean water and a damp cloth will
remove the material from the vehicle or tire
and wheel components. Once the sealant
dries, it can easily be peeled off and properly
discarded.
For optimum performance, make sure the
valve stem on the wheel is free of debris
before connecting the Tire Service Kit.
You can use the Tire Service Kit air pump to
inflate bicycle tires. The kit also comes with
two needles, located in the Accessory
Storage Compartment (on the bottom of the
air pump) for inflating sport balls, rafts, or
similar inflatable items. However, use only
the Air Pump Hose (7) and make sure the
Mode Select Knob (5) is in the Air Mode
when inflating such items to avoid injecting
sealant into them. The Tire Service Kit
Sealant is only intended to seal punctures
less than 1/4 inch (6 mm) diameter in the
tread of your tire.
Do not lift or carry the Tire Service Kit by the
hoses.
WARNING!
Do not attempt to seal a tire on the side of
the vehicle closest to traffic. Pull far enough
off the road to avoid the danger of being hit
when using the Tire Service Kit.
Do not use Tire Service Kit or drive the
vehicle under the following circumstances:
If the puncture in the tire tread is
approximately 1/4 inch (6 mm) or
larger.
If the tire has any sidewall damage.
If the tire has any damage from driving
with extremely low tire pressure.
If the tire has any damage from driving
on a flat tire.
If the wheel has any damage.
If you are unsure of the condition of the
tire or the wheel.
Keep Tire Service Kit away from open
flames or heat source.
A loose Tire Service Kit thrown forward in a
collision or hard stop could endanger the
occupants of the vehicle. Always stow the
Tire Service Kit in the place provided.
Failure to follow these warnings can result
in injuries that are serious or fatal to you,
your passengers, and others around you.
Take care not to allow the contents of Tire
Service Kit to come in contact with hair, eyes,
or clothing. Tire Service Kit sealant is
harmful if inhaled, swallowed, or absorbed
through the skin. It causes skin, eye, and
respiratory irritation. Flush immediately with
plenty of water if there is any contact with
eyes or skin. Change clothing as soon as
possible, if there is any contact with clothing.
Tire Service Kit Sealant solution contains
latex. In case of an allergic reaction or rash,
consult a physician immediately. Keep Tire
Service Kit out of reach of children. If swal-
lowed, rinse mouth immediately with plenty of
water and drink plenty of water. Do not induce
vomiting! Consult a physician immediately.
WARNING! (Continued)
20_LD_OM_EN_USC_t.book Page 236
Page 255 of 412
SERVICING AND MAINTENANCE253
Flush and replace the engine coolant at 10 years or
150,000 miles (240,000 km) whichever comes first.
X
X
Change the transfer case fluid; if using your vehicle for any of
the following: police, taxi, fleet, off-road, or frequent trailer
towing. (All Wheel Drive Only). X
X
Change the rear axle fluid and on models equipped with All
Wheel Drive (AWD) change the front axle fluid if using your
vehicle for any of the following: police, taxi, fleet, off-road, or
frequent trailer towing. X
XX
Inspect and replace PCV valve if necessary. X
1. The spark plug change interval is mileage based only, yearly intervals do not apply.
Mileage or time passed (whichever comes first)
20,000
30,000
40,000
50,000
60,000
70,000
80,000
90,000
100,000
110,000
120,000
130,000
140,000
150,000
Or Years: 2 3 4 5 6 7 8 9 10 11 12 13 14 15
Or Kilometers:
32,000
48,000
64,000
80,000
96,000
112,000
128,000
144,000
160,000
176,000
192,000
208,000
224,000
240,000
7
20_LD_OM_EN_USC_t.book Page 253
Page 298 of 412
296SERVICING AND MAINTENANCE
limited driving capabilities and needs to be
replaced immediately. A Run Flat tire is not
repairable. When a run flat tire is changed after
driving with underinflated tire condition, please
replace the TPM sensor as it is not designed to
be reused when driven under run flat mode 14
psi (96 kPa) condition.
NOTE:
TPM Sensor must be replaced after driving the
vehicle on a flat tire condition.
It is not recommended driving a vehicle loaded
at full capacity or to tow a trailer while a tire is in
the run flat mode.
See the tire pressure monitoring section for
more information.
Tire Spinning
When stuck in mud, sand, snow, or ice conditions,
do not spin your vehicle's wheels above 30 mph
(48 km/h) or for longer than 30 seconds
continuously without stopping.
Refer to “Freeing A Stuck Vehicle” in “In Case Of
Emergency” for further information.
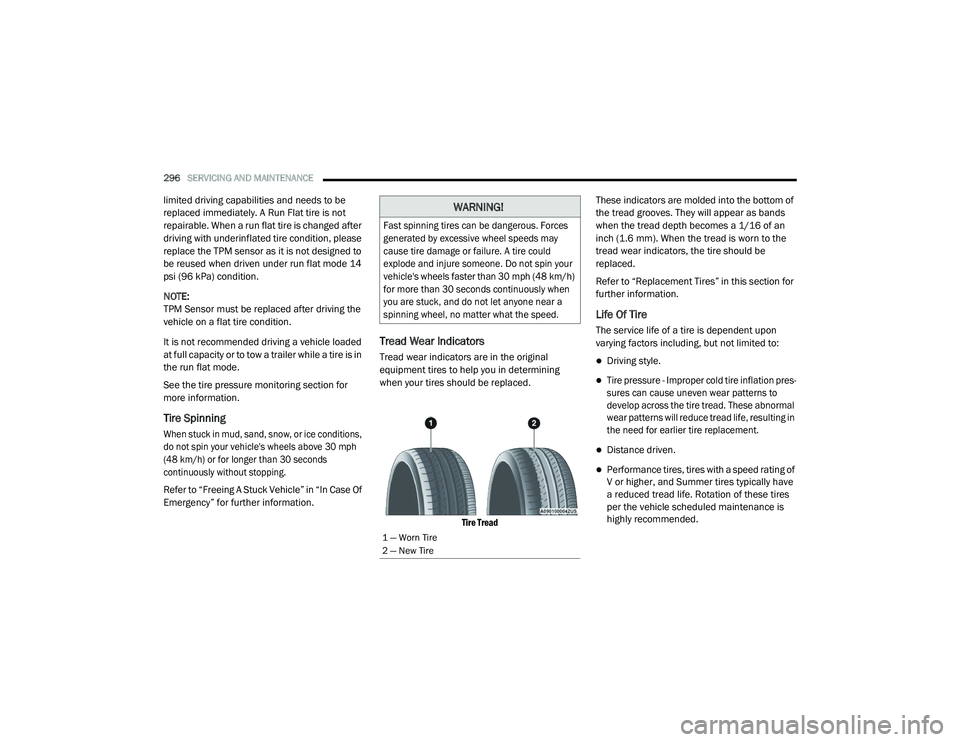
Tread Wear Indicators
Tread wear indicators are in the original
equipment tires to help you in determining
when your tires should be replaced.
Tire Tread
These indicators are molded into the bottom of
the tread grooves. They will appear as bands
when the tread depth becomes a 1/16 of an
inch (1.6 mm). When the tread is worn to the
tread wear indicators, the tire should be
replaced.
Refer to “Replacement Tires” in this section for
further information.
Life Of Tire
The service life of a tire is dependent upon
varying factors including, but not limited to:
Driving style.
Tire pressure - Improper cold tire inflation pres
-
sures can cause uneven wear patterns to
develop across the tire tread. These abnormal
wear patterns will reduce tread life, resulting in
the need for earlier tire replacement.
Distance driven.
Performance tires, tires with a speed rating of
V or higher, and Summer tires typically have
a reduced tread life. Rotation of these tires
per the vehicle scheduled maintenance is
highly recommended.
WARNING!
Fast spinning tires can be dangerous. Forces
generated by excessive wheel speeds may
cause tire damage or failure. A tire could
explode and injure someone. Do not spin your
vehicle's wheels faster than 30 mph (48 km/h)
for more than 30 seconds continuously when
you are stuck, and do not let anyone near a
spinning wheel, no matter what the speed.
1 — Worn Tire
2 — New Tire
20_LD_OM_EN_USC_t.book Page 296
Page 299 of 412

SERVICING AND MAINTENANCE297
NOTE:
Wheel valve stem must be replaced as well
when installing new tires due to wear and tear
in existing tires.
Keep dismounted tires in a cool, dry place with
as little exposure to light as possible. Protect
tires from contact with oil, grease, and gasoline.
Replacement Tires
The tires on your new vehicle provide a balance
of many characteristics. They should be
inspected regularly for wear and correct cold
tire inflation pressures. The manufacturer
strongly recommends that you use tires
equivalent to the originals in size, quality and
performance when replacement is needed. Refer to the paragraph on “Tread Wear
Indicators” in this section. Refer to the Tire and
Loading Information placard or the Vehicle
Certification Label for the size designation of
your tire. The Load Index and Speed Symbol for
your tire will be found on the original equipment
tire sidewall.
See the Tire Sizing Chart example found in the
“Tire Safety Information” section of this manual
for more information relating to the Load Index
and Speed Symbol of a tire.
It is recommended to replace the two front tires
or two rear tires as a pair. Replacing just one tire
can seriously affect your vehicle’s handling. If
you ever replace a wheel, make sure that the
wheel’s specifications match those of the
original wheels.
It is recommended you contact an authorized
tire dealer or original equipment dealer with any
questions you may have on tire specifications or
capability. Failure to use equivalent
replacement tires may adversely affect the
safety, handling, and ride of your vehicle.
WARNING!
Tires and the spare tire should be replaced
after six years, regardless of the remaining
tread. Failure to follow this warning can result
in sudden tire failure. You could lose control
and have a collision resulting in serious injury
or death.
WARNING!
Do not use a tire, wheel size, load rating, or
speed rating other than that specified for
your vehicle. Some combinations of unap
-
proved tires and wheels may change suspen -
sion dimensions and performance
characteristics, resulting in changes to
steering, handling, and braking of your
vehicle. This can cause unpredictable
handling and stress to steering and suspen -
sion components. You could lose control and
have a collision resulting in serious injury or
death. Use only the tire and wheel sizes with
load ratings approved for your vehicle.
Never use a tire with a smaller load index or
capacity, other than what was originally
equipped on your vehicle. Using a tire with
a smaller load index could result in tire
overloading and failure. You could lose
control and have a collision.
Failure to equip your vehicle with tires
having adequate speed capability can
result in sudden tire failure and loss of
vehicle control.
7
20_LD_OM_EN_USC_t.book Page 297
Page 329 of 412
MULTIMEDIA327
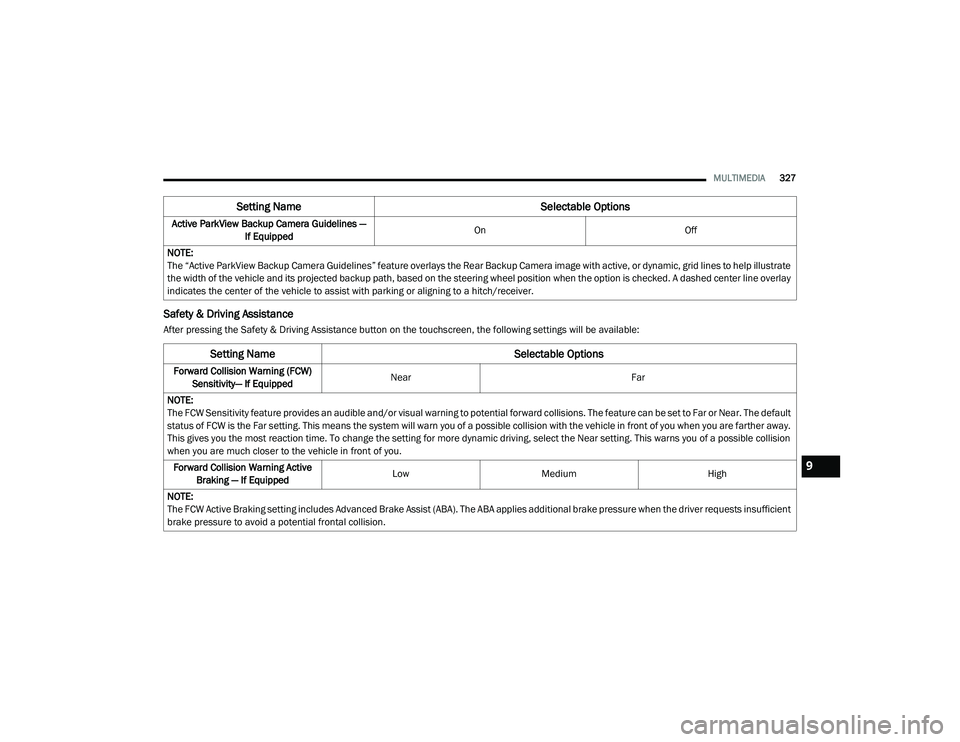
Safety & Driving Assistance
After pressing the Safety & Driving Assistance button on the touchscreen, the following settings will be available:Active ParkView Backup Camera Guidelines —
If Equipped On
Off
NOTE:
The “Active ParkView Backup Camera Guidelines” feature overlays the Rear Backup Camera image with active, or dynamic, grid lines to help illustrate
the width of the vehicle and its projected backup path, based on the steering wheel position when the option is checked. A dashed center line overlay
indicates the center of the vehicle to assist with parking or aligning to a hitch/receiver.
Setting Name Selectable Options
Setting NameSelectable Options
Forward Collision Warning (FCW)
Sensitivity— If Equipped Near
Far
NOTE:
The FCW Sensitivity feature provides an audible and/or visual warning to potential forward collisions. The feature can be set to Far or Near. The default
status of FCW is the Far setting. This means the system will warn you of a possible collision with the vehicle in front of you when you are farther away.
This gives you the most reaction time. To change the setting for more dynamic driving, select the Near setting. This warns you of a possible collision
when you are much closer to the vehicle in front of you. Forward Collision Warning Active Braking — If Equipped Low
Medium High
NOTE:
The FCW Active Braking setting includes Advanced Brake Assist (ABA). The ABA applies additional brake pressure when the driver requests insufficient
brake pressure to avoid a potential frontal collision.
9
20_LD_OM_EN_USC_t.book Page 327
Page 350 of 412
348MULTIMEDIA
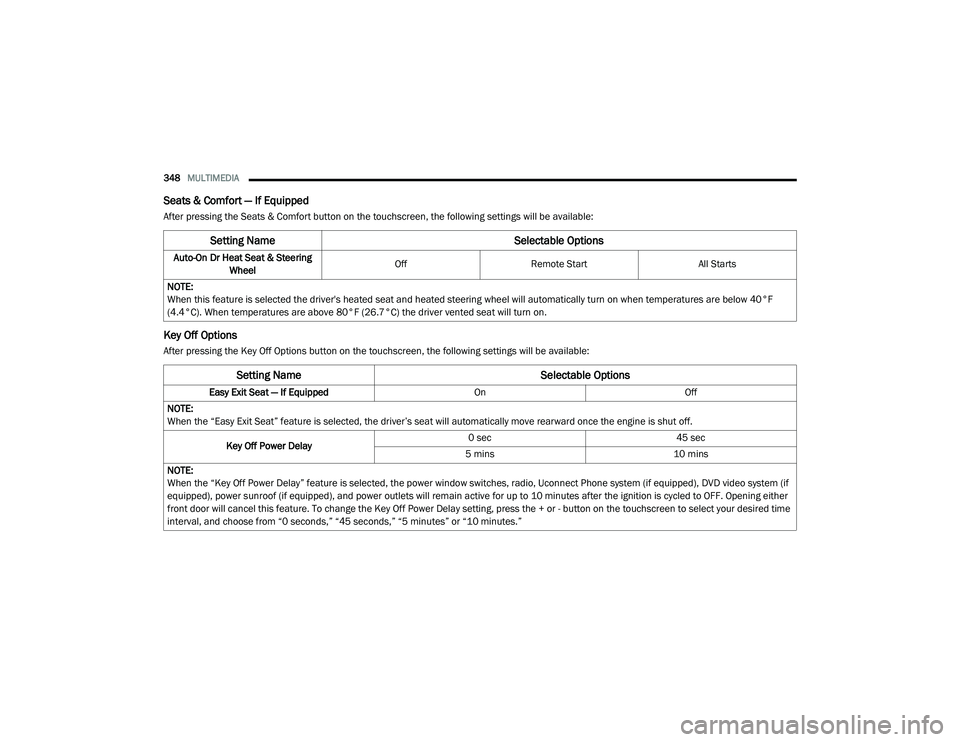
Seats & Comfort — If Equipped
After pressing the Seats & Comfort button on the touchscreen, the following settings will be available:
Key Off Options
After pressing the Key Off Options button on the touchscreen, the following settings will be available:
Setting Name Selectable Options
Auto-On Dr Heat Seat & Steering
Wheel Off
Remote Start All Starts
NOTE:
When this feature is selected the driver's heated seat and heated steering wheel will automatically turn on when temperatures are below 40°F
(4.4°C). When temperatures are above 80°F (26.7°C) the driver vented seat will turn on.
Setting Name Selectable Options
Easy Exit Seat — If EquippedOnOff
NOTE:
When the “Easy Exit Seat” feature is selected, the driver’s seat will automatically move rearward once the engine is shut off.
Key Off Power Delay 0 sec
45 sec
5 mins 10 mins
NOTE:
When the “Key Off Power Delay” feature is selected, the power window switches, radio, Uconnect Phone system (if equipped), DVD video system (if
equipped), power sunroof (if equipped), and power outlets will remain active for up to 10 minutes after the ignition is cycled to OFF. Opening either
front door will cancel this feature. To change the Key Off Power Delay setting, press the + or - button on the touchscreen to select your desired time
interval, and choose from “0 seconds,” “45 seconds,” “5 minutes” or “10 minutes.”
20_LD_OM_EN_USC_t.book Page 348