2020 CITROEN RELAY engine
[x] Cancel search: enginePage 153 of 196
151
Audio system
11Audio system
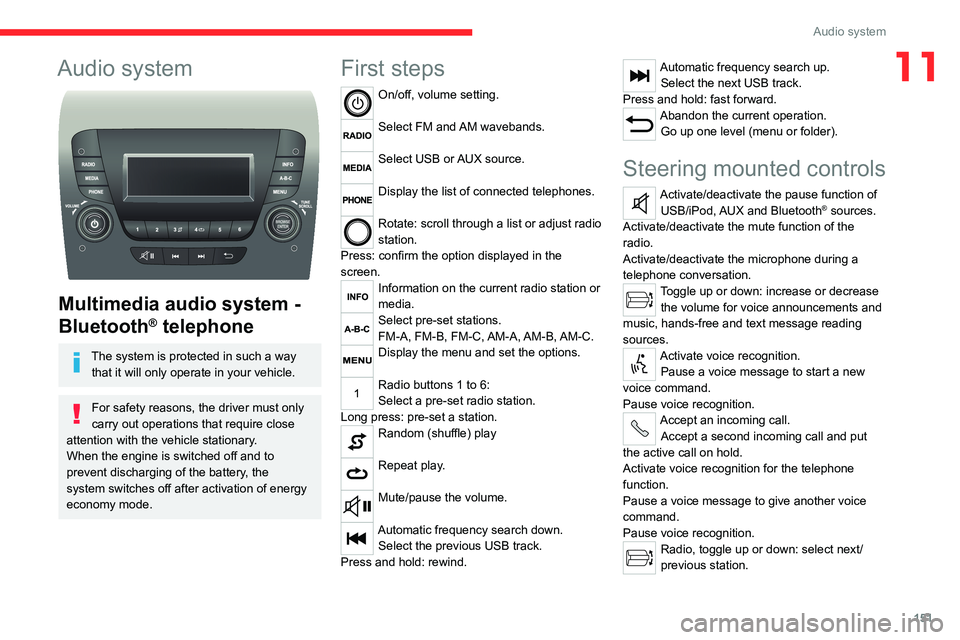
Multimedia audio system -
Bluetooth
® telephone
The system is protected in such a way
that it will only operate in your vehicle.
For safety reasons, the driver must only
carry out operations that require close
attention with the vehicle stationary.
When the engine is switched off and to
prevent discharging of the battery, the
system switches off after activation of energy
economy mode.
First steps
On/off, volume setting.
Select FM and AM wavebands.
Select USB or AUX source.
Display the list of connected telephones.
Rotate: scroll through a list or adjust radio
station.
Press: confirm the option displayed in the
screen.
Information on the current radio station or
media.
Select pre-set stations.
FM-A, FM-B, FM-C, AM-A, AM-B, AM-C.
Display the menu and set the options.
Radio buttons 1 to 6:
Select a pre-set radio station.
Long press: pre-set a station.
Random (shuffle) play
Repeat play.
Mute/pause the volume.
Automatic frequency search down. Select the previous USB track.
Press and hold: rewind.
Automatic frequency search up. Select the next USB track.
Press and hold: fast forward.
Abandon the current operation. Go up one level (menu or folder).
Steering mounted controls
Activate/deactivate the pause function of USB/iPod, AUX and Bluetooth® sources.
Activate/deactivate the mute function of the
radio.
Activate/deactivate the microphone during a
telephone conversation.
Toggle up or down: increase or decrease the volume for voice announcements and
music, hands-free and text message reading
sources.
Activate voice recognition. Pause a voice message to start a new
voice command.
Pause voice recognition.
Accept an incoming call. Accept a second incoming call and put
the active call on hold.
Activate voice recognition for the telephone
function.
Pause a voice message to give another voice
command.
Pause voice recognition.
Radio, toggle up or down: select next/
previous station.
Page 160 of 196
158
Touch screen audio and telematics system
Touch screen audio and telematics system
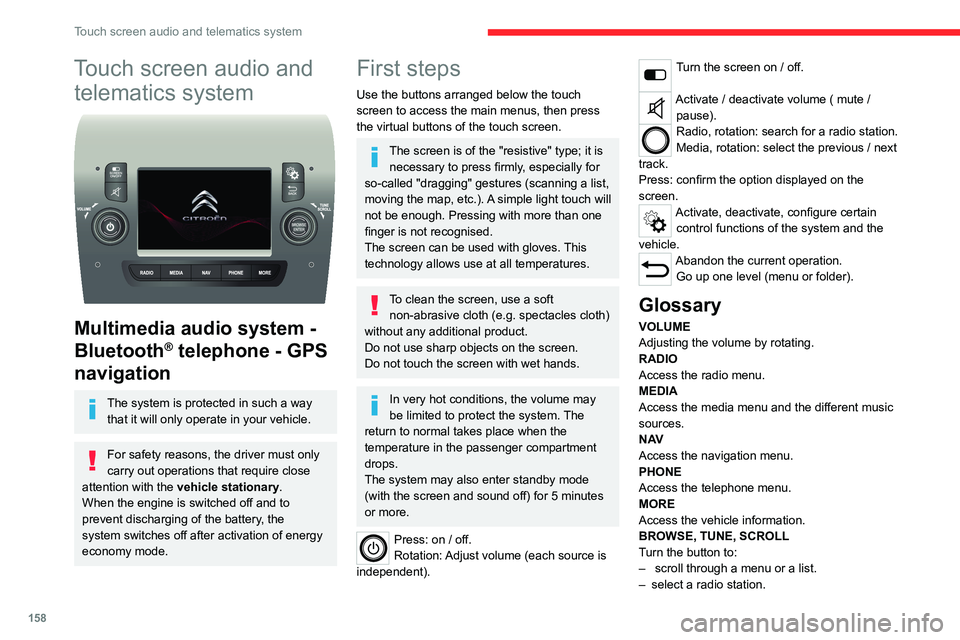
Multimedia audio system -
Bluetooth
® telephone - GPS
navigation
The system is protected in such a way
that it will only operate in your vehicle.
For safety reasons, the driver must only
carry out operations that require close
attention with the vehicle stationary.
When the engine is switched off and to
prevent discharging of the battery, the
system switches off after activation of energy
economy mode.
First steps
Use the buttons arranged below the touch
screen to access the main menus, then press
the virtual buttons of the touch screen.
The screen is of the "resistive" type; it is necessary to press firmly, especially for
so-called "dragging" gestures (scanning a list,
moving the map, etc.). A simple light touch will
not be enough. Pressing with more than one
finger is not recognised.
The screen can be used with gloves. This
technology allows use at all temperatures.
To clean the screen, use a soft non-abrasive cloth (e.g. spectacles cloth)
without any additional product.
Do not use sharp objects on the screen.
Do not touch the screen with wet hands.
In very hot conditions, the volume may
be limited to protect the system. The
return to normal takes place when the
temperature in the passenger compartment
drops.
The system may also enter standby mode
(with the screen and sound off) for 5 minutes
or more.
Press: on / off.
Rotation: Adjust volume (each source is
independent).
Turn the screen on / off.
Activate / deactivate volume ( mute / pause).
Radio, rotation: search for a radio station.
Media, rotation: select the previous / next
track.
Press: confirm the option displayed on the
screen.
Activate, deactivate, configure certain control functions of the system and the
vehicle.
Abandon the current operation. Go up one level (menu or folder).
Glossary
VOLUME
Adjusting the volume by rotating.
RADIO
Access the radio menu.
MEDIA
Access the media menu and the different music
sources.
N AV
Access the navigation menu.
PHONE
Access the telephone menu.
MORE
Access the vehicle information.
BROWSE, TUNE, SCROLL
Turn the button to:
– scroll through a menu or a list.
– select a radio station.
ENTER
Confirm an option displayed on the screen by
pressing.
Steering mounted controls
Activate / deactivate the pause function of USB/iPod and Bluetooth® sources.
Activate / deactivate the mute function of the
radio.
Activate / deactivate the microphone during a
telephone conversation.
Toggle up or down: increase or decrease volume for voice announcements, and
music sources, hands-free, and text message
reader.
Activate voice recognition. Pause a voice message to start a new
voice command.
Pause voice recognition.
Accept an incoming call. Accept a second incoming call and put
the active call on hold.
Activate voice recognition for the telephone
function.
Pause a voice message to give another voice
command.
Pause voice recognition.
Radio, toggle up or down: select next /
previous station.
Radio, toggle up or down continuously: scan up /
down frequencies until you release the button.
Page 166 of 196
164
Touch screen audio and telematics system
Change the appearance and behaviour of the
navigation system.
Most system settings can be accessed by
touching "Settings" in the main menu.
Help
Access information about assistance services
and other specialised services.
Finish
Validate the settings.
Limitation
Speed limitation (if known).
To see the difference between the desired arrival
time and the estimated arrival time.
Switch between a 3D map and a 2D map.
Go to..., Display the map, Plan a route,
Services, Settings, Help, Finish.
When the navigation system starts for the first
time, the "Driving mode" as well as detailed
information on the current position is displayed.
Touch the centre of the screen to open the main
menu.
Details
The route summary provides an overview of the
route, the remaining distance to the destination
and an estimate of the remaining travel time.
With the RDS-TMC data, the route summary
also shows the traffic information concerning
delays along the route.
Modify route
The navigation system helps you to get to your
destination as quickly as possible by displaying a
faster alternative route when it is available.
FinishValidate the settings.
Instructions
Navigation instructions for the next part of the
trip and the distance to the next instruction. If the
second instruction is less than 150 metres from
the first one, it is immediately displayed instead
of the distance.
Touch this part of the status bar to repeat the last
voice instruction.
Updating maps
To get a map update, you can proceed as follows:
– Map refresh guarantee: if a new map
becomes available within 90 days of the first
use of the system, you can download it once
for free.
– Map update: you can buy a new version of
your system’s map.
To install a map update on your system, perform
the following four steps:
– Prepare a USB device.
– Install TomTom HOME and create a
MyTomTom account.
– Download the map.
– Install the new map.
Use a USB device instead of a mass
storage device (telephone or media
player).
To protect the system, do not use a USB hub.
Prepare a USB device
The preparation of the USB device
must be done with the engine running
and the vehicle stationary.
In order to update the map, you must have
a USB device that meets the following
requirements:
– The USB device must be empty.
– The USB device has 16 GB of available
space.
– Use only USB devices in FAT32 format (File
Allocation Table).
– Do not lock the USB device and check that
files can be saved on it.
To prepare the USB device, proceed as follows:
► Make sure that the map you want to update is
active on your navigation system.
If the navigation system has multiple maps and
you want to update a map that is not currently
active, start by activating it.
► Select “Change map” in the “Settings” menu
of the navigation application.
► Select “Navigation updates” from the
“Settings” menu.
► You must indicate whether you want to
prepare a USB device to download updates.
► Select "Ye s ".
Page 167 of 196
165
Touch screen audio and telematics system
12► Insert the USB device into the USB socket
located in the central storage space dedicated
to data transfer.
The system starts preparing the USB device.
– If the system continues to ask you to
insert a USB device, make sure that your
USB device meets the above conditions, and
then try again.
– If you connect multiple USB devices, the
system prompts you to remove devices
so that only the device to be prepared is
connected.
– If there is not enough space on the USB
device, you are prompted to use another USB
device.
– If you connect a USB device that contains
files, the system warns you that files on the
USB device may be deleted.
When the USB device is ready, the message
below appears:
"Navigation updates"
The preparation of the USB device is
finished.
You can now safely remove the USB device.
► Remove the USB device; you can now
download the new map to your USB device.
Install TomTom HOME
To install "TomTom HOME" and create a
"MyTomTom" account, perform the following
steps:
► Download and install the TomTom HOME
app on your computer through this link:
tomtom.com/getstarted
► Select and download TomTom HOME, then
follow the on-screen instructions.
Use a secure Wi-Fi network rather than
3G/4G to download the application on
your computer.
► Connect the USB device to your computer;
"TomTom HOME" starts automatically.
► Select "Log in " in the upper right corner of
"TomTom HOME".
► Select "Register" and enter your information
to create a "MyTomTom" account.
To receive map updates, you must have a "MyTomTom" account.
Once the account is created, you must indicate
whether you want to link your system to your
account. The prepared USB device represents
your system.
► Select “Link device”, then “Close”.
You are now ready to download a map to your
USB device.
Download a map
Connect your USB device to your computer.
Select a map to download
– To check if you can download a map for free
with the map refresh guarantee, select " Tools"
and then "Map refresh guarantee " in "TomTom
HOME".
– To purchase a map update, select " Buy
maps" in "TomTom HOME".
– If you have already purchased an update,
select "Update my device" in "TomTom HOME".
Download a map
If a map update is available for your system, it is
listed as an available update.
If your system already has the most
recent map, no updates are available.
► Select the map to download, then select
"Update and install "; the map will be
downloaded and installed on your USB device.
► Select “Done” once the process is finished.
Install the map
The new map must be downloaded
with the engine running and the
vehicle stationary.
Once you have downloaded a map to your USB
device, you can install it on your system.
► Insert the USB device containing the new
map into the USB socket located in the central
storage space dedicated to data transfer to the
system.
The system detects the presence of a new
map on the USB device. It may also contain
an update of the navigation software if it is
necessary for the new map.
► You must indicate whether you want to
update the system.
► Select "Start".
Page 175 of 196
173
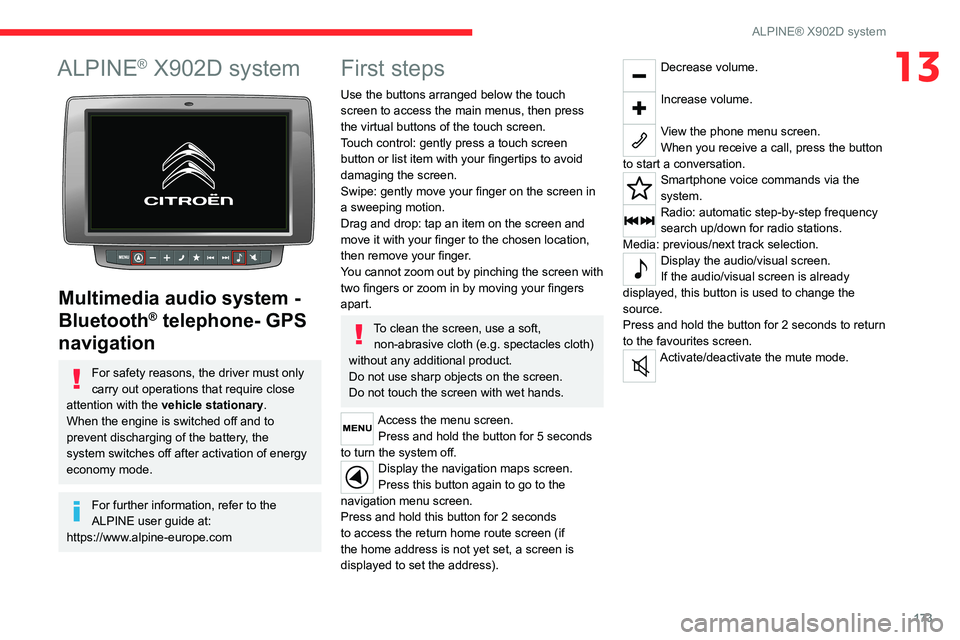
ALPINE® X902D system
13ALPINE® X902D system
Multimedia audio system -
Bluetooth
® telephone- GPS
navigation
For safety reasons, the driver must only
carry out operations that require close
attention with the vehicle stationary.
When the engine is switched off and to
prevent discharging of the battery, the
system switches off after activation of energy
economy mode.
For further information, refer to the
ALPINE user guide at:
https://www.alpine-europe.com
First steps
Use the buttons arranged below the touch
screen to access the main menus, then press
the virtual buttons of the touch screen.
Touch control: gently press a touch screen
button or list item with your fingertips to avoid
damaging the screen.
Swipe: gently move your finger on the screen in
a sweeping motion.
Drag and drop: tap an item on the screen and
move it with your finger to the chosen location,
then remove your finger.
You cannot zoom out by pinching the screen with
two fingers or zoom in by moving your fingers
apart.
To clean the screen, use a soft, non-abrasive cloth (e.g. spectacles cloth)
without any additional product.
Do not use sharp objects on the screen.
Do not touch the screen with wet hands.
Access the menu screen. Press and hold the button for 5 seconds
to turn the system off.
Display the navigation maps screen.
Press this button again to go to the
navigation menu screen.
Press and hold this button for 2 seconds
to access the return home route screen (if
the home address is not yet set, a screen is
displayed to set the address).
Decrease volume.
Increase volume.
View the phone menu screen.
When you receive a call, press the button
to start a conversation.
Smartphone voice commands via the
system.
Radio: automatic step-by-step frequency
search up/down for radio stations.
Media: previous/next track selection.
Display the audio/visual screen.
If the audio/visual screen is already
displayed, this button is used to change the
source.
Press and hold the button for 2 seconds to return
to the favourites screen.
Activate/deactivate the mute mode.
Page 179 of 196

177
Alphabetical index
E
EBA 52
EBFD 52
Eco-driving (advice) 5
Electric windows 25
Electronic brake force distribution (EBFD) 52
Emergency warning lamps 51
Emissions control system, SCR 101
Engine compartment 95
Engine, Diesel 91, 95, 124
Engines 124
Environment 5
ESP/ASR 53
F
Filling the AdBlue® tank 98, 101–102
Filling the fuel tank 90
Filter, air 98
Filter, Diesel fuel 96, 100
Filter, oil 99
Filter, particle 99
Filter, passenger compartment 31, 98
Fittings, front 38–42
Fittings, interior 38–42
Flap, fuel filler 90
Flashing indicators 46
Fluid, brake 97–98
Fluid, engine coolant 97–98
Fluid, power steering 97–98
Foglamps, front 46
Foglamps, rear 46
Front doors 23
Fuel 5, 91
Fuel consumption 5
Fuel tank 90
G
Gauge, fuel 90
Gearbox, manual 69–70, 99
Glove box 38–41
H
Hazard warning lamps 51
Headlamp flash 46
Headlamps, dipped beam 46
Headlamps, main beam 46
Head restraints, front 27
Heating 31–33
Heating, additional 35–36
Hill Descent Control 54–55
Hill start assist 70
Horn 51
I
Immobiliser, electronic 66
Indicator, coolant temperature 11
Indicator, engine oil level 10–11
Indicators, direction 46
Inflating tyres 100
Information, vehicle 168
Infrared camera 74
Instrument panel 74
Instruments and controls 4
Intelligent Traction Control 53–54
J
Jack 153, 162
K
Kit, hands-free 154, 166–167
L
Lane Departure Warning System (LDWS) 81
Level, AdBlue® 98
Level, brake fluid 97
Level, engine coolant 11, 97
Level, engine oil 96
Level, power steering fluid 97
Levels 97–98
Levels and checks 96–97
Lighting dimmer 6
Page 180 of 196

178
Alphabetical index
Low fuel level 90
Lumbar 27
M
Maintenance, routine 74, 98
Manoeuvring aids (recommendations) 73
Mat 74
Menu 13, 160–161, 163, 166, 168
Menus (audio) 160–161
Mirrors, door 31, 83
O
Oil change 96
Oil consumption 96
OIl, engine 96–98
On-board tools 105–110
Opening the bonnet 94
Overhead storage 38–41
P
Pads, brake 99
Parking brake 68, 100
Player, USB 152–153, 161–162
Port, USB 152–153, 161–162
Pressures, tyres 100
Pre-tensioning seat belts 56
Protecting children 57–59
R
Radar (warnings) 74
Radio 152, 160, 162
Radio, digital (Digital Audio
Broadcasting - DAB) 161
Range, AdBlue® 12, 98
Recovery 122
Regeneration of the particle filter 99
Remote control 20, 66
Replacing bulbs 111
Replacing the air filter 98
Replacing the oil filter 99
Replacing the passenger compartment
filter 98
Resetting the service indicator 10–11
Reversing camera 74
S
Safety, children 57–59
Screen, colour 160
Screen menu map 160–161, 163, 166, 168
Screenwash fluid 97–98
SCR (Selective Catalytic Reduction) 101
Seat belts 55–56
Seat belts, rear 56
Seats, heated 28
Seats, rear 59
Sensors (warnings) 74
Service indicator 10–11
Servicing 10–11, 98
Settings, equipment 13, 18
Sidelamps 46
Snow chains 91
Socket, auxiliary 153, 162
Socket, Jack 153, 162
Sockets, auxiliary 38–41
Speed limiter 76–77
Speed limit recognition 75–76
Speedometer 74
Stability control (ESC) 52
Stability control (ESP) 53
Starting a Diesel engine 91
Station, radio 152, 160
Steering mounted controls, audio 151, 159
Steering wheel adjustment 30
Stop & Start 32, 38, 49, 56, 69–70, 94, 98, 122
Storage 38–41
Sunshine sensor 31
T
Tables of engines 124
Table, writing 38–40
Tank, fuel 90
Technical data 124
Telephone 154, 166–168
Temperature, coolant 11