Page 57 of 324

55
Lumbar
F Turn the knob manually to obtain the desired level of lumbar support.
Table position for the
driver's and/or the front
passenger seat backrest
Check that there is no object that could
inter fere with the movement of a seat,
both above and below.
F
P
lace the head restraint in the low position,
and if fitted to your vehicle, raise the
armrest and fold the table on the back of the
seat. Deactivation of the passenger front airbag
is recommended.
F
P
ull the control fully up and tip the backrest
forward.
To return to the normal position, pull the
control up to release the backrest, then pull the
backrest up to its raised position.
On the front passenger side, this position
allows long objects to be carried.
On the driver's side, this position allows rear
passengers to be helped out of the vehicle (by
the emergency services).
When sharp deceleration occurs, objects
placed on the folded backrest may be
thrown around the vehicle.
Electric front seat
To avoid discharging the battery, carry
out these adjustments with the engine
running.
For more information on the Seat belts,
refer to the corresponding section.
Longitudinal
F Push the control for wards or rear wards to slide the seat.
Before moving the seat backwards,
ensure that there is nothing that might
prevent the full travel of the seat.
There is a risk of trapping or pinching
passengers if present in the rear seats
or jamming the seat if large objects are
placed on the floor behind the seat.
3
Ease of use and comfort
Page 58 of 324

56
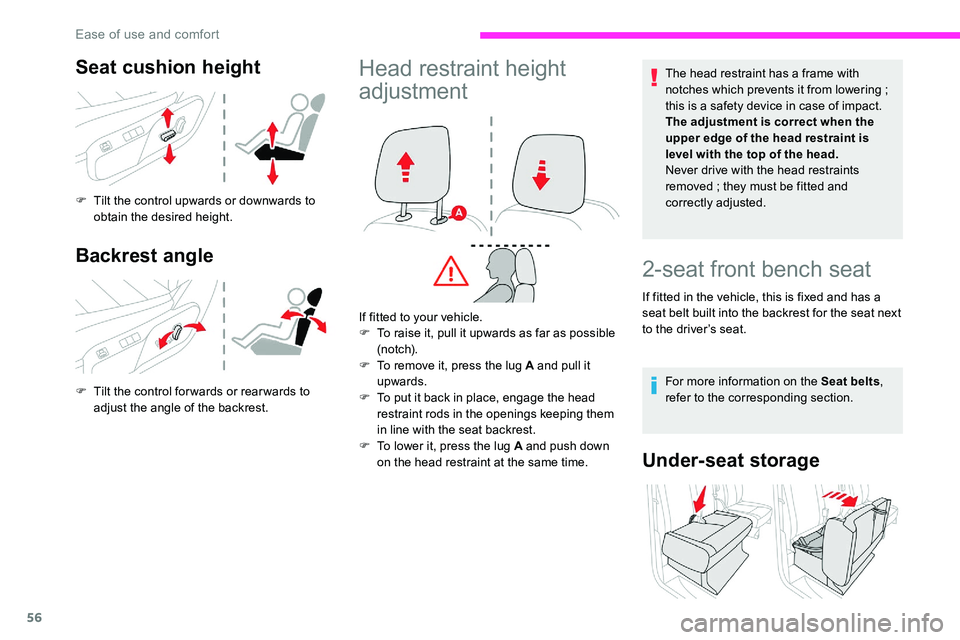
Seat cushion height
F Tilt the control upwards or downwards to obtain the desired height.
Backrest angle
F Tilt the control for wards or rear wards to adjust the angle of the backrest.
Head restraint height
adjustmentThe head restraint has a frame with
notches which prevents it from lowering ;
this is a safety device in case of impact.
The adjustment is correct when the
upper edge of the head restraint is
level with the top of the head.
Never drive with the head restraints
removed
; they must be fitted and
correctly adjusted.
If fitted to your vehicle.
F
T
o raise it, pull it upwards as far as possible
(n otc h).
F
T
o remove it, press the lug
A and pull it
upwards.
F
T
o put it back in place, engage the head
restraint rods in the openings keeping them
in line with the seat backrest.
F
T
o lower it, press the lug A and push down
on the head restraint at the same time.
2-seat front bench seat
If fitted in the vehicle, this is fixed and has a
seat belt built into the backrest for the seat next
to the driver’s seat.
For more information on the Seat belts ,
refer to the corresponding section.
Under-seat storage
Ease of use and comfort
Page 59 of 324

57
If the vehicle is so equipped, a storage space is
provided under the seat.
F
P
ull the strap towards you to tip the seat
cushion.
Armrest
The armrest has notches.
F
P
ull the armrest fully up
F
L
ower it fully down.
F
R
aise the armrest to the desired position.
Heated seat and bench
seat
If fitted to the vehicle.
F W ith the engine running, use the adjustment
wheel to switch on and select the desired
level of heating from 0
(off) to 3 (h i g h).Prolonged use of the heated seats is not
recommended for those with sensitive
skin.
There is a risk of burns for people whose
perception of heat is impaired (illness,
taking medication, etc.).
To keep the heated pad intact and to
prevent a short circuit:
-
d
o not place sharp or heavy objects on
the seat,
-
d
o not kneel or stand on the seat,
-
d
o not spill liquids onto the seat,
-
n
ever use the heating function if the
seat is wet.
Do not use the function when the seat is
not occupied.
Reduce the intensity of the heating as
soon as possible.
When the seat and passenger
compartment have reached an adequate
temperature, stop the function ; reducing
the consumption of electrical current
reduces fuel consumption.
3
Ease of use and comfort
Page 60 of 324

58
Electric lumbar
adjustment
F Press the control to obtain the desired lumbar support.
Massage function
This function provides lumbar massage to the
persons in front ; it only operates when the
engine is running as well as in the STOP mode
of the Stop & Start system.
Activation/Deactivation
F Press this button to activate/ deactivate the function.
Upon activation, the indicator lamp comes on.
The massage function is activated for a period
of one hour.
During this time, massage is per formed in
6
cycles of 10 minutes (6 minutes of massage
followed by a 4-minute break).
After one hour, the function is deactivated
; the
indicator lamp goes off.
Adjustment of intensity
Press this button to adjust the
intensity of the massage.
Two levels of massage are available.
Steering wheel adjustment
F When stationary , lower the control lever to
release the steering wheel.
F
A
djust the height and reach.
F
P
ull the control lever to lock the steering
wheel.
As a safety precaution, these operations
must only be carried out while the vehicle
is stationary.
Ease of use and comfort
Page 61 of 324

59
Mirrors
Door mirrors
Manual adjustment
Move the lever in any of the four directions to
adjust it.
When the vehicle is parked, the door mirrors
can be folded in manually.
If the mirror unit has come out of its initial
position, with the vehicle stationary, push it
back into place manually or use the control.
There is no risk of breakage, even in frosty
weather.
Electric adjustment
F Move control A to the right or to the left to select the corresponding mirror.
F
M
ove control B in any of the four directions
to adjust.
F
R
eturn control A to the central position.
As a safety measure, the mirrors should
be adjusted to reduce the blind spots.
The objects obser ved are, in reality, closer
than they appear.
Take this into account in order to
correctly judge the distance of vehicles
approaching from behind.
Manual folding
You can manually fold the mirrors (parking
obstruction, narrow garage, etc.)
F
T
urn the mirror towards the vehicle.
Electric folding
If your vehicle is fitted with this function, the
mirrors can be folded electrically from the
inside, with the vehicle parked and the ignition
on:
Electric unfolding
The electric unfolding of the mirrors is via
the remote control or the key when unlocking
the vehicle. Unless folding was selected with
control A , pull the control back again to the
central position. F
P
lace control A in the centre
position.
F
P
ull control A back.
From the outside, lock the vehicle using the
remote control or the key.
The folding / unfolding on locking /
unlocking can be deactivated. Contact a
CITROËN dealer or a qualified workshop.
If necessary, it is possible to fold the
mirrors manually.
3
Ease of use and comfort
Page 62 of 324

60
Heated mirrors
F Press this button.For more information on Rear screen
demisting - defrosting , refer to the
corresponding section.
Rear view mirror
Equipped with an anti-dazzle system, which
darkens the mirror glass and reduces the
nuisance to the driver caused by the sun,
headlamps from other vehicles, etc.
Manual model
Adjustment
F A djust the mirror so that the glass is
directed correctly in the "day" position. Day/night position
Automatic "electrochrome"
model
This system automatically and progressively
changes between day and night use by means
of a sensor measuring the light coming from the
rear of the vehicle. In order to ensure optimum visibility during
your manoeuvres, the mirror lightens
automatically when reverse gear is
engaged.
F
P
ull the lever to change to the "night" anti-
dazzle position.
F
P
ush the lever to change to the normal
"day" position.
Moduwork
When the flap is removed, it is possible
to load long objects underneath the outer
seat.
The outer seat cushion of the bench seat can
be folded onto the backrest to create a loading
area inside the cab.
A removable flap on the partition can be
removed to allow long objects to be loaded.
Ease of use and comfort
Page 63 of 324

61
Removable flap (type 1)
Removing the flap
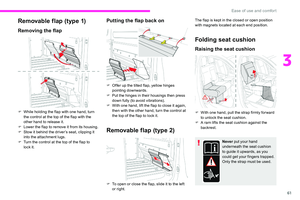
F While holding the flap with one hand, turn the control at the top of the flap with the
other hand to release it.
F
L
ower the flap to remove it from its housing.
F
S
tow it behind the driver’s seat, clipping it
into the attachment lugs.
F
T
urn the control at the top of the flap to
lock
it.
Putting the flap back on
F Offer up the tilted flap, yellow hinges pointing downwards.
F
P
ut the hinges in their housings then press
down fully (to avoid vibrations).
F
W
ith one hand, lift the flap to close it again,
then with the other hand, turn the control at
the top of the flap to lock it.
Removable flap (type 2)
The flap is kept in the closed or open position
with magnets located at each end position.
Folding seat cushion
Raising the seat cushion
F With one hand, pull the strap firmly for ward to unlock the seat cushion.
F
A r
am lifts the seat cushion against the
backrest.
F
T
o open or close the flap, slide it to the left
or right. Never put your hand
underneath the seat cushion
to guide it upwards, as you
could get your fingers trapped.
Only the strap must be used.
3
Ease of use and comfort
Page 64 of 324

62
When the side seat is up
and the flap is removed,
you must install the anti-
slip net.
Refer to the Anti-slip net
section.
Lowering the seat cushion
F Remove the anti-slip net. Ensure that no object or passenger feet
could obstruct the anchorage points
or prevent the correct latching of the
assembly.
Anti-slip net
Installing the net
F Put the first fastener into the upper cut-
out 1, located beneath the folded seat
cushion. Keep the fastener pressed against
the structure, then turn it a quarter turn (in a
clockwise direction) to lock it.
F
P
ut the second fastener into the lower
cut-out 2 , located on the seat base. Keep
the fastener pressed against the structure,
then turn it a quarter turn (in a clockwise
direction) to lock it.
F
S
ecure the first hook to the ring 3 located in
the glove box.
F
S
ecure the second hook to the ring 4
located on the floor.
F
T
o put the seat cushion back in place, press
firmly on the top of the seat with one hand
to lower the seat cushion until it locks into
the seat position.
Ease of use and comfort