2020 CHRYSLER 300 manual radio set
[x] Cancel search: manual radio setPage 30 of 328

28GETTING TO KNOW YOUR VEHICLE
AUTOMATIC DOOR LOCKS — IF
E
QUIPPED
The auto door lock feature default condition is
enabled. When enabled, the door locks will lock
automatically when the vehicle's speed exceeds
15 mph (24 km/h). The auto door lock feature
can be enabled or disabled by an authorized
dealer per written request of the customer.
Please see an authorized dealer for service.
CHILD-PROTECTION DOOR LOCK
S
YSTEM — REAR DOORS
To provide a safer environment for small
children riding in the rear seats, the rear doors
are equipped with Child-Protection Door Lock
system.
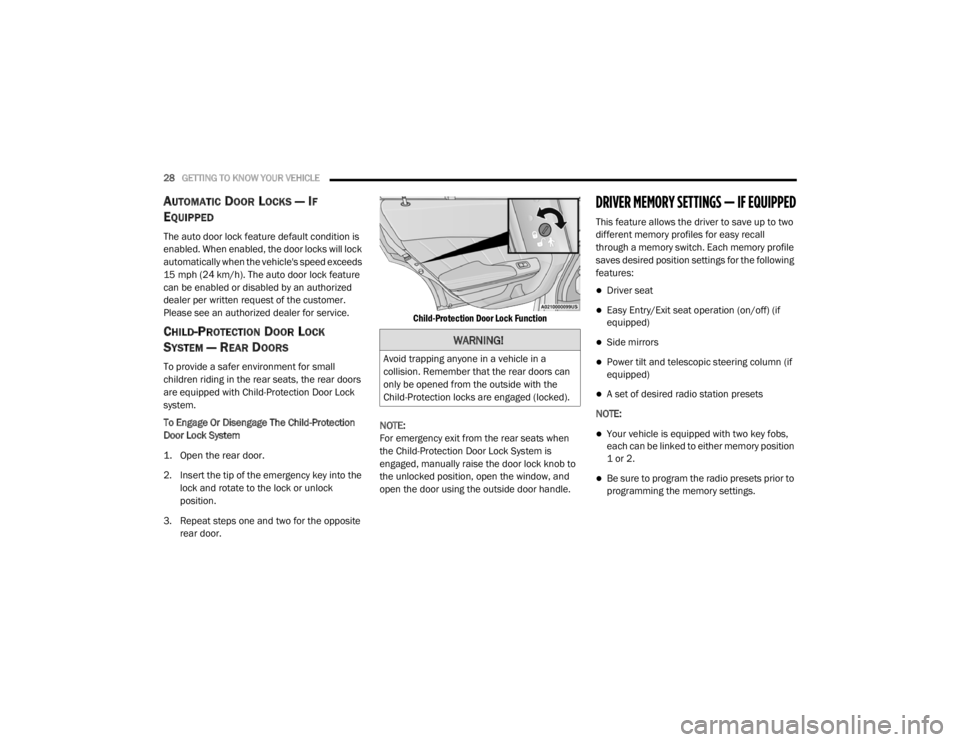
To Engage Or Disengage The Child-Protection
Door Lock System
1. Open the rear door.
2. Insert the tip of the emergency key into the
lock and rotate to the lock or unlock
position.
3. Repeat steps one and two for the opposite rear door.
Child-Protection Door Lock Function
NOTE:
For emergency exit from the rear seats when
the Child-Protection Door Lock System is
engaged, manually raise the door lock knob to
the unlocked position, open the window, and
open the door using the outside door handle.
DRIVER MEMORY SETTINGS — IF EQUIPPED
This feature allows the driver to save up to two
different memory profiles for easy recall
through a memory switch. Each memory profile
saves desired position settings for the following
features:
Driver seat
Easy Entry/Exit seat operation (on/off) (if
equipped)
Side mirrors
Power tilt and telescopic steering column (if
equipped)
A set of desired radio station presets
NOTE:
Your vehicle is equipped with two key fobs,
each can be linked to either memory position
1 or 2.
Be sure to program the radio presets prior to
programming the memory settings.
WARNING!
Avoid trapping anyone in a vehicle in a
collision. Remember that the rear doors can
only be opened from the outside with the
Child-Protection locks are engaged (locked).
20_LX_OM_EN_USC_t.book Page 28
Page 86 of 328

84GETTING TO KNOW YOUR INSTRUMENT PANEL
115 Volts AC Power Inverter System
Audio and Telematics System
Loss of the battery charge may indicate one or
more of the following conditions:
The charging system cannot deliver enough
electrical power to the vehicle system
because the electrical loads are larger than
the capability of the charging system. The
charging system is still functioning properly.
Turning on all possible vehicle electrical
loads (e.g. HVAC to max settings, exterior and
interior lights, overloaded power outlets
+12 Volts, 115 Volts AC, USB ports) during
certain driving conditions (city driving,
towing, frequent stopping).
Installing options like additional lights,
upfitter electrical accessories, audio
systems, alarms and similar devices.
Unusual driving cycles (short trips separated
by long parking periods).
The vehicle was parked for an extended
period of time (weeks, months).
The battery was recently replaced and was
not charged completely.
The battery was discharged by an electrical
load left on when the vehicle was parked.
The battery was used for an extended period
with the engine not running to supply radio,
lights, chargers, +12 Volt portable appli -
ances like vacuum cleaners, game consoles
and similar devices.
What to do when an electrical load reduction
action message is present (“Battery Saver On”
or “Battery Saver Mode”)
During a trip:
Reduce power to unnecessary loads if
possible:
Turn off redundant lights (interior or exte -
rior)
Check what may be plugged in to power
outlets +12 Volts, 115 Volts AC, USB
ports
Check HVAC settings (blower, tempera -
ture)
Check the audio settings (volume)
After a trip:
Check if any aftermarket equipment was
installed (additional lights, upfitter electrical accessories, audio systems, alarms) and
review specifications if any (load and Ignition
Off Draw currents).
Evaluate the latest driving cycles (distance,
driving time and parking time).
The vehicle should have service performed if
the message is still present during consecu
-
tive trips and the evaluation of the vehicle
and driving pattern did not help to identify the
cause.
WARNING LIGHTS AND MESSAGES
The warning/indicator lights will illuminate in
the instrument panel together with a dedicated
message and/or acoustic signal when
applicable. These indications are indicative and
precautionary and as such must not be
considered as exhaustive and/or alternative to
the information contained in the Owner’s
Manual, which you are advised to read carefully
in all cases. Always refer to the information in
this chapter in the event of a failure indication.
All active warning lights will display first if
applicable. The system check menu may
appear different based upon equipment
options and current vehicle status. Some
warning lights are optional and may not appear.
20_LX_OM_EN_USC_t.book Page 84
Page 287 of 328

MULTIMEDIA285
consent. For further information, refer to “Data
Collection & Privacy” in your Uconnect Owner’s
Manual Supplement or “Onboard Diagnostic
System (OBD II) Cybersecurity” in “Getting To
Know Your Instrument Panel”.
UCONNECT SETTINGS
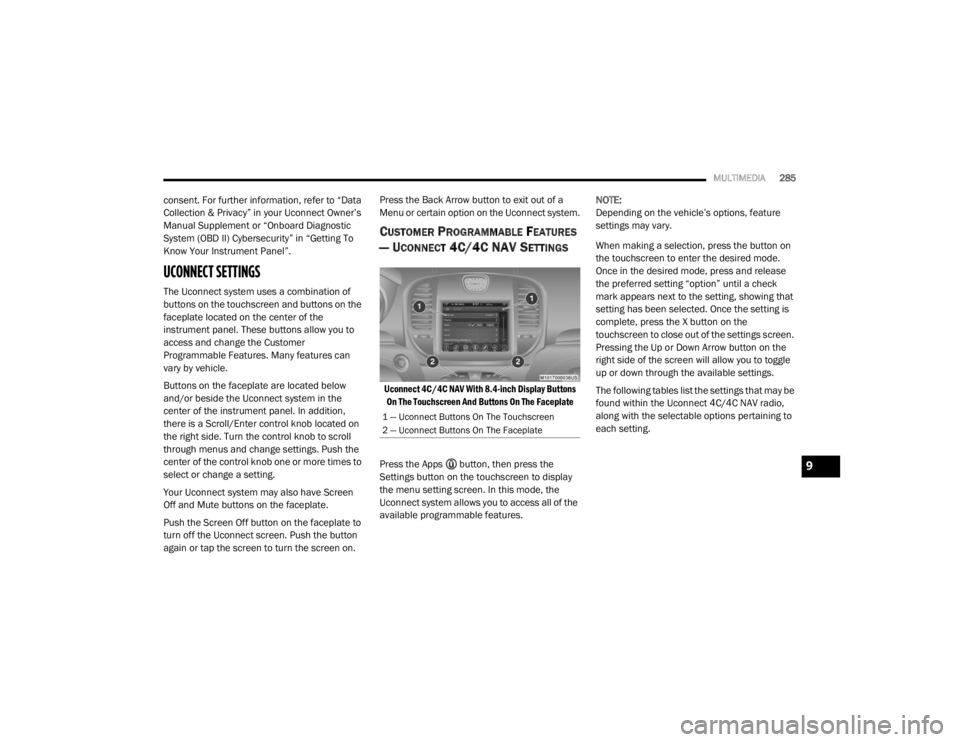
The Uconnect system uses a combination of
buttons on the touchscreen and buttons on the
faceplate located on the center of the
instrument panel. These buttons allow you to
access and change the Customer
Programmable Features. Many features can
vary by vehicle.
Buttons on the faceplate are located below
and/or beside the Uconnect system in the
center of the instrument panel. In addition,
there is a Scroll/Enter control knob located on
the right side. Turn the control knob to scroll
through menus and change settings. Push the
center of the control knob one or more times to
select or change a setting.
Your Uconnect system may also have Screen
Off and Mute buttons on the faceplate.
Push the Screen Off button on the faceplate to
turn off the Uconnect screen. Push the button
again or tap the screen to turn the screen on. Press the Back Arrow button to exit out of a
Menu or certain option on the Uconnect system.
CUSTOMER PROGRAMMABLE FEATURES
— U
CONNECT 4C/4C NAV SETTINGS
Uconnect 4C/4C NAV With 8.4-inch Display Buttons
On The Touchscreen And Buttons On The Faceplate
Press the Apps button, then press the
Settings button on the touchscreen to display
the menu setting screen. In this mode, the
Uconnect system allows you to access all of the
available programmable features. NOTE:
Depending on the vehicle’s options, feature
settings may vary.
When making a selection, press the button on
the touchscreen to enter the desired mode.
Once in the desired mode, press and release
the preferred setting “option” until a check
mark appears next to the setting, showing that
setting has been selected. Once the setting is
complete, press the X button on the
touchscreen to close out of the settings screen.
Pressing the Up or Down Arrow button on the
right side of the screen will allow you to toggle
up or down through the available settings.
The following tables list the settings that may be
found within the Uconnect 4C/4C NAV radio,
along with the selectable options pertaining to
each setting.
1 — Uconnect Buttons On The Touchscreen
2 — Uconnect Buttons On The Faceplate
9
20_LX_OM_EN_USC_t.book Page 285
Page 304 of 328

302MULTIMEDIA
STEERING WHEEL AUDIO CONTROLS
The remote sound system controls are located
on the rear surface of the steering wheel at the
three and nine o’clock positions.
Steering Wheel Audio Controls
(Back View Of Steering Wheel)
The right-hand control is a rocker-type switch
with a push button in the center and controls
the volume and mode of the sound system.
Pushing the top of the rocker switch will
increase the volume, and pushing the bottom of
the rocker switch will decrease the volume.
Pushing the center button will make the radio
switch between the various modes available
(AM/FM/SXM/AUX, etc.). The left-hand control is a rocker-type switch with
a push button in the center. The function of the
left-hand control is different depending on
which mode you are in.
The following describes the left-hand control
operation in each mode.
RADIO OPERATION
Pushing the top of the switch will “Seek” up for
the next listenable station and pushing the
bottom of the switch will “Seek” down for the
next listenable station.
The button located in the center of the left-hand
control will tune to the next preset station that
you have programmed in the radio preset
button.
MEDIA MODE
Pushing the top of the switch once goes to the
next track on the selected media (USB/
Bluetooth®). Pushing the bottom of the switch
once goes to the beginning of the current track,
or to the beginning of the previous track if it is
within eight seconds after the current track
begins to play.
NOTE:
While In Media Mode, the center button on the
left rocker switch is nonfunctional.
AUX/USB CONTROL
This feature allows an external USB device to be
plugged into the USB port.
Plugging in a smartphone device to a USB Port
may activate Android Auto™ or Apple CarPlay®
features, if equipped. For further information,
refer to “Android Auto™” or “Apple CarPlay®” in
the Owner’s Manual Supplement.
AUX/USB Ports
1 — USB 1 Port
2 — AUX Jack
3 — USB 2 Port
20_LX_OM_EN_USC_t.book Page 302
Page 322 of 328

320 M
Maintenance Free Battery
............................. 238Maintenance Schedule........................ 231, 232Malfunction Indicator Light
(Check Engine)......................................... 88, 93Manual Park Release............................................. 225Service...................................................... 314Media Hub..................................................... 302Memory Feature (Memory Seats).................... 30Memory Seat................................................... 30Memory Seats And Radio................................ 30Methanol....................................................... 277Mirrors............................................................. 39Electric Powered......................................... 40Electric Remote........................................... 40Heated........................................................ 41Outside........................................................ 39Rearview............................................ 39, 201Vanity.......................................................... 42Modifications/AlterationsVehicle.......................................................... 9Monitor, Tire Pressure System....................... 109Mopar Parts................................................... 313MP3 Control.................................................. 302Multi-Function Control Lever............................ 42
N
New Vehicle Break-In Period......................... 150
O
Occupant Restraints..................................... 113Octane Rating, Gasoline (Fuel)............ 276, 281Oil Change Indicator........................................ 79Reset........................................................... 79Oil Filter, Change.......................................... 241Oil Filter, Selection........................................ 241Oil Pressure Light............................................. 87Oil, Engine............................................ 240, 281Capacity.................................................... 280Change Interval........................................ 240Checking................................................... 238Dipstick.................................................... 238Disposal................................................... 241Filter................................................ 241, 281Filter Disposal........................................... 241Identification Logo.................................... 240Materials Added To.................................. 241Pressure Warning Light............................... 87Recommendation............................ 240, 280Synthetic.................................................. 241Viscosity................................. 240, 241, 280Onboard Diagnostic System............................. 93
Operating Precautions.....................................93Operator ManualOwner's Manual....................................9, 314Outside Rearview Mirrors.................................39Overheating, Engine...................................... 225Owner’s Manual (Operator Manual)................... 9
P
Paddle Shift Mode........................................ 158Paddle Shifters............................................. 158Paint Care..................................................... 272Panic Alarm......................................................13Parking Brake............................................... 150ParkSense System, Rear............................... 177Passive Entry....................................................24Pets............................................................... 142Placard, Tire And Loading Information.......... 257PowerBrakes...................................................... 275Deck Lid Release.........................................62Distribution Center (Fuses)....................... 213Door Locks...................................................24Mirrors.........................................................40Outlet (Auxiliary Electrical Outlet).................74Seats...........................................................31Steering.................................................... 160Sunroof........................................................59Tilt/Telescoping Steering Column................38Windows......................................................57
20_LX_OM_EN_USC_t.book Page 320