2020 CHRYSLER 300 park assist
[x] Cancel search: park assistPage 179 of 328

STARTING AND OPERATING177
PARKSENSE FRONT AND REAR PARK ASSIST
— IF EQUIPPED
The ParkSense Park Assist system provides
visual and audible indications of the distance
between the rear and/or front fascia and a
detected obstacle when backing up or moving
forward (e.g. during a parking maneuver). Refer
to “ParkSense System Usage Precautions” in
this section for limitations of this system and
recommendations.
ParkSense will retain the system state (enabled
or disabled) from the previous ignition cycle
when the ignition is changed to the ON/RUN
position.
ParkSense can be active only when the gear
selector is in REVERSE or DRIVE. If ParkSense is
enabled at one of these gear selector positions,
the system will remain active until the vehicle
speed is increased to approximately 7 mph
(11 km/h) or above. The system will become
active again if the vehicle speed is decreased to
speeds less than approximately 6 mph (9 km/h).
PARKSENSE SENSORS
The four ParkSense sensors, located in the rear
fascia/bumper, monitor the area behind the
vehicle that is within the sensors’ field of view.
The sensors can detect obstacles from
approximately 12 inches (30 cm) up to
79 inches (200 cm) from the rear fascia/
bumper in the horizontal direction, depending
on the location, type and orientation of the
obstacle.
The six ParkSense sensors, located in the front
fascia/bumper, monitor the area in front of the
vehicle that is within the sensors’ field of view.
The sensors can detect obstacles from
approximately 12 inches (30 cm) up to
47 inches (120 cm) from the front fascia/
bumper in the horizontal direction, depending
on the location, type and orientation of the
obstacle.
PARKSENSE WARNING DISPLAY
The ParkSense Warning screen will only be
displayed if Sound and Display is selected from
the Customer Programmable Features section
of the Uconnect System. Refer to "Uconnect
Settings” in “Multimedia” for further
information.
The ParkSense Warning screen is located within
the instrument cluster display. It provides visual
warnings to indicate the distance between the
rear fascia/bumper and/or front fascia/bumper
and the detected obstacle. Refer to “Instrument
Cluster Display” in “Getting To Know Your
Instrument Panel” for further information.
5
20_LX_OM_EN_USC_t.book Page 177
Page 183 of 328

STARTING AND OPERATING181
NOTE:
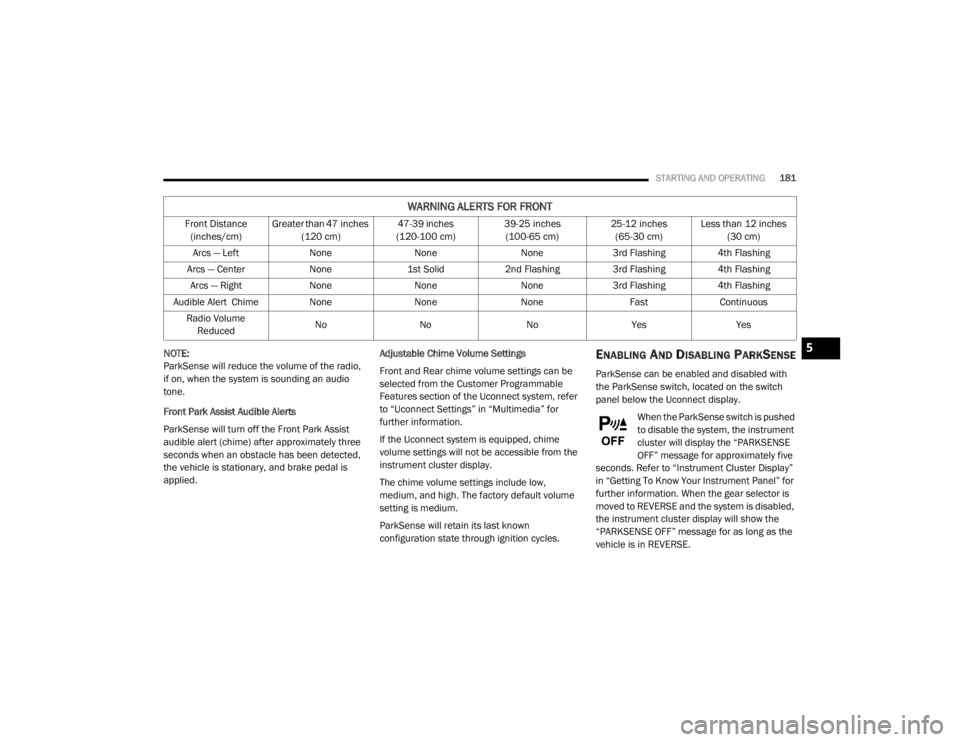
ParkSense will reduce the volume of the radio,
if on, when the system is sounding an audio
tone.
Front Park Assist Audible Alerts
ParkSense will turn off the Front Park Assist
audible alert (chime) after approximately three
seconds when an obstacle has been detected,
the vehicle is stationary, and brake pedal is
applied. Adjustable Chime Volume Settings
Front and Rear chime volume settings can be
selected from the Customer Programmable
Features section of the Uconnect system, refer
to “Uconnect Settings” in “Multimedia” for
further information.
If the Uconnect system is equipped, chime
volume settings will not be accessible from the
instrument cluster display.
The chime volume settings include low,
medium, and high. The factory default volume
setting is medium.
ParkSense will retain its last known
configuration state through ignition cycles.ENABLING AND DISABLING PARKSENSE
ParkSense can be enabled and disabled with
the ParkSense switch, located on the switch
panel below the Uconnect display.
When the ParkSense switch is pushed
to disable the system, the instrument
cluster will display the “PARKSENSE
OFF” message for approximately five
seconds. Refer to “Instrument Cluster Display”
in “Getting To Know Your Instrument Panel” for
further information. When the gear selector is
moved to REVERSE and the system is disabled,
the instrument cluster display will show the
“PARKSENSE OFF” message for as long as the
vehicle is in REVERSE.
WARNING ALERTS FOR FRONT
Front Distance (inches/cm) Greater than 47 inches
(120 cm) 47-39 inches
(120-100 cm) 39-25 inches
(100-65 cm) 25-12 inches
(65-30 cm) Less than 12 inches
(30 cm)
Arcs — Left NoneNone None3rd Flashing 4th Flashing
Arcs — Center None1st Solid 2nd Flashing 3rd Flashing4th Flashing
Arcs — Right NoneNone None3rd Flashing 4th Flashing
Audible Alert Chime NoneNone None FastContinuous
Radio Volume Reduced No
No NoYesYes
5
20_LX_OM_EN_USC_t.book Page 181
Page 184 of 328

182STARTING AND OPERATING
The ParkSense switch LED will be on when
ParkSense is disabled or requires service. The
ParkSense switch LED will be off when the
system is enabled. If the ParkSense switch is
pushed, and requires service, the ParkSense
switch LED will blink momentarily, and then the
LED will be on.
SERVICE THE PARKSENSE PARK ASSIST
S
YSTEM
During vehicle start up, when the ParkSense
System has detected a faulted condition, the
instrument cluster will actuate a single chime,
once per ignition cycle, and it will display the
"PARKSENSE UNAVAILABLE WIPE REAR
SENSORS", "PARKSENSE UNAVAILABLE WIPE
FRONT SENSORS", or the "PARKSENSE
UNAVAILABLE SERVICE REQUIRED" message
for five seconds. When the gear selector is
moved to REVERSE and the system has
detected a faulted condition, the instrument
cluster display will display a "PARKSENSE
UNAVAILABLE WIPE REAR SENSORS",
"PARKSENSE UNAVAILABLE WIPE FRONT
SENSORS" or "PARKSENSE UNAVAILABLE
SERVICE REQUIRED" pop up message for five
seconds. After five seconds, a vehicle graphic
will be displayed with "UNAVAILABLE" at either the front or rear sensor location depending on
where the fault is detected. The system will
continue to provide arc alerts for the side that is
functioning properly. These arc alerts will
interrupt the "PARKSENSE UNAVAILABLE WIPE
REAR SENSORS", "PARKSENSE UNAVAILABLE
WIPE FRONT SENSORS", or "PARKSENSE
UNAVAILABLE SERVICE REQUIRED" messages if
an object is detected within the five second
pop-up duration. The vehicle graphic will remain
displayed for as long as the vehicle is in
REVERSE.
Refer to “Instrument Cluster Display” in
“Getting To Know Your Instrument Panel” for
further information.
If "PARKSENSE UNAVAILABLE WIPE REAR
SENSORS" or "PARKSENSE UNAVAILABLE WIPE
FRONT SENSORS" appears in the instrument
cluster display make sure the outer surface and
the underside of the rear fascia/bumper and/or
front fascia/bumper is clean and clear of snow,
ice, mud, dirt or other obstruction and then
cycle the ignition. If the message continues to
appear see an authorized dealer.
If the "PARKSENSE UNAVAILABLE SERVICE
REQUIRED" message appears in the instrument
cluster display, see an authorized dealer.
CLEANING THE PARKSENSE SYSTEM
Clean the ParkSense sensors with water, car
wash soap and a soft cloth. Do not use rough or
hard cloths. Do not scratch or poke the sensors.
Otherwise, you could damage the sensors.
PARKSENSE SYSTEM USAGE
P
RECAUTIONS
NOTE:
Ensure that the front and rear bumpers are
free of snow, ice, mud, dirt and debris to keep
the ParkSense system operating properly.
Jackhammers, large trucks, and other vibra -
tions could affect the performance of Park -
Sense.
When you turn ParkSense off, the instrument
cluster will display “PARKSENSE OFF.”
Furthermore, once you turn ParkSense off, it
remains off until you turn it on again, even if
you cycle the ignition.
When you move the gear selector to the
REVERSE position and ParkSense is turned
off, the instrument cluster will display
“PARKSENSE OFF” for as long as the vehicle
is in REVERSE.
20_LX_OM_EN_USC_t.book Page 182
Page 188 of 328

186STARTING AND OPERATING
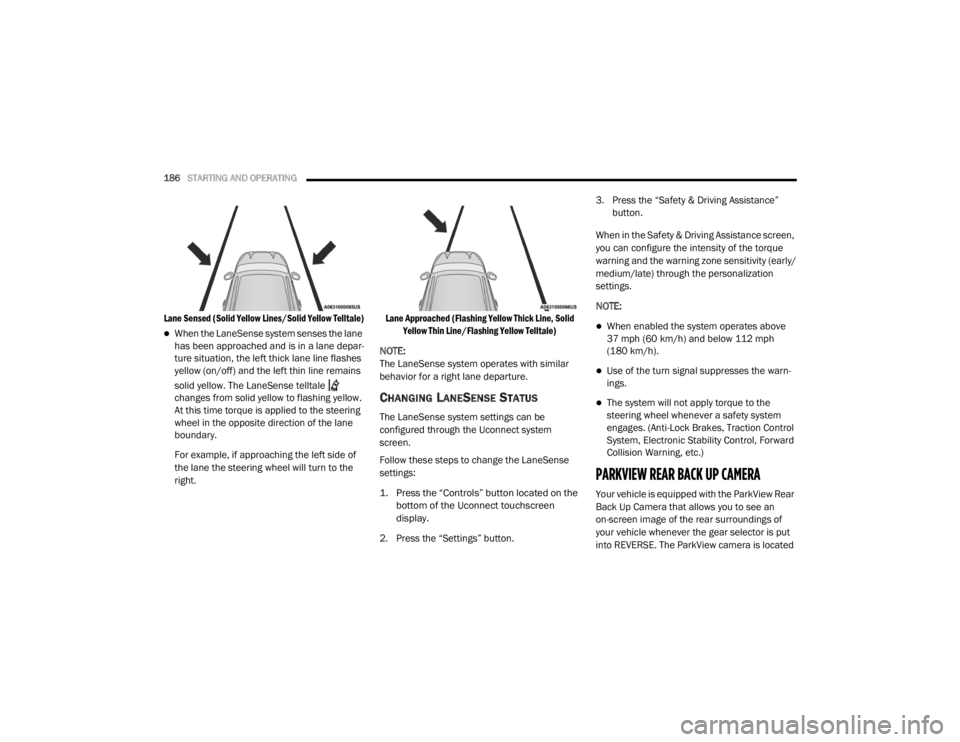
Lane Sensed (Solid Yellow Lines/Solid Yellow Telltale)
When the LaneSense system senses the lane
has been approached and is in a lane depar -
ture situation, the left thick lane line flashes
yellow (on/off) and the left thin line remains
solid yellow. The LaneSense telltale
changes from solid yellow to flashing yellow.
At this time torque is applied to the steering
wheel in the opposite direction of the lane
boundary.
For example, if approaching the left side of
the lane the steering wheel will turn to the
right.
Lane Approached (Flashing Yellow Thick Line, Solid
Yellow Thin Line/Flashing Yellow Telltale)
NOTE:
The LaneSense system operates with similar
behavior for a right lane departure.
CHANGING LANESENSE STATUS
The LaneSense system settings can be
configured through the Uconnect system
screen.
Follow these steps to change the LaneSense
settings:
1. Press the “Controls” button located on the bottom of the Uconnect touchscreen
display.
2. Press the “Settings” button. 3. Press the “Safety & Driving Assistance”
button.
When in the Safety & Driving Assistance screen,
you can configure the intensity of the torque
warning and the warning zone sensitivity (early/
medium/late) through the personalization
settings.
NOTE:
When enabled the system operates above
37 mph (60 km/h) and below 112 mph (180 km/h).
Use of the turn signal suppresses the warn -
ings.
The system will not apply torque to the
steering wheel whenever a safety system
engages. (Anti-Lock Brakes, Traction Control
System, Electronic Stability Control, Forward
Collision Warning, etc.)
PARKVIEW REAR BACK UP CAMERA
Your vehicle is equipped with the ParkView Rear
Back Up Camera that allows you to see an
on-screen image of the rear surroundings of
your vehicle whenever the gear selector is put
into REVERSE. The ParkView camera is located
20_LX_OM_EN_USC_t.book Page 186
Page 218 of 328

216IN CASE OF EMERGENCY
43–20 Amp Yellow Rear Heated Seats – If Equipped / Heated Steering Wheel –
If Equipped
44 –10 Amp Red Park Assist / Blind Spot / Rear View Camera
45 –15 Amp Blue Cluster / Rearview Mirror / Lane Departure
46 – –Fuse – Spare
47 –10 Amp Red Adaptive Front Lighting / Day Time Running Lamps – If Equipped
48 –20 Amp Yellow Active Suspension – (6.4L)
49 – –Fuse – Spare
50 – –Fuse – Spare
51 –20 Amp Yellow Front Heated / Vented Seats – If Equipped
52 –10 Amp RedHeated/Cooled Cup Holders/Rear Heated Seat Switches –
If Equipped
53 –10 Amp Red HVAC Module/In Vehicle Temperature Sensor
54 – –Fuse – Spare
55 – –Fuse – Spare
56 – –Fuse – Spare
57 – –Fuse – Spare
58 –10 Amp Red Airbag Module
59 –20 Amp Yellow Adjustable Pedals – Police
Cavity Cartridge Fuse Mini-FuseDescription
20_LX_OM_EN_USC_t.book Page 216
Page 281 of 328

TECHNICAL SPECIFICATIONS279
(Continued)
FUEL SYSTEM CAUTIONSNOTE:
Intentional tampering with the emissions
control system can result in civil penalties being
assessed against you.
CARBON MONOXIDE WARNINGS
CAUTION!
Follow these guidelines to maintain your
vehicle’s performance:
The use of leaded gasoline is prohibited by
Federal law. Using leaded gasoline can
impair engine performance and damage
the emissions control system.
An out-of-tune engine or certain fuel or igni -
tion malfunctions can cause the catalytic
converter to overheat. If you notice a
pungent burning odor or some light smoke,
your engine may be out of tune or malfunc -
tioning and may require immediate service.
Contact an authorized dealer for service
assistance.
The use of fuel additives, which are now
being sold as octane enhancers, is not
recommended. Most of these products
contain high concentrations of methanol.
Fuel system damage or vehicle perfor -
mance problems resulting from the use of
such fuels or additives is not the responsi -
bility of the manufacturer and may void or
not be covered under the New Vehicle
Limited Warranty.
WARNING!
Carbon monoxide (CO) in exhaust gases is
deadly. Follow the precautions below to
prevent carbon monoxide poisoning:
Do not inhale exhaust gases. They contain
carbon monoxide, a colorless and odorless
gas, which can kill. Never run the engine in
a closed area, such as a garage, and never
sit in a parked vehicle with the engine
running for an extended period. If the
vehicle is stopped in an open area with the
engine running for more than a short
period, adjust the ventilation system to
force fresh, outside air into the vehicle.
Guard against carbon monoxide with
proper maintenance. Have the exhaust
system inspected every time the vehicle is
raised. Have any abnormal conditions
repaired promptly. Until repaired, drive with
all side windows fully open.
WARNING! (Continued)
8
20_LX_OM_EN_USC_t.book Page 279
Page 291 of 328

MULTIMEDIA289
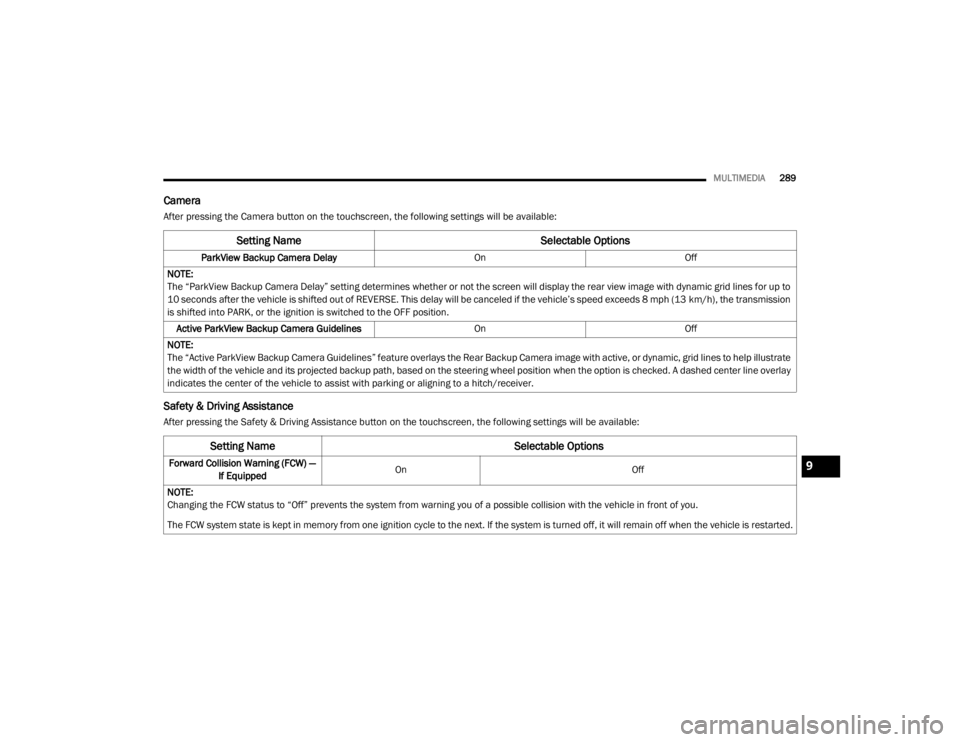
Camera
After pressing the Camera button on the touchscreen, the following settings will be available:
Safety & Driving Assistance
After pressing the Safety & Driving Assistance button on the touchscreen, the following settings will be available:
Setting Name Selectable Options
ParkView Backup Camera Delay OnOff
NOTE:
The “ParkView Backup Camera Delay” setting determines whether or not the screen will display the rear view image with dynamic grid lines for up to
10 seconds after the vehicle is shifted out of REVERSE. This delay will be canceled if the vehicle’s speed exceeds 8 mph (13 km/h), the transmission
is shifted into PARK, or the ignition is switched to the OFF position.
Active ParkView Backup Camera Guidelines OnOff
NOTE:
The “Active ParkView Backup Camera Guidelines” feature overlays the Rear Backup Camera image with active, or dynamic, grid lines to help illustrate
the width of the vehicle and its projected backup path, based on the steering wheel position when the option is checked. A dashed center line overlay
indicates the center of the vehicle to assist with parking or aligning to a hitch/receiver.
Setting Name Selectable Options
Forward Collision Warning (FCW) —
If Equipped On
Off
NOTE:
Changing the FCW status to “Off” prevents the system from warning you of a possible collision with the vehicle in front of you.
The FCW system state is kept in memory from one ignition cycle to the next. If the system is turned off, it will remain off when the vehicle is restarted.9
20_LX_OM_EN_USC_t.book Page 289
Page 318 of 328

316 AWD Towing
....................................................... 229Axle Fluid............................................. 281, 283Axle Lubrication................................... 281, 283
B
Back-Up......................................................... 186Battery.................................................... 86, 238Charging System Light................................. 86Keyless Key Fob Replacement.................... 13Location.................................................... 238Belts, Seat..................................................... 143Beverage Holder Cooled (Cupholder).............. 73Beverage Holder Heated (Cupholder).............. 73Body Mechanism Lubrication........................ 244B-Pillar Location............................................. 257Brake Assist System........................................ 96Brake Control System...................................... 96Brake Fluid................................. 251, 281, 283Brake System...................................... 250, 275Fluid Check............................ 251, 281, 283Master Cylinder......................................... 251Parking...................................................... 150Warning Light..................................... 85, 275Brake/Transmission Interlock....................... 153Break-In Recommendations, New Vehicle..... 150Brightness, Interior Lights................................ 48Bulb Replacement......................................... 206Bulbs, Light.......................................... 145, 206
C
Camera, Rear................................................ 186Capacities, Fluid........................................... 280Caps, FillerOil (Engine)...................................... 236, 241Radiator (Coolant Pressure)..................... 249Car Washes................................................... 272Carbon Monoxide Warning................... 143, 279CargoVehicle Loading........................................ 190Cargo Area Cover............................................. 64Cargo Compartment........................................ 64Cellular Phone.............................................. 303Certification Label......................................... 190Chains, Tire................................................... 269Changing A Flat Tire...................................... 253Chart, Tire Sizing........................................... 254Check Engine Light
(Malfunction Indicator Light)............................ 93Checking Your Vehicle For Safety................. 142Checks, Safety.............................................. 142Child Restraint.............................................. 130Child RestraintsBooster Seats........................................... 133Child Seat Installation.............................. 140How To Stow An unused ALR Seat Belt.... 138Infant And Child Restraints....................... 132Lower Anchors And Tethers For Children.. 135Older Children And Child Restraints......... 132
Seating Positions...................................... 134Child Safety Locks............................................28Clean Air Gasoline......................................... 277CleaningWheels...................................................... 268Climate Control................................................50Automatic....................................................50Coin Holder......................................................71Cold Weather Operation................................ 149Compact Spare Tire...................................... 266ConsoleFloor............................................................71Contract, Service........................................... 312Cooling Pressure Cap (Radiator Cap)............ 249Cooling System............................................. 247Adding Coolant (Antifreeze)...................... 248Coolant Capacity....................................... 280Coolant Level................................... 247, 250Disposal Of Used Coolant......................... 249Drain, Flush, And Refill............................. 248Inspection................................................. 250Points To Remember................................ 250Pressure Cap............................................ 249Radiator Cap............................................. 249Selection Of Coolant (Antifreeze)......................... 248, 280, 281Corrosion Protection..................................... 272Cruise Control (Speed Control)............. 160, 163Cruise Light............................................... 91, 92
20_LX_OM_EN_USC_t.book Page 316