2020 CHRYSLER 300 key battery
[x] Cancel search: key batteryPage 76 of 328

74GETTING TO KNOW YOUR VEHICLE
ELECTRICAL POWER OUTLETS
Your vehicle is equipped with one 12 Volt
(13 Amp) power outlet on the instrument panel
and one 12 Volt (13 Amp) power outlet in the
center console that can be used to power
cellular phones, small electronics and other low
powered electrical accessories. The power
outlets are labeled with either a “key” or a
“battery” symbol to indicate how the outlet is
powered. Power outlets labeled with a “key” are
powered when the ignition switch is in the ACC
or ON/RUN position, while the outlets labeled
with a “battery” are connected directly to the
battery and powered at all times.
NOTE:
All accessories connected to the “battery”
powered outlets should be removed or turned
off when the vehicle is not in use to protect the
battery against discharge.
The front power outlet is located inside the
storage area on the center stack of the
instrument panel.
Front Power Outlet
In addition to the front power outlet, there is
also a power outlet located in the storage area
of the center console.
Center Console Power Outlet
NOTE:
If the Media Hub is in use, do not exceed the
maximum power of 100 Watts (8 Amps) for the
center console power outlet. When the Media
Hub is not in use, the outlet can deliver up to
120 Watts (10 Amps). If the power rating is
exceeded, the fuse protecting the system will
need to be replaced.
The instrument panel power outlet and dual
rear console USB ports can be changed to
“battery” (powered at all times) by moving the
#12 20 Amp fuse from “IGN” to “B+”. These
fuses are located in the fuse box in the trunk,
below the load floor.
WARNING!
Do not place ashes inside the cubby bin
located on the center console on vehicles not
equipped with the ash receiver tray. A fire
leading to bodily injury could result.
20_LX_OM_EN_USC_t.book Page 74
Page 131 of 328

SAFETY129
(Continued)
Enhanced Accident Response System
In the event of an impact, if the communication
network remains intact, and the power remains
intact, depending on the nature of the event,
the ORC will determine whether to have the
Enhanced Accident Response System perform
the following functions:
Cut off fuel to the engine (if equipped).
Cut off battery power to the electric motor (if
equipped).
Flash hazard lights as long as the battery has
power.
Turn on the interior lights, which remain on
as long as the battery has power or for
15 minutes from the intervention of the
Enhanced Accident Response System.
Unlock the power door locks.
Your vehicle may also be designed to perform
any of these other functions in response to the
Enhanced Accident Response System:
Turn off the Fuel Filter Heater, Turn off the
HVAC Blower Motor, Close the HVAC Circula -
tion Door
Cut off battery power to the:
Engine
Electric Motor (if equipped)
Electric power steering
Brake booster
Electric park brake
Automatic transmission gear selector
Horn
Front wiper
Headlamp washer pump
NOTE:
After an accident, remember to cycle the igni -
tion to the STOP (OFF/LOCK) position and
remove the key from the ignition switch to avoid
draining the battery. Carefully check the vehicle
for fuel leaks in the engine compartment and on
the ground near the engine compartment and
fuel tank before resetting the system and
starting the engine. If there are no fuel leaks or
damage to the vehicle electrical devices (e.g.
headlights) after an accident, reset the system by following the procedure described below. If
you have any doubt, contact an authorized
dealer.
Enhanced Accident Response System
Reset Procedure
In order to reset the Enhanced Accident
Response System functions after an event, the
ignition switch must be changed from ignition
START or ON/RUN to ignition OFF. Carefully
check the vehicle for fuel leaks in the engine
compartment and on the ground near the
engine compartment and fuel tank before
resetting the system and starting the engine.
Maintaining Your Air Bag System
WARNING!
Modifications to any part of the air bag system
could cause it to fail when you need it. You
could be injured if the air bag system is not
there to protect you. Do not modify the
components or wiring, including adding any
kind of badges or stickers to the steering
wheel hub trim cover or the upper passenger
side of the instrument panel. Do not modify
the front bumper, vehicle body structure, or
add aftermarket side steps or running boards.
4
20_LX_OM_EN_USC_t.book Page 129
Page 151 of 328

STARTING AND OPERATING149
selector. As an added precaution, always apply
the parking brake when exiting the vehicle.
COLD WEATHER OPERATION (BELOW
–22°F O
R −30°C)
To ensure reliable starting at these
temperatures, use of an externally powered
electric engine block heater (available from an
authorized dealer) is recommended.
IF ENGINE FAILS TO START
If the engine fails to start after you have
followed the "Normal Starting" or "Cold Weather
Operation" procedure, and has not experienced
an extended park condition as identified in
"Extended Park Starting" procedure it may be
flooded. Push the accelerator pedal all the way
to the floor and hold it there. Crank the engine
for no more than 15 seconds. This should clear
any excess fuel in case the engine is flooded.
Leave the ignition key in the RUN position,
release the accelerator pedal and repeat the
“Normal Starting” procedure.
AFTER STARTING
The idle speed is controlled automatically, and
it will decrease as the engine warms up.
ENGINE BLOCK HEATER — IF EQUIPPED
The engine block heater warms the engine, and
permits quicker starts in cold weather. Connect
the cord to a standard 110-115 Volt AC
electrical outlet with a grounded, three-wire
extension cord.
The engine block heater must be plugged in at
least one hour to have an adequate warming
effect on the engine.
The engine block heater cord is routed under
the hood on the driver side of the vehicle. It has
a removable cap that is located near the air box.
WARNING!
Never pour fuel or other flammable liquid
into the throttle body air inlet opening in an
attempt to start the vehicle. This could result
in flash fire causing serious personal injury.
Do not attempt to push or tow your vehicle
to get it started. Vehicles equipped with an
automatic transmission cannot be started
this way. Unburned fuel could enter the
catalytic converter and once the engine has
started, ignite and damage the converter
and vehicle.
If the vehicle has a discharged battery,
booster cables may be used to obtain a
start from a booster battery or the battery in
another vehicle. This type of start can be
dangerous if done improperly. Refer to
“Jump Starting Procedure” in “In Case Of
Emergency” for further information.
CAUTION!
To prevent damage to the starter, do not
continuously crank the engine for more than
25 seconds at a time. Wait 60 seconds
before trying again.
WARNING!
Remember to disconnect the engine block
heater cord before driving. Damage to the
110-115 Volt electrical cord could cause
electrocution.
5
20_LX_OM_EN_USC_t.book Page 149
Page 230 of 328

228IN CASE OF EMERGENCY
(Continued)
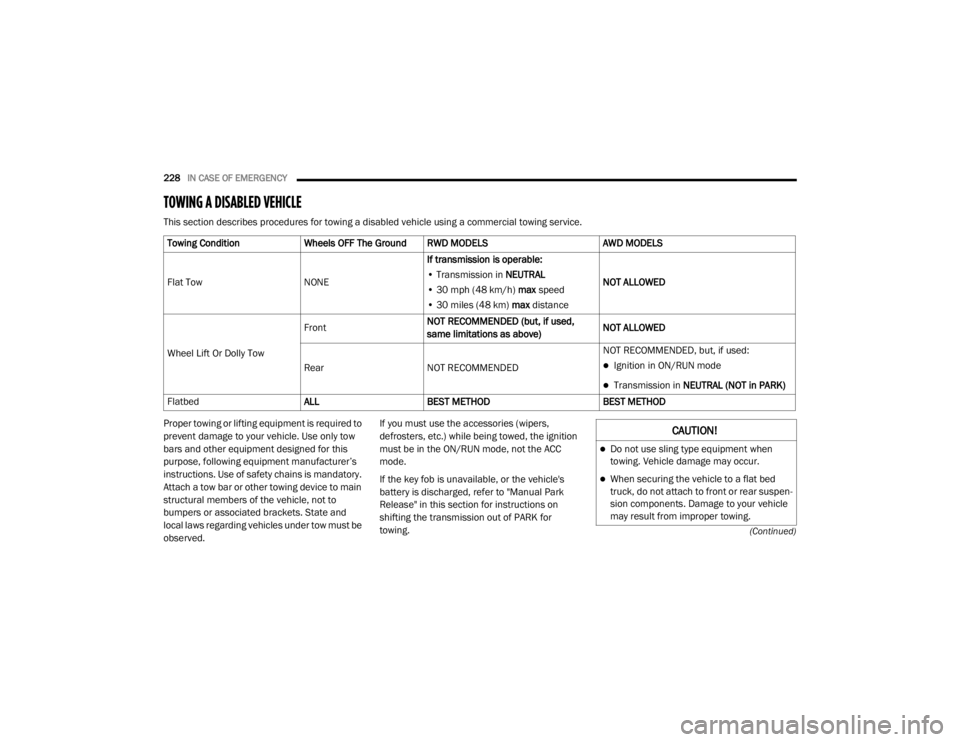
TOWING A DISABLED VEHICLE
This section describes procedures for towing a disabled vehicle using a commercial towing service.
Proper towing or lifting equipment is required to
prevent damage to your vehicle. Use only tow
bars and other equipment designed for this
purpose, following equipment manufacturer’s
instructions. Use of safety chains is mandatory.
Attach a tow bar or other towing device to main
structural members of the vehicle, not to
bumpers or associated brackets. State and
local laws regarding vehicles under tow must be
observed.If you must use the accessories (wipers,
defrosters, etc.) while being towed, the ignition
must be in the ON/RUN mode, not the ACC
mode.
If the key fob is unavailable, or the vehicle's
battery is discharged, refer to "Manual Park
Release" in this section for instructions on
shifting the transmission out of PARK for
towing.
Towing Condition
Wheels OFF The Ground RWD MODELS AWD MODELS
Flat Tow NONEIf transmission is operable:
• Transmission in NEUTRAL
• 30 mph (48 km/h) max speed
• 30 miles (48 km) max distance NOT ALLOWED
Wheel Lift Or Dolly Tow Front
NOT RECOMMENDED (but, if used,
same limitations as above) NOT ALLOWED
Rear NOT RECOMMENDED NOT RECOMMENDED, but, if used:
Ignition in ON/RUN mode
Transmission in
NEUTRAL (NOT in PARK)
Flatbed ALLBEST METHOD BEST METHOD
CAUTION!
Do not use sling type equipment when
towing. Vehicle damage may occur.
When securing the vehicle to a flat bed
truck, do not attach to front or rear suspen -
sion components. Damage to your vehicle
may result from improper towing.
20_LX_OM_EN_USC_t.book Page 228
Page 318 of 328

316 AWD Towing
....................................................... 229Axle Fluid............................................. 281, 283Axle Lubrication................................... 281, 283
B
Back-Up......................................................... 186Battery.................................................... 86, 238Charging System Light................................. 86Keyless Key Fob Replacement.................... 13Location.................................................... 238Belts, Seat..................................................... 143Beverage Holder Cooled (Cupholder).............. 73Beverage Holder Heated (Cupholder).............. 73Body Mechanism Lubrication........................ 244B-Pillar Location............................................. 257Brake Assist System........................................ 96Brake Control System...................................... 96Brake Fluid................................. 251, 281, 283Brake System...................................... 250, 275Fluid Check............................ 251, 281, 283Master Cylinder......................................... 251Parking...................................................... 150Warning Light..................................... 85, 275Brake/Transmission Interlock....................... 153Break-In Recommendations, New Vehicle..... 150Brightness, Interior Lights................................ 48Bulb Replacement......................................... 206Bulbs, Light.......................................... 145, 206
C
Camera, Rear................................................ 186Capacities, Fluid........................................... 280Caps, FillerOil (Engine)...................................... 236, 241Radiator (Coolant Pressure)..................... 249Car Washes................................................... 272Carbon Monoxide Warning................... 143, 279CargoVehicle Loading........................................ 190Cargo Area Cover............................................. 64Cargo Compartment........................................ 64Cellular Phone.............................................. 303Certification Label......................................... 190Chains, Tire................................................... 269Changing A Flat Tire...................................... 253Chart, Tire Sizing........................................... 254Check Engine Light
(Malfunction Indicator Light)............................ 93Checking Your Vehicle For Safety................. 142Checks, Safety.............................................. 142Child Restraint.............................................. 130Child RestraintsBooster Seats........................................... 133Child Seat Installation.............................. 140How To Stow An unused ALR Seat Belt.... 138Infant And Child Restraints....................... 132Lower Anchors And Tethers For Children.. 135Older Children And Child Restraints......... 132
Seating Positions...................................... 134Child Safety Locks............................................28Clean Air Gasoline......................................... 277CleaningWheels...................................................... 268Climate Control................................................50Automatic....................................................50Coin Holder......................................................71Cold Weather Operation................................ 149Compact Spare Tire...................................... 266ConsoleFloor............................................................71Contract, Service........................................... 312Cooling Pressure Cap (Radiator Cap)............ 249Cooling System............................................. 247Adding Coolant (Antifreeze)...................... 248Coolant Capacity....................................... 280Coolant Level................................... 247, 250Disposal Of Used Coolant......................... 249Drain, Flush, And Refill............................. 248Inspection................................................. 250Points To Remember................................ 250Pressure Cap............................................ 249Radiator Cap............................................. 249Selection Of Coolant (Antifreeze)......................... 248, 280, 281Corrosion Protection..................................... 272Cruise Control (Speed Control)............. 160, 163Cruise Light............................................... 91, 92
20_LX_OM_EN_USC_t.book Page 316
Page 321 of 328

319
J
Jack Location
................................................. 218Jack Operation..................................... 219, 253Jacking Instructions....................................... 219Jump Starting................................................ 222
K
Key Fob Arm The System
.......................................... 22Panic Alarm................................................. 13Programming Additional Key Fobs....... 15, 21Unlatch The Trunk....................................... 13Key Fob Battery Service
(Remote Keyless Entry)................................... 13Key Fob Programming
(Remote Keyless Entry)................................... 15Key-In Reminder.............................................. 17Keyless Enter-N-Go................................. 24, 146Enter The Trunk........................................... 13Passive Entry............................................... 24Passive Entry Programming......................... 24Keys................................................................. 11Replacement........................................ 15, 21
L
Lane Change And Turn Signals........................ 46Lane Change Assist......................................... 46LaneSense.................................................... 183Lap/Shoulder Belts....................................... 115
Latches......................................................... 145Hood............................................................ 61Lead Free Gasoline....................................... 276Leaks, Fluid.................................................. 145Life Of Tires................................................... 264Light Bulbs........................................... 145, 206Lights............................................................ 145Air Bag...................................... 85, 122, 143Automatic Headlights.................................. 44Brake Assist Warning.................................. 99Brake Warning....................................85, 275Bulb Replacement.................................... 206Cruise................................................... 91, 92Daytime Running......................................... 43Dimmer Switch, Headlight.................... 42, 43Engine Temperature Warning...................... 86Exterior..................................................... 145Fog.............................................................. 45Hazard Warning Flasher........................... 201Headlight Switch.......................................... 42Headlights...................................42, 45, 207Headlights On With Wipers.......................... 44High Beam................................................... 43High Beam/Low Beam Select...................... 43Instrument Cluster....................................... 42Intensity Control.......................................... 48Interior......................................................... 46License..................................................... 209Lights On Reminder..................................... 45
Malfunction Indicator (Check Engine)..........88Map.............................................................47Park......................................................44, 92Passing........................................................44Reading.......................................................47Seat Belt Reminder.....................................87Security Alarm.............................................87Service...................................................... 206Traction Control...........................................99Turn Signals......................... 42, 46, 92, 145Vanity Mirror................................................42Warning Instrument ClusterDescriptions.....................................86, 92Load Leveling System......................................65Load Shed Battery Saver On............................83Load Shed Electrical Load Reduction..............83Load Shed Intelligent Battery Sensor...............83Loading Vehicle............................................. 190Capacities................................................. 190Tires.......................................................... 257LocksAuto Unlock.................................................27Automatic Door............................................28Child Protection...........................................28Power Door..................................................24Low Tire Pressure System............................. 109Lubrication, Body.......................................... 244Lug Nuts........................................................ 27511
20_LX_OM_EN_USC_t.book Page 319