2020 CHRYSLER 300 wheel
[x] Cancel search: wheelPage 273 of 328
SERVICING AND MAINTENANCE271
TRACTION GRADES
The Traction grades, from highest to
lowest, are AA, A, B, and C. These grades
represent the tire's ability to stop on wet
pavement, as measured under
controlled conditions on specified
government test surfaces of asphalt and
concrete. A tire marked C may have poor
traction performance.
TEMPERATURE GRADES
The Temperature grades are A (the
highest), B, and C, representing the tire's
resistance to the generation of heat and
its ability to dissipate heat, when tested under controlled conditions on a
specified indoor laboratory test wheel.
Sustained high temperature can cause
the material of the tire to degenerate
and reduce tire life, and excessive
temperature can lead to sudden tire
failure. The grade C corresponds to a
level of performance, which all
passenger vehicle tires must meet
under the Federal Motor Vehicle Safety
Standard No. 109. Grades B and A
represent higher levels of performance
on the laboratory test wheel, than the
minimum required by law.
VEHICLE STORAGE
If you are leaving your vehicle dormant for more
than 21 days, you may want to take these steps
to protect your battery.
NOTE:
SRT (if equipped), storage between 21-60 days
can use Storage Mode rather than discon
-
necting the battery. Storage Mode can be found
in the instrument cluster display under vehicle
info/battery page.
Disconnect the negative cable from the
battery.
Anytime you store your vehicle, or keep it out
of service (e.g., vacation) for two weeks or
more, run the air conditioning system at idle
for about five minutes in the fresh air and
high blower setting. This will ensure
adequate system lubrication to minimize the
possibility of compressor damage when the
system is started again.
WARNING!
The traction grade assigned to this tire is
based on straight-ahead braking traction
tests, and does not include acceleration,
cornering, hydroplaning, or peak traction
characteristics.
WARNING!
The temperature grade for this tire is
established for a tire that is properly inflated
and not overloaded. Excessive speed,
under-inflation, or excessive loading, either
separately or in combination, can cause heat
buildup and possible tire failure.
7
20_LX_OM_EN_USC_t.book Page 271
Page 275 of 328
SERVICING AND MAINTENANCE273
Special Care
If you drive on salted or dusty roads or if you
drive near the ocean, hose off the undercar -
riage at least once a month.
It is important that the drain holes in the
lower edges of the doors, rocker panels, and
trunk be kept clear and open.
If you detect any stone chips or scratches in
the paint, touch them up immediately. The
cost of such repairs is considered the respon -
sibility of the owner.
If your vehicle is damaged due to a collision
or similar cause that destroys the paint and
protective coating, have your vehicle repaired as soon as possible. The cost of such repairs
is considered the responsibility of the owner.
If you carry special cargo such as chemicals,
fertilizers, de-icer salt, etc., be sure that such
materials are well packaged and sealed.
If a lot of driving is done on gravel roads,
consider mud or stone shields behind each
wheel.
Use Mopar Touch Up Paint on scratches as
soon as possible. An authorized dealer has
touch up paint to match the color of your
vehicle.
INTERIORS
SEATS AND FABRIC PARTS
Use Mopar Total Clean to clean fabric
upholstery and carpeting.
Seat Belt Maintenance
Do not bleach, dye, or clean the belts with
chemical solvents or abrasive cleaners. This will
weaken the fabric. Sun damage can also
weaken the fabric.
If the belts need cleaning, use Mopar Total
Clean, a mild soap solution, or lukewarm water.
Do not remove the belts from the vehicle to
wash them. Dry with a soft cloth.
Replace the belts if they appear frayed or worn
or if the buckles do not work properly.CAUTION!
Do not use abrasive or strong cleaning
materials such as steel wool or scouring
powder that will scratch metal and painted
surfaces.
Use of power washers exceeding 1,200 psi
(8,274 kPa) can result in damage or
removal of paint and decals.
WARNING!
Do not use volatile solvents for cleaning
purposes. Many are potentially flammable,
and if used in closed areas they may cause
respiratory harm.
WARNING!
A frayed or torn belt could rip apart in a
collision and leave you with no protection.
Inspect the belt system periodically, checking
for cuts, frays, or loose parts. Damaged parts
must be replaced immediately. Do not
disassemble or modify the system. Seat belt
assemblies must be replaced after a collision
if they have been damaged (i.e., bent
retractor, torn webbing, etc.).
7
20_LX_OM_EN_USC_t.book Page 273
Page 277 of 328

275
TECHNICAL SPECIFICATIONS
IDENTIFICATION DATA
VEHICLE IDENTIFICATION NUMBER
The Vehicle Identification Number (VIN) is on
the left front corner of the instrument panel. The
VIN is visible from outside of the vehicle through
the windshield.
Windshield VIN Location
NOTE:
It is illegal to remove or alter the VIN.
BRAKE SYSTEM
Your vehicle is equipped with dual hydraulic
brake systems. If either of the two hydraulic
systems loses normal capability, the remaining
system will still function. There will be some loss
of overall braking effectiveness. This may be
evident by increased pedal travel during
application, greater pedal force required to slow
or stop, and potential activation of the Brake
Warning Light.
In the event power assist is lost for any reason
(for example, repeated brake applications with
the engine OFF), the brakes will still function.
The effort required to brake the vehicle will be
much greater than that required with the power
system operating.
WHEEL AND TIRE TORQUE SPECIFICATIONS
Proper lug nut/bolt torque is very important to
ensure that the wheel is properly mounted to
the vehicle. Any time a wheel has been removed
and reinstalled on the vehicle, the lug nuts/
bolts should be torqued using a properly
calibrated torque wrench using a high quality six
sided (hex) deep wall socket.
TORQUE SPECIFICATIONS
**Use only authorized dealer recommended
lug nuts/bolts and clean or remove any dirt or
oil before tightening.
Lug Nut/Bolt
Torque **Lug Nut/
Bolt SizeLug Nut/Bolt
Socket Size
130 Ft-Lbs
(176 N·m) M14 x 1.50 22 mm
8
20_LX_OM_EN_USC_t.book Page 275
Page 278 of 328

276TECHNICAL SPECIFICATIONS
Inspect the wheel mounting surface prior to
mounting the tire and remove any corrosion or
loose particles.
Wheel Mounting Surface
Tighten the lug nuts/bolts in a star pattern until
each nut/bolt has been tightened twice. Ensure
that the socket is fully engaged on the lug nut/
bolt (do not insert it halfway).
NOTE:
If in doubt about the correct tightness, have
them checked with a torque wrench by an
authorized dealer or service station.
After 25 miles (40 km), check the lug nut/bolt torque to be sure that all the lug nuts/bolts are
properly seated against the wheel.
Torque Patterns
FUEL REQUIREMENTS
3.6L ENGINE
This engine is designed to meet all
emissions regulations and provide
excellent fuel economy and
performance when using high-quality
unleaded “Regular” gasoline having an octane
rating of 87 as specified by the (R+M)/2 method. The use of higher octane “Premium” gasoline will
not provide any benefit over “Regular” gasoline in
these engines.
While operating on gasoline with an octane
number of 87, hearing a light knocking sound
from the engine is not a cause for concern.
However, if the engine is heard making a heavy
knocking sound, see an authorized dealer
immediately. Use of gasoline with an octane
number lower than 87 can cause engine failure
and may void or not be covered by the New
Vehicle Limited Warranty.
Poor quality gasoline can cause problems such
as hard starting, stalling, and hesitations. If you
experience these symptoms, try another brand
of gasoline before considering service for the
vehicle.
5.7L ENGINE
Do not use E-85 flex fuel or ethanol blends
greater than 15% in this engine.
This engine is designed to meet all
emissions regulations and provide
satisfactory fuel economy and
performance when using high-quality
unleaded gasoline having an octane range of
87 to 89 as specified by the (R+M)/2 method.
WARNING!
To avoid the risk of forcing the vehicle off the
jack, do not tighten the lug nuts/bolts fully
until the vehicle has been lowered. Failure to
follow this warning may result in personal
injury.
20_LX_OM_EN_USC_t.book Page 276
Page 291 of 328
MULTIMEDIA289
Camera
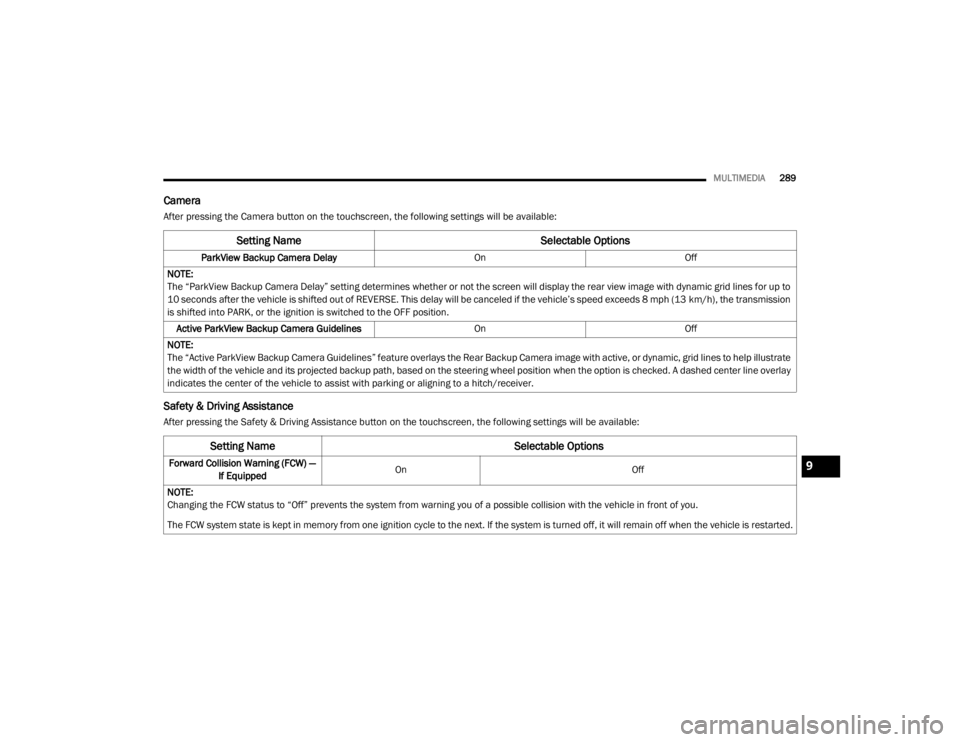
After pressing the Camera button on the touchscreen, the following settings will be available:
Safety & Driving Assistance
After pressing the Safety & Driving Assistance button on the touchscreen, the following settings will be available:
Setting Name Selectable Options
ParkView Backup Camera Delay OnOff
NOTE:
The “ParkView Backup Camera Delay” setting determines whether or not the screen will display the rear view image with dynamic grid lines for up to
10 seconds after the vehicle is shifted out of REVERSE. This delay will be canceled if the vehicle’s speed exceeds 8 mph (13 km/h), the transmission
is shifted into PARK, or the ignition is switched to the OFF position.
Active ParkView Backup Camera Guidelines OnOff
NOTE:
The “Active ParkView Backup Camera Guidelines” feature overlays the Rear Backup Camera image with active, or dynamic, grid lines to help illustrate
the width of the vehicle and its projected backup path, based on the steering wheel position when the option is checked. A dashed center line overlay
indicates the center of the vehicle to assist with parking or aligning to a hitch/receiver.
Setting Name Selectable Options
Forward Collision Warning (FCW) —
If Equipped On
Off
NOTE:
Changing the FCW status to “Off” prevents the system from warning you of a possible collision with the vehicle in front of you.
The FCW system state is kept in memory from one ignition cycle to the next. If the system is turned off, it will remain off when the vehicle is restarted.9
20_LX_OM_EN_USC_t.book Page 289
Page 292 of 328
290MULTIMEDIA
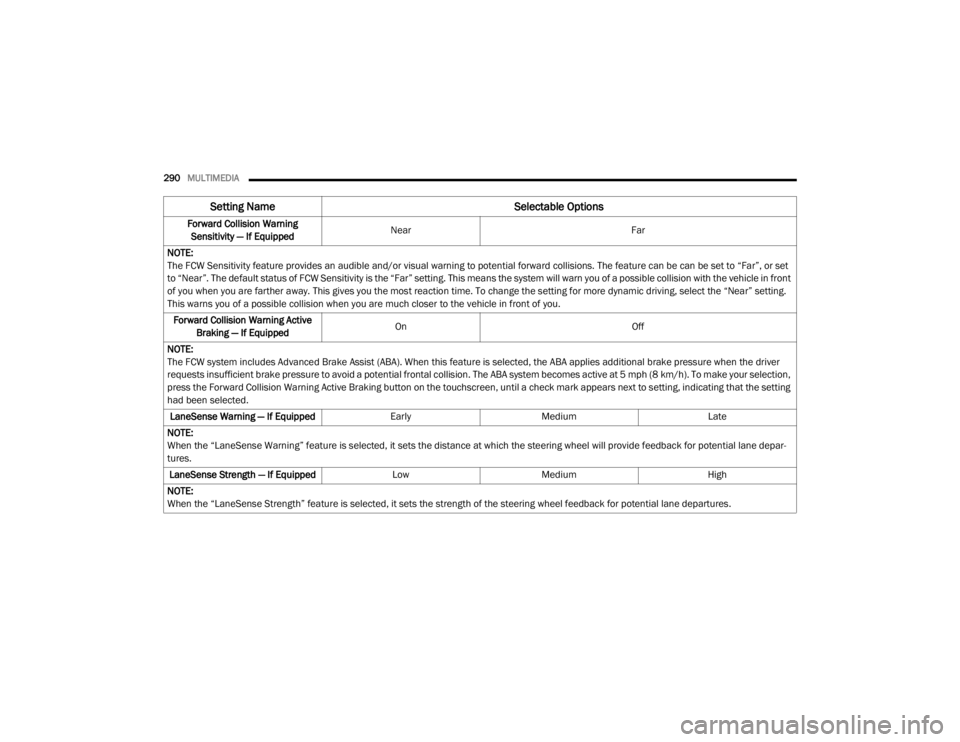
Forward Collision Warning
Sensitivity — If Equipped Near
Far
NOTE:
The FCW Sensitivity feature provides an audible and/or visual warning to potential forward collisions. The feature can be can be set to “Far”, or set
to “Near”. The default status of FCW Sensitivity is the “Far” setting. This means the system will warn you of a possible collision with the vehicle in front
of you when you are farther away. This gives you the most reaction time. To change the setting for more dynamic driving, select the “Near” setting.
This warns you of a possible collision when you are much closer to the vehicle in front of you. Forward Collision Warning Active Braking — If Equipped On
Off
NOTE:
The FCW system includes Advanced Brake Assist (ABA). When this feature is selected, the ABA applies additional brake pressure when the driver
requests insufficient brake pressure to avoid a potential frontal collision. The ABA system becomes active at 5 mph (8 km/h). To make your selection,
press the Forward Collision Warning Active Braking button on the touchscreen, until a check mark appears next to setting, indicating that the setting
had been selected. LaneSense Warning — If Equipped EarlyMedium Late
NOTE:
When the “LaneSense Warning” feature is selected, it sets the distance at which the steering wheel will provide feedback for potential lane depar -
tures.
LaneSense Strength — If Equipped LowMedium High
NOTE:
When the “LaneSense Strength” feature is selected, it sets the strength of the steering wheel feedback for potential lane departures.
Setting Name Selectable Options
20_LX_OM_EN_USC_t.book Page 290
Page 298 of 328
296MULTIMEDIA
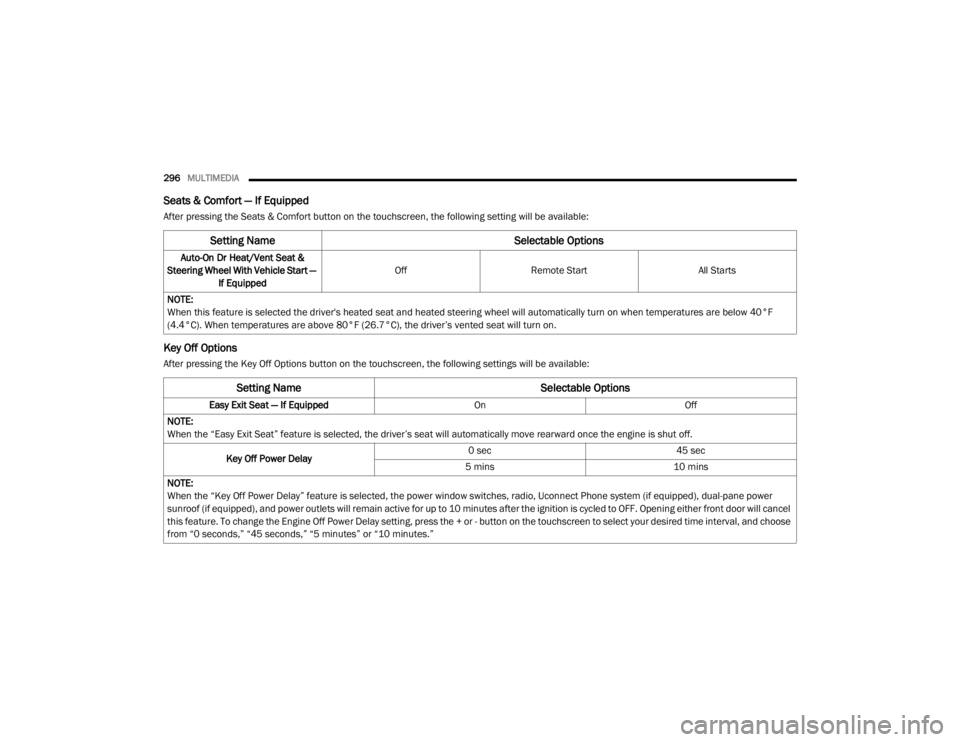
Seats & Comfort — If Equipped
After pressing the Seats & Comfort button on the touchscreen, the following setting will be available:
Key Off Options
After pressing the Key Off Options button on the touchscreen, the following settings will be available:
Setting Name Selectable Options
Auto-On Dr Heat/Vent Seat &
Steering Wheel With Vehicle Start — If Equipped Off
Remote Start All Starts
NOTE:
When this feature is selected the driver's heated seat and heated steering wheel will automatically turn on when temperatures are below 40°F
(4.4°C). When temperatures are above 80°F (26.7°C), the driver’s vented seat will turn on.
Setting Name Selectable Options
Easy Exit Seat — If EquippedOnOff
NOTE:
When the “Easy Exit Seat” feature is selected, the driver’s seat will automatically move rearward once the engine is shut off.
Key Off Power Delay 0 sec
45 sec
5 mins 10 mins
NOTE:
When the “Key Off Power Delay” feature is selected, the power window switches, radio, Uconnect Phone system (if equipped), dual-pane power
sunroof (if equipped), and power outlets will remain active for up to 10 minutes after the ignition is cycled to OFF. Opening either front door will cancel
this feature. To change the Engine Off Power Delay setting, press the + or - button on the touchscreen to select your desired time interval, and choose
from “0 seconds,” “45 seconds,” “5 minutes” or “10 minutes.”
20_LX_OM_EN_USC_t.book Page 296
Page 304 of 328

302MULTIMEDIA
STEERING WHEEL AUDIO CONTROLS
The remote sound system controls are located
on the rear surface of the steering wheel at the
three and nine o’clock positions.
Steering Wheel Audio Controls
(Back View Of Steering Wheel)
The right-hand control is a rocker-type switch
with a push button in the center and controls
the volume and mode of the sound system.
Pushing the top of the rocker switch will
increase the volume, and pushing the bottom of
the rocker switch will decrease the volume.
Pushing the center button will make the radio
switch between the various modes available
(AM/FM/SXM/AUX, etc.). The left-hand control is a rocker-type switch with
a push button in the center. The function of the
left-hand control is different depending on
which mode you are in.
The following describes the left-hand control
operation in each mode.
RADIO OPERATION
Pushing the top of the switch will “Seek” up for
the next listenable station and pushing the
bottom of the switch will “Seek” down for the
next listenable station.
The button located in the center of the left-hand
control will tune to the next preset station that
you have programmed in the radio preset
button.
MEDIA MODE
Pushing the top of the switch once goes to the
next track on the selected media (USB/
Bluetooth®). Pushing the bottom of the switch
once goes to the beginning of the current track,
or to the beginning of the previous track if it is
within eight seconds after the current track
begins to play.
NOTE:
While In Media Mode, the center button on the
left rocker switch is nonfunctional.
AUX/USB CONTROL
This feature allows an external USB device to be
plugged into the USB port.
Plugging in a smartphone device to a USB Port
may activate Android Auto™ or Apple CarPlay®
features, if equipped. For further information,
refer to “Android Auto™” or “Apple CarPlay®” in
the Owner’s Manual Supplement.
AUX/USB Ports
1 — USB 1 Port
2 — AUX Jack
3 — USB 2 Port
20_LX_OM_EN_USC_t.book Page 302