2020 CHEVROLET SILVERADO ESP
[x] Cancel search: ESPPage 289 of 495

Chevrolet Silverado Owner Manual (GMNA-Localizing-U.S./Canada/Mexico-
13337620) - 2020 - CTC - 1/27/20
288 Driving and Operating
the drive mode that is
appropriate for the road
conditions.
Caution
If the vehicle tires begin to spin
and the vehicle begins to slide
toward the water, remove your
foot from the accelerator pedal
and apply the brake pedal. Seek
help to have the vehicle towed up
the ramp.
Maintenance when Trailer
Towing
The vehicle needs service more
often when used to tow trailers. See
Maintenance Schedule0437. It is
especially important to check the
engine oil, axle lubricant, belts,
cooling system, and brake system
before and during each trip.
Check periodically to see that all
nuts and bolts on the trailer hitch
are tight.
Engine Cooling When Trailer
Towing
The cooling system may temporarily
overheat during severe operating
conditions. See Engine Overheating
0 347.
Trailer Towing
If equipped with a diesel engine,
see the Duramax diesel
supplement.
Caution
Towing a trailer improperly can
damage the vehicle and result in
costly repairs not covered by the
vehicle warranty. To tow a trailer
correctly, follow the directions in
this section and see your dealer
for important information about
towing a trailer with the vehicle.
Trailering is different than just
driving the vehicle by itself.
Trailering means changes in
handling, acceleration, braking,
durability, and fuel economy. Successful, safe trailering takes
correct equipment, and it has to be
used properly.
The following information has many
time-tested, important trailering tips
and safety rules. Many of these are
important for your safety and that of
your passengers. Read this section
carefully before pulling a trailer.
Trailer Weight
{Warning
Never exceed the towing capacity
for your vehicle.
Safe trailering requires monitoring
the weight, speed, altitude, road
grades, outside temperature, and
how frequently the vehicle is used to
tow a trailer.
Trailer Weight Ratings
When towing a trailer, the combined
weight of the vehicle, vehicle
contents, trailer, and trailer contents
Page 297 of 495

Chevrolet Silverado Owner Manual (GMNA-Localizing-U.S./Canada/Mexico-
13337620) - 2020 - CTC - 1/27/20
296 Driving and Operating
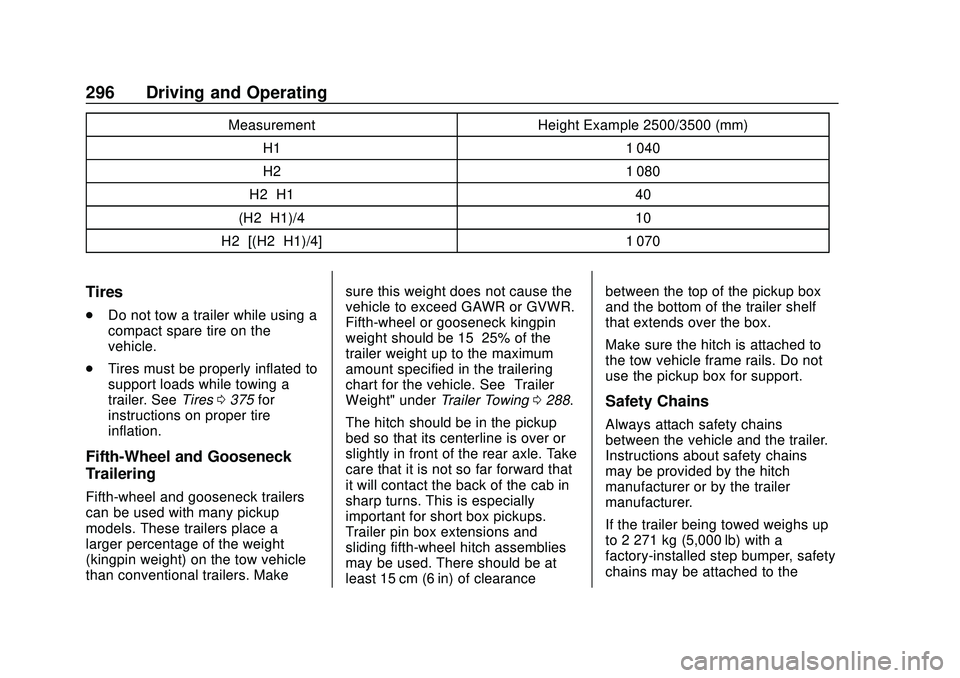
MeasurementHeight Example 2500/3500 (mm)
H1 1 040
H2 1 080
H2−H1 40
(H2−H1)/4 10
H2−[(H2−H1)/4] 1 070
Tires
.
Do not tow a trailer while using a
compact spare tire on the
vehicle.
. Tires must be properly inflated to
support loads while towing a
trailer. See Tires0375 for
instructions on proper tire
inflation.
Fifth-Wheel and Gooseneck
Trailering
Fifth-wheel and gooseneck trailers
can be used with many pickup
models. These trailers place a
larger percentage of the weight
(kingpin weight) on the tow vehicle
than conventional trailers. Make sure this weight does not cause the
vehicle to exceed GAWR or GVWR.
Fifth-wheel or gooseneck kingpin
weight should be 15–25% of the
trailer weight up to the maximum
amount specified in the trailering
chart for the vehicle. See
“Trailer
Weight" under Trailer Towing0288.
The hitch should be in the pickup
bed so that its centerline is over or
slightly in front of the rear axle. Take
care that it is not so far forward that
it will contact the back of the cab in
sharp turns. This is especially
important for short box pickups.
Trailer pin box extensions and
sliding fifth-wheel hitch assemblies
may be used. There should be at
least 15 cm (6 in) of clearance between the top of the pickup box
and the bottom of the trailer shelf
that extends over the box.
Make sure the hitch is attached to
the tow vehicle frame rails. Do not
use the pickup box for support.
Safety Chains
Always attach safety chains
between the vehicle and the trailer.
Instructions about safety chains
may be provided by the hitch
manufacturer or by the trailer
manufacturer.
If the trailer being towed weighs up
to 2 271 kg (5,000 lb) with a
factory-installed step bumper, safety
chains may be attached to the
Page 312 of 495

Chevrolet Silverado Owner Manual (GMNA-Localizing-U.S./Canada/Mexico-
13337620) - 2020 - CTC - 1/27/20
Driving and Operating 311
Connections OK
If all of the trailer connections are
detected (Running Lights, Left Turn
Signal Light, Right Turn Signal
Light, Reverse Lights, and Electric
Brakes, if equipped), the view will
display OK.
Connection Problem
If any of the trailer connections are
not detected, a message about the
connection issue will appear on the
Driver Information Center (DIC). The
infotainment display will also show
the connection issue in the
Connection Status view.
Diagnose View
Touch Diagnose to see more
information about the connection
problem.
This view will display the names of
the trailer connector pins, a graphic
of the trailer connector, and a
graphic of the back of the trailer.Any connector pin that failed will be
amber color, and the location of the
corresponding connection will be
highlighted on the graphic of the
back of the trailer.
The Running Lights connection may
not detect partial outages. Activate
the light test to check all trailer
lamps. See
“Light Test”following.
If the trailer is not equipped with
reverse lights or electric brakes and
you are receiving failure messages
in the DIC or on this view, turn off
the Reverse Lights Alert or the
Electric Brakes Alert setting in the
trailer ’s profile page.
Light Test
Touch Start Light Test to cycle the
trailer lights on and off to determine
if they are working. The test follows
this sequence: 1. The running lights turn on first and remain on throughout the
sequence.
2. The brake lights turn on for about two seconds. 3. The left turn signal light flashes
three times.
4. The right turn signal light flashes three times.
5. The reverse lights turn on for about two seconds.
6. Steps 2–5 repeat for approximately one minute and
45 seconds, or until the test
deactivates.
Touch Stop to stop the test. The test
will automatically end after
one minute and 45 seconds.
The sequence also deactivates
when any of the following occur:
. The ignition is turned off.
. The transmission is shifted out
of P (Park).
. The brake pedal is pressed.
. The turn signal is activated.
. The hazard warning lights are
activated.
Page 336 of 495

Chevrolet Silverado Owner Manual (GMNA-Localizing-U.S./Canada/Mexico-
13337620) - 2020 - CTC - 1/27/20
Vehicle Care 335
1. Remote Negative (–) Location.See Jump Starting - North
America 0415.
2. Positive (+) Terminal (Under Cover). See Jump Starting -
North America 0415.
3. Battery - North America 0354.
4. Engine Air Cleaner/Filter 0340.
5. Engine Oil Dipstick. See “Checking Engine Oil” under
Engine Oil 0335.
6. Engine Cooling Fan (Out of View). See Cooling System
0 342.
7. Power Steering Fluid Reservoir. See Power Steering
Fluid 0350.
8. Engine Oil Fill Cap. See “When
to Add Engine Oil” under
Engine Oil 0335.
9. Auxiliary Battery. Battery -
North America 0354.
10. Brake Fluid Reservoir. See Brake Fluid 0353.
11. Engine Compartment Fuse
Block 0367. 12. Coolant Surge Tank and
Pressure Cap. See Cooling
System 0342.
13. Windshield Washer Fluid Reservoir. See “Adding Washer
Fluid” under Washer Fluid
0 350.
If the vehicle has a diesel engine,
see the Duramax diesel
supplement.
Engine Oil
For diesel engine vehicles, see
“Engine Oil” in the Duramax diesel
supplement.
To ensure proper engine
performance and long life, careful
attention must be paid to engine oil.
Following these simple, but
important steps will help protect
your investment:
. Use engine oil approved to the
proper specification and of the
proper viscosity grade. See
“Selecting the Right Engine Oil”
in this section. .
Check the engine oil level
regularly and maintain the
proper oil level. See “Checking
Engine Oil” and“When to Add
Engine Oil” in this section.
. Change the engine oil at the
appropriate time. See Engine Oil
Life System 0337.
. Always dispose of engine oil
properly. See “What to Do with
Used Oil” in this section.Checking Engine Oil
Check the engine oil level regularly,
every 650 km (400 mi), especially
prior to a long trip. The engine oil
dipstick handle is a loop. See
Engine Compartment Overview
0328 for the location.
{Warning
The engine oil dipstick handle
may be hot; it could burn you.
Use a towel or glove to touch the
dipstick handle.
Page 383 of 495

Chevrolet Silverado Owner Manual (GMNA-Localizing-U.S./Canada/Mexico-
13337620) - 2020 - CTC - 1/27/20
382 Vehicle Care
Intended Outboard Sidewall:
The side of an asymmetrical tire
that must always face outward
when mounted on a vehicle.
Kilopascal (kPa)
:The metric
unit for air pressure.
Light Truck (LT-Metric) Tire
:A
tire used on light duty trucks and
some multipurpose passenger
vehicles.
Load Index
:An assigned
number ranging from 1 to 279
that corresponds to the load
carrying capacity of a tire.
Maximum Inflation Pressure
:
The maximum air pressure to
which a cold tire can be inflated.
The maximum air pressure is
molded onto the sidewall.
Maximum Load Rating
:The
load rating for a tire at the
maximum permissible inflation
pressure for that tire. Maximum Loaded Vehicle
Weight
:The sum of curb
weight, accessory weight,
vehicle capacity weight, and
production options weight.
Normal Occupant Weight
:The
number of occupants a vehicle
is designed to seat multiplied by
68 kg (150 lb). See Vehicle Load
Limits 0197.
Occupant Distribution
:
Designated seating positions.
Outward Facing Sidewall
:The
side of an asymmetrical tire that
has a particular side that faces
outward when mounted on a
vehicle. The side of the tire that
contains a whitewall, bears
white lettering, or bears
manufacturer, brand, and/or
model name molding that is
higher or deeper than the same
moldings on the other sidewall
of the tire. Passenger (P-Metric) Tire
:A
tire used on passenger cars and
some light duty trucks and
multipurpose vehicles.
Recommended Inflation
Pressure
:Vehicle
manufacturer's recommended
tire inflation pressure as shown
on the tire placard. See Tire
Pressure 0383 and
Vehicle Load Limits 0197.
Radial Ply Tire
:A pneumatic
tire in which the ply cords that
extend to the beads are laid at
90 degrees to the centerline of
the tread.
Rim
:A metal support for a tire
and upon which the tire beads
are seated.
Sidewall
:The portion of a tire
between the tread and the bead.
Page 386 of 495

Chevrolet Silverado Owner Manual (GMNA-Localizing-U.S./Canada/Mexico-
13337620) - 2020 - CTC - 1/27/20
Vehicle Care 385
Tire Pressure for
High-Speed Operation
{Warning
Driving at high speeds, 160 km/h
(100 mph) or higher, puts
additional strain on tires.
Sustained high-speed driving
causes excessive heat buildup
and can cause sudden tire failure.
This could cause a crash, and
you or others could be killed.
Some high-speed rated tires
require inflation pressure
adjustment for high-speed
operation. When speed limits and
road conditions allow the vehicle
to be driven at high speeds, make
sure the tires are rated for
high-speed operation, are in
excellent condition, and are set to
the correct cold tire inflation
pressure for the vehicle load.
Tire Pressure Monitor
System
The Tire Pressure Monitor System
(TPMS) uses radio and sensor
technology to check tire pressure
levels. The TPMS sensors monitor
the air pressure in your tires and
transmit tire pressure readings to a
receiver located in the vehicle.
Each tire, including the spare (if
provided), should be checked
monthly when cold and inflated to
the inflation pressure recommended
by the vehicle manufacturer on the
vehicle placard or tire inflation
pressure label. (If your vehicle has
tires of a different size than the size
indicated on the vehicle placard or
tire inflation pressure label, you
should determine the proper tire
inflation pressure for those tires.)
As an added safety feature, your
vehicle has been equipped with a
tire pressure monitoring system
(TPMS) that illuminates a low tire
pressure telltale when one or more
of your tires is significantly
under-inflated.Accordingly, when the low tire
pressure telltale illuminates, you
should stop and check your tires as
soon as possible, and inflate them
to the proper pressure. Driving on a
significantly under-inflated tire
causes the tire to overheat and can
lead to tire failure. Under-inflation
also reduces fuel efficiency and tire
tread life, and may affect the
vehicle's handling and stopping
ability.
Please note that the TPMS is not a
substitute for proper tire
maintenance, and it is the driver's
responsibility to maintain correct tire
pressure, even if under-inflation has
not reached the level to trigger
illumination of the TPMS low tire
pressure telltale.
Your vehicle has also been
equipped with a TPMS malfunction
indicator to indicate when the
system is not operating properly.
The TPMS malfunction indicator is
combined with the low tire pressure
telltale. When the system detects a
malfunction, the telltale will flash for
approximately one minute and then
Page 399 of 495

Chevrolet Silverado Owner Manual (GMNA-Localizing-U.S./Canada/Mexico-
13337620) - 2020 - CTC - 1/27/20
398 Vehicle Care
compact spare tires, tires with
nominal rim diameters of
10 to 12 inches (25 to 30 cm),
or to some limited-production
tires.
While the tires available on
General Motors passenger cars
and light trucks may vary with
respect to these grades, they
must also conform to federal
safety requirements and
additional General Motors Tire
Performance Criteria (TPC)
standards.
Quality grades can be found
where applicable on the tire
sidewall between tread shoulder
and maximum section width. For
example:
Treadwear 200 Traction AA
Temperature A
All Passenger Car Tires Must
Conform to Federal Safety
Requirements In Addition To
These Grades.Treadwear
The treadwear grade is a
comparative rating based on the
wear rate of the tire when tested
under controlled conditions on a
specified government test
course. For example, a tire
graded 150 would wear one and
one-half (1½) times as well on
the government course as a tire
graded 100. The relative
performance of tires depends
upon the actual conditions of
their use, however, and may
depart significantly from the
norm due to variations in driving
habits, service practices and
differences in road
characteristics and climate.
Traction
The traction grades, from
highest to lowest, are AA, A, B,
and C. Those grades represent
the tire's ability to stop on wet
pavement as measured under
controlled conditions onspecified government test
surfaces of asphalt and
concrete. A tire marked C may
have poor traction performance.
Warning: The traction grade
assigned to this tire is based on
straight-ahead braking traction
tests, and does not include
acceleration, cornering,
hydroplaning, or peak traction
characteristics.
Temperature
The temperature grades are A
(the highest), B, and C,
representing the tire's resistance
to the generation of heat and its
ability to dissipate heat when
tested under controlled
conditions on a specified indoor
laboratory test wheel. Sustained
high temperature can cause the
material of the tire to degenerate
and reduce tire life, and
excessive temperature can lead
to sudden tire failure. The grade
C corresponds to a level of
Page 402 of 495

Chevrolet Silverado Owner Manual (GMNA-Localizing-U.S./Canada/Mexico-
13337620) - 2020 - CTC - 1/27/20
Vehicle Care 401
Caution (Continued)
vehicle has 255/70R17,
LT245/75R17, or LT275/70R18
size tires, they may be installed
on the tires of the front and rear
axle. If the vehicle is a 2500
Series with LT265/70R17 size
tires, chains may be installed on
the tires of both the front and rear
axle. Tighten them as tightly as
possible with the ends securely
fastened. Drive slowly and follow
the chain manufacturer's
instructions. If you can hear the
chains contacting the vehicle,
stop and retighten them. If the
contact continues, slow down
until it stops. Driving too fast or
spinning the wheels with chains
on will damage the vehicle.
If a Tire Goes Flat
It is unusual for a tire to blowout
while driving, especially if the tires
are maintained properly. If air goes
out of a tire, it is much more likely toleak out slowly. But if there ever is a
blowout, here are a few tips about
what to expect and what to do:
If a front tire fails, the flat tire
creates a drag that pulls the vehicle
toward that side. Take your foot off
the accelerator pedal and grip the
steering wheel firmly. Steer to
maintain lane position, and then
gently brake to a stop, well off the
road, if possible.
A rear blowout, particularly on a
curve, acts much like a skid and
may require the same correction as
used in a skid. Stop pressing the
accelerator pedal and steer to
straighten the vehicle. It may be
very bumpy and noisy. Gently brake
to a stop, well off the road,
if possible.
{Warning
Driving on a flat tire will cause
permanent damage to the tire.
Re-inflating a tire after it has been
driven on while severely
(Continued)
Warning (Continued)
underinflated or flat may cause a
blowout and a serious crash.
Never attempt to re-inflate a tire
that has been driven on while
severely underinflated or flat.
Have your dealer or an authorized
tire service center repair or
replace the flat tire as soon as
possible.
{Warning
Lifting a vehicle and getting under
it to do maintenance or repairs is
dangerous without the
appropriate safety equipment and
training. If a jack is provided with
the vehicle, it is designed only for
changing a flat tire. If it is used for
anything else, you or others could
be badly injured or killed if the
vehicle slips off the jack. If a jack
is provided with the vehicle, only
use it for changing a flat tire.