2020 CHEVROLET SILVERADO 2500 battery
[x] Cancel search: batteryPage 215 of 500
Chevrolet Silverado Owner Manual (GMNA-Localizing-U.S./Canada/Mexico-
13337620) - 2020 - CRC - 4/11/19
214 Driving and Operating
{Warning
The automatic engine Stop/Start
feature causes the engine to shut
off while the vehicle is still on. Do
not exit the vehicle before shifting
to P (Park). The vehicle may
restart and move unexpectedly.
Always shift to P (Park), and then
turn the ignition off before exiting
the vehicle.
Auto Engine Stop/Start
When the brakes are applied and
the vehicle is at a complete stop,
the engine may turn off. When
stopped, the tachometer displays
AUTO STOP. See Tachometer
0 132. When the brake pedal is
released or the accelerator pedal is
pressed, the engine will restart.
To maintain vehicle performance,
other conditions may cause the
engine to automatically restart
before the brake pedal is released.
Auto Stops may not occur and/or
Auto Starts may occur because: .
The climate control settings
require the engine to be running
to cool or heat the vehicle
interior.
. The vehicle battery charge
is low.
. The vehicle battery has recently
been disconnected.
. Minimum vehicle speed has not
been reached since the last
Auto Stop.
. The accelerator pedal is
pressed.
. The engine or transmission is
not at the required operating
temperature.
. The outside temperature is not
in the required operating range.
. The vehicle is in any gear other
than D (Drive).
. Tow/Haul Mode or other driver
modes have been selected.
. The vehicle is on a steep hill or
grade. .
The driver door has been
opened or the driver seat belt
has been unbuckled.
. The hood has been opened.
. The Auto Stop has reached the
maximum allowed time.
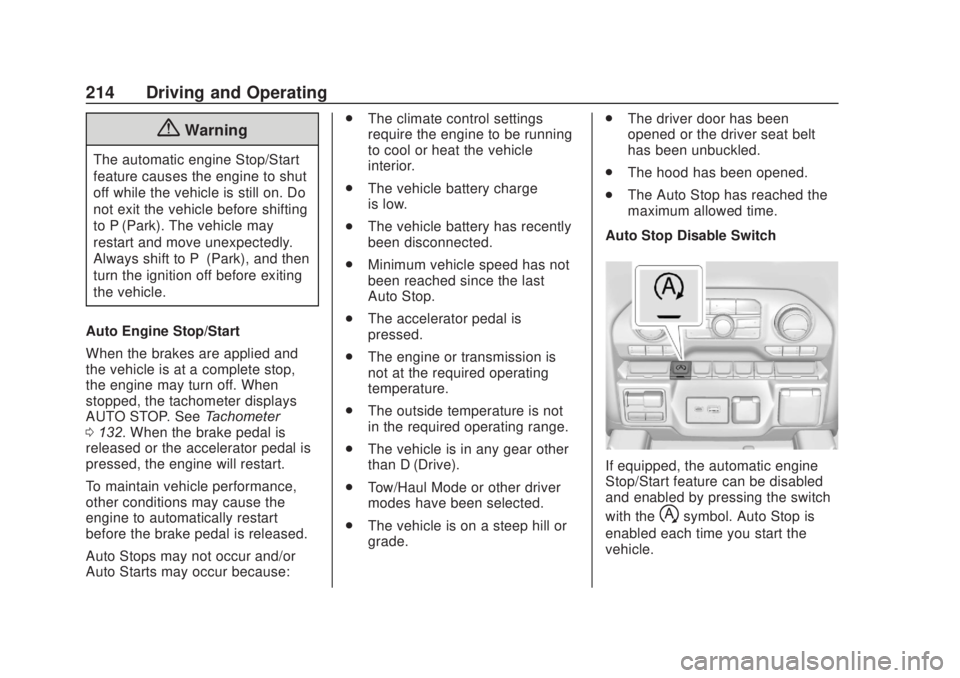
Auto Stop Disable Switch
If equipped, the automatic engine
Stop/Start feature can be disabled
and enabled by pressing the switch
with the
hsymbol. Auto Stop is
enabled each time you start the
vehicle.
Page 219 of 500
Chevrolet Silverado Owner Manual (GMNA-Localizing-U.S./Canada/Mexico-
13337620) - 2020 - CRC - 4/11/19
218 Driving and Operating
If you have to leave the vehicle with
the engine running, be sure the
vehicle is in P (Park) and the
parking brake is firmly set before
you leave it. After moving the shift
lever into P (Park), hold the regular
brake pedal down. Then, see if you
can move the shift lever away from
P (Park) without first pulling it toward
you. If you can, it means that the
shift lever was not fully locked into
P (Park).
Torque Lock
If you are parking on a hill and you
do not shift the transmission into
P (Park) properly, the weight of the
vehicle may put too much force on
the parking pawl in the
transmission. You may find it difficult
to pull the shift lever out of P (Park).
This is called torque lock. To
prevent torque lock, set the parking
brake and then shift into P (Park)
properly before you leave the
driver seat.
When you are ready to drive, move
the shift lever out of P (Park) before
you release the parking brake.If torque lock does occur, you may
need to have another vehicle push
yours a little uphill to take some of
the pressure from the parking pawl
in the transmission. You will then be
able to pull the shift lever out of
P (Park).
Shifting out of Park
This vehicle is equipped with an
electronic shift lock release system.
The system is designed to prevent
movement of the shift lever out of
P (Park), unless the brake pedal is
applied and the ignition is on or in
Service Mode.
The shift lock release is always
functional except in the case of an
uncharged or low voltage
–less
than 9 volt –battery.
If the vehicle has an uncharged or
low voltage battery, try charging or
jump starting the battery. See Jump
Starting - North America 0419.
To shift out of P (Park): 1. Apply the brake pedal. 2. Release the parking brake if it
is applied. See Electric Parking
Brake 0233.
3. Pull the shift lever toward you, then move it to the desired
position, and release.
If the vehicle still cannot be shifted
out of P (Park): 1. Ease the pressure on, or release the shift lever.
2. While holding the brake pedal, push the shift lever all the way
into P (Park).
3. Pull the shift lever toward you, then move it to the desired
position, and release.
If there is still a problem shifting,
have the vehicle serviced soon.
Page 234 of 500
Chevrolet Silverado Owner Manual (GMNA-Localizing-U.S./Canada/Mexico-
13337620) - 2020 - CRC - 4/11/19
Driving and Operating 233
may be heard while this test is going
on, and the brake pedal may move
slightly. This is normal.
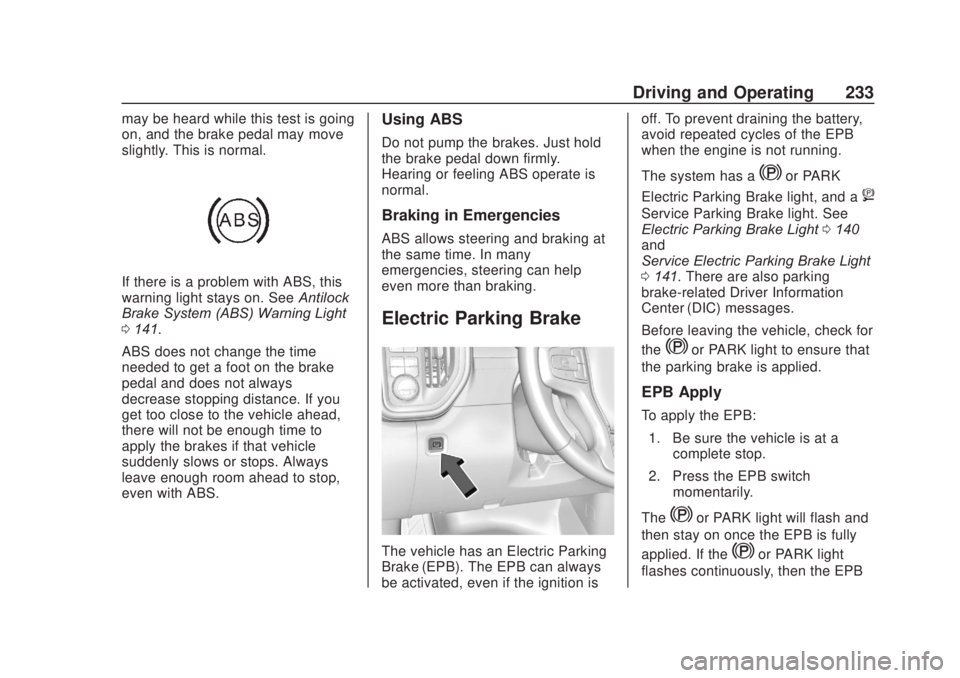
If there is a problem with ABS, this
warning light stays on. SeeAntilock
Brake System (ABS) Warning Light
0 141.
ABS does not change the time
needed to get a foot on the brake
pedal and does not always
decrease stopping distance. If you
get too close to the vehicle ahead,
there will not be enough time to
apply the brakes if that vehicle
suddenly slows or stops. Always
leave enough room ahead to stop,
even with ABS.
Using ABS
Do not pump the brakes. Just hold
the brake pedal down firmly.
Hearing or feeling ABS operate is
normal.
Braking in Emergencies
ABS allows steering and braking at
the same time. In many
emergencies, steering can help
even more than braking.
Electric Parking Brake
The vehicle has an Electric Parking
Brake (EPB). The EPB can always
be activated, even if the ignition is off. To prevent draining the battery,
avoid repeated cycles of the EPB
when the engine is not running.
The system has a
Yor PARK
Electric Parking Brake light, and a
8
Service Parking Brake light. See
Electric Parking Brake Light 0140
and
Service Electric Parking Brake Light
0 141. There are also parking
brake-related Driver Information
Center (DIC) messages.
Before leaving the vehicle, check for
the
Yor PARK light to ensure that
the parking brake is applied.
EPB Apply
To apply the EPB:
1. Be sure the vehicle is at a complete stop.
2. Press the EPB switch momentarily.
The
Yor PARK light will flash and
then stay on once the EPB is fully
applied. If the
Yor PARK light
flashes continuously, then the EPB
Page 302 of 500
Chevrolet Silverado Owner Manual (GMNA-Localizing-U.S./Canada/Mexico-
13337620) - 2020 - CRC - 4/11/19
Driving and Operating 301
attaching points on the bumper;
otherwise, safety chains should be
attached to holes on the trailer hitch.
Cross the safety chains under the
tongue of the trailer to help prevent
the tongue from contacting the road
if it becomes separated from the
hitch. Always leave enough slack in
the safety chains to allow the
combination to turn. Never allow
safety chains to drag on the ground.
Trailer Brakes
Loaded trailers over 900 kg
(2,000 lb) must be equipped with
brake systems and with brakes for
each axle. Trailer braking equipment
conforming to Canadian Standards
Association (CSA) requirement
CAN3-D313, or its equivalent, is
recommended.
State or local regulations may
require trailers to have their own
braking system if the loaded weight
of the trailer exceeds certain
minimums that can vary from state
to state. Read and follow the
instructions for the trailer brakes so
they are installed, adjusted, andmaintained properly. Never attempt
to tap into your vehicle's hydraulic
brake system. If you do, both the
vehicle antilock brakes and the
trailer brakes may not function,
which could result in a crash.
Auxiliary Battery
If equipped, the vehicle's auxiliary
battery can be used to supply
electrical power to additional
equipment that may be added, such
as a slide-in camper.
Locate the auxiliary battery
connector under the hood on the
driver side of the vehicle, next to the
engine compartment fuse block.
Follow the proper installation
instructions included with any
electrical equipment that is installed.
Caution
To prevent draining the auxiliary
battery, always turn off electrical
equipment when not in use and
do not use any equipment that
(Continued)
Caution (Continued)
may exceed the
maximum amperage rating of
30 amps.
Trailer Wiring Harness
Basic Trailer Wiring
If the vehicle is not equipped with a
trailer connector on the rear bumper,
a 7-wire trailering harness is tied to
the vehicles frame. The harness
requires the installation of a trailer
connector, which is available
through your dealer.
Use only a round, seven-wire
connector with flat blade terminals
meeting SAE J2863 specifications
for proper electrical connectivity.
The seven-wire harness contains
the following trailer circuits:
Stop/Turn
Signal Left Yellow/Blue
Stop/Turn
Signal Right Green/Violet
Page 303 of 500
Chevrolet Silverado Owner Manual (GMNA-Localizing-U.S./Canada/Mexico-
13337620) - 2020 - CRC - 4/11/19
302 Driving and Operating
Tail/Parking
LampsGray/Brown
Reverse Lamps White/Green
Battery Feed Red/Green
Ground White
Electric Trailer
Brake Blue
Heavy-Duty Trailer Wiring Harness
Package
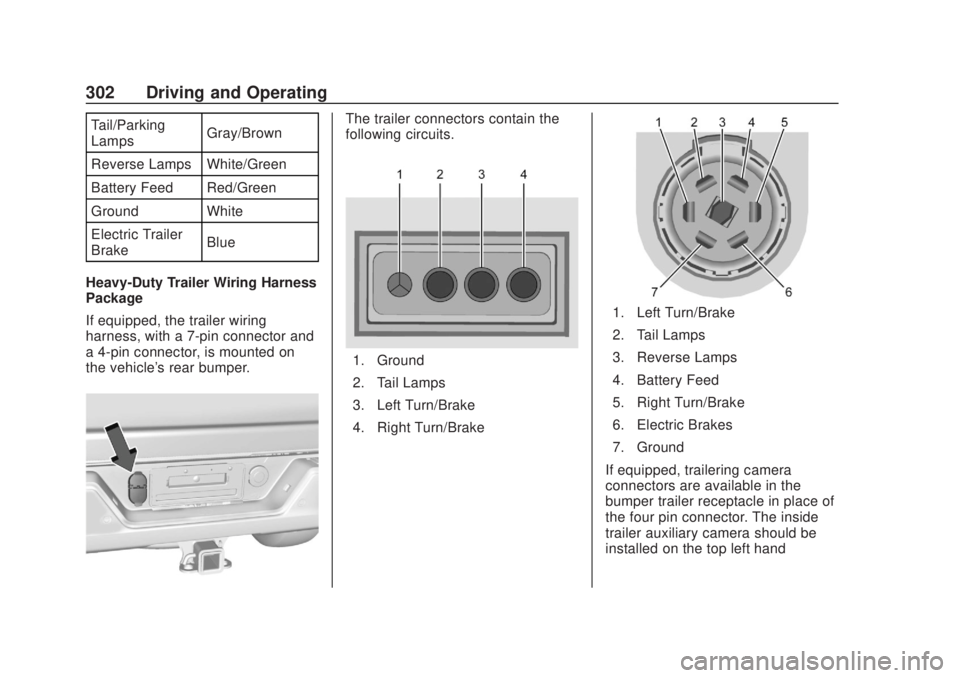
If equipped, the trailer wiring
harness, with a 7-pin connector and
a 4-pin connector, is mounted on
the vehicle's rear bumper.The trailer connectors contain the
following circuits.
1. Ground
2. Tail Lamps
3. Left Turn/Brake
4. Right Turn/Brake
1. Left Turn/Brake
2. Tail Lamps
3. Reverse Lamps
4. Battery Feed
5. Right Turn/Brake
6. Electric Brakes
7. Ground
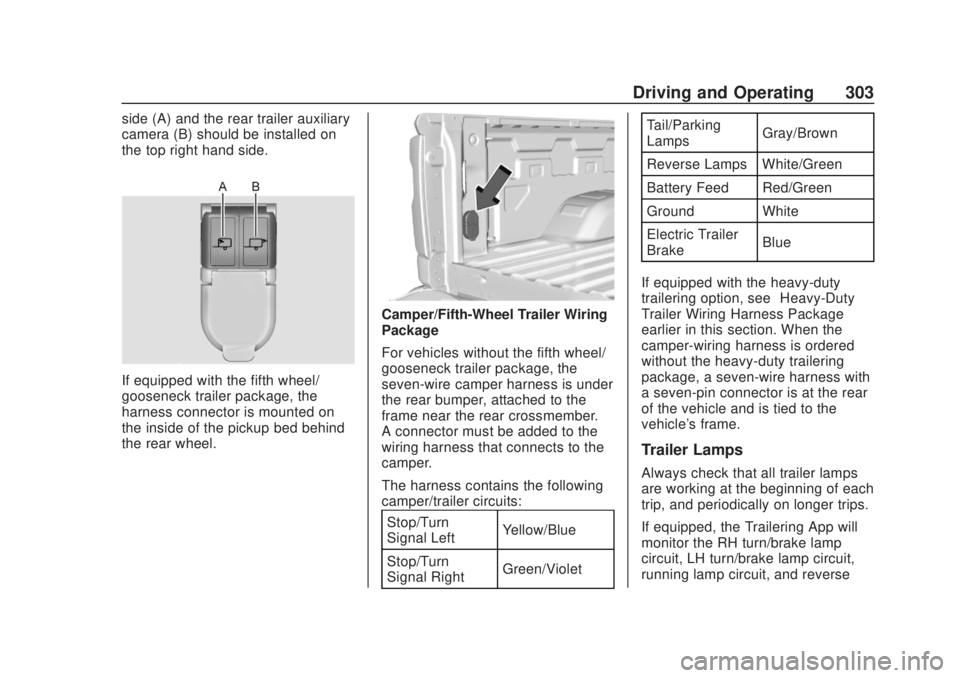
If equipped, trailering camera
connectors are available in the
bumper trailer receptacle in place of
the four pin connector. The inside
trailer auxiliary camera should be
installed on the top left hand
Page 304 of 500
Chevrolet Silverado Owner Manual (GMNA-Localizing-U.S./Canada/Mexico-
13337620) - 2020 - CRC - 4/11/19
Driving and Operating 303
side (A) and the rear trailer auxiliary
camera (B) should be installed on
the top right hand side.
If equipped with the fifth wheel/
gooseneck trailer package, the
harness connector is mounted on
the inside of the pickup bed behind
the rear wheel.
Camper/Fifth-Wheel Trailer Wiring
Package
For vehicles without the fifth wheel/
gooseneck trailer package, the
seven-wire camper harness is under
the rear bumper, attached to the
frame near the rear crossmember.
A connector must be added to the
wiring harness that connects to the
camper.
The harness contains the following
camper/trailer circuits:Stop/Turn
Signal Left Yellow/Blue
Stop/Turn
Signal Right Green/Violet Tail/Parking
Lamps
Gray/Brown
Reverse Lamps White/Green
Battery Feed Red/Green
Ground White
Electric Trailer
Brake Blue
If equipped with the heavy-duty
trailering option, see “Heavy-Duty
Trailer Wiring Harness Package”
earlier in this section. When the
camper-wiring harness is ordered
without the heavy-duty trailering
package, a seven-wire harness with
a seven-pin connector is at the rear
of the vehicle and is tied to the
vehicle's frame.
Trailer Lamps
Always check that all trailer lamps
are working at the beginning of each
trip, and periodically on longer trips.
If equipped, the Trailering App will
monitor the RH turn/brake lamp
circuit, LH turn/brake lamp circuit,
running lamp circuit, and reverse
Page 323 of 500
Chevrolet Silverado Owner Manual (GMNA-Localizing-U.S./Canada/Mexico-
13337620) - 2020 - CRC - 4/11/19
322 Driving and Operating
reminder will appear to turn on Tow/
Haul Mode when the Trailer Profile
is active.
If Tow/Haul Mode is on and this
setting is on for a Trailer Profile, the
reminder will not appear when the
Trailer Profile is active.Conversions and
Add-Ons
Add-On Electrical
Equipment
{Warning
The Data Link Connector (DLC) is
used for vehicle service
and Emission Inspection/
Maintenance testing. See
Malfunction Indicator Lamp
(Check Engine Light)0138.
A device connected to the DLC —
such as an aftermarket fleet or
driver-behavior tracking device —
may interfere with vehicle
systems. This could affect vehicle
operation and cause a crash.
Such devices may also access
information stored in the vehicle’s
systems.
Caution
Some electrical equipment can
damage the vehicle or cause
components to not work and
would not be covered by the
vehicle warranty. Always check
with your dealer before adding
electrical equipment.
Add-on equipment can drain the
vehicle's 12-volt battery, even if the
vehicle is not operating.
The vehicle has an airbag system.
Before attempting to add anything
electrical to the vehicle, see
Servicing the Airbag-Equipped
Vehicle 083 and
Adding Equipment to the
Airbag-Equipped Vehicle 083.
For information on wiring auxiliary
switches, see www.gmupfitter.com
or contact your dealer.
Page 328 of 500
Chevrolet Silverado Owner Manual (GMNA-Localizing-U.S./Canada/Mexico-
13337620) - 2020 - CRC - 4/10/19
Vehicle Care 327
Vehicle Care
General Information
General Information . . . . . . . . . . 328
California Proposition65 Warning . . . . . . . . . . . . . . . . . 329
California Perchlorate Materials Requirements . . . . . 329
Accessories and Modifications . . . . . . . . . . . . . . . . 329
Vehicle Checks
Doing Your OwnService Work . . . . . . . . . . . . . . . 330
Hood . . . . . . . . . . . . . . . . . . . . . . . . . 330
Engine Compartment Overview . . . . . . . . . . . . . . . . . . . . 332
Engine Oil . . . . . . . . . . . . . . . . . . . . 339
Engine Oil Life System . . . . . . . 341
Automatic Transmission Fluid . . . . . . . . . . . . . . . . . . . . . . . . 343
Engine Air Filter Life System . . . . . . . . . . . . . . . . . . . . . . 343
Engine Air Cleaner/Filter . . . . . . 344
Cooling System . . . . . . . . . . . . . . 346
Engine Overheating . . . . . . . . . . 351
Overheated Engine Protection Operating Mode . . . . . . . . . . . . . 352
Engine Fan . . . . . . . . . . . . . . . . . . . 353 Power Steering Fluid . . . . . . . . . 353
Washer Fluid . . . . . . . . . . . . . . . . . 354
Brakes . . . . . . . . . . . . . . . . . . . . . . . 355
Brake Pad Life System . . . . . . . 356
Brake Fluid . . . . . . . . . . . . . . . . . . . 357
Battery - North America . . . . . . 358
Four-Wheel Drive . . . . . . . . . . . . . 360
Front Axle . . . . . . . . . . . . . . . . . . . . 361
Rear Axle . . . . . . . . . . . . . . . . . . . . 361
Noise Control System . . . . . . . . 361
Starter Switch Check . . . . . . . . . 362
Automatic Transmission Shift
Lock Control Function
Check . . . . . . . . . . . . . . . . . . . . . . . 363
Ignition Transmission Lock Check . . . . . . . . . . . . . . . . . . . . . . . 363
Park Brake and P (Park) Mechanism Check . . . . . . . . . . 363
Wiper Blade Replacement . . . . 364
Glass Replacement . . . . . . . . . . 365
Windshield Replacement . . . . . 365
Gas Strut(s) . . . . . . . . . . . . . . . . . . 365
Headlamp Aiming
Headlamp Aiming . . . . . . . . . . . . 366
Bulb Replacement
Bulb Replacement . . . . . . . . . . . . 366
Halogen Bulbs . . . . . . . . . . . . . . . . 366
LED Lighting . . . . . . . . . . . . . . . . . 367 Headlamps, Front Turn Signal,
Sidemarker, and Parking
Lamps . . . . . . . . . . . . . . . . . . . . . . 367
Taillamps, Turn Signal, Stoplamps, and Back-Up
Lamps . . . . . . . . . . . . . . . . . . . . . . 368
Center High-Mounted Stoplamp (CHMSL) and
Cargo Lamp . . . . . . . . . . . . . . . . . 369
License Plate Lamp . . . . . . . . . . 369
Electrical System
Electrical System Overload . . . 370
Fuses and Circuit Breakers . . . 370
Engine Compartment Fuse Block . . . . . . . . . . . . . . . . . . . . . . . . 371
Instrument Panel Fuse
Block (Left) . . . . . . . . . . . . . . . . . 374
Instrument Panel Fuse Block (Right) . . . . . . . . . . . . . . . . . . . . . . 376
Wheels and Tires
Tires . . . . . . . . . . . . . . . . . . . . . . . . . . 379
All-Season Tires . . . . . . . . . . . . . . 379
Winter Tires . . . . . . . . . . . . . . . . . . 380
Low-Profile Tires . . . . . . . . . . . . . 380
All-Terrain Tires . . . . . . . . . . . . . . . 381
Tire Sidewall Labeling . . . . . . . . 381
Tire Designations . . . . . . . . . . . . . 383
Tire Terminology andDefinitions . . . . . . . . . . . . . . . . . . 385