2020 CHEVROLET SILVERADO 2500 auxiliary battery
[x] Cancel search: auxiliary batteryPage 166 of 500

Chevrolet Silverado Owner Manual (GMNA-Localizing-U.S./Canada/Mexico-
13337620) - 2020 - CRC - 4/2/19
Lighting 165
Lighting
Exterior Lighting
Exterior Lamp Controls . . . . . . . 165
Exterior Lamps OffReminder . . . . . . . . . . . . . . . . . . . 167
Headlamp High/Low-Beam Changer . . . . . . . . . . . . . . . . . . . . 167
Flash-to-Pass . . . . . . . . . . . . . . . . 168
Daytime Running Lamps (DRL) . . . . . . . . . . . . . . . 168
Automatic Headlamp System . . . . . . . . . . . . . . . . . . . . . . 168
Hazard Warning Flashers . . . . . 169
Turn and Lane-Change Signals . . . . . . . . . . . . . . . . . . . . . . 170
Fog Lamps . . . . . . . . . . . . . . . . . . . 170
Task Lighting . . . . . . . . . . . . . . . . . 171
Auxiliary Roof-Mounted Lamp . . . . . . . . 171
Exterior Cargo Lamps . . . . . . . . 172
Interior Lighting
Instrument Panel Illumination Control . . . . . . . . . . . . . . . . . . . . . . 173
Dome Lamps . . . . . . . . . . . . . . . . . 173
Reading Lamps . . . . . . . . . . . . . . 173
Lighting Features
Entry Lighting . . . . . . . . . . . . . . . . 174
Exit Lighting . . . . . . . . . . . . . . . . . . 174
Battery Load Management . . . 174
Battery Power Protection . . . . . 175
Exterior Lighting Battery Saver . . . . . . . . . . . . . . . . . . . . . . . 175Exterior Lighting
Exterior Lamp Controls
The exterior lamp control is on the
instrument panel to the left of the
steering wheel.
O: Turns off the automatic
headlamps and Daytime Running
Lamps (DRL). Turn the headlamp
control to
Oagain to turn the
automatic headlamps or DRL
back on.
Page 302 of 500
Chevrolet Silverado Owner Manual (GMNA-Localizing-U.S./Canada/Mexico-
13337620) - 2020 - CRC - 4/11/19
Driving and Operating 301
attaching points on the bumper;
otherwise, safety chains should be
attached to holes on the trailer hitch.
Cross the safety chains under the
tongue of the trailer to help prevent
the tongue from contacting the road
if it becomes separated from the
hitch. Always leave enough slack in
the safety chains to allow the
combination to turn. Never allow
safety chains to drag on the ground.
Trailer Brakes
Loaded trailers over 900 kg
(2,000 lb) must be equipped with
brake systems and with brakes for
each axle. Trailer braking equipment
conforming to Canadian Standards
Association (CSA) requirement
CAN3-D313, or its equivalent, is
recommended.
State or local regulations may
require trailers to have their own
braking system if the loaded weight
of the trailer exceeds certain
minimums that can vary from state
to state. Read and follow the
instructions for the trailer brakes so
they are installed, adjusted, andmaintained properly. Never attempt
to tap into your vehicle's hydraulic
brake system. If you do, both the
vehicle antilock brakes and the
trailer brakes may not function,
which could result in a crash.
Auxiliary Battery
If equipped, the vehicle's auxiliary
battery can be used to supply
electrical power to additional
equipment that may be added, such
as a slide-in camper.
Locate the auxiliary battery
connector under the hood on the
driver side of the vehicle, next to the
engine compartment fuse block.
Follow the proper installation
instructions included with any
electrical equipment that is installed.
Caution
To prevent draining the auxiliary
battery, always turn off electrical
equipment when not in use and
do not use any equipment that
(Continued)
Caution (Continued)
may exceed the
maximum amperage rating of
30 amps.
Trailer Wiring Harness
Basic Trailer Wiring
If the vehicle is not equipped with a
trailer connector on the rear bumper,
a 7-wire trailering harness is tied to
the vehicles frame. The harness
requires the installation of a trailer
connector, which is available
through your dealer.
Use only a round, seven-wire
connector with flat blade terminals
meeting SAE J2863 specifications
for proper electrical connectivity.
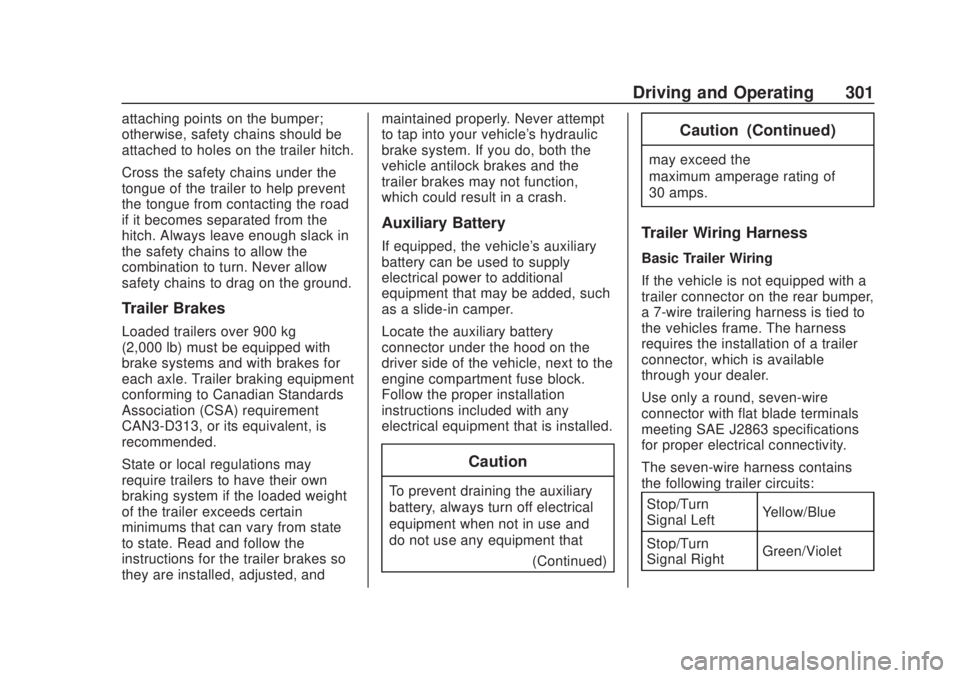
The seven-wire harness contains
the following trailer circuits:
Stop/Turn
Signal Left Yellow/Blue
Stop/Turn
Signal Right Green/Violet
Page 303 of 500
Chevrolet Silverado Owner Manual (GMNA-Localizing-U.S./Canada/Mexico-
13337620) - 2020 - CRC - 4/11/19
302 Driving and Operating
Tail/Parking
LampsGray/Brown
Reverse Lamps White/Green
Battery Feed Red/Green
Ground White
Electric Trailer
Brake Blue
Heavy-Duty Trailer Wiring Harness
Package
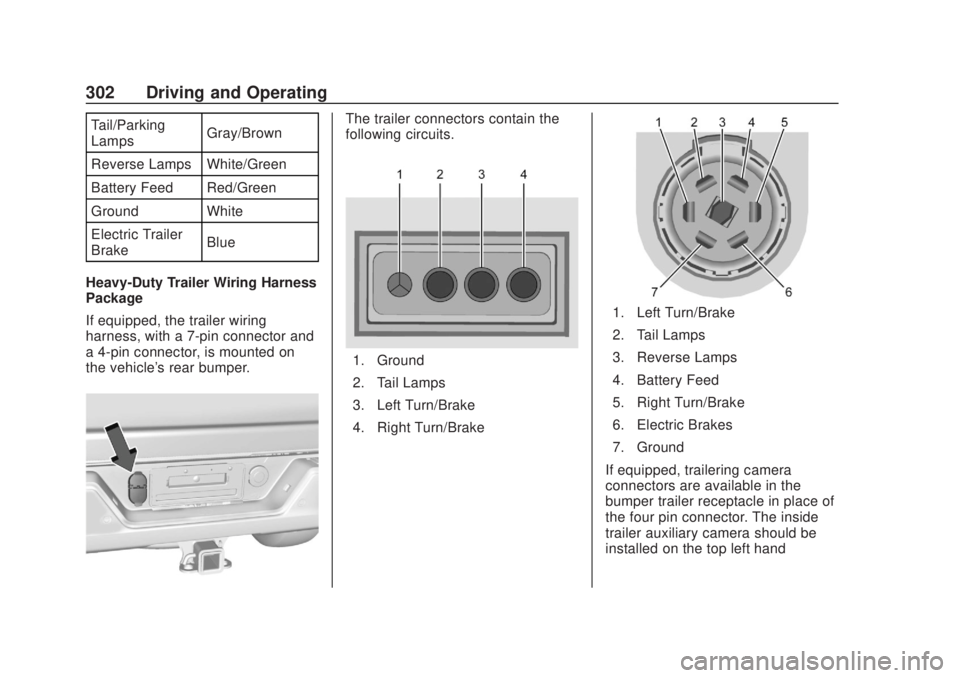
If equipped, the trailer wiring
harness, with a 7-pin connector and
a 4-pin connector, is mounted on
the vehicle's rear bumper.The trailer connectors contain the
following circuits.
1. Ground
2. Tail Lamps
3. Left Turn/Brake
4. Right Turn/Brake
1. Left Turn/Brake
2. Tail Lamps
3. Reverse Lamps
4. Battery Feed
5. Right Turn/Brake
6. Electric Brakes
7. Ground
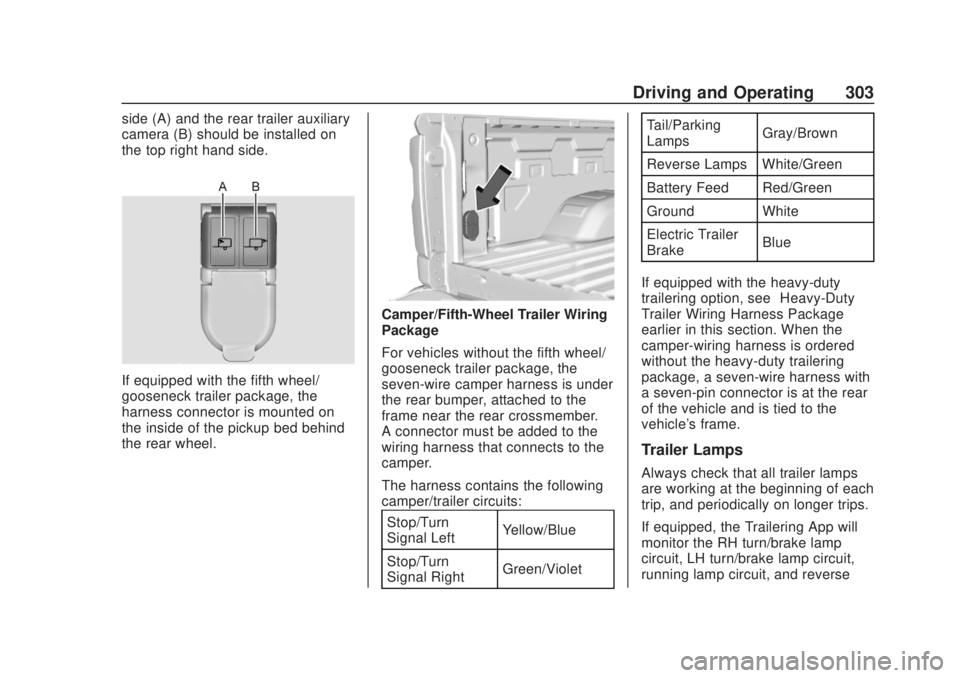
If equipped, trailering camera
connectors are available in the
bumper trailer receptacle in place of
the four pin connector. The inside
trailer auxiliary camera should be
installed on the top left hand
Page 304 of 500
Chevrolet Silverado Owner Manual (GMNA-Localizing-U.S./Canada/Mexico-
13337620) - 2020 - CRC - 4/11/19
Driving and Operating 303
side (A) and the rear trailer auxiliary
camera (B) should be installed on
the top right hand side.
If equipped with the fifth wheel/
gooseneck trailer package, the
harness connector is mounted on
the inside of the pickup bed behind
the rear wheel.
Camper/Fifth-Wheel Trailer Wiring
Package
For vehicles without the fifth wheel/
gooseneck trailer package, the
seven-wire camper harness is under
the rear bumper, attached to the
frame near the rear crossmember.
A connector must be added to the
wiring harness that connects to the
camper.
The harness contains the following
camper/trailer circuits:Stop/Turn
Signal Left Yellow/Blue
Stop/Turn
Signal Right Green/Violet Tail/Parking
Lamps
Gray/Brown
Reverse Lamps White/Green
Battery Feed Red/Green
Ground White
Electric Trailer
Brake Blue
If equipped with the heavy-duty
trailering option, see “Heavy-Duty
Trailer Wiring Harness Package”
earlier in this section. When the
camper-wiring harness is ordered
without the heavy-duty trailering
package, a seven-wire harness with
a seven-pin connector is at the rear
of the vehicle and is tied to the
vehicle's frame.
Trailer Lamps
Always check that all trailer lamps
are working at the beginning of each
trip, and periodically on longer trips.
If equipped, the Trailering App will
monitor the RH turn/brake lamp
circuit, LH turn/brake lamp circuit,
running lamp circuit, and reverse
Page 323 of 500
Chevrolet Silverado Owner Manual (GMNA-Localizing-U.S./Canada/Mexico-
13337620) - 2020 - CRC - 4/11/19
322 Driving and Operating
reminder will appear to turn on Tow/
Haul Mode when the Trailer Profile
is active.
If Tow/Haul Mode is on and this
setting is on for a Trailer Profile, the
reminder will not appear when the
Trailer Profile is active.Conversions and
Add-Ons
Add-On Electrical
Equipment
{Warning
The Data Link Connector (DLC) is
used for vehicle service
and Emission Inspection/
Maintenance testing. See
Malfunction Indicator Lamp
(Check Engine Light)0138.
A device connected to the DLC —
such as an aftermarket fleet or
driver-behavior tracking device —
may interfere with vehicle
systems. This could affect vehicle
operation and cause a crash.
Such devices may also access
information stored in the vehicle’s
systems.
Caution
Some electrical equipment can
damage the vehicle or cause
components to not work and
would not be covered by the
vehicle warranty. Always check
with your dealer before adding
electrical equipment.
Add-on equipment can drain the
vehicle's 12-volt battery, even if the
vehicle is not operating.
The vehicle has an airbag system.
Before attempting to add anything
electrical to the vehicle, see
Servicing the Airbag-Equipped
Vehicle 083 and
Adding Equipment to the
Airbag-Equipped Vehicle 083.
For information on wiring auxiliary
switches, see www.gmupfitter.com
or contact your dealer.
Page 340 of 500
Chevrolet Silverado Owner Manual (GMNA-Localizing-U.S./Canada/Mexico-
13337620) - 2020 - CRC - 4/10/19
Vehicle Care 339
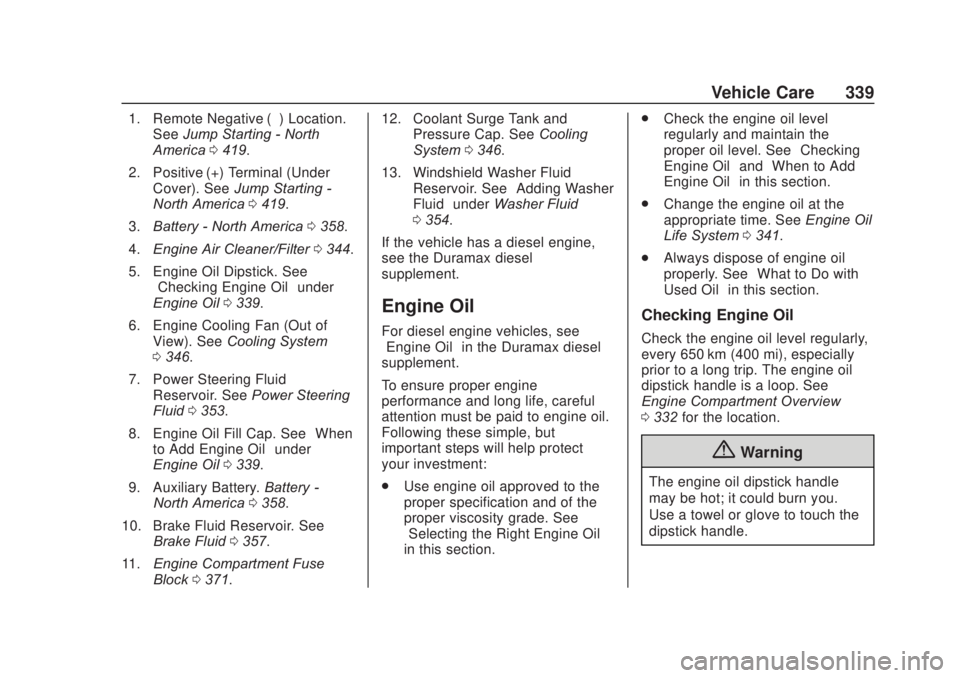
1. Remote Negative (–) Location.See Jump Starting - North
America 0419.
2. Positive (+) Terminal (Under Cover). See Jump Starting -
North America 0419.
3. Battery - North America 0358.
4. Engine Air Cleaner/Filter 0344.
5. Engine Oil Dipstick. See “Checking Engine Oil” under
Engine Oil 0339.
6. Engine Cooling Fan (Out of View). See Cooling System
0 346.
7. Power Steering Fluid Reservoir. See Power Steering
Fluid 0353.
8. Engine Oil Fill Cap. See “When
to Add Engine Oil” under
Engine Oil 0339.
9. Auxiliary Battery. Battery -
North America 0358.
10. Brake Fluid Reservoir. See Brake Fluid 0357.
11. Engine Compartment Fuse
Block 0371. 12. Coolant Surge Tank and
Pressure Cap. See Cooling
System 0346.
13. Windshield Washer Fluid Reservoir. See “Adding Washer
Fluid” under Washer Fluid
0 354.
If the vehicle has a diesel engine,
see the Duramax diesel
supplement.
Engine Oil
For diesel engine vehicles, see
“Engine Oil” in the Duramax diesel
supplement.
To ensure proper engine
performance and long life, careful
attention must be paid to engine oil.
Following these simple, but
important steps will help protect
your investment:
. Use engine oil approved to the
proper specification and of the
proper viscosity grade. See
“Selecting the Right Engine Oil”
in this section. .
Check the engine oil level
regularly and maintain the
proper oil level. See “Checking
Engine Oil” and“When to Add
Engine Oil” in this section.
. Change the engine oil at the
appropriate time. See Engine Oil
Life System 0341.
. Always dispose of engine oil
properly. See “What to Do with
Used Oil” in this section.Checking Engine Oil
Check the engine oil level regularly,
every 650 km (400 mi), especially
prior to a long trip. The engine oil
dipstick handle is a loop. See
Engine Compartment Overview
0332 for the location.
{Warning
The engine oil dipstick handle
may be hot; it could burn you.
Use a towel or glove to touch the
dipstick handle.
Page 374 of 500
Chevrolet Silverado Owner Manual (GMNA-Localizing-U.S./Canada/Mexico-
13337620) - 2020 - CRC - 4/10/19
Vehicle Care 373
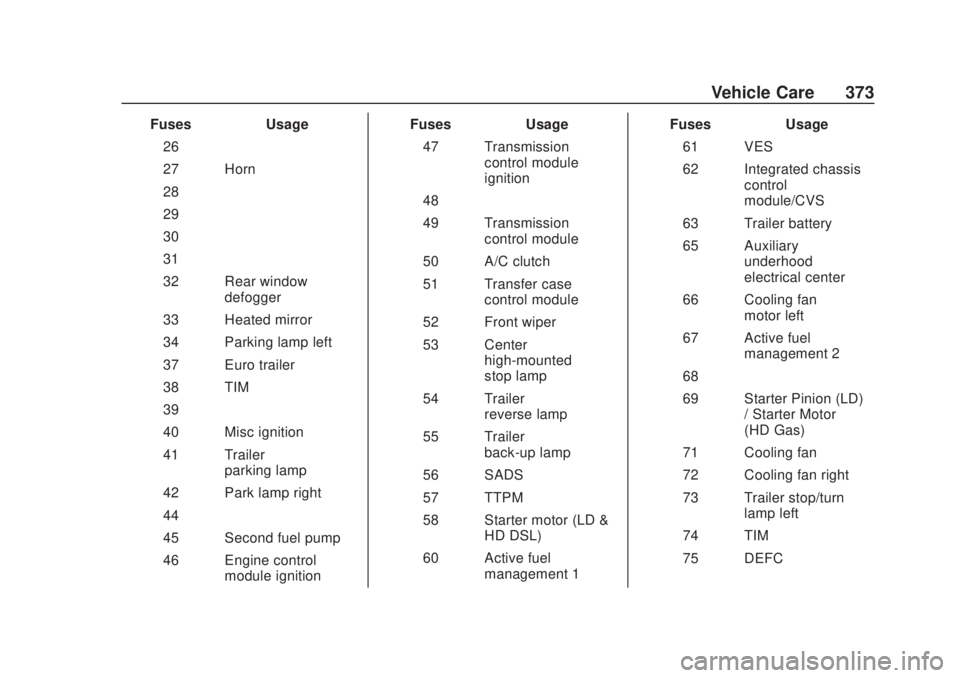
FusesUsage
26 –
27 Horn
28 –
29 –
30 –
31 –
32 Rear window defogger
33 Heated mirror
34 Parking lamp left
37 Euro trailer
38 TIM
39 –
40 Misc ignition
41 Trailer parking lamp
42 Park lamp right
44 –
45 Second fuel pump
46 Engine control module ignition Fuses
Usage
47 Transmission control module
ignition
48 –
49 Transmission control module
50 A/C clutch
51 Transfer case control module
52 Front wiper
53 Center high-mounted
stop lamp
54 Trailer reverse lamp
55 Trailer back-up lamp
56 SADS
57 TTPM
58 Starter motor (LD & HD DSL)
60 Active fuel management 1 Fuses
Usage
61 VES
62 Integrated chassis control
module/CVS
63 Trailer battery
65 Auxiliary underhood
electrical center
66 Cooling fan motor left
67 Active fuel management 2
68 –
69 Starter Pinion (LD) / Starter Motor
(HD Gas)
71 Cooling fan
72 Cooling fan right
73 Trailer stop/turn lamp left
74 TIM
75 DEFC
Page 375 of 500
Chevrolet Silverado Owner Manual (GMNA-Localizing-U.S./Canada/Mexico-
13337620) - 2020 - CRC - 4/10/19
374 Vehicle Care
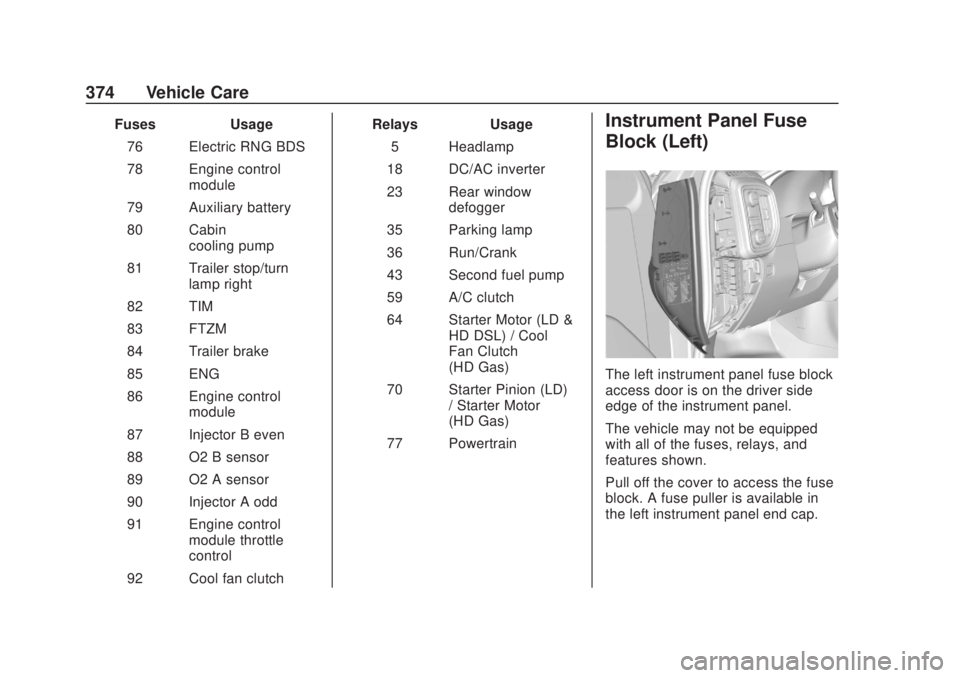
FusesUsage
76 Electric RNG BDS
78 Engine control module
79 Auxiliary battery
80 Cabin cooling pump
81 Trailer stop/turn lamp right
82 TIM
83 FTZM
84 Trailer brake
85 ENG
86 Engine control module
87 Injector B even
88 O2 B sensor
89 O2 A sensor
90 Injector A odd
91 Engine control module throttle
control
92 Cool fan clutch Relays
Usage
5 Headlamp
18 DC/AC inverter
23 Rear window defogger
35 Parking lamp
36 Run/Crank
43 Second fuel pump
59 A/C clutch
64 Starter Motor (LD & HD DSL) / Cool
Fan Clutch
(HD Gas)
70 Starter Pinion (LD) / Starter Motor
(HD Gas)
77 PowertrainInstrument Panel Fuse
Block (Left)
The left instrument panel fuse block
access door is on the driver side
edge of the instrument panel.
The vehicle may not be equipped
with all of the fuses, relays, and
features shown.
Pull off the cover to access the fuse
block. A fuse puller is available in
the left instrument panel end cap.