2020 CHEVROLET SILVERADO 2500 torque
[x] Cancel search: torquePage 356 of 500
Chevrolet Silverado Owner Manual (GMNA-Localizing-U.S./Canada/Mexico-
13337620) - 2020 - CRC - 4/10/19
Vehicle Care 355
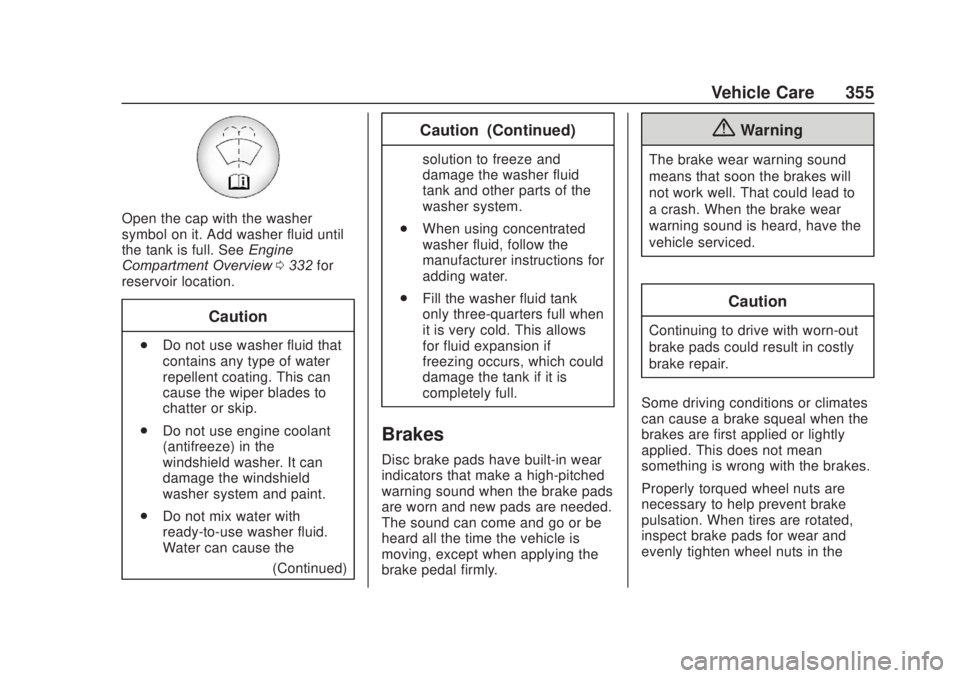
Open the cap with the washer
symbol on it. Add washer fluid until
the tank is full. SeeEngine
Compartment Overview 0332 for
reservoir location.
Caution
. Do not use washer fluid that
contains any type of water
repellent coating. This can
cause the wiper blades to
chatter or skip.
. Do not use engine coolant
(antifreeze) in the
windshield washer. It can
damage the windshield
washer system and paint.
. Do not mix water with
ready-to-use washer fluid.
Water can cause the
(Continued)
Caution (Continued)
solution to freeze and
damage the washer fluid
tank and other parts of the
washer system.
. When using concentrated
washer fluid, follow the
manufacturer instructions for
adding water.
. Fill the washer fluid tank
only three-quarters full when
it is very cold. This allows
for fluid expansion if
freezing occurs, which could
damage the tank if it is
completely full.
Brakes
Disc brake pads have built-in wear
indicators that make a high-pitched
warning sound when the brake pads
are worn and new pads are needed.
The sound can come and go or be
heard all the time the vehicle is
moving, except when applying the
brake pedal firmly.
{Warning
The brake wear warning sound
means that soon the brakes will
not work well. That could lead to
a crash. When the brake wear
warning sound is heard, have the
vehicle serviced.
Caution
Continuing to drive with worn-out
brake pads could result in costly
brake repair.
Some driving conditions or climates
can cause a brake squeal when the
brakes are first applied or lightly
applied. This does not mean
something is wrong with the brakes.
Properly torqued wheel nuts are
necessary to help prevent brake
pulsation. When tires are rotated,
inspect brake pads for wear and
evenly tighten wheel nuts in the
Page 357 of 500
Chevrolet Silverado Owner Manual (GMNA-Localizing-U.S./Canada/Mexico-
13337620) - 2020 - CRC - 4/10/19
356 Vehicle Care
proper sequence to torque
specifications inCapacities and
Specifications 0457.
Brake linings should always be
replaced as complete axle sets.
Brake Pedal Travel
See your dealer if the brake pedal
does not return to normal height,
or if there is a rapid increase in
pedal travel. This could be a sign
that brake service may be required.
Replacing Brake System Parts
Always replace brake system parts
with new, approved replacement
parts. If this is not done, the brakes
may not work properly. The braking
performance expected can change
in many other ways if the wrong
replacement brake parts are
installed or parts are improperly
installed.
Brake Pad Life System
When to Change Brake Pads
This vehicle has a system that
estimates the remaining life of the
front and rear brake pads. Brake
pad life is displayed in the Driver
Information Center (DIC), along with
a percentage for each axle. The
system must be reset every time the
brake pads are changed.
When the system has determined
that the brake pads need to be
replaced, a message will display,
which may include mileage
remaining.
Brake pads should always be
replaced as complete axle sets.
How to Reset the Brake Pad
Life System
The system will automatically detect
when significantly worn brake pads
are replaced. When the ignition is
turned on after new pads and wear
sensors are installed, a message
will display. Follow the prompts to
reset the system. The brake pad life system can also
be manually reset:
1. Display Brake Pad Life on the DIC. See Driver Information
Center (DIC) (Base Level)
0 148 or
Driver Information Center (DIC)
(Midlevel and Uplevel) 0149.
2. Press the thumbwheel or the trip odometer reset stem if the
vehicle does not have DIC
buttons. Select front or rear
pads as appropriate.
3. Select YES on the confirmation message, or press the trip
odometer reset stem on a base
level DIC. Repeat for pads on
the other axle if they were also
replaced.
How to Disable the Brake Pad
Life System
The brake pad life system can be
turned off. This may be necessary if
aftermarket brake pads without wear
sensors are installed. When the
system is turned off, the front and
rear brake pad life percentages will
not display. However, the built-in
Page 398 of 500
Chevrolet Silverado Owner Manual (GMNA-Localizing-U.S./Canada/Mexico-
13337620) - 2020 - CRC - 4/10/19
Vehicle Care 397
Dual Tire Rotation
When the vehicle is new,
or whenever a wheel, wheel
bolt, or wheel nut is replaced or
serviced, check the wheel nut
torque after 160, 1 600, and
10 000 km (100, 1,000, and
6,000 mi) of driving. For proper
torque and wheel nut tightening
information, see“Removing the
Flat Tire and Installing the Spare
Tire” under Tire Changing 0407
and “Wheel Nut Torque” under
Capacities and Specifications
0 457 and “Removing the Flat
Tire and Installing the Spare
Tire” under Tire Changing 0407.
The outer tire on a dual wheel
setup generally wears faster
than the inner tire. Tires last
longer and wear more evenly if
they are rotated. See Tire
Inspection 0396 and
Tire Rotation 0396. Also see
Maintenance Schedule 0441.{Warning
If the vehicle is operated with a
tire that is underinflated, the tire
can overheat. An overheated tire
can lose air suddenly or catch
fire. You or others could be
injured. Properly inflate all tires,
including the spare.
See Tire Pressure 0387, for
information on proper tire
inflation.
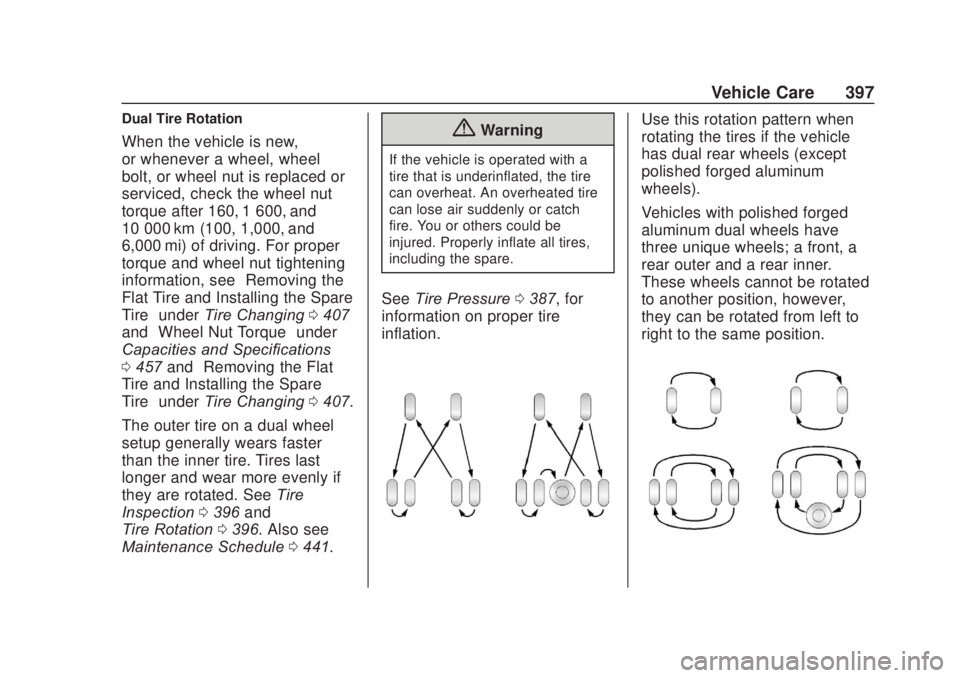
Use this rotation pattern when
rotating the tires if the vehicle
has dual rear wheels (except
polished forged aluminum
wheels).
Vehicles with polished forged
aluminum dual wheels have
three unique wheels; a front, a
rear outer and a rear inner.
These wheels cannot be rotated
to another position, however,
they can be rotated from left to
right to the same position.
Page 399 of 500

Chevrolet Silverado Owner Manual (GMNA-Localizing-U.S./Canada/Mexico-
13337620) - 2020 - CRC - 4/10/19
398 Vehicle Care
Use this rotation pattern when
rotating the tires if the vehicle
has polished forged aluminum
dual rear wheels. The spare
wheel can be used in any
position in the event of a flat tire,
and can be rotated with the rear
inner wheels. After the flat tire is
repaired, if the spare is not on
one of the inner rear positions, it
must be replaced by the correct
wheel in the front or rear outer
positions.
When installing dual wheels,
check that the vent holes in the
inner and outer wheels on each
side are lined up.
Adjust the front and rear tires to
the recommended inflation
pressure on the Tire and
Loading Information label after
the tires have been rotated. See
Tire Pressure0387 and
Vehicle Load Limits 0200. Check that all wheel nuts are
properly tightened. See
“Wheel
Nut Torque” underCapacities
and Specifications 0457, and
“Removing the Flat Tire and
Installing the Spare Tire” under
Tire Changing 0407.
{Warning
Rust or dirt on a wheel, or on the
parts to which it is fastened, can
make wheel nuts become loose
after time. The wheel could come
off and cause a crash. When
changing a wheel, remove any
rust or dirt from places where the
wheel attaches to the vehicle. In
an emergency, a cloth or a paper
towel can be used; however, use
a scraper or wire brush later to
remove all rust or dirt.
Lightly coat the inner diameter of
the wheel hub opening with
wheel bearing grease after a
wheel change or tire rotation to
prevent corrosion or rust build-up. Do not get grease on
the flat wheel mounting surface
or on the wheel nuts or bolts.
Reset the Tire Pressure Monitor
System (TPMS), if the vehicle
has one. See
Tire Pressure
Monitor Operation 0390.
If the full-size tire is part of the
tire rotation, make sure the tire
rotated into the spare position is
stored securely. Push, pull, and
then try to rotate or turn the tire.
If it moves, use the wheel
wrench/hoist shaft to tighten the
cable. See Tire Changing 0407.
When It Is Time for New
Tires
Factors, such as maintenance,
temperatures, driving speeds,
vehicle loading, and road conditions
affect the wear rate of the tires.
Page 405 of 500
Chevrolet Silverado Owner Manual (GMNA-Localizing-U.S./Canada/Mexico-
13337620) - 2020 - CRC - 4/10/19
404 Vehicle Care
Caution
The wrong wheel can also cause
problems with bearing life, brake
cooling, speedometer or
odometer calibration, headlamp
aim, bumper height, vehicle
ground clearance, and tire or tire
chain clearance to the body and
chassis.
Whenever a wheel, wheel bolt,
or wheel nut is replaced on a dual
wheel setup, check the wheel nut
torque after 160,1 600, and
10 000 km (100,1,000, and
6,000 mi) of driving. For proper
torque, see “Wheel Nut Torque”
under Capacities and Specifications
0 457.
See If a Tire Goes Flat 0405 for
more information. Used Replacement Wheels{Warning
Replacing a wheel with a used
one is dangerous. How it has
been used or how far it has been
driven may be unknown. It could
fail suddenly and cause a crash.
When replacing wheels, use a
new GM original equipment
wheel.
Tire Chains
{Warning
If the vehicle has LT275/65R18,
275/60R20, LT275/65R20, or 275/
50R22 size tires, do not use tire
chains. If the vehicle is a 1500
Series with LT265/70R17 size
tires, do not use tire chains. They
can damage the vehicle because
there is not enough clearance.
Tire chains used on a vehicle
(Continued)
Warning (Continued)
without the proper amount of
clearance can cause damage to
the brakes, suspension, or other
vehicle parts. The area damaged
by the tire chains could cause you
to lose control of the vehicle, and
you or others may be injured in a
crash.
Use another type of traction
device only if its manufacturer
recommends it for use on the
vehicle's tire size combination
and road conditions. Follow that
manufacturer's instructions. To
help avoid damage to the vehicle,
drive slowly, readjust, or remove
the device if it is contacting the
vehicle, and do not spin the
vehicle's wheels.
If you do find traction devices that
will fit, install them on the rear
tires.
Page 415 of 500
Chevrolet Silverado Owner Manual (GMNA-Localizing-U.S./Canada/Mexico-
13337620) - 2020 - CRC - 4/10/19
414 Vehicle Care
{Warning
Wheel nuts that are improperly or
incorrectly tightened can cause
the wheels to become loose or
come off. The wheel nuts should
be tightened with a torque wrench
to the proper torque specification
after replacing. Follow the torque
specification supplied by the
aftermarket manufacturer when
using accessory locking wheel
nuts. SeeCapacities and
Specifications 0457 for original
equipment wheel nut torque
specifications.
Caution
Improperly tightened wheel nuts
can lead to brake pulsation and
rotor damage. To avoid expensive
brake repairs, evenly tighten the
wheel nuts in the proper
sequence and to the proper
(Continued)
Caution (Continued)
torque specification. See
Capacities and Specifications
0457 for the wheel nut torque
specification.
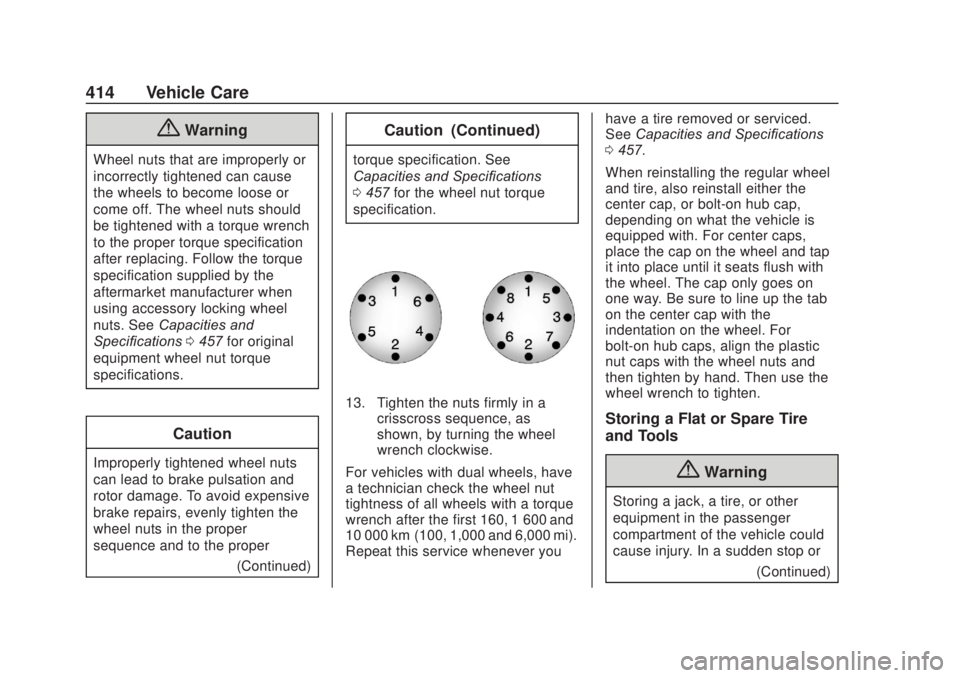
13. Tighten the nuts firmly in a crisscross sequence, as
shown, by turning the wheel
wrench clockwise.
For vehicles with dual wheels, have
a technician check the wheel nut
tightness of all wheels with a torque
wrench after the first 160, 1 600 and
10 000 km (100, 1,000 and 6,000 mi).
Repeat this service whenever you have a tire removed or serviced.
See
Capacities and Specifications
0 457.
When reinstalling the regular wheel
and tire, also reinstall either the
center cap, or bolt-on hub cap,
depending on what the vehicle is
equipped with. For center caps,
place the cap on the wheel and tap
it into place until it seats flush with
the wheel. The cap only goes on
one way. Be sure to line up the tab
on the center cap with the
indentation on the wheel. For
bolt-on hub caps, align the plastic
nut caps with the wheel nuts and
then tighten by hand. Then use the
wheel wrench to tighten.
Storing a Flat or Spare Tire
and Tools
{Warning
Storing a jack, a tire, or other
equipment in the passenger
compartment of the vehicle could
cause injury. In a sudden stop or (Continued)
Page 448 of 500
Chevrolet Silverado Owner Manual (GMNA-Localizing-U.S./Canada/Mexico-
13337620) - 2020 - CRC - 4/2/19
Service and Maintenance 447
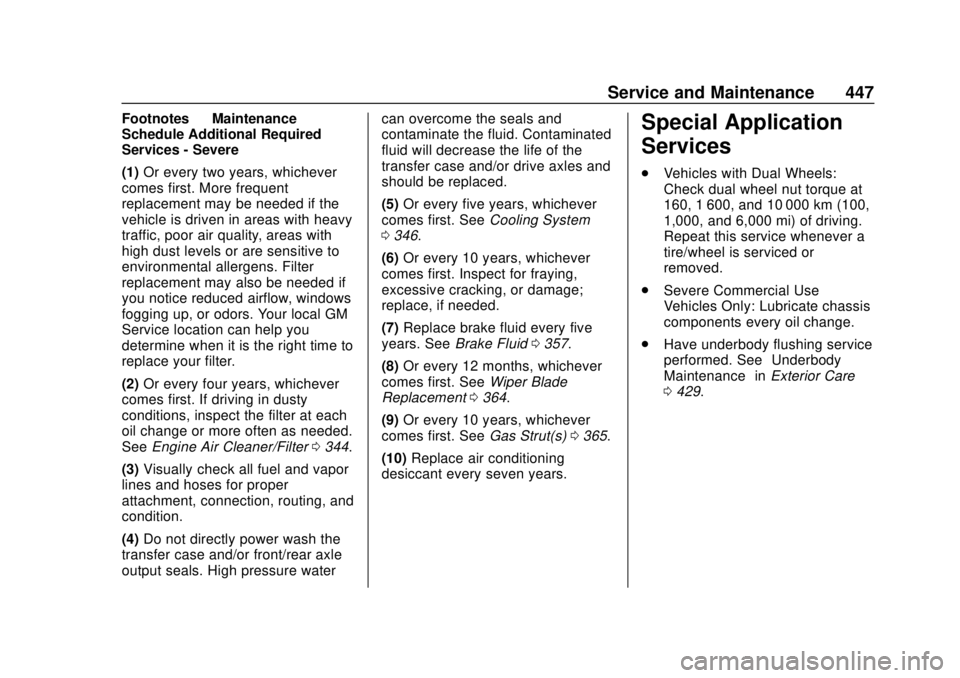
Footnotes—Maintenance
Schedule Additional Required
Services - Severe
(1) Or every two years, whichever
comes first. More frequent
replacement may be needed if the
vehicle is driven in areas with heavy
traffic, poor air quality, areas with
high dust levels or are sensitive to
environmental allergens. Filter
replacement may also be needed if
you notice reduced airflow, windows
fogging up, or odors. Your local GM
Service location can help you
determine when it is the right time to
replace your filter.
(2) Or every four years, whichever
comes first. If driving in dusty
conditions, inspect the filter at each
oil change or more often as needed.
See Engine Air Cleaner/Filter 0344.
(3) Visually check all fuel and vapor
lines and hoses for proper
attachment, connection, routing, and
condition.
(4) Do not directly power wash the
transfer case and/or front/rear axle
output seals. High pressure water can overcome the seals and
contaminate the fluid. Contaminated
fluid will decrease the life of the
transfer case and/or drive axles and
should be replaced.
(5)
Or every five years, whichever
comes first. See Cooling System
0 346.
(6) Or every 10 years, whichever
comes first. Inspect for fraying,
excessive cracking, or damage;
replace, if needed.
(7) Replace brake fluid every five
years. See Brake Fluid 0357.
(8) Or every 12 months, whichever
comes first. See Wiper Blade
Replacement 0364.
(9) Or every 10 years, whichever
comes first. See Gas Strut(s)0365.
(10) Replace air conditioning
desiccant every seven years.Special Application
Services
. Vehicles with Dual Wheels:
Check dual wheel nut torque at
160, 1 600, and 10 000 km (100,
1,000, and 6,000 mi) of driving.
Repeat this service whenever a
tire/wheel is serviced or
removed.
. Severe Commercial Use
Vehicles Only: Lubricate chassis
components every oil change.
. Have underbody flushing service
performed. See “Underbody
Maintenance” inExterior Care
0 429.
Page 460 of 500
Chevrolet Silverado Owner Manual (GMNA-Localizing-U.S./Canada/Mexico-
13337620) - 2020 - CRC - 4/2/19
Technical Data 459
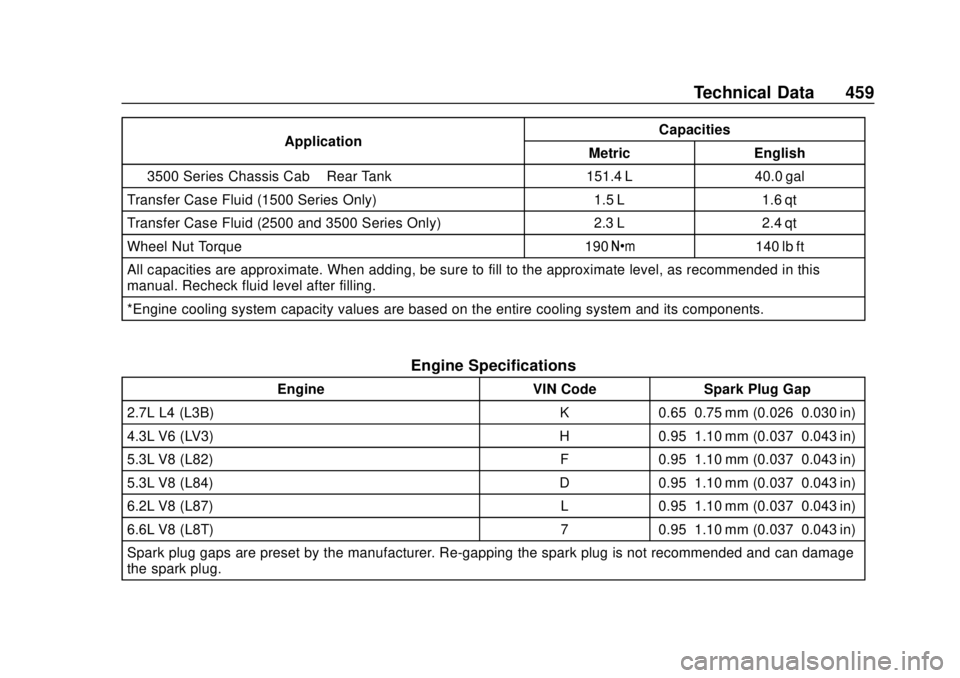
ApplicationCapacities
Metric English
3500 Series Chassis Cab –Rear Tank 151.4 L 40.0 gal
Transfer Case Fluid (1500 Series Only) 1.5 L 1.6 qt
Transfer Case Fluid (2500 and 3500 Series Only) 2.3 L 2.4 qt
Wheel Nut Torque 190 Y140 lb ft
All capacities are approximate. When adding, be sure to fill to the approximate level, as recommended in this
manual. Recheck fluid level after filling.
*Engine cooling system capacity values are based on the entire cooling system and its components.
Engine Specifications
Engine VIN CodeSpark Plug Gap
2.7L L4 (L3B) K0.65–0.75 mm (0.026–0.030 in)
4.3L V6 (LV3) H0.95–1.10 mm (0.037–0.043 in)
5.3L V8 (L82) F0.95–1.10 mm (0.037–0.043 in)
5.3L V8 (L84) D0.95–1.10 mm (0.037–0.043 in)
6.2L V8 (L87) L0.95–1.10 mm (0.037–0.043 in)
6.6L V8 (L8T) 70.95–1.10 mm (0.037–0.043 in)
Spark plug gaps are preset by the manufacturer. Re-gapping the spark plug is not recommended and can damage
the spark plug.