2020 CHEVROLET EQUINOX how to turn on
[x] Cancel search: how to turn onPage 332 of 415
Chevrolet Equinox Owner Manual (GMNA-Localizing-U.S./Canada/Mexico-
13555863) - 2020 - CRC - 8/2/19
Vehicle Care 331
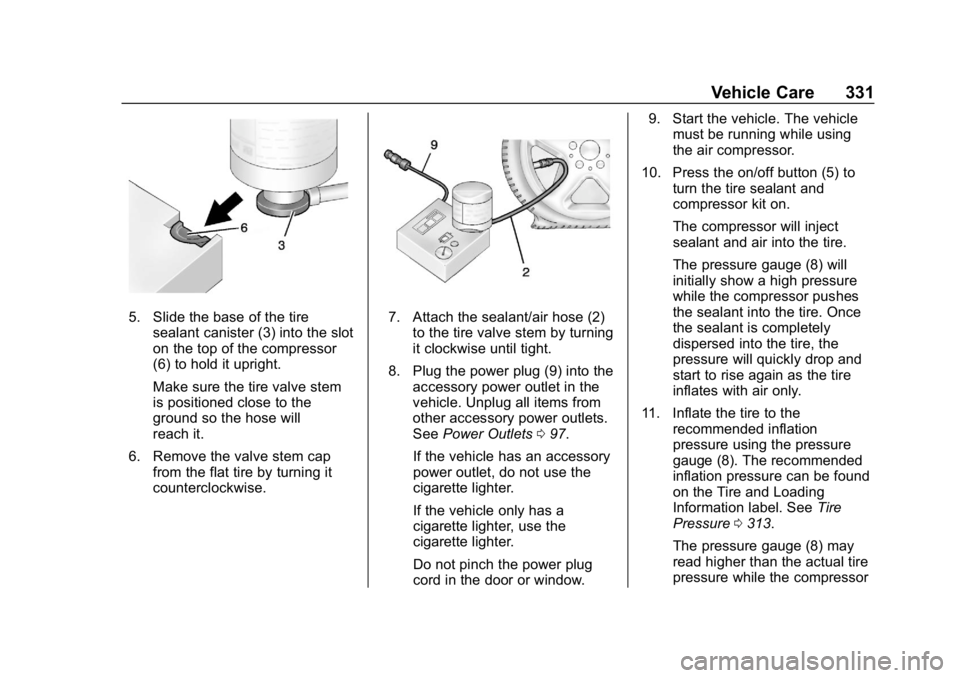
5. Slide the base of the tiresealant canister (3) into the slot
on the top of the compressor
(6) to hold it upright.
Make sure the tire valve stem
is positioned close to the
ground so the hose will
reach it.
6. Remove the valve stem cap from the flat tire by turning it
counterclockwise.7. Attach the sealant/air hose (2)
to the tire valve stem by turning
it clockwise until tight.
8. Plug the power plug (9) into the accessory power outlet in the
vehicle. Unplug all items from
other accessory power outlets.
See Power Outlets 097.
If the vehicle has an accessory
power outlet, do not use the
cigarette lighter.
If the vehicle only has a
cigarette lighter, use the
cigarette lighter.
Do not pinch the power plug
cord in the door or window. 9. Start the vehicle. The vehicle
must be running while using
the air compressor.
10. Press the on/off button (5) to turn the tire sealant and
compressor kit on.
The compressor will inject
sealant and air into the tire.
The pressure gauge (8) will
initially show a high pressure
while the compressor pushes
the sealant into the tire. Once
the sealant is completely
dispersed into the tire, the
pressure will quickly drop and
start to rise again as the tire
inflates with air only.
11. Inflate the tire to the recommended inflation
pressure using the pressure
gauge (8). The recommended
inflation pressure can be found
on the Tire and Loading
Information label. See Tire
Pressure 0313.
The pressure gauge (8) may
read higher than the actual tire
pressure while the compressor
Page 337 of 415
Chevrolet Equinox Owner Manual (GMNA-Localizing-U.S./Canada/Mexico-
13555863) - 2020 - CRC - 8/2/19
336 Vehicle Care
2. Fold the rear part of the loadfloor to the front, pull it
rearward to disengage the
clips, then pull upward to
remove it.
3. Pull the spare tire cover forward and upward to
remove it.
4. Turn the retainer nut counterclockwise to remove the
spare tire. Place the spare tire
next to the tire being changed.
5. The jack and tools are stored below the spare tire. Remove
them from their container and
place them near the tire being
changed.
Removing the Flat Tire and
Installing the Spare Tire
1. Do a safety check beforeproceeding. See If a Tire Goes
Flat 0327 for more information.
2. For vehicles with a wheel cover or center cap, pull the cover or
center cap away from the
wheel to remove it. Store the wheel cover in the cargo area
until you have the flat tire
repaired or replaced.
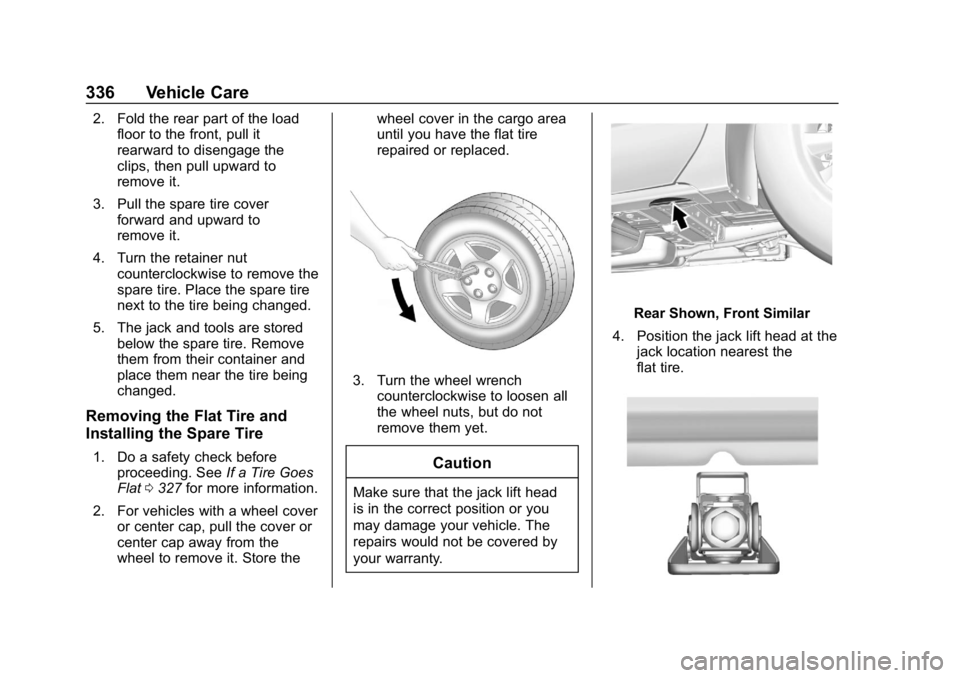
3. Turn the wheel wrench
counterclockwise to loosen all
the wheel nuts, but do not
remove them yet.
Caution
Make sure that the jack lift head
is in the correct position or you
may damage your vehicle. The
repairs would not be covered by
your warranty.
Rear Shown, Front Similar
4. Position the jack lift head at the jack location nearest the
flat tire.
Page 339 of 415
Chevrolet Equinox Owner Manual (GMNA-Localizing-U.S./Canada/Mexico-
13555863) - 2020 - CRC - 8/2/19
338 Vehicle Care
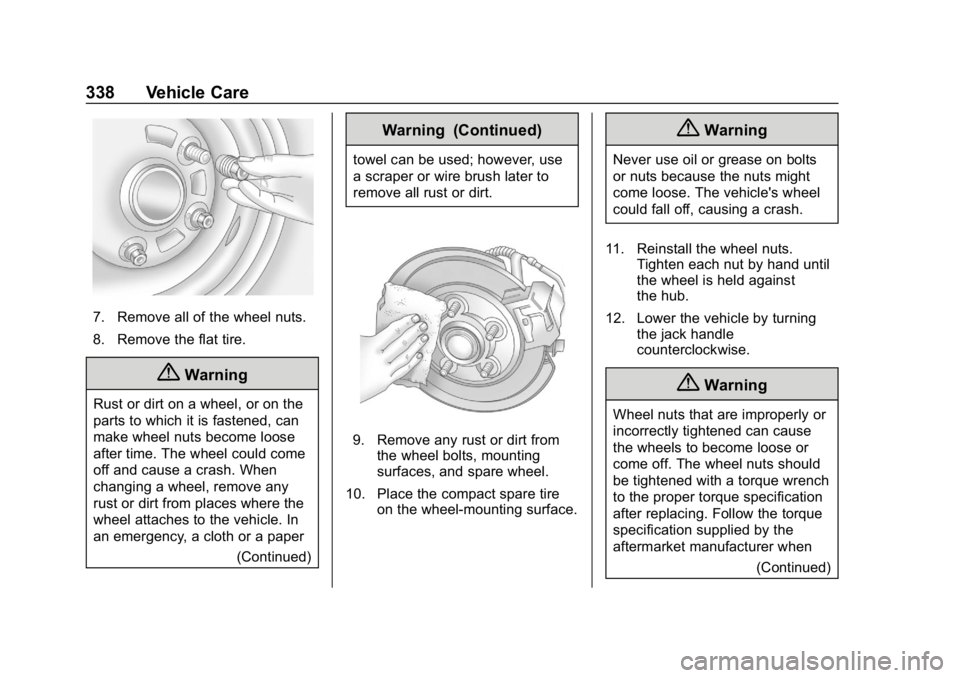
7. Remove all of the wheel nuts.
8. Remove the flat tire.
{Warning
Rust or dirt on a wheel, or on the
parts to which it is fastened, can
make wheel nuts become loose
after time. The wheel could come
off and cause a crash. When
changing a wheel, remove any
rust or dirt from places where the
wheel attaches to the vehicle. In
an emergency, a cloth or a paper(Continued)
Warning (Continued)
towel can be used; however, use
a scraper or wire brush later to
remove all rust or dirt.
9. Remove any rust or dirt fromthe wheel bolts, mounting
surfaces, and spare wheel.
10. Place the compact spare tire on the wheel-mounting surface.
{Warning
Never use oil or grease on bolts
or nuts because the nuts might
come loose. The vehicle's wheel
could fall off, causing a crash.
11. Reinstall the wheel nuts. Tighten each nut by hand until
the wheel is held against
the hub.
12. Lower the vehicle by turning the jack handle
counterclockwise.
{Warning
Wheel nuts that are improperly or
incorrectly tightened can cause
the wheels to become loose or
come off. The wheel nuts should
be tightened with a torque wrench
to the proper torque specification
after replacing. Follow the torque
specification supplied by the
aftermarket manufacturer when
(Continued)
Page 340 of 415
Chevrolet Equinox Owner Manual (GMNA-Localizing-U.S./Canada/Mexico-
13555863) - 2020 - CRC - 8/2/19
Vehicle Care 339
Warning (Continued)
using accessory locking wheel
nuts. SeeCapacities and
Specifications 0374 for original
equipment wheel nut torque
specifications.
Caution
Improperly tightened wheel nuts
can lead to brake pulsation and
rotor damage. To avoid expensive
brake repairs, evenly tighten the
wheel nuts in the proper
sequence and to the proper
torque specification. See
Capacities and Specifications
0 374 for the wheel nut torque
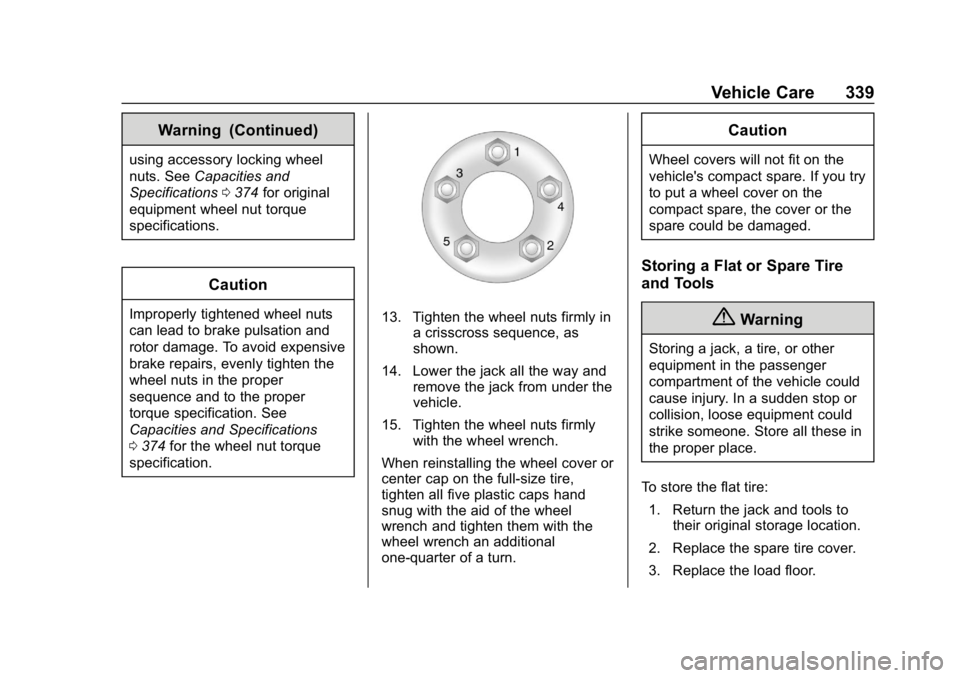
specification.13. Tighten the wheel nuts firmly in a crisscross sequence, as
shown.
14. Lower the jack all the way and remove the jack from under the
vehicle.
15. Tighten the wheel nuts firmly with the wheel wrench.
When reinstalling the wheel cover or
center cap on the full-size tire,
tighten all five plastic caps hand
snug with the aid of the wheel
wrench and tighten them with the
wheel wrench an additional
one-quarter of a turn.
Caution
Wheel covers will not fit on the
vehicle's compact spare. If you try
to put a wheel cover on the
compact spare, the cover or the
spare could be damaged.
Storing a Flat or Spare Tire
and Tools
{Warning
Storing a jack, a tire, or other
equipment in the passenger
compartment of the vehicle could
cause injury. In a sudden stop or
collision, loose equipment could
strike someone. Store all these in
the proper place.
To store the flat tire: 1. Return the jack and tools to their original storage location.
2. Replace the spare tire cover.
3. Replace the load floor.
Page 347 of 415
Chevrolet Equinox Owner Manual (GMNA-Localizing-U.S./Canada/Mexico-
13555863) - 2020 - CRC - 8/2/19
346 Vehicle Care
Install the tow eye into the socket
and turn it until it is fully tightened.
When the tow eye is removed,
reinstall the cover with the notch in
the original position.
To tow the vehicle behind another
vehicle for recreational purposes,
such as behind a motor home, see
Recreational Vehicle Towing0346.
Recreational Vehicle
Towing
Recreational vehicle towing means
towing the vehicle behind another
vehicle, such as behind a motor
home. The two most common types
of recreational vehicle towing are
known as dinghy towing and dolly
towing. Dinghy towing is towing the
vehicle with all four wheels on the
ground. Dolly towing is towing the
vehicle with two wheels on the
ground and two wheels up on a
device known as a dolly.
Here are some important things to
consider before recreational vehicle
towing: .
Before towing the vehicle,
become familiar with the local
laws that apply to recreational
vehicle towing. These laws may
vary by region.
. The towing capacity of the
towing vehicle. Be sure to read
the tow vehicle manufacturer's
recommendations.
. How far the vehicle will be
towed. Some vehicles have
restrictions on how far and how
long they can tow.
. The proper towing equipment.
See your dealer or trailering
professional for additional advice
and equipment
recommendations.
. If the vehicle is ready to be
towed. Just as preparing the
vehicle for a long trip, make sure
the vehicle is prepared to be
towed.
Dinghy Towing
All vehicles may be dinghy towed
from the front. These vehicles can
also be towed by placing them on a platform trailer with all four wheels
off of the ground. All other engine/
transmission combinations must be
towed by platform trailer. Also see
the information on dolly towing later
in this section.
For vehicles being dinghy towed,
the vehicle should be run at the
beginning of each day and at each
RV fuel stop for about five minutes.
This will ensure proper lubrication of
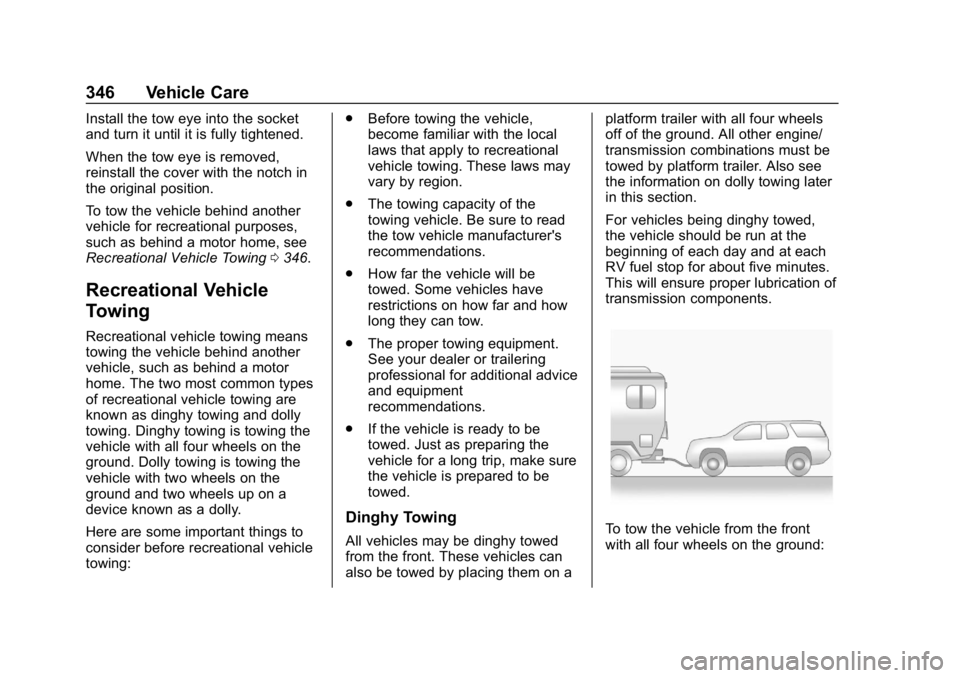
transmission components.To tow the vehicle from the front
with all four wheels on the ground:
Page 393 of 415

Chevrolet Equinox Owner Manual (GMNA-Localizing-U.S./Canada/Mexico-
13555863) - 2020 - CRC - 8/2/19
392 OnStar
Functionality of the Voice Command
button may vary by vehicle and
region.
Press
=to:
. Open the OnStar app on the
infotainment display. See the
infotainment manual for
information on how to use the
OnStar app.
Or
. Give OnStar Turn-by-Turn
Navigation voice commands.
. Obtain and customize the Wi-Fi
hotspot name or SSID and
password, if equipped.
Press
Qto connect to an
Advisor to:
. Verify account information or
update contact information.
. Get driving directions.
. Receive a Diagnostic check of
the vehicle's key operating
systems.
. Receive Roadside Assistance. .
Manage Wi-Fi Settings,
if equipped.
Press
>to get a priority connection
to an OnStar Advisor available
24/7 to:
. Get help for an emergency.
. Be a Good Samaritan or
respond to an AMBER Alert.
. Get assistance in severe
weather or other crisis situations
and find evacuation routes.
OnStar Services
Emergency
Emergency Services require an
active safety and security plan. With
Automatic Crash Response, built-in
sensors can automatically alert a
specially trained OnStar Advisor
who is immediately connected in to
the vehicle to help.
Press
>for a priority connection to
an OnStar Advisor who can contact
emergency service providers, direct
them to your exact location, and
relay important information.
With OnStar Crisis Assist, specially
trained Advisors are available
24 hours a day, 7 days a week, to
provide a central point of contact,
assistance, and information during a
crisis.
With Roadside Assistance, Advisors
can locate a nearby service provider
to help with a flat tire, a battery
jump, or an empty gas tank.
Page 396 of 415

Chevrolet Equinox Owner Manual (GMNA-Localizing-U.S./Canada/Mexico-
13555863) - 2020 - CRC - 8/2/19
OnStar 395
Languages
The vehicle can be programmed to
respond in multiple languages.
Press
Qand ask for an Advisor.
Advisors are available in English,
Spanish, and French. Available
languages may vary by country.
Potential Issues
OnStar cannot perform Remote
Door Unlock or Stolen Vehicle
Assistance after the vehicle has
been off continuously for 10 days
without an ignition cycle. If the
vehicle has not been started for
10 days, OnStar can contact
Roadside Assistance or a locksmith
to help gain access to the vehicle.
Global Positioning
System (GPS)
. Obstruction of the GPS can
occur in a large city with tall
buildings; in parking garages;
around airports; in tunnels and
underpasses; or in an area with
very dense trees. If GPS signals
are not available, the OnStar
system should still operate to call OnStar. However, OnStar
could have difficulty identifying
the exact location.
. In emergency situations, OnStar
can use the last stored GPS
location to send to emergency
responders.
A temporary loss of GPS can cause
loss of the ability to send a
Turn-by-Turn Navigation route. The
Advisor may give a verbal route or
may ask for a call back after the
vehicle is driven into an open area.
Cellular and GPS Antennas
Cellular reception is required for
OnStar to send remote signals to
the vehicle. Do not place items over
or near the antenna to prevent
blocking cellular and GPS signal
reception.
Unable to Connect to OnStar
Message
If there is limited cellular coverage
or the cellular network has reached
maximum capacity, this message may come on. Press
Qto try the
call again or try again after driving a
few miles into another cellular area.
Vehicle and Power Issues
OnStar services require a vehicle
electrical system, wireless service,
and GPS satellite technologies to be
available and operating for features
to function properly. These systems
may not operate if the battery is
discharged or disconnected.
Add-on Electrical Equipment
The OnStar system is integrated
into the electrical architecture of the
vehicle. Do not add any electrical
equipment. See Add-On Electrical
Equipment 0263. Added electrical
equipment may interfere with the
operation of the OnStar system and
cause it to not operate.
Vehicle Software Updates
OnStar or GM may remotely deliver
software updates or changes to the
vehicle without further notice or
consent. These updates or changes
may enhance or maintain safety,
Page 408 of 415

Chevrolet Equinox Owner Manual (GMNA-Localizing-U.S./Canada/Mexico-
13555863) - 2020 - CRC - 8/2/19
Index 407
Headlamps (cont'd)Bulb Replacement . . . . . . . . . . . . 295
Daytime Running
Lamps (DRL) . . . . . . . . . . . . . . . . 146
Flash-to-Pass . . . . . . . . . . . . . . . . . 146
Front Turn Signal and Fog Lamps . . . . . . . . . . . . . . . . . . . . . . 297
High Intensity Discharge (HID) Lighting . . . . . . . . . . . . . . . 296
High-Beam On Light . . . . . . . . . . 122
High/Low Beam Changer . . . . . 146
Lamps On Reminder . . . . . . . . . 123
Heated Rear Seats . . . . . . . . . . . . . . . . . . . . . 47
Steering Wheel . . . . . . . . . . . . . . . . . 94
Heated and Ventilated Front Seats . . . . . . . . . . . . . . . . . . . . . . . . . . 43
Heated Mirrors . . . . . . . . . . . . . . . . . . . 29
Heater
Engine . . . . . . . . . . . . . . . . . . . . . . . . 187
Heating . . . . . . . . . . . . . . . . . . . . 154, 156
High-Beam On Light . . . . . . . . . . . . 122
Hill and Mountain Roads . . . . . . . . 173
Hill Start Assist (HSA) . . . . . . . . . . 207
Hood . . . . . . . . . . . . . . . . . . . . . . . . . . . 268
Horn . . . . . . . . . . . . . . . . . . . . . . . . . . . . . 94
How to Wear Seat Belts Properly . . . . . . . . . . . . . . . . . . . . . . . . 49 HVAC . . . . . . . . . . . . . . . . . . . . . . 154, 156
I
Ignition Positions . . . . . . . . . . . . . . . 180
Immobilizer . . . . . . . . . . . . . . . . . . . . . . 27
Indicator
Pedestrian Ahead . . . . . . . . . . . . .119
Vehicle Ahead . . . . . . . . . . . . . . . . .118
Infants and Young Children, Restraints . . . . . . . . . . . . . . . . . . . . . . 70
Information Publication Ordering . . . . . . . . . . 386
Infotainment . . . . . . . . . . . . . . . . . . . . 153
Infotainment System . . . . . . . . . . . . 390
Instrument Cluster . . . . . . . . . 102, 106
Instrument Panel Overview . . . . . . . 5
Interior Rearview Mirrors . . . . . . . . . 30
Introduction . . . . . . . . . . . . . . . . . . . . . . . 2
J
Jump Starting - North America . . . . . . . . . . . . . . . . . . . . . . . 341
K
Keyless Entry
Remote (RKE) System . . . . . . . . . . 8
Keys . . . . . . . . . . . . . . . . . . . . . . . . . . . . . . 7
L
Labeling, Tire Sidewall . . . . . . . . . . 308 Lamps
Courtesy . . . . . . . . . . . . . . . . . . . . . . 149
Daytime Running (DRL) . . . . . . 146
Dome . . . . . . . . . . . . . . . . . . . . . . . . . 149
Exterior Controls . . . . . . . . . . . . . . 144
Exterior Lighting BatterySaver . . . . . . . . . . . . . . . . . . . . . . . 152
License Plate . . . . . . . . . . . . . . . . . 298
Malfunction Indicator (Check Engine) . . . . . . . . . . . . . .114
On Reminder . . . . . . . . . . . . . . . . . 123
Reading . . . . . . . . . . . . . . . . . . . . . . 150
Taillamps . . . . . . . . . . . . . . . . . . . . . 297
Lane Change Alert (LCA) . . . . . . . 236
Lane Keep Assist (LKA) . . . . . . . . 238
Lane Keep Assist Light . . . . . . . . . 118
Lap-Shoulder Belt . . . . . . . . . . . . . . . 51
LATCH System Replacing Parts after aCrash . . . . . . . . . . . . . . . . . . . . . . . . . 82
LATCH, Lower Anchors and
Tethers for Children . . . . . . . . . . . . 75
LED Lighting . . . . . . . . . . . . . . . . . . . . 296
Liftgate . . . . . . . . . . . . . . . . . . . . . . . . . . 21
Lighting Entry . . . . . . . . . . . . . . . . . . . . . . . . . 151
Exit . . . . . . . . . . . . . . . . . . . . . . . . . . . 151
Illumination Control . . . . . . . . . . . 149