2020 CHEVROLET EQUINOX Remove liftgate
[x] Cancel search: Remove liftgatePage 12 of 415

Chevrolet Equinox Owner Manual (GMNA-Localizing-U.S./Canada/Mexico-
13555863) - 2020 - CRC - 8/2/19
Keys, Doors, and Windows 11
the vehicle is off and at least one
RKE transmitter has been removed
or none remain in the interior.
If other electronic devices interfere
with the RKE transmitter signal, the
vehicle may not detect the RKE
transmitter inside the vehicle.
If passive locking is enabled, the
doors may lock with the RKE
transmitter inside the vehicle. Do
not leave the RKE transmitter in an
unattended vehicle.
To customize the doors to
automatically lock when exiting the
vehicle, see“Remote Lock, Unlock,
Start” under Vehicle Personalization
0 134.
Temporary Disable of Passive
Locking
Temporarily disable passive locking
by pressing and holding
Kon the
interior door switch with a door open
for at least four seconds, or until
three chimes are heard. Passive
locking will then remain disabled
until
Qon the interior door is
pressed, or until the vehicle is
turned on. Remote Left in Vehicle Alert
When the vehicle is turned off and
an RKE transmitter is left in the
vehicle, the horn will chirp three
times after all doors are closed. To
turn on or off, see
Vehicle
Personalization 0134.
Remote No Longer in Vehicle Alert
If the vehicle is on with a door open,
and then all doors are closed, the
vehicle will check for RKE
transmitters inside. If an RKE
transmitter is not detected, the
Driver Information Center (DIC) will
display NO REMOTE DETECTED
and the horn will chirp three times.
This occurs only once each time the
vehicle is driven.
To turn on or off see Vehicle
Personalization 0134
Keyless Liftgate Opening
When the doors are locked, press
the touch pad on the liftgate handle
to open the liftgate if the RKE
transmitter is within 1 m (3 ft). Key Access
To access a vehicle with a dead
transmitter battery, see
Door Locks
0 16.
Programming Transmitters to
the Vehicle
Only RKE transmitters programmed
to the vehicle will work. If a
transmitter is lost or stolen, a
replacement can be purchased and
programmed through your dealer.
The vehicle can be reprogrammed
so that lost or stolen transmitters no
longer work. Each vehicle can have
up to eight transmitters matched
to it.
Programming with Recognized
Transmitters
A new transmitter can be
programmed to the vehicle when
there are two recognized
transmitters.
To program, the vehicle must be off
and all of the transmitters, both
currently recognized and new, must
be with you.
Page 18 of 415
Chevrolet Equinox Owner Manual (GMNA-Localizing-U.S./Canada/Mexico-
13555863) - 2020 - CRC - 8/2/19
Keys, Doors, and Windows 17
Warning (Continued)
the vehicle. Locking the
doors can help prevent this
from happening.
To lock or unlock the doors from the
outside:
. Press
QorKon the Remote
Keyless Entry (RKE) transmitter.
See Remote Keyless Entry
(RKE) System Operation 08.
. Use the key in the driver door.
The key lock cylinder is covered
with a cap.
To lock or unlock the doors from the
inside:
. Press
QorKon the power door
lock switch.
. Push down on the door lock
knob to lock a door.
. Pull the door handle once to
unlock the door. Pull the handle
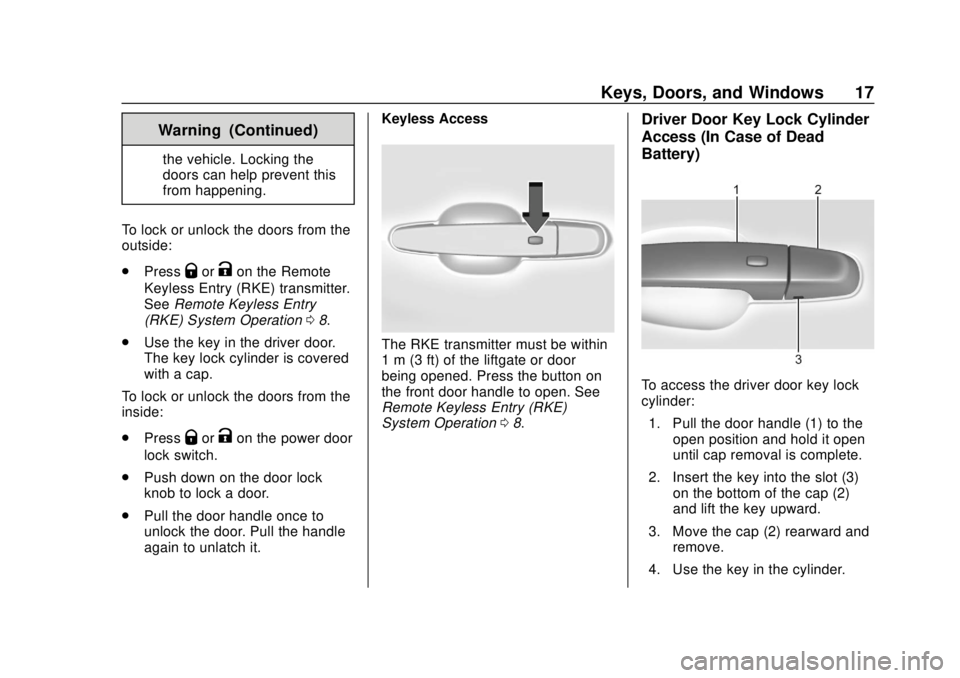
again to unlatch it. Keyless Access
The RKE transmitter must be within
1 m (3 ft) of the liftgate or door
being opened. Press the button on
the front door handle to open. See
Remote Keyless Entry (RKE)
System Operation
08.
Driver Door Key Lock Cylinder
Access (In Case of Dead
Battery)
To access the driver door key lock
cylinder:
1. Pull the door handle (1) to the open position and hold it open
until cap removal is complete.
2. Insert the key into the slot (3) on the bottom of the cap (2)
and lift the key upward.
3. Move the cap (2) rearward and remove.
4. Use the key in the cylinder.
Page 24 of 415
Chevrolet Equinox Owner Manual (GMNA-Localizing-U.S./Canada/Mexico-
13555863) - 2020 - CRC - 8/2/19
Keys, Doors, and Windows 23
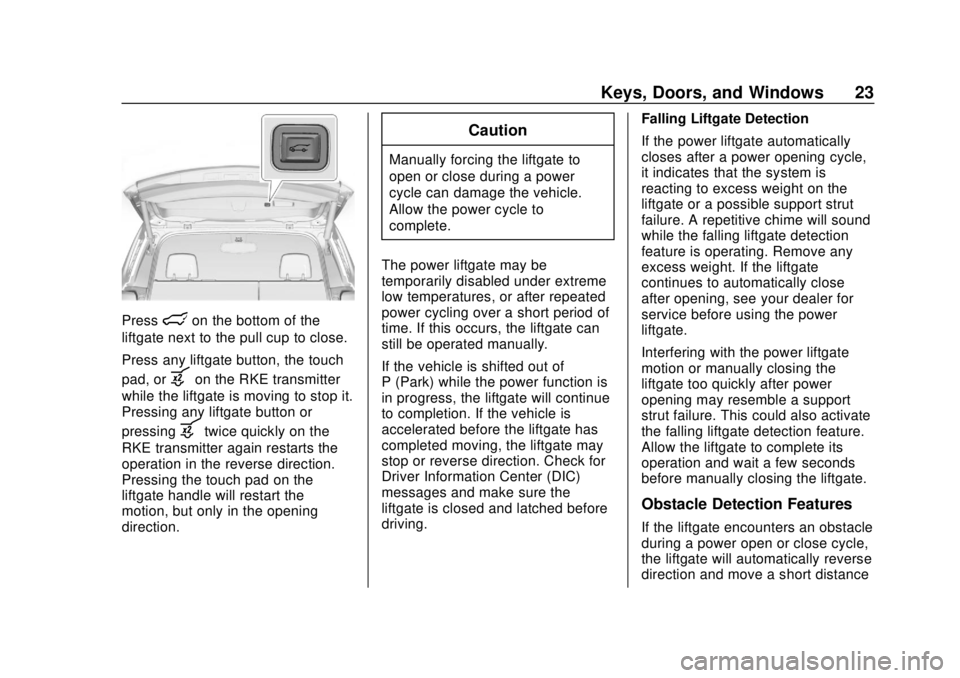
Presslon the bottom of the
liftgate next to the pull cup to close.
Press any liftgate button, the touch
pad, or
bon the RKE transmitter
while the liftgate is moving to stop it.
Pressing any liftgate button or
pressing
btwice quickly on the
RKE transmitter again restarts the
operation in the reverse direction.
Pressing the touch pad on the
liftgate handle will restart the
motion, but only in the opening
direction.
Caution
Manually forcing the liftgate to
open or close during a power
cycle can damage the vehicle.
Allow the power cycle to
complete.
The power liftgate may be
temporarily disabled under extreme
low temperatures, or after repeated
power cycling over a short period of
time. If this occurs, the liftgate can
still be operated manually.
If the vehicle is shifted out of
P (Park) while the power function is
in progress, the liftgate will continue
to completion. If the vehicle is
accelerated before the liftgate has
completed moving, the liftgate may
stop or reverse direction. Check for
Driver Information Center (DIC)
messages and make sure the
liftgate is closed and latched before
driving. Falling Liftgate Detection
If the power liftgate automatically
closes after a power opening cycle,
it indicates that the system is
reacting to excess weight on the
liftgate or a possible support strut
failure. A repetitive chime will sound
while the falling liftgate detection
feature is operating. Remove any
excess weight. If the liftgate
continues to automatically close
after opening, see your dealer for
service before using the power
liftgate.
Interfering with the power liftgate
motion or manually closing the
liftgate too quickly after power
opening may resemble a support
strut failure. This could also activate
the falling liftgate detection feature.
Allow the liftgate to complete its
operation and wait a few seconds
before manually closing the liftgate.
Obstacle Detection Features
If the liftgate encounters an obstacle
during a power open or close cycle,
the liftgate will automatically reverse
direction and move a short distance
Page 298 of 415
Chevrolet Equinox Owner Manual (GMNA-Localizing-U.S./Canada/Mexico-
13555863) - 2020 - CRC - 8/2/19
Vehicle Care 297
Front Turn Signal and
Fog Lamps
Driver Side Shown, PassengerSide Similar
To replace one of these lamps: 1. Remove the fastener to remove the access panel.
2. Access the lamp through the hole in the underbody air
deflector.
3. Disconnect the electrical connector from the bulb
assembly. 4. Turn the bulb socket
counterclockwise and pull the
bulb straight out of the socket.
5. Replace the bulb and reverse Steps 1–4 to reinstall.
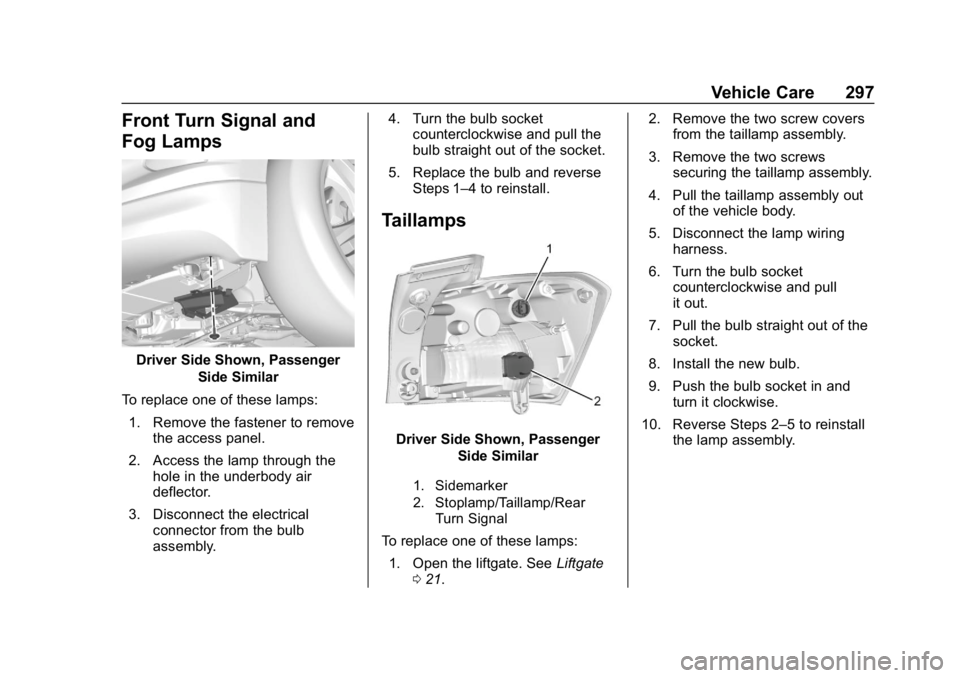
Taillamps
Driver Side Shown, Passenger
Side Similar
1. Sidemarker
2. Stoplamp/Taillamp/RearTurn Signal
To replace one of these lamps:
1. Open the liftgate. See Liftgate
0 21. 2. Remove the two screw covers
from the taillamp assembly.
3. Remove the two screws securing the taillamp assembly.
4. Pull the taillamp assembly out of the vehicle body.
5. Disconnect the lamp wiring harness.
6. Turn the bulb socket counterclockwise and pull
it out.
7. Pull the bulb straight out of the socket.
8. Install the new bulb.
9. Push the bulb socket in and turn it clockwise.
10. Reverse Steps 2–5 to reinstall the lamp assembly.
Page 299 of 415
Chevrolet Equinox Owner Manual (GMNA-Localizing-U.S./Canada/Mexico-
13555863) - 2020 - CRC - 8/2/19
298 Vehicle Care
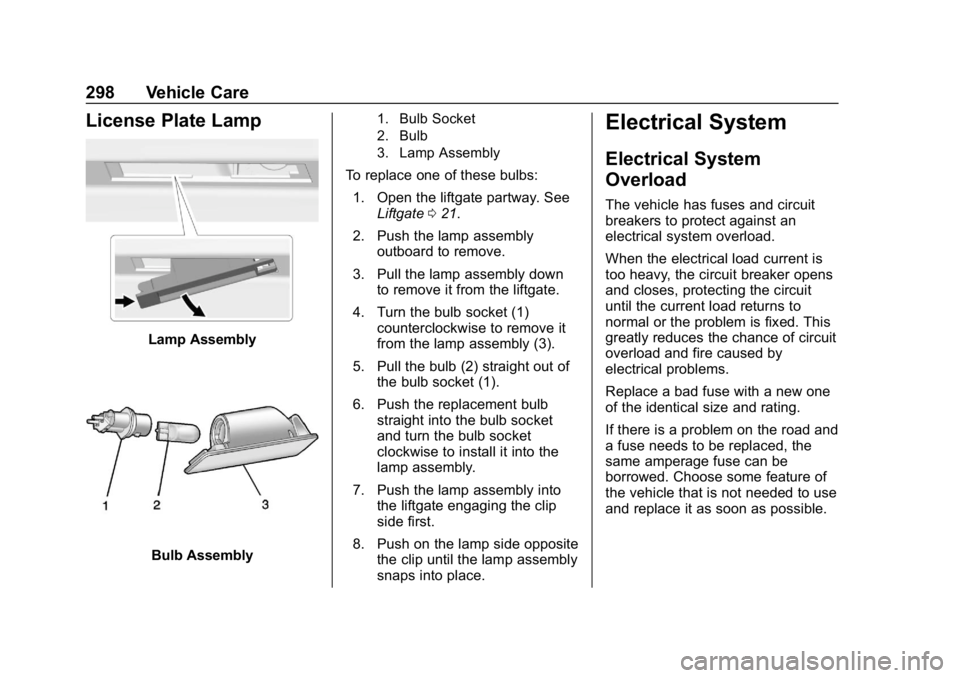
License Plate Lamp
Lamp Assembly
Bulb Assembly
1. Bulb Socket
2. Bulb
3. Lamp Assembly
To replace one of these bulbs:1. Open the liftgate partway. See Liftgate 021.
2. Push the lamp assembly outboard to remove.
3. Pull the lamp assembly down to remove it from the liftgate.
4. Turn the bulb socket (1) counterclockwise to remove it
from the lamp assembly (3).
5. Pull the bulb (2) straight out of the bulb socket (1).
6. Push the replacement bulb straight into the bulb socket
and turn the bulb socket
clockwise to install it into the
lamp assembly.
7. Push the lamp assembly into the liftgate engaging the clip
side first.
8. Push on the lamp side opposite the clip until the lamp assembly
snaps into place.
Electrical System
Electrical System
Overload
The vehicle has fuses and circuit
breakers to protect against an
electrical system overload.
When the electrical load current is
too heavy, the circuit breaker opens
and closes, protecting the circuit
until the current load returns to
normal or the problem is fixed. This
greatly reduces the chance of circuit
overload and fire caused by
electrical problems.
Replace a bad fuse with a new one
of the identical size and rating.
If there is a problem on the road and
a fuse needs to be replaced, the
same amperage fuse can be
borrowed. Choose some feature of
the vehicle that is not needed to use
and replace it as soon as possible.
Page 336 of 415
Chevrolet Equinox Owner Manual (GMNA-Localizing-U.S./Canada/Mexico-
13555863) - 2020 - CRC - 8/2/19
Vehicle Care 335
12. Turn the air only hose (10)counterclockwise to remove it
from the tire valve stem.
13. Replace the tire valve stem cap.
14. Return the air only hose (10) and power plug (9) back to
their original storage location.
15. Return the equipment to its original storage location in the
vehicle.
The tire sealant and compressor kit
has accessory adapters located in a
compartment on the bottom of its
housing that can be used to inflate
air mattresses, balls, etc.
Storing the Tire Sealant
and Compressor Kit
The tire sealant and compressor kit
is in a bag in the rear compartment
storage area. 1. Open the liftgate. See Liftgate
0 21.
2. Fold the rear part of the load floor to the front.
3. Turn the retainer nutcounterclockwise to remove the
tire sealant and compressor
kit bag.
4. Remove the tire sealant and compressor kit from the bag.
To store the tire sealant and
compressor kit, reverse the steps.
Tire Changing
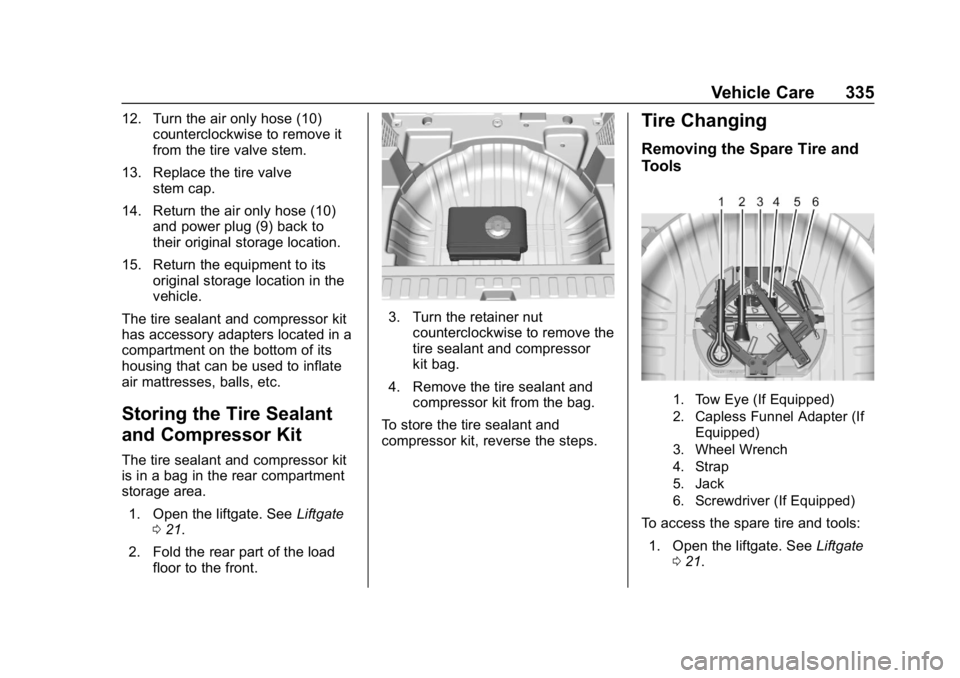
Removing the Spare Tire and
Tools
1. Tow Eye (If Equipped)
2. Capless Funnel Adapter (If Equipped)
3. Wheel Wrench
4. Strap
5. Jack
6. Screwdriver (If Equipped)
To access the spare tire and tools:
1. Open the liftgate. See Liftgate
0 21.
Page 354 of 415
Chevrolet Equinox Owner Manual (GMNA-Localizing-U.S./Canada/Mexico-
13555863) - 2020 - CRC - 8/2/19
Vehicle Care 353
pads for wear and rotors for surface
condition. Inspect drum brake
linings/shoes for wear or cracks.
Inspect all other brake parts.
Steering, Suspension, and
Chassis Components
Visually inspect steering,
suspension, and chassis
components for damaged, loose,
or missing parts or signs of wear at
least once a year.
Inspect power steering for proper
attachment, connections, binding,
leaks, cracks, chafing, etc.
Visually check constant velocity joint
boots and axle seals for leaks.
Body Component Lubrication
Lubricate all key lock cylinders,
hood hinges, liftgate hinges, steel
fuel door hinges, and power assist
step hinges, unless the components
are plastic. Applying silicone grease
on weatherstrips with a clean cloth
will make them last longer, seal
better, and not stick or squeak.
Underbody Maintenance
At least twice a year, spring and fall,
use plain water to flush any
corrosive materials from the
underbody. Take care to thoroughly
clean any areas where mud and
other debris can collect.
Do not directly power wash the
transfer case and/or front/rear axle
output seals. High pressure water
can overcome the seals and
contaminate the fluid. Contaminated
fluid will decrease the life of the
transfer case and/or axles and
should be replaced.
Sheet Metal Damage
If the vehicle is damaged and
requires sheet metal repair or
replacement, make sure the body
repair shop applies anti-corrosion
material to parts repaired or
replaced to restore corrosion
protection.
Original manufacturer replacement
parts will provide the corrosion
protection while maintaining the
vehicle warranty.
Finish Damage
Quickly repair minor chips and
scratches with touch-up materials
available from your dealer to avoid
corrosion. Larger areas of finish
damage can be corrected in your
dealer's body and paint shop.
Chemical Paint Spotting
Airborne pollutants can fall upon
and attack painted vehicle surfaces
causing blotchy, ring-shaped
discolorations, and small, irregular
dark spots etched into the paint
surface. See“Finish Care”
previously in this section.
Interior Care
To prevent dirt particle abrasions,
regularly clean the vehicle's interior.
Immediately remove any soils.
Newspapers or dark garments can
transfer color to the vehicle’s
interior.
Use a soft bristle brush to remove
dust from knobs and crevices on the
instrument cluster. Using a mild
soap solution, immediately remove