2020 AUDI A8 USB port
[x] Cancel search: USB portPage 32 of 360
Touch displays
MMI by securing it in the holder
=> page 30.
— When streaming media, the following situa-
tions may cause reduced data transfer rates,
interrupted connections, or restrictions:
—If there are multiple Wi-Fi hotspots or de-
vices connected to Wi-Fi and Bluetooth
within range of the vehicle
— If multiple devices are connected to the
vehicle Wi-Fi hotspot and in use at the
same time
— The Audi tablet has been tested with many
of the products available on the market.
However, there may be cases where individ-
ual devices are not recognized, or where us-
age may be restricted or impossible.
Lea TN]
Applies to: vehicles with Audi tablet
[RAZ-0110
|
a
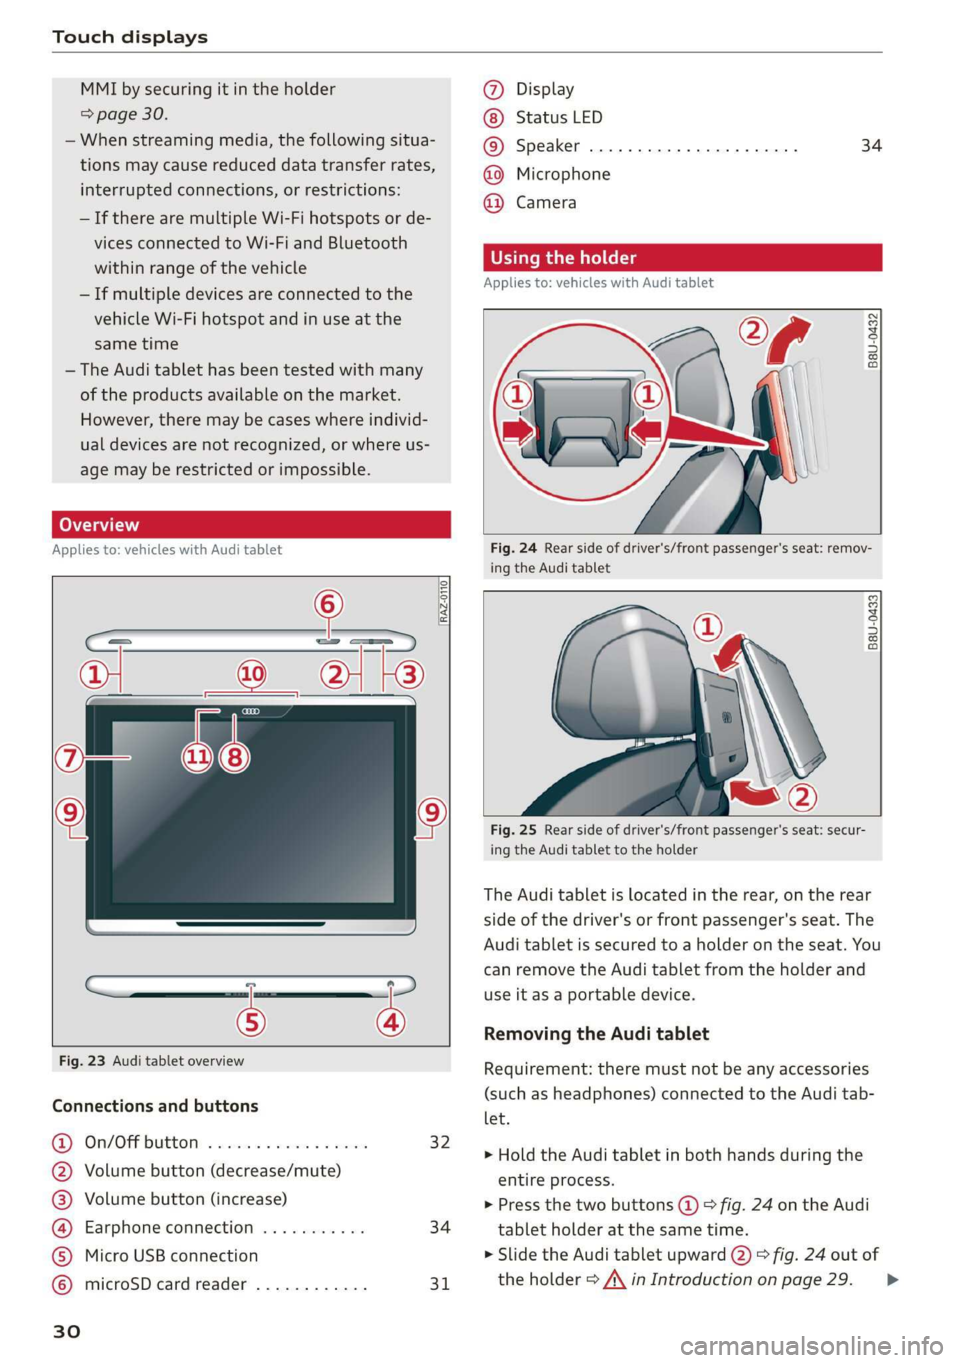
Fig. 23 Audi tablet overview
Connections and buttons
@) On/OFPbuttOM: » cso ee css ov eeceeee 32
@ Volume button (decrease/mute)
@® Volume button (increase)
@ Earphone connection ........... 34
© Micro USB connection
© microSD card reader ............ 31
Ww °o
@ Display
Status LED
© Speaker
@ Microphone
@ Camera
34
Using the holder
Applies to: vehicles with Audi tablet
B8U-0432
VA
Fig. 24 Rear side of driver's/front passenger's seat: remov-
ing the Audi tablet
B8U-0433
Fig. 25 Rear side of driver's/front passenger's seat: secur-
ing the Audi tablet to the holder
The Audi tablet is located in the rear, on the rear
side of the driver's or front passenger's seat. The
Audi tablet is secured to a holder on the seat. You
can remove the Audi tablet from the holder and
use it as a portable device.
Removing the Audi tablet
Requirement: there must not be any accessories
(such as headphones) connected to the Audi tab-
let.
> Hold the Audi tablet in both hands during the
entire process.
> Press the two buttons (@) > fig. 24 on the Audi
tablet holder at the same time.
> Slide the Audi tablet upward @) > fig. 24 out of
the holder > A\ in Introduction on page 29. >
Page 37 of 360
4N0012721BD
Touch displays
Symbol Description
There is no sound output. To switch
on the audio output, connect head-
phones or adjust the audio output
through the vehicle speakers.
The sound output is through the
Audi tablet speakers.
G) Tips
— Applies to: Rear Seat Remote: You can also
control the audio output from the Audi tab-
let using the Rear Seat Remote > page 28.
— The sound is only played through the Audi
tablet speakers if the Audi tablet is not con-
nected to the MMI and no headphones are
connected.
— If headphones are connected to the head-
phone jack (@) > page 30, fig. 23, the audio
output is sent to the wired headphones.
Bluetooth headphones already connected
will be muted.
— If the volume is too high, it will be adjusted
down to a set level when connecting to
headphones.
— Any integrated remote control functions are
not supported for wired headphones.
Applies to: vehicles with Audi tablet
The Audi tablet settings can be set in the MMI,
for example to restrict operation by children.
> Applies to: MMI: Select on the home screen:
SETTINGS > Display & brightness > MMI.
Possible settings:
— Transfer MMI language to the Audi tablet
— Receive destinations from Audi tablet
— Display home screen on Audi tablet
— Allow Rear Seat Entertainment access to
speakers
Block RSE with parental control button
When this function is switched on and parental
control is activated > page 53, the ability to op-
erate the Audi tablet by touch is blocked. You can
continue to receive content on the Audi tablet
and adjust the volume using the buttons on the
Audi tablet. The MMI is used for control.
Block RSE access to media sources
When this function is switched on, access to the
MMI media sources (such as the radio or DVD
drive) is blocked. Access to files from the internal
Audi tablet flash drive is unrestricted.
Troubleshooting
Applies to: vehicles with Audi tablet
You can perform a device test when the Audi tab-
let functionality is limited.
> Select on the home screen: SETTINGS > Device
test.
> Follow the instructions in the display.
Technical data
Applies to: vehicles with Audi tablet
Audi tablet
Display LCD (IPS), 10.1" screen, 1920 x 1200 pixels
Internal flash drive Approximately 25 GB
Camera 1080p
Wi-Fi Wi-Fi 802.11 a/b/g/n
Bluetooth Bluetooth 4.0
Earphone connection 3.5 mm jack port
Memory card reader Memory cards with a capacity of up to 128 GB: mi-
croSD, microSDHC, microSDXC
USB
Micro-USB connection (USB 2.0) >
35
Page 99 of 360

4N0012721BD
Stowing and using
Stowing and using
Power sources
When the ignition is switched on, you may be
able to use multiple power sources for external
devices, depending on the vehicle equipment.
12 volt sockets
You can connect electrical accessories to the 12
volt sockets. The power usage must not exceed
120 watts.
The 12 volt sockets are labeled with the 12V
symbol. They are located in the front center con-
sole, in the rear* and on the side trim panel in the
luggage compartment*.
USB ports
Applies to: vehicles with USB port
You can charge mobile devices using the USB
ports. The USB ports are labeled with the «<> or
(4 symbol or CHARGE ONLY.
115 volt socket
Applies to: vehicles with 115 volt socket
The socket is located in the center console in the
rear and can be used for electrical devices > A\.
The power usage must not exceed 150 watts.
When you push the device connector all the way
into the socket, the child safety mechanism re-
leases and there is electric current.
—If the LED on the socket is green or flashes
slowly, then the socket is ready for use.
—If the LED is red and flashes quickly, there is a
malfunction in the connected device or the
socket is too hot. The socket will switch off for
safety reasons. To reactivate the socket, remove
the device connector. Connect the device after
correcting the malfunction or reconnect after a
brief cool-down period.
— Incorrect usage can lead to serious injuries
or burns. To reduce the risk of injuries, never
leave children unattended in the vehicle
with the key.
Z\ WARNING
Applies to: vehicles with 115 volt socket
—To reduce the risk of fatal injury, do not in-
sert any conductive objects, such as knitting
needles, into the contacts on the socket.
—To reduce the risk of fatal injury, do not spill
any fluids on the socket. Should any mois-
ture enter the socket, make sure that it has
dried out completely before using the socket
again.
— If devices or connectors that are heavy (such
as a power supply unit) are attached directly
to the socket, the holder can become dam-
aged, which increases the risk of injury.
— Using adapters and extension cables in-
creases the risk of injury because they over-
ride the safety devices for the socket.
—To reduce the risk of injury, remove the con-
nector of the connected device if the socket
has switched off due to a malfunction.
Z\ WARNING
—To reduce the risk of fatal injury, store all
connected devices securely when driving so
that they do not move around inside the ve-
hicle when braking or in the event of an acci-
dent.
@) Note
— Read the operating manuals for the con-
nected devices.
—To reduce the risk of damage to the vehicle
electrical system, never attempt to charge
the vehicle battery by connecting accesso-
ries that provide power to the power sour-
ces.
— Do not connect any device whose network
class (voltage) does not match the network
class designed for the socket.
— Disconnect the connectors from the power
sources carefully to reduce the risk of dam-
aging them.
(i) Tips
Applies to: vehicles with 115 volt socket
— Devices that are not shielded or devices near
the rear window antenna can cause mal-
functions in the radio, TV, or vehicle electri-
cal system.
97
Page 213 of 360
4N0012721BD
Telephone
Ringtone and volume settings
— Ringtone and message volume: you can adjust
the volume of the selected ringtone and the no-
tification volume when a message is received by
moving the position of the slider.
— Ringtone”: available ringtones are played using
the Ringtone function. Press on an entry in the
list.
— Microphone input level: you can adjust the mi-
crophone input level using the slider.
Turn on car phone or data module
Applies to: vehicles with car phone/data module
When this function is switched on, you can use
the car phone or data module.
As long as the car phone was not turned off sepa-
rately the last time it was used, it will turn on au-
tomatically when the ignition is switched on.
Edit voicemail number
You can change your voicemail number.
Enable VoLTE
When this function is switched on, Voice over
LTE* will be supported.
Network settings
— Login to mobile phone network: select to log
into your cell phone service provider network
automatically or manually.
— Network selection: Requirement: the data
module must be switched on and Login to mo-
bile phone network must be set to Manual. Se-
lect a network manually from the list of availa-
ble networks at the present location.
Car phone serial number (IMEI):
Applies to: vehicles with car phone
The serial number (IMEI) of your car phone is dis-
played.
@ Tips
— Several mobile devices can be paired with
the MMI, but only two* mobile devices can
be actively connected.
—To delete all paired Bluetooth devices, the
Bluetooth function can be reset to the fac-
tory default settings > page 267.
Directory settings
Applies
to: vehicles with telephone
> Applies to: MMI: Select on the home screen:
PHONE > Contacts > <2.
Switching between two mobile devices
Requirement: telephone 1 and telephone 2 must
be connected.
Switch telephones: the device name of the avail-
able mobile device is displayed. You can switch
the phone by pressing the button.
The directory for the selected phone will be dis-
played.
Hide grayed-out contacts
When this function is switched on, contacts that
have no phone numbers stored for them will be
hidden.
Sort order
You can sort the contacts in alphabetical order by
Last name or First name.
Download contacts
Requirement: a mobile device must be connected
to the MMI.
To update the contacts in the MMI, you can man-
ually download your mobile device contacts. De-
pending on the mobile device, you may need to
disconnect and reconnect the Bluetooth connec-
tion to update the contacts.
Memory capacity
You can manage up to 23,000 contacts. You can
also download up to 5,000 contacts from maxi-
mum four mobile devices. You can also import up
to 3,000 contacts from a storage medium.
Importing and exporting contacts
Requirement: an SD card must be in the SD card
reader* = page 250 or a USB storage device must
be connected to the Audi music interface
=> page 253.
211
Page 214 of 360
Telephone
Contacts in vCard format (.vcf) can be imported
or exported from the MMI.
— Applies to: MMI: Importing contacts from a
storage device: Select: Import contacts >
Search for import data > SD card 1 or USB de-
vice 1/USB device 2 > desired contacts or Se-
lect all contacts > Start import.
— Applies to: MMI: Exporting contacts to a stor-
age device: Requirement: Only previously im-
ported contacts can be exported. Select: Export
contacts > Find source for exporting > SD card
1 or USB device 1/USB device 2 > desired con-
tacts or Select all contacts > Start export.
@ Tips
— For more information about the myAudi ac-
count, visit my.audi.com.
— The imported contacts are stored in the lo-
cal MMI memory.
— Contacts that were downloaded from a mo-
bile device cannot be exported.
— There should be no other files or folders on
the storage medium containing the contacts
to be imported.
— Apple devices and MTP devices (such as
smartphones) are not recognized as USB
storage devices.
Mobile phone network settings
Applies to: vehicles with telephone
> Applies to: MMI: Select on the home screen:
SETTINGS > Connection settings > Mobile
phone network.
Switching the car phone or data module on
Applies to: vehicles with car phone/data module
See > page 211.
Instrument cluster
Telephone
Applies to: vehicles with multifunction steering wheel and
telephone
In the instrument cluster display, you can control
the MMI functions with the multifunction steer-
ing wheel. Operating > page 13 and > page 40,
Additional function buttons.
212
Requirement: the Telephone tab must be select-
ed in the instrument cluster.
> Press the [=] button.
Possible options:
— Call list: Requirement: the call list must con-
tain a phone number.
— Favorites: Requirement: favorites must be stor-
ed in the MMI.
— Switch telephones: Requirement: two cell
phones must be connected to the MMI.
— Back to call: Requirement: there must be a call
in progress.
i) Tips
Depending on the selected function, it may be
necessary to use the MMI.
Using the Rear Seat
Remote
Pairing a mobile device
Applies to: vehicles with Rear Seat Remote and Audi phone
box
You can make calls through the exterior antenna
on the vehicle using the Rear Seat Remote. Using
the exterior antenna helps when there is a low
signal and also provides better reception quality.
When making phone calls, you can leave the Rear
Seat Remote in the holder or remove it. If you
hold the Rear Seat Remote in your hand, the
screen will automatically switch to the Phone
menu when there is an active phone call. Pay at-
tention to the positioning of the screen so that
the other person on the call can hear you.
You can use the phone functions with the Rear
Seat Remote. You can adjust settings in the MMI,
for example, the Bluetooth settings for connect-
ing with the mobile device.
Connecting a mobile device
Requirement: The Bluetooth settings must be
open on your mobile device during the connec-
tion setup. The mobile device to be connected
must not be actively connected to any other Blue-
tooth device.
Page 238 of 360

Navigation
Depending on availability, colored markings on
the map indicate the probability of open parking
spaces.
Green | High probability
Medium probability
Red Low probability
Read the information about Audi connect, and
be sure to note the connectivity costs section
=@ in General information on page 216.
Orange
Satellite map
Applies to: vehicles with navigation system and satellite map
You can display the navigation map with satel-
lite images.
Requirement: the MMI must be connected to the
Internet > page 216, Audi connect.
> Applies to: MMI: Select on the home screen:
NAVIGATION > <2} > Map settings > Satellite
map).
The map view is based on data packets received
from the Internet in the form of satellite images,
which are then combined with the roadways from
the > page 231, fig. 163 standard map view.
Read the information about Audi connect, and
be sure to note the connectivity costs section
=>@ in General information on page 216.
~The satellite map») is updated regularly
whenever the function is opened. The proc-
ess may take several seconds.
— When the satellite map display is switched
on )) with the 3D position map type, the dis-
play automatically switches to the 2D map
type when driving through tunnels.
D Audi provides access to services from third party provid-
ers. Permanent availability cannot be guaranteed, because
that depends on the third party provider.
236
— Depending on the Internet connection, the
standard map may also be displayed when
the satellite map is switched on).
Electric range
Applies to: vehicles with navigation system and plug-in hybrid
drive
The electric range shows the maximum distance
that can be driven using electric power. Informa-
tion such as the type of road, speeds, and alti-
tude will be taken into account.
Fig. 167 Upper display: electric range display
> Applies to: MMI: Select on the home screen:
NAVIGATION > %} > Map settings > Show
range.
You can read the electric range of your vehicle
based on the border (@).
Map update
Introduction
Applies to: vehicles with navigation system
You can update the map data in the MMI with a
map update. The functions depend on the coun-
try and vehicle equipment:
— Map updates through online map update
=> page 237.
— Import map updates from the SD card or USB
connection to your MMI & page 237.
— Map update at an authorized Audi dealer or au-
thorized Audi Service Facility. This can result in
additional costs.
Page 239 of 360

4N0012721BD
Navigation
Online map update
Applies to: vehicles with MMI, navigation system, and Audi
connect Infotainment
Using map update online, you can update the
map material in your navigation system directly
from your vehicle.
Using your vehicle position, the MMI identifies
regions which you are frequently in. Based on
this, update data for these regions are available
for your MMI.
Start map update
Applies to: MMI
Requirement: the MMI must be connected to the
Internet > page 216, Audi connect.
> A notification for a map update will appear in
the upper display.
> If the option Automatic online map update
= page 237 is switched on, the MMI will start
the map update. Or:
> Press on the notification. Or: access the notifi-
cation in the notification center on > page 22
and press on the notification.
> If the Automatic online map update option
=> page 237 is switched off, press on Allow
once or Always allow.
The MMI will start the map update. The progress
of the download and installation will be shown in
the upper display.
When the update has ended, a notification will
be displayed.
@) Note
Read the information about Audi connect, and
be sure to note the connectivity costs section
=@ in General information on page 216.
@ Tips
Because of the high volume of data, down-
loading large country packages or the whole
package to your PC from your myAudi ac-
count, storing it on an SD card or a USB stick,
and then importing it to your MMI is recom-
mended > page 237.
Map update using an SD card or USB
connection
Applies to: vehicles with MMI, navigation system, and Audi
connect Infotainment
With the map update, you can update the map
material in your navigation system.
Requirement: you must have created a myAudi
account at my.audi.com. Your vehicle must be
registered in your myAudi account.
Prepare map update
> Download the map update at my.audi.com and
store it on an SD card or on a USB flash drive.
For additional information, visit my.audi.com.
Start map update
Requirement: a map update for your vehicle must
be on an SD card or a USB flash drive.
> Insert the SD card in your vehicle's SD card
reader > page 250. Or: connect the USB flash
drive to the Audi music interface > page 254.A
notification for a map update will appear in the
upper display.
> Press on the notification. Or: access the notifi-
cation in the notification center on > page 22
and press on the notification. The update pack-
age is shown.
> Press Next. The installation status is shown in
the upper display.
> When the update has ended, a notification will
be displayed.
Map updates settings
Applies to: vehicles with a navigation system and Audi con-
nect Infotainment
> Applies to: MMI: Select on the home screen:
SETTINGS > System maintenance.
Automatic online map update: when the func-
tion is switched on, map updates will be auto-
matically downloaded and installed.
® Note
Read the information about Audi connect, and
be sure to note the connectivity costs section
=> in General information on page 216.
237
Page 252 of 360
Media
Media
General information
There may be different media drives and connec-
tions available depending on the vehicle equip-
ment. For example, you can play media files us-
ing the SD card reader or connect your mobile de-
vices to the Audi music interface and operate
them through the MMI.
Media and format restrictions: the MMI (includ-
ing the SD card reader and the USB storage de-
vice connection) was tested with a variety of
products and media on the market. However,
there may be cases where individual devices or
media and audio/video files may not be recog-
nized, may play only with restrictions, or may not
play at all.
Restricted functionality: reset the Media to the
factory default settings if functionality is restrict-
ed.
Digital Rights Management: please note that
the audio/video files are subject to copyright pro-
tection.
The media drives do not play files that are pro-
tected by DRM and are identified with the symbol
&.
Data security: never store important data on SD
cards, CDs/DVDs, or mobile devices. Audi is not
responsible for damaged or lost files and media.
Loading times: the more files/folders/playlists
there are on a storage medium, the longer it will
take to load. To reduce the amount of time it
takes the audio/video files to load, use a storage
medium that only contains audio/video files, and
create subfolders (for example, for each artist or
album).
Additional information: when playing, audio
files are automatically displayed with any addi-
tional information that is stored (such as the ar-
tist, track and album cover). If this information is
not available on the storage medium, the MMI
will check the Gracenote metadata database.
However, in some cases, the additional informa-
tion may not be displayed.
250
C@) Note
Read the information about Audi connect, and
be sure to note the connectivity costs section
=>@ in General information on page 216.
SD card reader
The SD card reader is in the storage compartment
under the front center armrest.
Inserting the SD card
> The angled corner of the SD card must face to-
ward the right front side when being inserted.
> Slide the SD card into the card reader slot until
the SD card clicks into place.
The SD card reader is accessed and operated
through the MMI = page 255.
@) Note
— Only use one-piece SD cards. If adapter
cards (SD cards with more than one piece)
are used, the card could fall out of the
adapter when driving because of vibrations.
Individual pieces could then become stuck
in the drive and impair the functionality.
—To reduce the risk of damaging drives and
data carriers, always keep data carriers ina
sleeve and never expose them to direct sun-
light.
DVD drive
General information
Applies to: vehicles with a DVD drive
The functionality of individual storage mediums
may be limited due to the variety of blank CDs/
DVDs available and the various capacities. Audio
CDs or video DVDs with copy protection, CDs/
DVDs that do not conform to the standard, and
multisession CDs may have limited playback or
may not play at all. Audi recommends finalizing
the recording process when creating multisession
CDs. Multisession DVDs are not supported.
C) Note
To reduce the risk of damaging the drive and
data carriers: