Page 161 of 310

4K8012721BC
Parking and maneuvering
AN WARNING
— Follow the safety precautions and note the
limits of the assist systems, sensors, and
cameras > page 115.
— The Surroundings and 3D surroundings are
created from the individual camera images.
The vehicle image is shown by the system.
Objects and obstacles above the camera are
not displayed.
® Note
Only use the images provided by the camera
on the rear of the vehicle when the luggage
compartment lid is completely closed. Make
sure any objects you may have mounted on
the luggage compartment lid do not block the
rearview camera.
G@) Tips
— Depending on the selected gear, it will auto-
matically switch between the Front and
Rear views. If you switch the view manually,
the automatic front/rear camera change will
be temporarily deactivated.
— When first activated while a forward gear is
engaged, the Front corner is displayed.
Rear cross-traffic assist
Applies to: vehicles with rear cross-traffic assist
rr]
s e
= = a
Fig. 117 Sensor detection range for rear cross-traffic assist
Fig. 118 Upper display: rear cross-traffic assist display
General information
The rear cross-traffic assist monitors the area be-
hind and next to the vehicle using radar sensors
at the rear corners of the vehicle. The system can
detect moving objects that are approaching, such
as vehicles > fig. 117. A display in the MMI and
various warnings provide assistance when exiting
a parking space.
Requirements for using the rear cross-traffic
assist:
— Reverse gear must be engaged and the speed
while driving in reverse must not be higher than
6 mph (10 km/h).
Displays, warnings, and braking
— Display: the indicator @ in the upper display
only appears when the parking aid is activated.
In vehicles with peripheral cameras, the display
only appears in the Rear and Rear corner cam-
era views. Arrows show the direction from
which the cross traffic is approaching.
— Audible warnings: an audio signal may sound
as an additional warning when driving in re-
verse.
— Automatic brake activation: if you do not react
to a warning, a brief braking by the system can
warn you of a potential collision with an ap-
proaching object.
The audible warning signal and the automatic
brake activation occur only when driving in re-
verse.
Switch rear cross-traffic assist on and off
— Applies to MMI: Select on the home screen: VE-
HICLE > Parking aid > Rear cross-traffic assist.
Or
159
Page 162 of 310

Parking and maneuvering
— Select |--| > Rear cross-traffic assist in the upper
display when the parking system is active.
Messages
re or > is displayed when there is a mal-
function, the rear cross traffic assist functions
may be unavailable or may be limited.
A message that indicates the cause and possible
solution may appear with some displays. The
weather conditions may be too poor or a sensor
may be covered. Clean the sensor area in the ve-
hicle rear and try to turn the systems on again
later.
If the malfunction remains, drive to an author-
ized Audi dealer or authorized Audi Service Facili-
ty immediately to have the malfunction correct-
ed.
Z\ WARNING
— Follow the safety precautions and note the
limits of the assist systems, sensors, and
cameras > page 115.
— The rear cross-traffic assist will not provide
alerts about people and cannot warn you
about every type of approaching objects,
such as cyclists. Always monitor the traffic
as well as the vehicle's surroundings with di-
rect eye contact.
— The system may not react if objects are ap-
proaching very quickly.
— The rear cross-traffic assist will not provide
alerts if your vehicle is parallel parked or if
your vehicle is pulled too far into the park-
ing space so that it is hidden by adjacent
vehicles.
@ Tips
— Certain settings are stored automatically in
the active personal profile.
— Once an automatic brake activation occurs,
the system cannot initiate another activa-
tion for several seconds.
— System functions may not be available if the
ESC is limited or switched off, or if there is a
malfunction.
— If there is an acoustic warning signal from
the rear cross-traffic assist, then the park-
160
ing system may not warn you of detected
obstacles under certain circumstances.
— For an explanation on conformity with the
FCC regulations in the United States and the
Industry Canada regulations, see
=> page 289.
— The coverage areas of the sensors > fig. 117
are diagrams and do not represent a true-
to-scale image of the sensor ranges.
Page 163 of 310

4K8012721BC
Telephone
Telephone
Introduction
Applies to: vehicles with telephone
You can operate various telephone functions easi-
ly through the MMI in your vehicle.
Depending on the country and the vehicle equip-
ment, the following options may be available:
— Connecting a cell phone with Bluetooth
— Using two telephones
— Using the Audi phone box
ZA WARNING
— Medical experts warn that mobile devices
can interfere with the function of pacemak-
ers. Always maintain a minimum distance of
about 7.9 inches (20 cm) between the mo-
bile device antennas and the pacemaker.
— Do not carry the mobile device in a pocket
directly over the pacemaker when the
phone is switched on.
— Switch the mobile device off immediately
if you suspect it may be interfering with
the pacemaker.
— Do not use the voice recognition system*
=> page 27 in emergencies because your
voice may change in stressful situations. The
system may take longer to dial the number
or may not be able to dial it at all. Dial the
emergency number manually.
— Switch your mobile device off in areas where
there is a risk of an explosion. These loca-
tions are not always clearly marked. This
may include gas stations, fuel and chemical
storage facilities or transport vehicles, or lo-
cations where fuel vapors (such as propane
or gasoline vapor in vehicles or buildings),
chemicals or large quantities of dust parti-
cles (such as flour, sawdust or metal) may
be present in the air. This also applies to all
other locations where you would normally
turn your vehicle engine off.
— The demands of traffic require your full at-
tention. Always read the chapter > page 20,
Traffic safety information.
CG) Note
Read the information about Audi connect, and
be sure to note the connectivity costs section
=> page 174.
G@) Tips
— The Bluetooth connection range is limited
to inside the vehicle.
—Aselection of supported Bluetooth devices
can be found in the database for tested mo-
bile devices at www.audi.com/bluetooth.
Setup
Connecting a cell phone via Bluetooth
Applies to: vehicles with telephone
Requirement: the vehicle must be stationary and
the ignition must be switched on. The Bluetooth
settings must be open on your mobile device dur-
ing the connection setup. The mobile device to be
connected must not be actively connected to any
other Bluetooth device. The MMI must only be
connected to one mobile device.
> Enable the Bluetooth function and visibility on
the MMI = page 220 and the cell phone.
> Applies to: MMI: Select on the home screen:
PHONE.
> Follow the system instructions. The available
Bluetooth devices will be displayed after sever-
al seconds.
> Press on the desired mobile device in the list of
displayed Bluetooth devices.
> To update the list, press OQ.
A PIN for a secure Bluetooth connection will be
generated.
> Confirm the PIN on your mobile device, or
> Enter the PIN for connecting on your cell
phone. The time allowed for entering the PIN is
limited to approximately 30 seconds.
> Follow the system instructions.
> Pay attention to any other system prompts on
the MMI and on your cell phone.
161
>
Page 164 of 310

Telephone
After connecting successfully
Information about the connected profiles will ap-
pear. You can also change the profiles later
=> page 221.
The cell phone contacts are automatically loaded
in the MMI. This process can take several mi-
nutes, depending on the number of contacts.
Depending on your cell phone and the connection
type, you can use the following functions:
Handsfree
Requirement: your cell phone must be connected
to the MMI via a Bluetooth Hands Free Profile
(Bluetooth HFP).
You can use the hands-free system. You can make
calls using the antenna on your mobile device.
Sending and receiving messages
See > page 169.
@) Note
Read the information about Audi connect, and
be sure to note the connectivity costs section
=> page 174.
@) Tips
— You can apply additional settings to con-
nected mobile devices under Connected de-
vices > page 220.
— You can also search for the MMI on your mo-
bile device using the Bluetooth device
search.
— You only have to pair your device one time.
Bluetooth devices that are already paired
automatically connect to the MMI when the
Bluetooth function is switched on, when
they are within range, and when the ignition
is switched on. The last connected mobile
device is given first priority.
— Pay attention to any system prompts dis-
played on your mobile device or the MMI,
for example if the system should connect
automatically in the future. Depending on
2) SIM card installed in the vehicle at the factory.
2) Not available in all countries.
162
the mobile device, you may also need to
download contacts and confirm access to
your messages separately.
— When leaving the vehicle, the Bluetooth
connection to the mobile device will auto-
matically disconnect. Depending on your
mobile device, phone calls in progress may
be automatically redirected from the MMI
to your mobile device so that you can con-
tinue the call on your phone.
— When the car phone or data module func-
tion* is switched on, Audi connect Infotain-
ment* is available through the embedded
SIM card2)2).
Using two telephones
Applies to: vehicles with telephone, and Audi phone box
You can connect two mobile devices to the MMI,
for example your business and your personal mo-
bile device. You can use both mobile devices to
make calls in the vehicle.
Connecting another mobile device
Requirement: a mobile device must be connected
to the MMI.
> Applies to: MMI: Select on the home screen:
PHONE > [?. Follow the system instructions, or
> Applies to: MMI: Select on the home screen:
SETTINGS > Connected devices > Telephone 1
or Telephone 2 > New connection.
See > page 161, Connecting a cell phone via
Bluetooth.
Switching between two mobile devices
Requirement: phone 1 and phone 2 must be con-
nected to the MMI.
> Applies to: MMI: Select on the home screen:
PHONE >
Page 165 of 310

4K8012721BC
Telephone
Disconnecting a mobile device
Applies to: vehicles with telephone
The mobile device will be disconnected from the
MMI and removed from the list of paired devices.
> To disconnect a connected device, use the con-
nection manager > page 221.
Using the Audi phone
box
Applies to: vehicles with Audi phone box
Fig. 119 Storage compartment under the center armrest:
Audi phone box with connections
You can charge your mobile device battery wire-
lessly using the Audi phone box. You can make
calls through the exterior antenna* on the vehi-
cle. Using the external antenna* helps when
there is a low signal and also provides better re-
ception quality.
— Position the mobile device in the Audi phone
box centered on the @ symbol @ with the dis-
play facing up.
Depending on the vehicle equipment, you may
then be able to use the following functions:
— Connect to the exterior vehicle antenna!)
— Wirelessly charge the mobile device. Require-
ment: the ignition must be switched on. The
charging function must be switched on in the
MMI. You must have a Qi-capable2) mobile de-
vice.
D_ Not available in all countries. These are additional car
phone functions only in conjunction with Audi connect In-
fotainment*.
2) The Qi standard makes it possible to charge your mobile
device wirelessly.
You can also charge a mobile device using the
USB adapter: connect your mobile device to the
Audi music interface using a USB adapter cable
@. You can charge your mobile device using spe-
cific USB adapters > page 208, fig. 137.
Reminder signal
When the device reminder signal is switched on,
you will be notified that your mobile device is still
in the Audi phone box when you leave the vehicle.
Requirement
—A Qi-capable”) mobile device must be in the
Audi phone box, or
— Your mobile device must be connected to the
Audi music interface by a USB adapter, and the
Audi smartphone interface must be active, or
— Your iPhone® must be connected to the MMI
via Bluetooth® > page 161 and must be charg-
ing through the Audi music interface using a
USB adapter.
Applies to: MMI: Select on the home screen: SET-
TINGS > General > Reminder signal and mobile
device wireless charging .
The following settings are available:
— Signal tone
— Spoken cue”: this setting is switched on at the
factory.
— Off
— Mobile device charging notification*: when
this function is switched on, the charge status
of your mobile device is displayed. You will also
be reminded not to forget your mobile device
when leaving the vehicle.
— Mobile device wireless charging: when this
function is switched on, you can charge your Qi-
capable mobile device wirelessly in the Audi
phone box.
WARNING
— Loose objects can be thrown around the ve-
hicle interior during sudden driving or >
y
163
Page 166 of 310

Telephone
braking maneuvers, which increases the risk
of
an accident. Store objects securely while
driving.
— The mobile device may become hot during
wireless charging. Pay attention to the tem-
perature of your mobile device and be care-
ful when removing it from the Audi phone
box.
— An alternating magnetic field is used for
wireless charging. Maintain a minimum dis-
tance of approximately 2.4 in (6 cm) to the
Audi phone box charging plate. The thresh-
olds for prolonged exposure at this distance
comply with ICNIRP1998. Therefore, inter-
actions such as irritation of sensory organs,
malfunctions of active implants (such as
pacemakers, infusion pumps, or neurosti-
mulators) or effects on passive implants
(such as prosthetic limbs) is highly unlikely.
If you have an implant, consult a medical
specialist if you have any questions. You can
also switch the function for wireless charg-
ing in the Audi phone box on and off. You
can continue to charge your mobile device
using a cable connection.
@) Note
Applicable to U.S.A.
Operation of the Audi phone box is subject to
the following requirements of the Federal
Communications Commission:
— This is a CONSUMER device.
— BEFORE USE, you MUST REGISTER THIS DE-
VICE with your wireless provider and have
your provider’s consent. Most wireless pro-
viders consent to the use of signal boosters.
Some providers may not consent to the use
of this device on their network. If you are
unsure, contact your service provider.
— You MUST operate this device with approved
antennas and cables as specified by the
manufacturer. Antennas MUST be installed
at least 20 cm (8 inches) from any person.
— You MUST cease operating this device im-
mediately if requested by the FCC or a li-
censed wireless service provider.
164
— WARNING: E911 location information may
not be provided or may be inaccurate for
calls served by using this device.
C) Note
Applicable to Canada
In Canada, operation of a Zone Enhancer,
such as an Audi Phone Box, is subject to the
following requirements of the Innovation,
Science and Economic Development Canada
(ISED):
— This is a CONSUMER device.
— BEFORE USE, you MUST meet all require-
ments set out in CPC-2-1-05.
— You MUST operate this device with approved
antennas
and cables as specified by the
manufacturer. Antennas MUST NOT be in-
stalled within 20 cm of any person.
— You MUST cease operating this device im-
mediately if requested by ISED or a licensed
wireless service provider.
— WARNING: £911 location information may
not be provided or may be inaccurate for
calls served by using this device.
@ Tips
— Only one mobile device at a time can be
charged wirelessly in the Audi phone box.
— Strong transmission quality* cannot be
guaranteed if more than one mobile device
is in the box.
— To reduce the risk of malfunctions, make
sure the mobile device is positioned correct-
ly in the Audi phone box.
— Make sure there are no objects between the
Audi phone box and the mobile device.
— Placing the mobile device in a bag or protec-
tive sleeve inside the Audi phone box can in-
terfere with the connection to the external
antenna”*.
— Metallic objects in the Audi phone box block
the wireless charging of your mobile device
and calls made using the exterior antenna”*.
—The maximum charging output is 5 W.
—The charging time and temperature will vary
depending on the mobile device being used. >
Page 167 of 310

4K8012721BC
Telephone
— You can purchase a USB adapter from an au-
thorized Audi dealer or authorized Audi
Service Facility, or at specialty stores.
— Audi recommends using Audi Genuine Ac-
cessories. Audi has verified their reliability,
safety, and suitability.
Using the telephone
Accessing the telephone functions
Applies to: vehicles with telephone
w
fentins frencsy
or
Requirement: a mobile device must be connected
to the MMI > page 161.
Fig. 120 Upper —O selection menu
> Applies to: MMI: Select on the home screen:
PHONE.
The following phone functions will be available:
@ Search
@ Calllist ........ ee 165
GQ). Favorites! « « seiscus x 5 estes 2 «weave vo 166
CB) COMtACES isws + x naps so ews ge saws 166
® Voicemail ...............0.000. 167
© Dialnumber ..............20005 167
@ Switching between two mobile de-
VICES sevens x aeswnn « % euenoos wo seeomus «aoe 171
Selected phone functions are also available in the
instrument cluster > page 173.
Opening the call list
Applies to: vehicles with telephone
(0)
=e) Call list
Smith, John (4) PIES ti
Perm AnPED 9:31AM
Albert, Simon (3) Pate}
Peewee era) EEE
ENT TES Ae) PLSD
Perm EL PE)
PUT ea 2018-10-28
Mobile 001712345678 rT
Fig. 121 Upper display: call list
Requirement: the call list must contain a phone
number.
> Applies to: MMI: Select on the home screen:
PHONE > Call list.
Possible call list symbols:
Missed calls
Dialed numbers
Received calls
Edit call list
Displaying a business card ....... 166
Number of interactions with a con-
tact
©OO®COLO
If more than one interaction with a contact has
already taken place, the last one is always dis-
played in the form of an arrow (a), @) or @).
Press and hold a contact or a phone number in
the list until the Options menu appears. Depend-
ing on your mobile device, the following options
may be available:
— Save as a shortcut > page 23, Shortcuts.
— Edit telephone number: edit a phone number
before dialing it. Press Dial and start the call.
— Show history*: Requirement: you must have al-
ready had more than one interaction with a
contact. All interactions with a contact or a
number are displayed.
— Store as favorite > page 166.
— Send text message > page 169.
— Send e-mail > page 170.
@) Tips
The call list can only be edited via the MMI.
165
Page 168 of 310

Telephone
Managing favorites
Applies to: vehicles with telephone
You can store the desired number for a contact as
a shortcut in the favorites list.
Accessing favorites
> Applies to: MMI: Select on the home screen:
PHONE > Favorites.
Storing an existing phone number as a
favorite:
> Press Call list.
> Press and hold a contact in the list until the Op-
tions menu appears.
> Press Store as favorite. The favorite has been
stored. will appear briefly.
Deleting stored favorites
> Select: Favorites > Z > one or multiple favor-
ites or Select all > Delete > (Done).
@) Tips
If there are multiple mobile devices, you can
create separate favorites in the MMI for each
mobile device.
Opening contacts
Applies to: vehicles with telephone
(enced)
eu os ;
or
Business ©=
0049841123456
PMU esac}
Poeanect
ones Reel)
Fig. 122 Upper display: business card
You can connect multiple mobile devices to the
MMI and manage up to four private phone books
in the MMI.
Requirement: a mobile device must be connected
to the MMI > page 161. You must have at least
one contact stored in your mobile device.
) Not available in all languages.
166
> Applies to: MMI: Select on the home screen:
PHONE > Contacts.
The contacts are displayed in alphabetical order.
You can change the sort order > page 172, Sort
order.
Displaying a business card
To open a business card, press on a contact in the
directory. The business card shows you details
about a contact.
If you press on a contact in the business card,
there are multiple options available:
@ Storinga favorite .............. 166
@® Options
© call
@ Send text message ............. 169
© Start navigation
© Sende-mail ..............2000. 170
Business card options
Press Q).
— Send contact*: you can select Text message or
E-mail > page 169.
— Add destination: you can add a business or pri-
vate address > page 191, Contacts as naviga-
tion destinations.
— Read out name: the MMI automatically cre-
ates a name tag that can be read aloud for each
entry > page 27.
— Save as a shortcut > page 23, Shortcuts.
Contact options
Press and hold a contact in the list until the Op-
tions menu appears.
— Send contact: you can select Text message or
E-mail > page 169.
— Send text message > page 169.
— Send e-mail > page 170.
— Store as favorite > page 166.
— Save as a shortcut > page 23, Shortcuts.
 1
1 2
2 3
3 4
4 5
5 6
6 7
7 8
8 9
9 10
10 11
11 12
12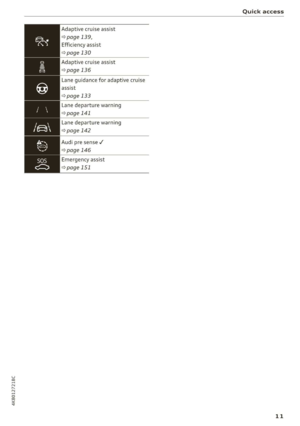 13
13 14
14 15
15 16
16 17
17 18
18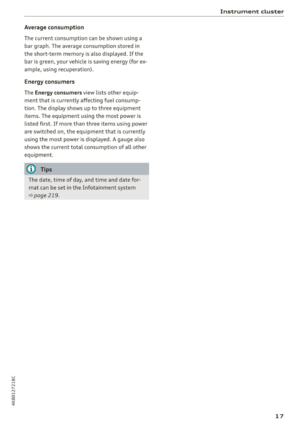 19
19 20
20 21
21 22
22 23
23 24
24 25
25 26
26 27
27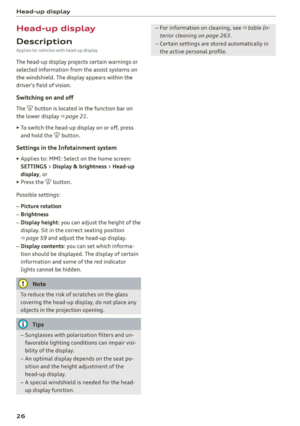 28
28 29
29 30
30 31
31 32
32 33
33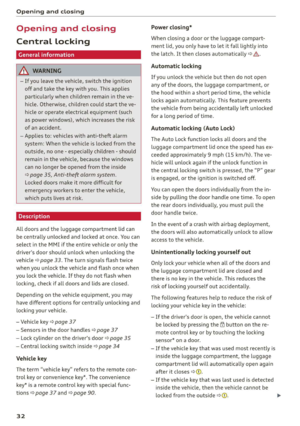 34
34 35
35 36
36 37
37 38
38 39
39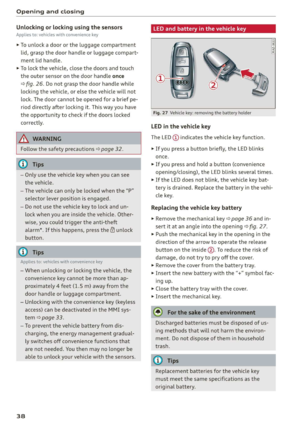 40
40 41
41 42
42 43
43 44
44 45
45 46
46 47
47 48
48 49
49 50
50 51
51 52
52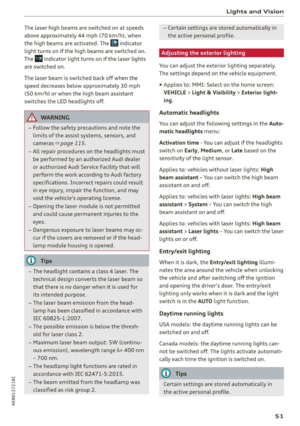 53
53 54
54 55
55 56
56 57
57 58
58 59
59 60
60 61
61 62
62 63
63 64
64 65
65 66
66 67
67 68
68 69
69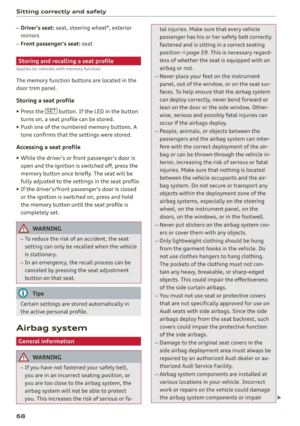 70
70 71
71 72
72 73
73 74
74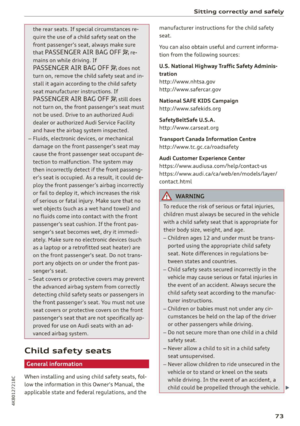 75
75 76
76 77
77 78
78 79
79 80
80 81
81 82
82 83
83 84
84 85
85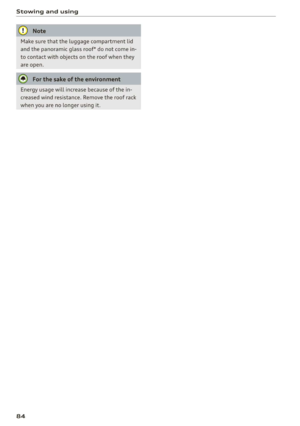 86
86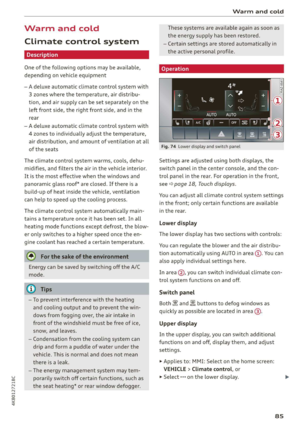 87
87 88
88 89
89 90
90 91
91 92
92 93
93 94
94 95
95 96
96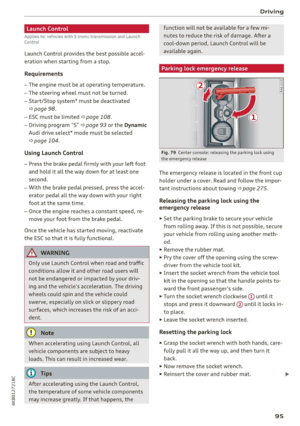 97
97 98
98 99
99 100
100 101
101 102
102 103
103 104
104 105
105 106
106 107
107 108
108 109
109 110
110 111
111 112
112 113
113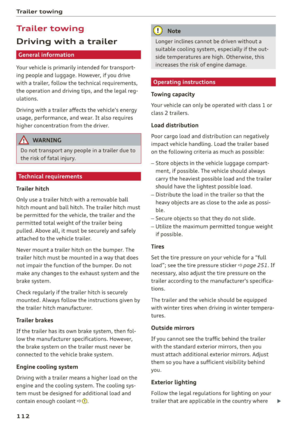 114
114 115
115 116
116 117
117 118
118 119
119 120
120 121
121 122
122 123
123 124
124 125
125 126
126 127
127 128
128 129
129 130
130 131
131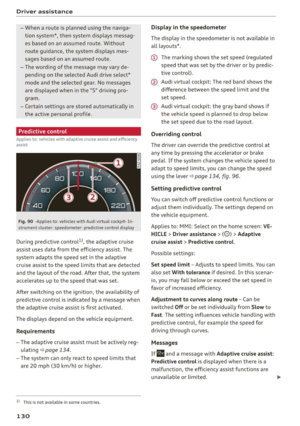 132
132 133
133 134
134 135
135 136
136 137
137 138
138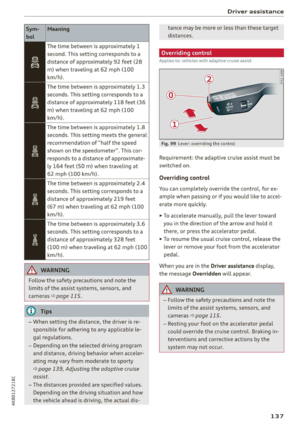 139
139 140
140 141
141 142
142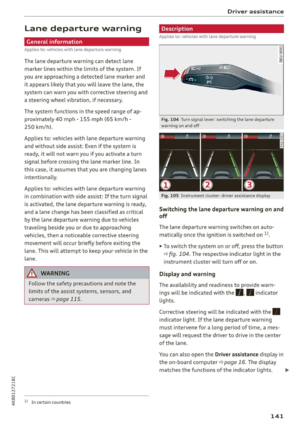 143
143 144
144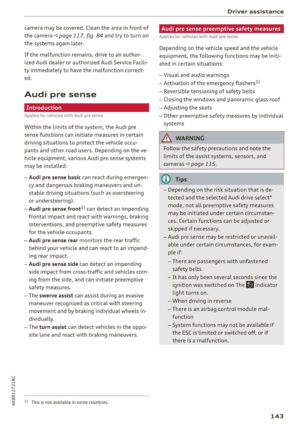 145
145 146
146 147
147 148
148 149
149 150
150 151
151 152
152 153
153 154
154 155
155 156
156 157
157 158
158 159
159 160
160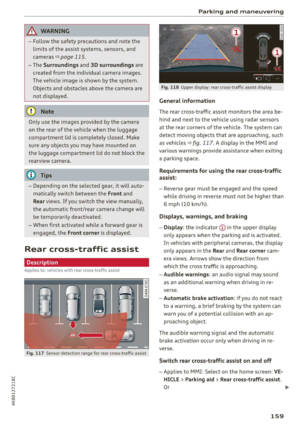 161
161 162
162 163
163 164
164 165
165 166
166 167
167 168
168 169
169 170
170 171
171 172
172 173
173 174
174 175
175 176
176 177
177 178
178 179
179 180
180 181
181 182
182 183
183 184
184 185
185 186
186 187
187 188
188 189
189 190
190 191
191 192
192 193
193 194
194 195
195 196
196 197
197 198
198 199
199 200
200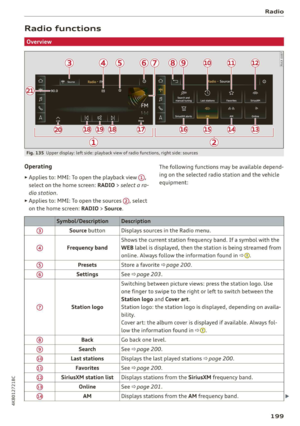 201
201 202
202 203
203 204
204 205
205 206
206 207
207 208
208 209
209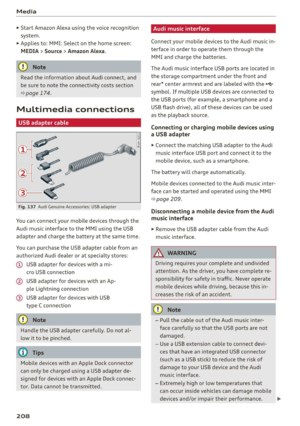 210
210 211
211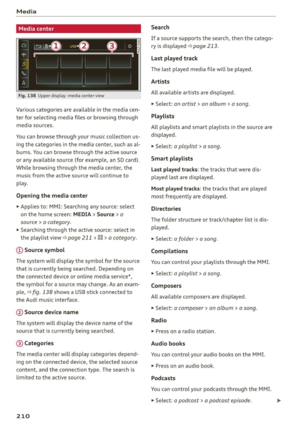 212
212 213
213 214
214 215
215 216
216 217
217 218
218 219
219 220
220 221
221 222
222 223
223 224
224 225
225 226
226 227
227 228
228 229
229 230
230 231
231 232
232 233
233 234
234 235
235 236
236 237
237 238
238 239
239 240
240 241
241 242
242 243
243 244
244 245
245 246
246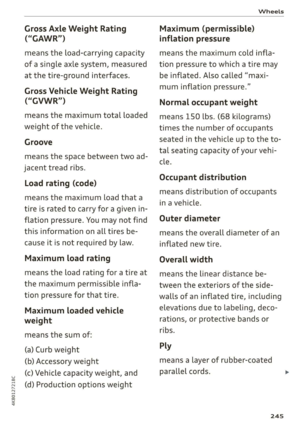 247
247 248
248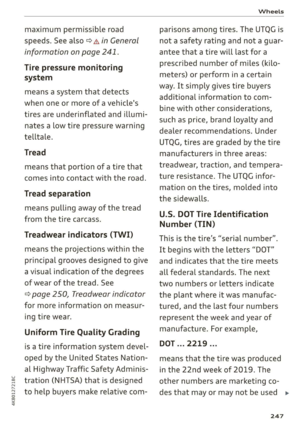 249
249 250
250 251
251 252
252 253
253 254
254 255
255 256
256 257
257 258
258 259
259 260
260 261
261 262
262 263
263 264
264 265
265 266
266 267
267 268
268 269
269 270
270 271
271 272
272 273
273 274
274 275
275 276
276 277
277 278
278 279
279 280
280 281
281 282
282 283
283 284
284 285
285 286
286 287
287 288
288 289
289 290
290 291
291 292
292 293
293 294
294 295
295 296
296 297
297 298
298 299
299 300
300 301
301 302
302 303
303 304
304 305
305 306
306 307
307 308
308 309
309