Page 177 of 296

8W1012721BB
Emergency call
LED status
— Green - The emergency call function is availa-
ble.
— Red - There is a malfunction in the emergency
call function. Contact an authorized Audi dealer
or authorized Audi Service Facility. Note the
messages about the availability of the emer-
gency function > page 175.
— Off - The emergency call function is not availa-
ble, perhaps because no network is available.
Warnings
If there is a critical system failure in the emer-
gency call systems, the vehicle occupants will re-
ceive the following warning: see > page 175, LED
status and > page 175, Messages.
@) Tips
If the emergency call is canceled due to a
poor connection, then the system automati-
cally tries to connect again.
Applies to: vehicles with emergency call function
& Emergency call function: malfunction! Lim-
ited availability. Please contact Service
If this indicator light turns on and this message
appears, the emergency call function is restrict-
ed. For example, you cannot call the emergency
call center, but data may still be transmitted un-
der certain circumstances. Drive to an authorized
Audi dealer or authorized Audi Service Facility im-
mediately to have the malfunction corrected.
& Emergency call function: malfunction! Func-
tion unavailable. Please contact Service
If this indicator light turns on and this message
appears, you cannot make an emergency call.
Drive to an authorized Audi dealer or authorized
Audi Service Facility immediately to have the
malfunction corrected.
D_ The availability of the services offered depends on the
country and may change in the future.
Online roadside
assistance
Applies to: vehicles with online roadside assistance
An online roadside assistance call )) is a combina-
tion of data transmission and a phone call. The
data transmission from your vehicle forwards im-
portant information to the Audi service center,
such as the vehicle and position data.
Calling online roadside assistance
Applies to: vehicles with online roadside assistance
[RAzZ-04a3|
2
Fig. 141 Front headliner: online roadside assistance but-
ton
Calling online roadside assistance
> Press the button @). The LED in the button
turns red. The online roadside assistance call
will be made.
> If you press the button @) by mistake, then
press it again. Or
> Applies to: MMI: Press Cancel or End call.
Audi incident assistance
A minor accident may be detected by the vehicle
electrical system. You are able to select between
online roadside assistance and an emergency call
in the MMI.
(i) Tips
If the roadside assistance call is canceled due
to a poor connection, then the call must be
made again.
175
Page 178 of 296

Navigation
Navigation
Opening navigation
Applies to: vehicles with navigation system
The navigation system directs you to your desti-
nation, around traffic incidents, and on alterna-
tive routes, if desired.
Fig. 142 Center display: route guidance not started
Opening navigation
> Applies to: MMI: Press NAVIGATION on the
home screen.
After accessing the navigation for the first time,
the map is displayed.
Opening navigation using the multifunction
steering wheel
> Applies to: multifunction steering wheel: Select
the Navigation tab in the instrument cluster.
> To display navigation when route guidance has
started, select in the instrument cluster: the
button > Map.
The following functions are available in the MMI:
@ Open the Select destination menu
=> page 178, fig. 143.
@ Open the intelligent search > page 177.
@ Switch between the map and the menu:
press A repeatedly until the desired function
is displayed.
You can find additional information about the
map update at > page 181, Map operation.
the traffic regulations that are applicable in
the country where you are operating the ve-
hicle. In the event that the driving directions
contradict traffic regulations, always follow
the traffic regulations applicable in the
country where you are operating the vehicle
to reduce the risk of an accident.
Z\ WARNING
— The demands of traffic require your full at-
tention. Always read the chapter > page 18,
Traffic safety information.
—The route calculated by the navigation sys-
tem is a driving recommendation. Follow
176
@ Note
Read the information about Audi connect, and
be sure to note the connectivity costs section
=>@ in General information on page 169.
@ Tips
— Snow and obstructions on the GPS antenna
or trees and large buildings can impair sat-
ellite reception and affect the system's abil-
ity to determine the vehicle position. Sever-
al deactivated or malfunctioning satellites
can also interrupt GPS reception and affect
the system's ability to determine the vehicle
position.
— Because street names sometimes change,
the names stored in the MMI may in rare
cases differ from the actual street name.
— Applies to: multifunction steering wheel:
Depending on the selected function, opera-
tion through the center display may be re-
quired.
— Applies to: vehicles with Audi connect Info-
tainment: Depending on the country and ve-
hicle equipment, additional services may be
available.
— An additional indicator will appear in the
head-up display.
myAudi navigation
Applies to: vehicles with Audi connect Infotainment
MMI navigation works seamlessly with the myAu-
di app.
Your destinations (favorites, last destinations)
are synchronized through your myAudi account.
All important destinations can be displayed in
the vehicle and in the myAudi app.
Page 179 of 296

8W1012721BB
Navigation
To load destinations in the vehicle automatically,
logging into the vehicle with a myAudi user is
recommended > page 27.
myAudi navigation functions:
— You can send destinations and routes from the
myAudi app to the vehicle > page 179.
— Active route guidance in the myAudi app can be
continued in the MMI.
— Depending on the situation, it may be possible
to continue active route guidance from the MMI
in the myAudi app to continue navigating to the
destination after leaving the vehicle.
Entering a destination
Intelligent search for navigation
Crary
Applies to: vehicles with navigation system
Using the intelligent search, you can enter the
data for a navigation destination in any order all
at once (for example, 5th Avenue New York).
Likewise, you can search for points of interest,
contacts, previous destinations, or favorites in
order to navigate to the desired destination.
Opening a menu
» Applies to: MMI: Select on the home screen:
NAVIGATION > &.
Intelligent search
» Enter one or more search terms into the input
field. See > page 21, Text input.
> Press on the desired destination in the results
list. The Details menu will be displayed.
> Press Start. Route guidance will be activated
and the map will be displayed > page 180,
fig. 145.
Online Points of Interest
> Searching for points of interest: enter the
name of a POI.
> Select: a symbol for a POI category (such as
4) >a POI, or
) Audi provides access to services from third party provid-
ers. Permanent availability cannot be guaranteed, because
that depends on the third party provider.
> To display all categories and search for a POI,
select: |---| > a category (such as restaurants) >
a POI.
Change search area
Requirement: route guidance must be active.
>» Applies to: MMI: Select on the home screen:
NAVIGATION > 2.
> To change the search area, press %9 / (a) / P re-
peatedly until the desired search area is select-
ed.
Online search)
Applies to: vehicles with navigation system and online search
You can use the results from a search engine pro-
vider to find a navigation destination.
Requirement: the MMI must be connected to the
Internet > page 169, Audi connect.
> Applies to: MMI: Select on the home screen:
NAVIGATION > © >G.
> Enter one or more search terms into the input
field.
> The search engine provider shows suggestions
§ to narrow down the search.
> Press on suggestions until the desired destina-
tion appears in the results list. If necessary, use
one finger to swipe upward or downward until
the suggestions © or destinations 9 appear.
> Press on the desired destination 9. The Details
menu will be displayed.
> Press Start.
Route guidance will be activated and the map will
be displayed > page 180, fig. 145.
@® Tips
— The MMI input suggestions depend on the
last navigated destinations.
— The navigation system always searches for
the fastest route. You can have alternative
routes displayed if necessary > page 182.
— If the destination cannot be found, it may
not be stored in the navigation database.
1L7Z
>
Page 180 of 296

Navigation
Check the spelling of the term that was
searched or check the search area
=> page 177.
— Distances to points of interest are displayed
as a Straight-line distance from your current
location. The actual distance from your cur-
rent location to the point of interest is up-
dated automatically. The list of points of in-
terest that were found is not resorted when
this happens.
Select destinati
Applies to: vehicles with navigation system
eer er
RAX-0146 cr) m
&
i Last
|__ destinations | sere Pinte
$3 6 6
Fig. 143 Center display: menu: select destination
Opening a menu
Applies to: MMI
> Press NAVIGATION on the home screen.
> If the map is displayed, press aa (2) > page 176,
fig. 142.
The following functions are available > fig. 143:
©@ Last destinations 178
GQ) PréS6ts! s cess s vee as pawu ce xenas 178
@® Contacts ...................., 178
@ Received destinations & routes . . 179
Loading previous destinations
Applies to: vehicles with navigation system
Your last destinations and routes can be loaded
directly as a navigation destination.
As soon as you start route guidance, the destina-
tion is automatically saved in the last destina-
tions. Your previous destinations are marked with
the © symbol.
If you use myAudi navigation, your previous des-
tinations will be synchronized with your myAudi
account > page 176.
178
Accessing previous destinations
> Applies to: MMI: Select on the home screen:
NAVIGATION > (Ga) > Last destinations > select
a desired destination > Start.
> Applies to: multifunction steering wheel: Select
in the instrument cluster: Navigation tab > [=]
button > Last destinations > desired destina-
tion.
Deleting previous destinations
> Applies to MMI: Select on the home screen:
NAVIGATION > (Ge) > Last destinations > Z >
one or more entries or Select all > Delete >
(Done).
G) Tips
The last route will be automatically deleted
from the list if you start a new route guidance
after canceling the route.
Setting a favorite as the destination
Applies to: vehicles with navigation system
You can access frequent destinations in the fa-
vorites. You can quickly and easily start route
guidance using the home address or business ad-
dress function.
Requirement: a favorite must be stored
> page 183.
> Applies to: MMI: Select on the home screen:
NAVIGATION > (&&) > Favorites > select a de-
sired destination > Start.
> Applies to: multifunction steering wheel: Select
in the instrument cluster: Navigation tab >
button > Favorites > desired destination.
ST a dle meee eee eee dilly
Applies to: vehicles with MMI and navigation system
You can navigate directly to contacts.
Requirement: a contact must have an address
stored.
> Applies to: MMI: Select on the home screen:
NAVIGATION > (8) > Contacts > a contact.
> Press on the address for a contact.
Page 181 of 296
 Tips
— Ifa contact is grayed out, there is no ad-
dress stored for that con")
8W1012721BB
Navigation
> Press on a suggested address. The Details
menu will be displayed.
> Press Start.
G) Tips
— Ifa contact is grayed out, there is no ad-
dress stored for that contact.
— Navigation to geographic coordinates for a
contact is not possible.
Loading received destinations and routes
Applies to: vehicles with a navigation system and Audi con-
nect Infotainment
You can search for destinations or routes in the
myAudi app and send to the vehicle.
Requirement: the MMI and the mobile device
must be connected to the Internet > page 169,
Audi connect. You must have the myAudi app in-
stalled on your mobile device.
> Send a destination or route in the myAudi app
to the vehicle.
> Applies to: MMI: Select on the home screen:
NAVIGATION > (&5) > Receiv. destns. & routes.
> Make sure you are logged into the vehicle and
the myAudi app with the same myAudi account.
The received destination and routes will be
loaded automatically.
> Navigating to a destination: press on a desti-
nation.
> Deleting destinations: select: Z > one or more
entries or Select all > Delete > (Done).
Destination details
Applies to: vehicles with navigation system
RAX-0148,
SAR
{0} eset exe ae os 3)
Fig. 144 Center display: details
After you have selected a destination, the details
will be displayed. Route guidance is will not be
active yet.
The functions depend on the vehicle equipment
and the selected destination.
@ Map preview: to zoom in on the map pre-
view, press on the map.
@ Route criteria: see > page 187.
@ Weather: Requirement: the MMI must be
connected to the Internet > page 169, Audi
connect. Also see > page 170.
@ Applies to: MMI and telephone
Call: Requirement: a mobile device must be
connected to the MMI > page 158. You will
make a direct call to the phone number that
is stored for the destination.
© Start: starts navigation to the displayed des-
tination directly. The map will be displayed
= page 181, Map operation.
© Parking: press Parking to search for a park-
ing space at the destination. You can use the
parking space as the destination or stopover.
@ Details: Requirement: the MMI must be con-
nected to the Internet > page 169, Audi con-
nect.
Weather at the destination: Requirement:
the MMI must be connected to the Internet
=> page 169, Audi connect.
© Display of distance/driving time to the des-
tination
Selecting a destination from the map
Applies to: vehicles with navigation system
A point on the map can be used as the destina-
tion.
Opening the map
Applies to: MMI
> Press NAVIGATION on the home screen.
> If necessary, press A to display the map.
Adjusting the scale
> Select: / > select a scale.
Marking the destination
> Press and hold a point on the map until a mark-
ing appears @2) > page 180, fig. 146 or the ad-
dress for the selected destination is shown @
=> page 180, fig. 146.
179
>
Page 182 of 296
 as the
destination
Requirement: map content must be displayed
=> page 186.
> Press on map content on the map (for example,
@) > page 180, fig.")
Navigation
Selecting map content (such as POIs) as the
destination
Requirement: map content must be displayed
=> page 186.
> Press on map content on the map (for example,
@) > page 180, fig. 146).
Selecting the destination
> Select: @ > page 180, fig. 146, or
> To display destination details, press on
=> page 180, fig. 146 > Start.
Route guidance will be activated and the map will
be displayed > page 180, fig. 145.
SS) ee meee el
Applies to: vehicles with navigation system
You can enter additional destinations during ac-
tive route guidance.
Entering a stopover
Requirement: route guidance must be active.
> Enter a destination > page 177.
Displaying stopovers or the route plan
All destinations are listed in the route plan.
> Press on 2) page 180, fig. 145 on the map.
Editing stopovers
> Press on %) > page 180, fig. 145 on the map.
> Adding a stopover: Select: Add destination > a
destination > Add.
> Moving a stopover: press Z. Touch the $ sym-
bol and move the entry to the desired position.
Press Done.
> Deleting a stopover: Select: Z > one or more
entries or Select all > Delete > (Done).
Stopping route guidance
Applies to: vehicles with navigation system
Requirement: route guidance must be active and
the map must be displayed.
> Applies to: MMI: Press BX @ > page 180,
fig. 145.
180
> Applies to: multifunction steering wheel: Select
in the instrument cluster: Navigation tab >
button > Cancel route guidance.
Map
Applies to: vehicles with navigation system
Cera
Drees eaey cr amy
Fig. 146 Center display: marked map object
Opening the map
Applies to: MMI
> Press NAVIGATION on the home screen.
> If necessary, press A to display the map.
The following list gives an overview of the infor-
mation displayed on the map. Press on any func-
tion (for example, alternative routes) to show ad-
ditional options.
Select destination > page 178
Enter a destination using intelligent search
=> page 177
Cancel route guidance > page 180
Current route
Request spoken prompt
Alternative routes > page 182
Display active destinations, stopovers, or
route plan > page 180.
©@
COOH
OO
The distance to the destination including the
calculated arrival time is displayed.
Online traffic information > page 185
Altitude ©©
Page 183 of 296

8W1012721BB
Navigation
@
©®®
O8©
@
®
OO®8
® ®
®
Displays the maximum permitted speed”:
within city limits, on expressways, and on
highways.
Current vehicle position
Route information > page 187
Name of the street on which you are current-
ly driving
Start
route guidance for the marked destina-
tion @3) > page 179, Selecting a destination
from the map
Display details for the destination
=> page 179
Intelligent search nearby
Adjust the map orientation. Also see
=> page 186
Navigation settings > page 186
Adjust the scale. Set scale. Or: press the
magnifying glass to switch automatic zoom
=> page 186 on or off directly on the map. The
® symbol appears when this function is
switched on.
Marked destination. See > page 179, Select-
ing a destination from the map
Map contents (points of interest, favorites).
When there are multiple map contents in the
immediate vicinity, the symbols are shown
stacked on the map. To display a list of indi-
vidual symbols, press @@) > fig. 146. Press on
a POT in the list.
Center the map to the current vehicle posi-
tion
Additional possible symbols on the map
Symbol Meaning
Home address > page 183, Favor-
ites
Business address > page 183, Fa-
tl vorites
Presets > page 183
*
Previous destinations display
Re
dD Only applies to vehicles without camera-based speed limit
display.
Traffic information display on the map or
map preview
Color-coded markings along the route indicate
the traffic flow:
Green: traffic is flowing freely.
Orange: stop-and-go traffic
Red: traffic jam or traffic obstructions.
Traffic information
— Colored warning symbols: traffic incidents
ahead that are on your route.
— Grayed out warning symbols: traffic incidents
that are not on your route.
— All traffic incidents will display in color when
route guidance is inactive.
— Warning symbols with arrow: traffic incident
that you have been routed around, for example
2.
You can adjust the display of colored markings
for traffic information on the maps > page 186.
Map operation
Applies to: vehicles with navigation system
You can operate the map > page 180, fig. 145
with the movements described in the following
information.
Moving the map
> Drag your finger across the map in the desired
direction.
Moving the map quickly
> Swipe your finger across the map in the desired
direction and lift your finger off the map.
Zooming in on the map
> Place two fingers on the map and pull your fin-
gers apart, or
> Double-tap on the map with one finger.
Zooming out on the map
> Place two fingers on the map and pull your fin-
gers together, or
181
>
Page 184 of 296
 Tips
Certain gestures")
Navigation
> Double-tap on the map with two fingers.
Rotating the map
> Rotate the map using two fingers.
Tilting the map
> Drag upward or downward with two fingers.
G) Tips
Certain gestures may not be available on all
touch displays or in every menu.
Naviga w with
started
Applies to: vehicles with navigation system and Audi virtual
cockpit
e guidance
Fig. 147 Instrument cluster: default view: turning maneu-
ver when route guidance is active (Audi virtual cockpit)
Requirement: route guidance must be on
=> page 177.
The following information will be displayed in the
driver information system, if available:
@ Current vehicle position
@A bar graph appears when there is an upcom-
ing turn. The fewer the bars that are shown, the
shorter the distance is until the turn. If there is
no upcoming turn immediately ahead, the dis-
tance to the destination or stopover, the calculat-
ed arrival time, and a direction arrow for the up-
coming maneuver will be displayed in the right
speedometer. If there is no upcoming maneuver,
the distance to the next maneuver will be dis-
played.
@ Lane recommendation
182
Alternative routes
Applies to: vehicles with navigation system
al S| 3|
ne Ny | cc|
Fig. 148 Center display: display of alternative routes in the
overview map
Opening alternative routes
Requirement: route guidance must be started
= page 177 and the map must be displayed
=> page 181.
> Press ©) > page 180, fig. 145.
@ Current route
The distance to the destination and the calculat-
ed arrival time will be displayed for the current
route.
@ Alternative route
The difference in travel time compared to the se-
lected route will be displayed.
Displaying alternative routes in the
foreground
> Press @ in the corresponding information win-
dow, or
> Press and hold the information window for the
corresponding alternative route (for example,
@ © fig. 148).
Select route
> Press on the information window for the corre-
sponding route (for example @) > fig. 148).
 1
1 2
2 3
3 4
4 5
5 6
6 7
7 8
8 9
9 10
10 11
11 12
12 13
13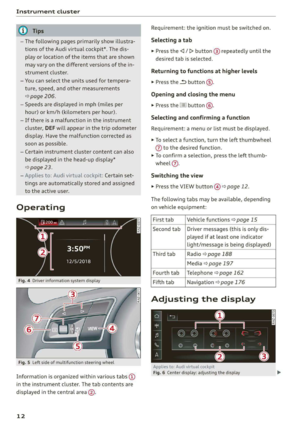 14
14 15
15 16
16 17
17 18
18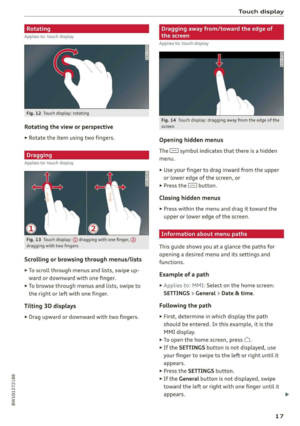 19
19 20
20 21
21 22
22 23
23 24
24 25
25 26
26 27
27 28
28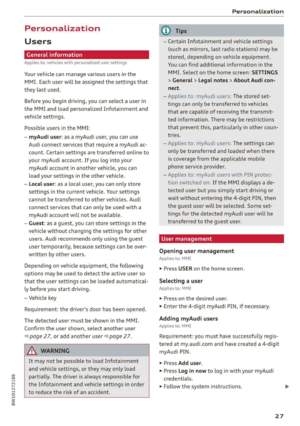 29
29 30
30 31
31 32
32 33
33 34
34 35
35 36
36 37
37 38
38 39
39 40
40 41
41 42
42 43
43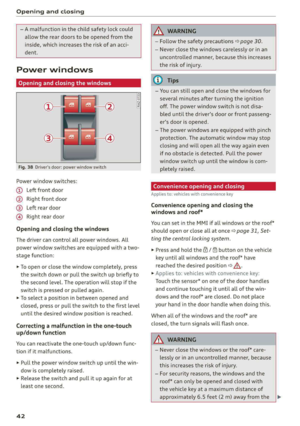 44
44 45
45 46
46 47
47 48
48 49
49 50
50 51
51 52
52 53
53 54
54 55
55 56
56 57
57 58
58 59
59 60
60 61
61 62
62 63
63 64
64 65
65 66
66 67
67 68
68 69
69 70
70 71
71 72
72 73
73 74
74 75
75 76
76 77
77 78
78 79
79 80
80 81
81 82
82 83
83 84
84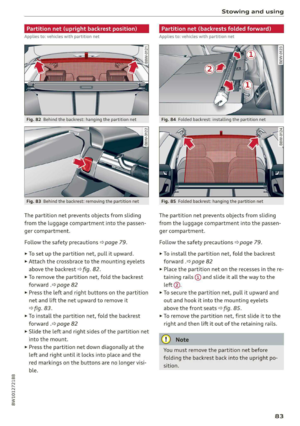 85
85 86
86 87
87 88
88 89
89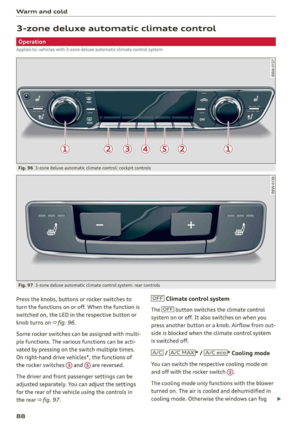 90
90 91
91 92
92 93
93 94
94 95
95 96
96 97
97 98
98 99
99 100
100 101
101 102
102 103
103 104
104 105
105 106
106 107
107 108
108 109
109 110
110 111
111 112
112 113
113 114
114 115
115 116
116 117
117 118
118 119
119 120
120 121
121 122
122 123
123 124
124 125
125 126
126 127
127 128
128 129
129 130
130 131
131 132
132 133
133 134
134 135
135 136
136 137
137 138
138 139
139 140
140 141
141 142
142 143
143 144
144 145
145 146
146 147
147 148
148 149
149 150
150 151
151 152
152 153
153 154
154 155
155 156
156 157
157 158
158 159
159 160
160 161
161 162
162 163
163 164
164 165
165 166
166 167
167 168
168 169
169 170
170 171
171 172
172 173
173 174
174 175
175 176
176 177
177 178
178 179
179 180
180 181
181 182
182 183
183 184
184 185
185 186
186 187
187 188
188 189
189 190
190 191
191 192
192 193
193 194
194 195
195 196
196 197
197 198
198 199
199 200
200 201
201 202
202 203
203 204
204 205
205 206
206 207
207 208
208 209
209 210
210 211
211 212
212 213
213 214
214 215
215 216
216 217
217 218
218 219
219 220
220 221
221 222
222 223
223 224
224 225
225 226
226 227
227 228
228 229
229 230
230 231
231 232
232 233
233 234
234 235
235 236
236 237
237 238
238 239
239 240
240 241
241 242
242 243
243 244
244 245
245 246
246 247
247 248
248 249
249 250
250 251
251 252
252 253
253 254
254 255
255 256
256 257
257 258
258 259
259 260
260 261
261 262
262 263
263 264
264 265
265 266
266 267
267 268
268 269
269 270
270 271
271 272
272 273
273 274
274 275
275 276
276 277
277 278
278 279
279 280
280 281
281 282
282 283
283 284
284 285
285 286
286 287
287 288
288 289
289 290
290 291
291 292
292 293
293 294
294 295
295