2020 AUDI A3 infotainment
[x] Cancel search: infotainmentPage 223 of 400

8V2012721BK
Media
© Tracks
All available tracks are displayed. Select and con-
firm
a track.
@ Folders
The folder structure or track/chapter list is dis-
played. Select a folder, if necessary. Select and
confirm a track.
Playlists
All available playlists from the source and the
smart playlists are displayed. Select and confirm
a playlist and then a track.
Smart playlists:
— Last played tracks: the last tracks played in the
selected source are displayed.
— Most played: the most played tracks in the se-
lected source are displayed.
— 5 stars to 1 star: tracks from the selected
source are displayed according to their rating.
— Unrated: all files from the selected source
without rating information (for example, in the
ID3 tag) are displayed.
© Videos*
All available video files are displayed. Select and
confirm a video file.
@ Tips
— Only the categories supported by the medi-
um are available. For example, CD/DVD-
ROM tracks cannot be selected with catego-
ries such as Artists, Albums or Genres.
With an iPod/iPhone (source: Audi music in-
terface* > page 217), the Podcasts, Audio
books and Composers categories are also
available.
— For safety reasons, the video image is only
displayed when the vehicle is stationary. On-
ly the sound from the video plays while driv-
ing.
—When synchronizing a portable device with
"Cloud“ services, playlists may display incor-
rectly
in the MMI. Use the media center in
the device.
a \ey dary tLe)
Applies to: vehicles with free text search
Oxree Rock Band
Rock Band
©- Rock Band
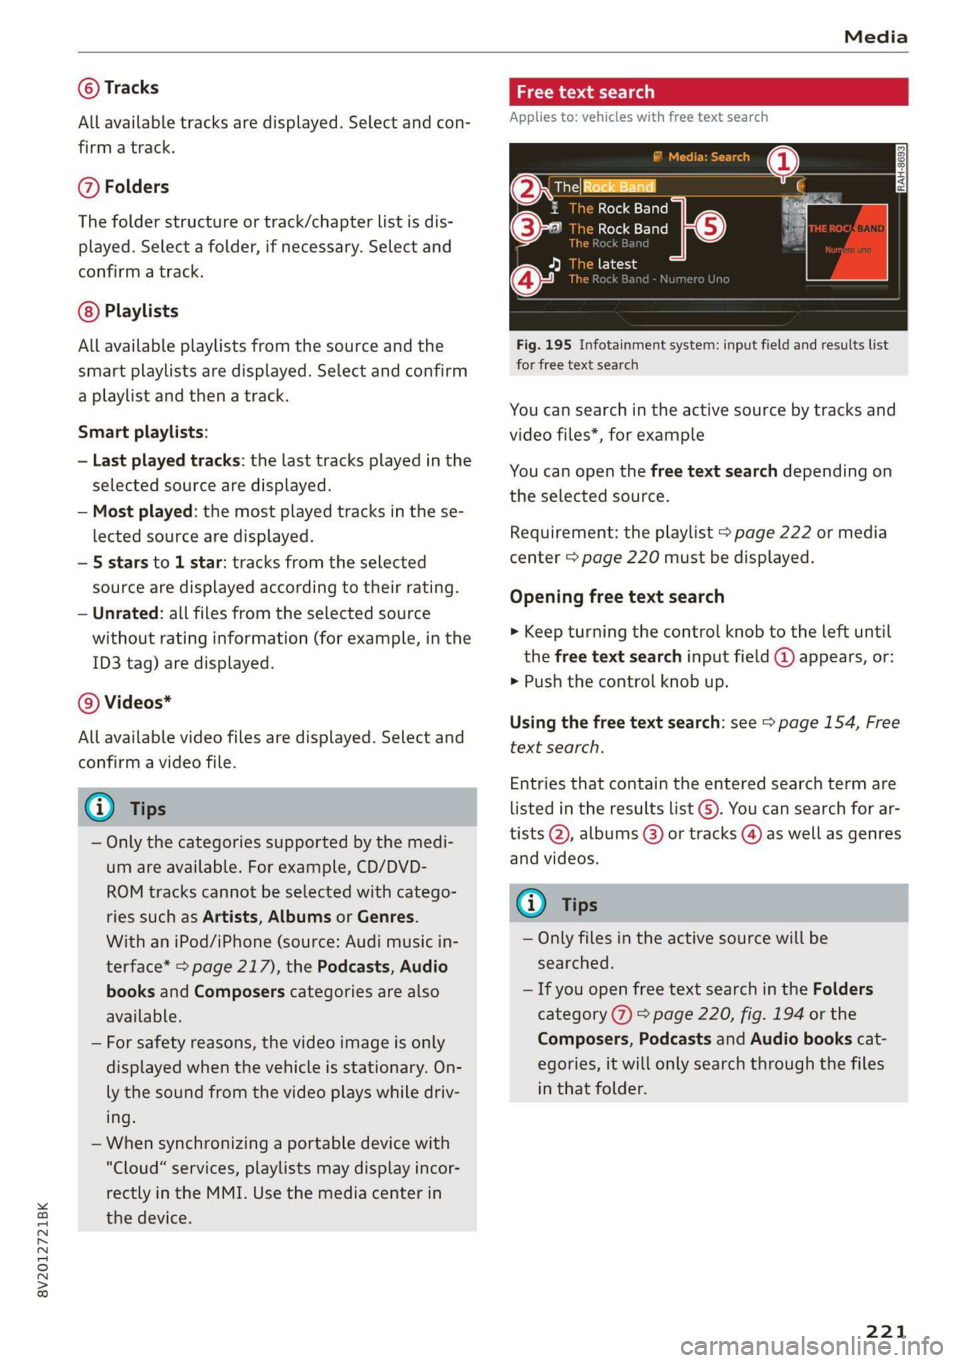
Fig. 195 Infotainment system: input field and results list
for free text search
You can search in the active source by tracks and
video files*, for example
You can open the free text search depending on
the selected source.
Requirement: the playlist > page 222 or media
center > page 220 must be displayed.
Opening free text search
> Keep turning the control knob to the left until
the free text search input field @ appears, or:
> Push the control knob up.
Using the free text search: see > page 154, Free
text search.
Entries that contain the entered search term are
listed
in the results list G). You can search for ar-
tists @, albums (8) or tracks @) as well as genres
and videos.
(i) Tips
— Only files in the active source will be
searched.
— If you open free text search in the Folders
category (7) > page 220, fig. 194 or the
Composers, Podcasts and Audio books cat-
egories, it will only search through the files
in that folder.
221
Page 224 of 400

Media
Ete
Hymn
as
The big B
Se
Sola
kB
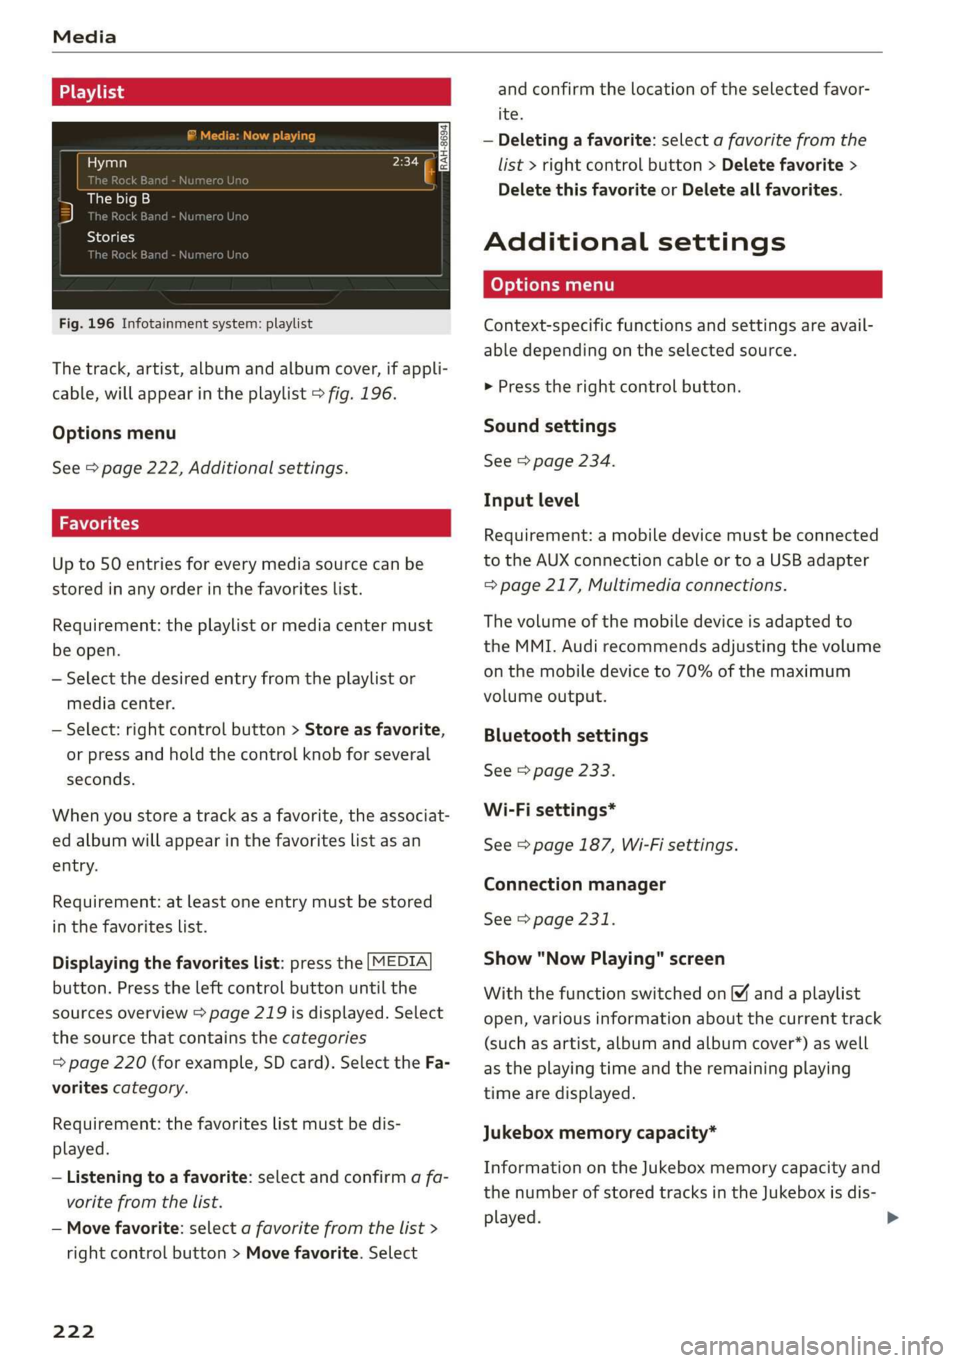
Fig. 196 Infotainment system: playlist
The track, artist, album and album cover, if appli-
cable, will appear in the playlist > fig. 196.
Options menu
See > page 222, Additional settings.
iz Wol ei asty
Up to 50 entries for every media source can be
stored in any order in the favorites list.
Requirement: the playlist or media center must
be open.
— Select the desired entry from the playlist or
media center.
— Select: right control button > Store as favorite,
or press and hold the control knob for several
seconds.
When you store a track as a favorite, the associat-
ed album will appear in the favorites list as an
entry.
Requirement: at least one entry must be stored
in the favorites list.
Displaying the favorites list: press the [MEDIA
button. Press the left control button until the
sources overview > page 219 is displayed. Select
the source that contains the categories
=> page 220 (for example, SD card). Select the Fa-
vorites category.
Requirement: the favorites list must be dis-
played.
— Listening to a favorite: select and confirm a fa-
vorite from the list.
— Move favorite: select a favorite from the list >
right control button > Move favorite. Select
222
and confirm the location of the selected favor-
ite.
— Deleting a favorite: select a favorite from the
list > right control button > Delete favorite >
Delete this favorite or Delete all favorites.
Additional settings
Context-specific functions and settings are avail-
able depending on the selected source.
> Press the right control button.
Sound settings
See > page 234.
Input level
Requirement: a mobile device must be connected
to the AUX connection cable or to a USB adapter
= page 217, Multimedia connections.
The volume of the mobile device is adapted to
the MMI. Audi recommends adjusting the volume
on the mobile device to 70% of the maximum
volume output.
Bluetooth settings
See > page 233.
Wi-Fi settings*
See > page 187, Wi-Fi settings.
Connection manager
See > page 231.
Show "Now Playing" screen
With the function switched on [¥ and a playlist
open, various information about the current track
(such as artist, album and album cover*) as well
as the playing time and the remaining playing
time are displayed.
Jukebox memory capacity*
Information on the Jukebox memory capacity and
the number of stored tracks in the Jukebox is dis-
played.
Page 225 of 400

8V2012721BK
Media
Rewind/Fast forward
Turn the control knob to the left or right, or move
your finger on the MMI touch control pad* from
the left to the right.
Shuffle!)
With the function switched on, all files in the
playlist are played and shown in random order.
Repeat track!)
When the function is switched on, the current
track repeats.
Back to 'Playback'
The options menu is closed. The track currently
playing appears in the playlist.
Play similar music*
The track currently playing is quickly analyzed for
features such as artist, genres, mood, and beat,
and a smart playlist with similar tracks will be
shown.
Play more...
A smart playlist is shown based on the track cur-
rently playing. You can select between a playlist
with more tracks by this artist, from this album
or of this genre.
Copy to jukebox*
See > page 213, Adding files to the Jukebox.
Set as ringtone*
Requirement: a mobile device must be connected
to the MMI. The track currently playing must be
in the Jukebox* > page 213.
The selected track will be used as the ringtone
for incoming calls.
Gracenote online database*
Requirement: the MMI must be connected to the
Internet.
) The function automatically switches off when the source is
changed.
2) This function is not available for all cell phones.
Depending on availability, various information
will load about the track currently playing when
this function is switched on™.
Favorites
See > page 222.
Additional options
Requirement: the vehicle must be stationary and
a video file* or a DVD* must be playing.
Parental control*
Playback of video DVDs can be restricted using
parental control.
Enter the password for parental control. Pass-
word set at the factory: 1234. You have the fol-
lowing options:
— Protection level: select and confirm the protec-
tion level (for example, Level 5). Eight different
protection levels can be set for parental con-
trol. If you set the parental control level at Lev-
el 5, all DVDs from levels 1-5 can be played.
Video DVDs with a higher level will not play. Se-
lect Unrestricted to remove all of the restric-
tions.
— Change password: edit the current password.
Switch to full screen
The video image is displayed. Turn the control
knob to display the playlist, or press the [BACK
button.
Replay video)
When this function is switched on, the current
video will replay.
Show DVD menu
The DVD main menu opens in the Infotainment
system display.
223
Page 226 of 400

Media
— Selecting a menu item: select and confirm a
menu item, or move your finger on the MMI
touch control pad* and press the control knob.
Audio track!)
You can manually set the audio track (language
and audio format). The language and audio for-
mat options depend on the video DVD.
Subtitles»)
You can manually select subtitles for playback.
The languages available depend on the DVD.
Aspect
Audi recommends the Automatic setting for the
picture format. You can set the picture format
depending on the active file or source (for exam-
ple video file*, DVD*).
Aspect ra-
tio
Description
Original The image is displayed in the ratio
of the source format. Select this
option if the image is distorted or a
section of the image is cut off
when Auto is selected.
4:3 The image is set to the 4:3 picture
format. Black bars are shown on
the sides of the Infotainment sys-
tem display.
16:9 The image is set to the 16:9 picture
format. Black bars are shown in the
upper and lower edges of the Info-
tainment system display.
Aspect ra- |Description
tio
Automatic |The MMI detects the picture for-
mat of the source and displays the
image in the optimum ratio. Black
bars may appear on the sides of
the display, depending on the
source format and the Infotain-
ment system display that is instal-
led.
Zoom The image is enlarged to fill the en-
tire Infotainment system display.
Switch the function off if the image
is distorted.
Cinema- Use this setting for films in cinema
scope format 21:9. Black bars are shown
in the upper and lower edges of the
Infotainment system display.
@) Tips
— Not all video DVDs have parental control.
— The protection levels for the Parental con-
trol are based on the US standards from the
Motion Picture Association of America
(MPAA). Note that the age levels for video
DVDs in European countries may differ.
— Password entry for Parental control will be
locked for approximately one minute if you
enter the incorrect password three times in
a row. The password can only be reset by an
authorized Audi dealer.
Supported media and file formats
LO TaV TN]
The following audio/video file properties are sup-
ported by the DVD drive*, the Jukebox”, the SD
)) Depending on the DVD, this may not be possible during
playback.
224
card reader and the USB storage device* connec-
tion:
Page 233 of 400

8V2012721BK
System settings
Switch off pop-up: when the function is switched
on [M, the messages in the Infotainment system
display regarding the charging status of your cell
phone in the Audi phone box are hidden. The re-
minder not to forget your cell phone when leav-
ing the vehicle is also switched off.
Tool tips
When this function is switched on M, your MMI
shows you tips for input. The frequency of how
often it displays decreases with time.
Speech dialog system
Applies to: vehicles with voice recognition system
Depending on vehicle equipment, the following
functions
may be available:
Command display: when this function is switch-
ed on [M, the MMI will show you the possible
commands for voice input in the respective
menu.
Short dialog: when this function is switched on
, a shorter form of the prompts is used.
Command during voice output: this function is
switched on at the factory. When this function is
switched on M, you can say new commands dur-
ing announcements. You do not need to wait for
the signal tone (beep) during an announcement.
When the function is switched off (J, you need to
wait for the signal tone (beep) to say a new com-
mand.
Volume: you can adjust the volume of the
prompts by turning the control knob.
Individual speech training (only when the vehi-
cle is stationary): you can adapt the voice recog-
nition system to your voice or pronunciation in or-
der to improve the system's ability to recognize
your speech. Individual speech training is com-
prised of 20 speech entries that consist of com-
mands and sequences of numbers. You can de-
lete the programmed voice training with the Re-
set individual speech training function.
Display brightness
You can adjust the brightness of the Infotain-
ment system display by turning the control knob.
Factory settings
Depending on the vehicle equipment, the follow-
ing functions can be reset to factory settings:
— Sound settings
— Radio
— Media settings
— Jukebox
— Directory
— Telephone
— Bluetooth and Wi-Fi
— Navigation settings
— Navigation and online memory
— Speech dialog system
— Message settings
— Apps
—Tool tips
— Audi connect
— Audi smartphone interface
You can select the desired functions individually
or all at once with the option Select all entries.
Select and confirm Restore factory settings.
@ Tips
Make sure that not only the settings were de-
leted but also the stored data, if necessary.
Connection manager
Introduction
The connection manager provides an overview of
your connected devices and their network status:
> Select: [MENU] button > Settings > left control
button > MMI settings > Connection manager.
> Select and confirm a menu item.
If a mobile device was already connected and you
select
and confirm the corresponding menu item,
the device name and connection status are dis-
played under the menu item.
You can individually connect () or disconnect
(L)) a paired device.
Requirement: the vehicle must be stationary and
the ignition must be switched on. The Bluetooth
settings will open on your mobile device during
the connection setup. The Bluetooth function and >
231
Page 234 of 400

System settings
visibility of the MMI > page 233 and mobile de-
vice must be switched on. The mobile device to
be connected must not be connected to any other
Bluetooth device.
aeluatleva daeyit
Applies to: vehicles with telephone
> Connect new device: search for and connect a
cell phone.
> List of devices already paired: select your cell
phone from the list of all the devices that are
already paired.
Toate Tava en
Applies to: vehicles with telephone, and Audi phone box
> Connect new device: search for and connect a
cell phone.
> List of devices already paired: select your cell
phone from the list of all the devices that are
already paired.
PELE Mel a-Vaaleya)
Applies to: vehicles with Audi connect Infotainment
The data connection is made using the embedded
SIM card ) > page 183. You do not need to ad-
just any additional settings.
@) Note
Always follow the information found in 9@ in
General information on page 182.
myAudi app
Applies to: vehicles with Audi connect Infotainment
Requirement: the myAudi app must be installed
and open on your mobile device.
> Connect new device: search for and connect a
mobile device (such as a smartphone).
> List of devices already paired: select your mo-
bile device from the list of all the devices that
are already paired.
D_ SIM card installed in the vehicle at the factory.
232
Audio player
Applies to: vehicles with Bluetooth or Wi-Fi audio player
Bluetooth player
Requirement: the Bluetooth function and visibili-
ty must be switched on in the MMI > page 233
and on the Bluetooth audio player.
> Connect new device: press the control knob.
> Select Bluetooth audio player.
» Search for and connect a mobile device.
> List of devices already paired: select a Blue-
tooth device from the list of all the devices that
are already paired.
Wi-Fi audio player
Requirement: the Wi-Fi hotspot on the MMI
=> page 187 and on your Wi-Fi audio player must
be switched on.
> Connect new device: press the control knob.
Search for and connect a Wi-Fi capable device.
> Disconnecting the Wi-Fi audio player: deacti-
vate the Wi-Fi on your Wi-Fi capable device. The
device will be automatically removed from the
list.
() Note
Always follow the information found in S@ in
General information on page 182.
Applies to: vehicles with telephone
Display contacts from a cell phone (or an addi-
tional cell phone).
Requirement: no cell phones can be connected to
the MMI using the Handsfree profile.
> Connect new device: search for and connect a
new cell phone.
> List of devices already paired: select your cell
phone from the list of all the cell phones that
are already paired.
Page 320 of 400

Checking and Filling
Service interval display
The service interval display detects when your ve-
hicle is due for service.
The service interval display works in two stages:
— Inspection or oil change reminder: after driv-
ing a certain distance, a message appears in the
instrument cluster display each time the igni-
tion is switched on or off. The remaining dis-
tance or time is displayed briefly.
— Inspection or oil change due: if your vehicle
has reached an inspection or oil change interval
or both intervals at the same time, the mes-
sage Inspection due! or Oil change due! or Oil
change and inspection due! appears briefly af-
ter switching the ignition on/off.
Checking service intervals
You can check the remaining distance or time un-
til the next oil change or next inspection in the
Infotainment system. Select in the Infotainment
system: the [MENU] button > Vehicle > left con-
trol button > Service & checks > Service inter-
vals.
Resetting the indicator
An authorized Audi dealer or authorized Audi
Service Facility will reset the service interval dis-
play after performing service.
If you have changed the oil yourself, you must re-
set the oil change interval.
To reset the display, select in the Infotainment
system: the [MENU] button > Vehicle > left con-
trol button > Service & checks > Service intervals
> Reset oil change interval.
@ Note
— Only reset the oil change indicator if the oil
was changed.
— Following the service intervals is critical to
maintaining the function, service life, and
value of your vehicle, especially the engine.
Even if the mileage on the vehicle is low, do
not exceed the time for the next service.
318
Page 332 of 400
![AUDI A3 2020 Owner´s Manual Wheels
SU c=w yee)
oO oS
o 2
Pd e ]
Fig. 259 Driver's side B-pillar: tire pres-
sure label
B8K-1151
ARRIERE
‘SPARE
DE SECOURS
Fig. 260 Tire pressur AUDI A3 2020 Owner´s Manual Wheels
SU c=w yee)
oO oS
o 2
Pd e ]
Fig. 259 Driver's side B-pillar: tire pres-
sure label
B8K-1151
ARRIERE
‘SPARE
DE SECOURS
Fig. 260 Tire pressur](/manual-img/6/40265/w960_40265-331.png)
Wheels
SU c=w yee)
oO oS
o 2
Pd e ]
Fig. 259 Driver's side B-pillar: tire pres-
sure label
B8K-1151
ARRIERE
‘SPARE
DE SECOURS
Fig. 260 Tire pressure label
The correct tire pressure for tires
mounted at the factory and for
the spare tire* is indicated on a la-
bel. The label is located on the B-
pillar > fig. 259, > fig. 260. The
location may vary depending on
the model.
Use the tire pressure specified for
a normal vehicle load when the
vehicle is partially loaded > table
on page 331. If driving the vehi-
cle when fully loaded, you must
increase the tire pressure to the
maximum specified pressure > A.
330
Checking and correcting tire
pressure
>Check the tire pressure at least
once per month and also check it
before every long drive.
> Always check the tire pressure
when the tires are cold. Do not
reduce the pressure if it increas-
es when the tires are warm.
>Refer to the sticker > fig. 260
for the correct tire pressure.
>Correct the tire pressure if nec-
essary.
> Store the new tire pressure in
the Infotainment system
> page 338 or > page 341.
> Check the pressure in the emer-
gency tire*/spare tire*. Always
maintain the maximum temper-
ature that is specified for the
tire.
Z\ WARNING
Always adapt the tire pressure
to your driving style and the ve-
hicle load.
—Overloading can lead to loss of
vehicle control and increase
the risk of an accident. Read
and follow the important safe-
ty precautions in > page 332,
Tires and vehicle load limits. |»