Page 25 of 120

Instrument and control functions
3-10
3
Apply the front or rear brake.
Squeeze the clutch lever.
Use the shift pedal.
Push the power switch to turn off the
cruise control system. The “ ” indica-
tor light and the “SET” indicator light
will go off.
TIPTraveling speed decreases as soon as
the cruise control system is deactivat-
ed; unless the throttle grip is turned.Usin g the resume function
Push the “RES+” side of the cruise
control setting switch to reactivate the
cruise control system. The traveling
speed will return to the previously set
cruising speed. The “SET” indicator
light will come on.
WARNING
EWA16351
It is d angerous to use the resume
function when the previously set
cruisin g speed is too hi gh for current
con ditions.
TIPPushing the power switch while the
system is operating will turn the sys-
tem off completely and erase the previ-
ously set cruising speed. You will not
be able to use the resume function until
a new cruising speed has been set.Automatic deactivation of the cruisecontrol systemThe cruise control system for this mod-
el is electronically controlled and is
linked with the other control systems.
The cruise control system will auto-
matically become deactivated under
the following conditions:
The cruise control system is not
able to maintain the set cruising
speed.
Wheel slip or wheel spin is detect-
ed. (If the traction control system
has not been turned off, the trac-
tion control system will work.)
The start/engine stop switch is set
to the “ ” position.
The engine stalls.
The sidestand is lowered. When traveling with a set cruising
speed, if the cruise control system is
deactivated under the above condi-
tions, the “ ” indicator light will go off
and the “SET” indicator light will flash
for 4 seconds, and then go off.
When not traveling with a set cruising
speed, if the start/engine stop switch is
set to the “ ” position, the engine
stalls, or the sidestand is lowered, then
the “ ” indicator light will go off (the
“SET” indicator light will not flash).
If the cruise control system is automat-
ically deactivated, please stop and
confirm that your vehicle is in good op-
erating condition.
Before using the cruise control system
again, activate it using the power
switch.
TIPIn some cases, the cruise control sys-
tem may not be able to maintain the set
cruising speed when the vehicle is
traveling uphill or downhill.
When the vehicle is traveling up-
hill, the actual traveling speed may
become lower than the set cruis-
UB1JE1E0.book Page 10 Thursday, October 11, 2018 10:43 AM
Page 26 of 120

Instrument and control functions
3-11
3 ing speed. If this occurs, acceler-
ate to the desired traveling speed
using the throttle.
When the vehicle is traveling
downhill, the actual traveling
speed may become higher than
the set cruising speed. If this oc-
curs, the setting switch cannot be
used to adjust the set cruising
speed. To reduce the traveling
speed, apply the brakes. When
the brakes are applied, the cruise
control system will become deac-
tivated.
EAU84301
DisplayThe following items can be found on
the display.
Speedometer
Tachometer
Fuel meter
Information display
Transmission gear display
Drive mode display
TCS display
Air temperature display
Grip warmer display
QS indicator
Clock
Revolution peak hold indicator
Eco indicator
Fuel level warning icon
Engine oil warning icon
Coolant temperature warning iconTIPThis model uses a thin-film-transistor
liquid-crystal display (TFT LCD) for
good contrast and readability in vari-
ous lighting conditions. However, due
to the nature of this technology, it is
normal for a small number of pixels to
be inactive.
1. Tachometer
2. QS indicator
3. Speedometer
4. Revolution peak hold indicator
5. Clock
6. Fuel meter
7. Eco indicator “ECO”
8. Grip warmer display
9. Air temperature display
10.Transmission gear display
11.TCS display
12.Drive mode display
13.Information display
km
TRIP-2
TRIP-1
1234.5 1234.5
km
1N
2km/h
1000 r/min
QS
12
:
00 EECOF2/1
MODE-
STD
TCS 1
In °C 25
7
10
13
8
9
11
12
1
6
4
2
5
3
UB1JE1E0.book Page 11 Thursday, October 11, 2018 10:43 AM
Page 27 of 120

Instrument and control functions
3-12
3
WARNING
EWA18210
Stop the vehicle before makin g any
settin g chan ges. Chan gin g settin gs
while ri din g can distract the opera-
tor an d increase the risk of an acci-
d ent.Spee dometer
The speedometer shows the vehicle’s
traveling speed.TIPThe display can be set to miles or kilo-
meters. Use the “Unit” module on the
MENU screen.Tachometer
The tachometer shows the engine
speed, as measured by the rotational
velocity of the crankshaft, in revolu-
tions per minute (r/min). When the ve-
hicle is first powered on, the
tachometer will sweep across the r/min
range and then return to zero.
TIPThe tachometer can be color-adjusted
and has a revolution peak hold indica-
tor which can be turned on or off.NOTICE
ECA10032
Do not operate the en gine in the ta-
chometer red zone.
Re d zone: 11250 r/min an d a boveFuel meter
The fuel meter indicates the amount of
fuel in the fuel tank. The display seg-
ments of the fuel meter disappear from
“F” (full) towards “E” (empty) as the fuel
level decreases.
When the last segment starts flashing
and the fuel level warning icon comes
on, refuel as soon as possible.TIPIf all the fuel meter display segments
flash repeatedly, have a Yamaha deal-
er check the related circuits.Clock
The clock uses a 12-hour time system. Information
display
This section of the main screen is used
to show additional riding related infor-
mation such as air and coolant temper-
ature readings, tripmeters, and fuel
consumption statistics. The informa-
tion display items can be set into four
groups via the MENU screen.
The information display items are:
A.TEMP: air temperature
C.TEMP: coolant temperature
TRIP-1: tripmeter 1
TRIP-2: tripmeter 2
F-TRIP: fuel tripmeter
ODO: odometer
FUEL CON: the amount of fuel con-
sumed
FUEL AVG: average fuel consumption
CRNT FUEL: current fuel consumption
TIP ODO will lock at 999999.
TRIP-1 and TRIP-2 will reset and
continue counting after 9999.9
has been reached.
UB1JE1E0.book Page 12 Thursday, October 11, 2018 10:43 AM
Page 28 of 120

Instrument and control functions
3-13
3
When the fuel tank reserve level
has been reached, F-TRIP ap-
pears automatically and begins
recording distance traveled from
that point.
After refueling and traveling some
distance, F-TRIP will automatically
disappear.
See “Unit” on page 3-16 to chan-
ge the fuel consumption units, set
the clock, and switch between
miles and kilometers, etc.
TRIP-1, TRIP-2, F-TRIP, FUEL CON,
and FUEL AVG items can be individu-
ally reset.
To reset information display items1. Use the wheel switch to scroll
through the display items until the
item you want to reset appears.
2. Short push the wheel switch and the item will flash for five seconds.
If both items are resettable items,
the top item will flash first. Scroll
down to select the bottom item.
3. While the item is flashing, press and hold the wheel switch for one
second. Transmission
gear display
This shows which gear the transmis-
sion is in. This model has 6 gears and a
neutral position. The neutral position is
indicated by the neutral indicator
light “ ” and by the transmission gear
display “ ”.
Revolution peak hol d in dicator
This small bar momentarily appears
within the tachometer to mark the most
recent peak r/min speed of the engine.
TIPThe indicator comes on momentarily
only if the peak engine speed is 7000
r/min or higher.QS in dicator
When the key is turned to “ON”, the
quick shift system (page 3-26) turns on
and this indicator comes on.TIPIf a problem is detected in the quick
shift system, this indicator will turn off
and the quick shift system will be un-
available. Have a Yamaha dealer check
the vehicle.
Eco in dicator
This indicator comes on when the vehi-
cle is being operated in an environ-
mentally friendly, fuel-efficient manner.
The indicator goes off when the vehicle
is stopped.TIPConsider the following tips to reduce
fuel consumption: Avoid high engine speeds during
acceleration.
Travel at a constant speed.
Select the transmission gear that
is appropriate for the vehicle
speed.Drive mo de display
This display indicates which drive
mode has been selected: “STD”, “A” or
“B”. (See page 3-25.)
TCS display
This display indicates which traction
control system setting has been se-
lected: “1”, “2” or “OFF”. (See page
3-28.)
UB1JE1E0.book Page 13 Thursday, October 11, 2018 10:43 AM
Page 29 of 120

Instrument and control functions
3-14
3
Air temperature
display
This display indicates the air tempera-
ture from –9 °C to 50 °C in 1 °C incre-
ments.
TIP –9 °C will be displayed even if the
air temperature falls below –9 °C.
50 °C will be displayed even if the
ambient temperature climbs
above 50 °C.
The temperature displayed may
vary from the actual ambient tem-
perature.Grip warmer d isplay
The grip warmers can be used when
the engine is running. There are 4 grip
warmer settings.
To change the grip warmer setting1. Select the grip warmer display. 2. Short push the wheel switch, and
then rotate the wheel switch up or
down to change the setting while
the display is flashing. Short push
the wheel switch to confirm the
setting.
TIPEach grip warmer setting can be fine
tuned in “Grip Warmer Setting” (see
page 3-23).NOTICE
ECA17932
Be sure to wear g loves when
using the grip warmers.
Do not use the grip warmers in
warm weather.
If the han dle bar grip or throttle
g rip becomes worn or d am-
a g ed , stop usin g the g rip warm-
ers an d replace the grips.
Warnin g icons
Coolant temperature warnin g“”
This icon comes on if the coolant tem-
perature reaches 117 °C or higher.
Stop the vehicle and turn off the en-
gine. Allow the engine to cool.NOTICE
ECA10022
Do not continue to operate the en-
g ine if it is overheatin g.En gine oil warnin g“”
This icon comes on when the engine oil
level is low. Stop the vehicle and cor-
rect the engine oil level.
Display Setting
Off
Low
Middle High
1. Coolant temperature warning “ ”
2. Engine oil warning “ ”
3. Fuel level warning “ ”1000 r/min
QS
12 :
00
2
3
1
UB1JE1E0.book Page 14 Thursday, October 11, 2018 10:43 AM
Page 30 of 120

Instrument and control functions
3-15
3 When the vehicle is turned on, this icon
will come on for a few seconds, and
then go off.
If a malfunction is detected, the oil level
warning icon will flash repeatedly.
Have a Yamaha dealer check the vehi-
cle.
NOTICE
ECA26400
Do not continue to operate the en-
g
ine if the oil level is low.Fuel level warnin g“”
This icon comes on when approxi-
mately 2.6 L (0.69 US gal, 0.57 Imp.gal)
of fuel remains in the tank.
If a malfunction is detected, the fuel
level warning icon will flash repeatedly.
Have a Yamaha dealer check the vehi-
cle.
EAU84311
MENU screenThe MENU screen contains the follow-
ing setting modules. Select a module
to make related setting changes. Al-
though some settings can be changed
or reset via the main screen, the MENU
screen offers access to all display and
control settings. MENU access an
d operation
The following wheel switch operations
are common operations for accessing,
selecting, and moving within the
MENU screen and its modules.
Lon g push - press and hold the wheel
switch for one second to access the
MENU screen or exit MENU entirely.
Select - rotate the wheel switch up or
down to highlight the desired module
or setting item and then short push the
wheel switch (briefly press the wheel
switch inward) to confirm the selection.
Trian gle mark - certain setting
screens have an upward pointing trian-
gle mark item. Select the triangle mark
to exit that screen and move back one
screen (or long push the wheel switch
to exit MENU entirely).
Mo dule Description
View and reset three main-
tenance item intervals.
Set fuel consumption
units.
Set background color.
Turn the shift indicator
on/off and adjust tachom-
eter settings.
Set the multi-function dis-
play window items.
Adjust screen brightness.
12:
00
MENU
km/h
BrightnessDisplay SettingShift IndicatorWallpaperUnit
MaintenanceMaintenance
Maintenance
Unit
WallpaperShift IndicatorDisplay SettingBrightness
Set the low, middle, and
high settings to 10 tem-
perature levels.
Adjust the clock.
Return all settings to fac-
tory default settings.
Grip Warmer
Setting
ClockAll Reset
UB1JE1E0.book Page 15 Thursday, October 11, 2018 10:43 AM
Page 31 of 120
 is dis")
Instrument and control functions
3-16
3
TIP The MENU screen can be ac-
cessed by long pushing the wheel
switch, except when the grip
warmer display is selected or the
fuel tripmeter (F-TRIP) is dis-
played.
Should vehicle motion be detect-
ed, the screen will automatically
exit MENU and change to the
main screen.“Maintenance”
This module allows you to record dis-
tance traveled between engine oil
changes (use the OIL item), and for two
other items of your choice (use INTER-
VAL 1 and INTERVAL 2).
To reset a maintenance item1. From the MENU screen, select
“Maintenance”. 2. Select the item you want to reset.
3. Long push the wheel switch to re-
set the item.
TIPMaintenance item names cannot be
changed.“Unit”
This module allows you to switch the
display between kilometers and miles.
When using kilometers, the fuel con-
sumption units can be changed be-
tween km/L or L/100km. When using
miles, MPG will be available.
To set the distance or fuel consump-tion units1. From the MENU screen, select“Unit”.
12:
00
MENU
km/h
BrightnessDisplay SettingShift IndicatorWallpaperUnit
MaintenanceMaintenance
INTERVAL 2 OIL
INTERVAL 1
123456 km123456 km
123456 km
Maintenance
km/h
GPS
12 :
00
INTERVAL 2 OIL
INTERVAL 1
0 km
123456 km
123456 km
Maintenance
km/h
GPS
12 :
00
UB1JE1E0.book Page 16 Thursday, October 11, 2018 10:43 AM
Page 32 of 120

Instrument and control functions
3-17
3
2. Select the distance or consump-tion unit item you want to adjust.
TIPWhen “km” is selected, “km/L” or
“L/100km” can be set as the fuel con-
sumption units. To set the fuel con-
sumption units, proceed as follows. If
“mile” is selected, skip step 3.
3. Select the units you want to use.
4. Select the triangle symbol to exit.
“Wallpaper”
This module allows you to set the main
screen background color to black or
white for both the day and night set-
tings. A photo sensor equipped in the
instrument panel detects lighting con-
ditions and will automatically change
the display between its day and night
settings. The photo sensor also con-
trols a subtle automatic brightness ad-
justment function within both the day
and night modes to suit ambient light
conditions. To set the wallpaper
1. From the MENU screen, select
“Wallpaper”.
2. Select the mode you want to ad- just (select DAY for daytime dis-
play settings or NIGHT for
nighttime display settings).
12:
00
MENU
km/h
BrightnessDisplay SettingShift IndicatorWallpaperUnit
Maintenance
Unit
km/L or L/100km km or mile
km
km/L
Unit
km/h
GPS
12 :
00
km/L or L/100km km or mile
km
km/L
Unit
km/h
GPS
12 :
00
1. Photo sensor
1
12 :
00
MENU
km/h
BrightnessDisplay SettingShift IndicatorWallpaperUnit
MaintenanceWallpaper
UB1JE1E0.book Page 17 Thursday, October 11, 2018 10:43 AM
 1
1 2
2 3
3 4
4 5
5 6
6 7
7 8
8 9
9 10
10 11
11 12
12 13
13 14
14 15
15 16
16 17
17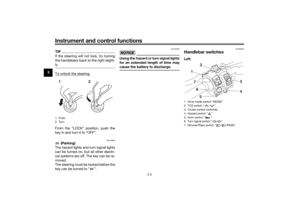 18
18 19
19 20
20 21
21 22
22 23
23 24
24 25
25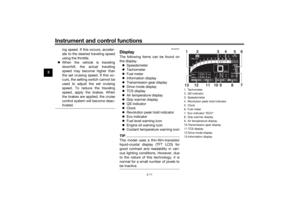 26
26 27
27 28
28 29
29 30
30 31
31 32
32 33
33 34
34 35
35 36
36 37
37 38
38 39
39 40
40 41
41 42
42 43
43 44
44 45
45 46
46 47
47 48
48 49
49 50
50 51
51 52
52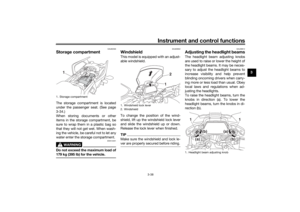 53
53 54
54 55
55 56
56 57
57 58
58 59
59 60
60 61
61 62
62 63
63 64
64 65
65 66
66 67
67 68
68 69
69 70
70 71
71 72
72 73
73 74
74 75
75 76
76 77
77 78
78 79
79 80
80 81
81 82
82 83
83 84
84 85
85 86
86 87
87 88
88 89
89 90
90 91
91 92
92 93
93 94
94 95
95 96
96 97
97 98
98 99
99 100
100 101
101 102
102 103
103 104
104 105
105 106
106 107
107 108
108 109
109 110
110 111
111 112
112 113
113 114
114 115
115 116
116 117
117 118
118 119
119