2019 VOLVO XC60 TWIN ENGINE tow
[x] Cancel search: towPage 79 of 695

SAFETY
}}
* Option/accessory.77
Folding up the integrated booster
cushion*
When the integrated booster cushion is used, itmust be folded up.
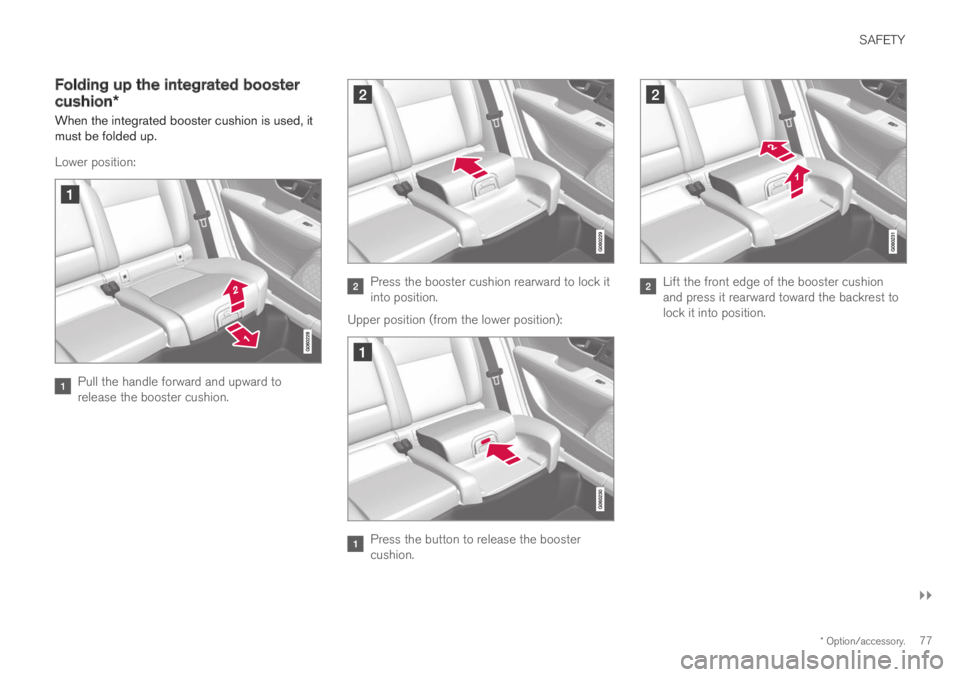
Lower position:
Pull the handle forward and upward torelease the booster cushion.
Press the booster cushion rearward to lock itinto position.
Upper position (from the lower position):
Press the button to release the boostercushion.
Lift the front edge of the booster cushionand press it rearward toward the backrest tolock it into position.
Page 80 of 695

||
SAFETY
* Option/accessory.78
WARNING
DEATH or SERIOUS INJURY can
occur
Follow all instructions on this
child restraint and in the vehicle's
owner's manual.
Make sure the booster cushion is
securely locked before the child
is seated.
Use this booster cushion only with chil-dren whose height and weight are withinthe permitted limits shown in the table.
Use only the vehicle's lap and shoulderbelt system when restraining the child inthis booster cushion.
In the event of a collision while the inte-grated booster cushion was occupied, theentire booster cushion and seat belt mustbe replaced. The booster cushion shouldalso be replaced if it is badly worn ordamaged in any way. This work should beperformed by a trained and qualifiedVolvo service technician only.
NOTE
The integrated booster cushion cannot bemoved directly from the upper position to thelower position. From the upper position, thebooster cushion must first be folded downcompletely into the rear seat and then raisedto the lower position.
Related information
Integrated booster cushion* (p. 75)
Folding down the integrated booster cush-ion* (p. 78)
Folding down the integrated
booster cushion*
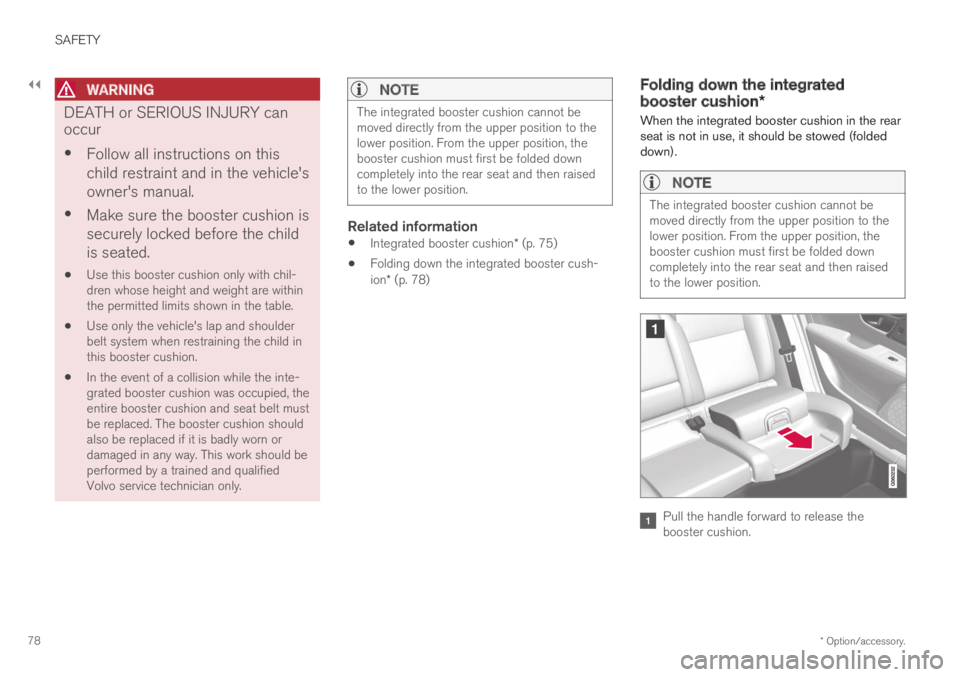
When the integrated booster cushion in the rearseat is not in use, it should be stowed (foldeddown).
NOTE
The integrated booster cushion cannot bemoved directly from the upper position to thelower position. From the upper position, thebooster cushion must first be folded downcompletely into the rear seat and then raisedto the lower position.
Pull the handle forward to release thebooster cushion.
Page 81 of 695

SAFETY
* Option/accessory.79
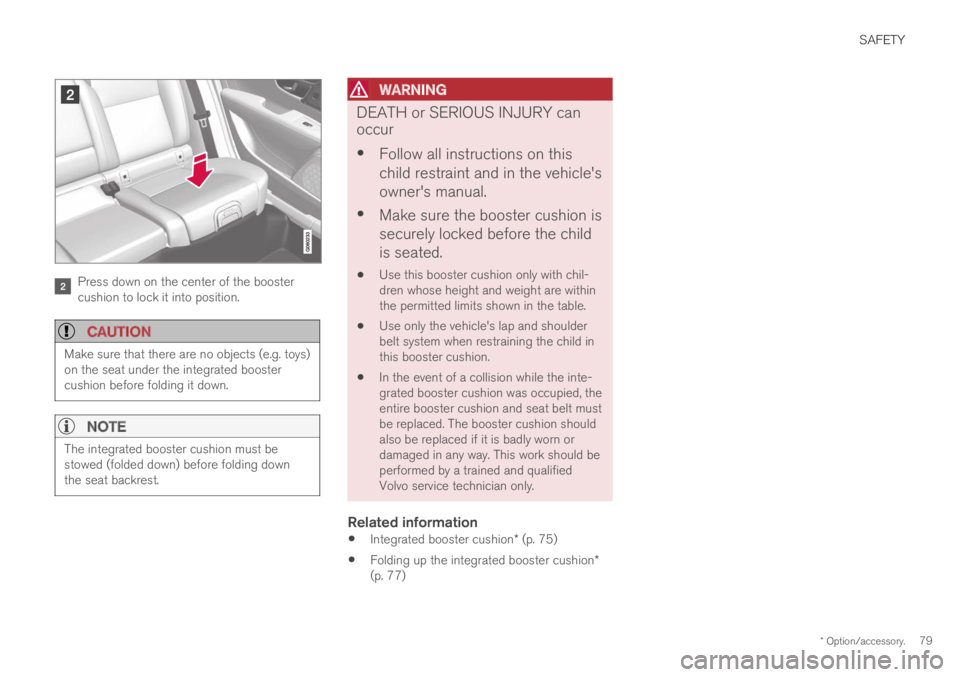
Press down on the center of the boostercushion to lock it into position.
CAUTION
Make sure that there are no objects (e.g. toys)on the seat under the integrated boostercushion before folding it down.
NOTE
The integrated booster cushion must bestowed (folded down) before folding downthe seat backrest.
WARNING
DEATH or SERIOUS INJURY can
occur
Follow all instructions on this
child restraint and in the vehicle's
owner's manual.
Make sure the booster cushion is
securely locked before the child
is seated.
Use this booster cushion only with chil-dren whose height and weight are withinthe permitted limits shown in the table.
Use only the vehicle's lap and shoulderbelt system when restraining the child inthis booster cushion.
In the event of a collision while the inte-grated booster cushion was occupied, theentire booster cushion and seat belt mustbe replaced. The booster cushion shouldalso be replaced if it is badly worn ordamaged in any way. This work should beperformed by a trained and qualifiedVolvo service technician only.
Related information
Integrated booster cushion* (p. 75)
Folding up the integrated booster cushion*(p. 77)
Page 162 of 695

||
LIGHTING
160
The rear fog light turns off automatically whenthe ignition is switched off or when the steering
wheel lever lighting ring is in position or
.
NOTE
Regulations concerning rear fog light use varyfrom country to country.
Related information
Lighting panel and controls (p. 152)
Ignition modes (p. 433)
Brake lights
The brake lights are automatically illuminatedwhen braking.
The brake lights illuminate when the brake pedalis depressed. They also illuminate when thebrakes are automatically applied by one of thedriver support systems.
Related information
Emergency brake lights (p. 160)
Brake functions (p. 434)
Emergency brake lights
The emergency brake lights are activated towarn following vehicles of hard braking.
This function causes an additional taillight oneach side of the vehicle to illuminate.
The emergency brake lights are activated in theevent of hard braking or if the ABS system isactivated and the vehicle is traveling at a highspeed.
After the driver decelerates to a low speed andthen releases the brake, the brake lights resumetheir normal brightness.
Related information
Brake lights (p. 160)
Brakes (p. 435)
Hazard warning flashers (p. 161)
Page 163 of 695

LIGHTING
* Option/accessory.161
Hazard warning flashers
Hazard warning flashers warn other road usersby all of the vehicle's turn signals being activatedat the same time. The function can be used towarn about a traffic hazard.
Hazard warning flashers button.
Press the button to activate the hazard warningflashers.
NOTE
Regulations concerning the use of hazardwarning flashers may vary from country tocountry.
Related information
Emergency brake lights (p. 160)
Using turn signals (p. 158)
Using home safe lighting
Some of the exterior lights remain on to illumi-nate the area around the vehicle. This is calledhome safe lighting.
To activate home safe lighting:
1.Switch off the ignition.
2. Push the left-side steering wheel levertoward the dashboard and release.
3. Exit the vehicle and lock the doors.
When the function is activated, a symbol will beshown in the instrument panel and the parkinglights, outer door handle lights* and the licenseplate lights will be illuminated.
The length of time home safe lighting remainsilluminated can be set in the center display.
Related information
Adjusting light functions via the center dis-play (p. 153)
Welcome Light (p. 161)
Welcome Light
Approach lighting is activated when the vehicleis unlocked and can be used to provide light asyou walk toward the vehicle.
The function is activated when the remote key isused for unlocking. The parking lights, outer doorhandle lights*, license plate lights, interior ceilinglights, footwell lighting and trunk/cargo compart-ment lighting will be illuminated. If a door isopened while the function is activated, the light-ing in the outer door handle* and the interiorlighting will remain illuminated for a longer periodof time.
This function can be activated and deactivated inthe center display.
Related information
Adjusting light functions via the center dis-play (p. 153)
Using home safe lighting (p. 161)
Remote key (p. 237)
Page 168 of 695

WINDOWS, GLASS AND MIRRORS
* Option/accessory.166
Windows, glass and mirrors
The vehicle is equipped with controls for win-dows, glass and mirrors. Some of the windowsin the car are laminated.
Laminated glass
The windshield has laminated glass. Laminatedglass is also available as on option for someother glass surfaces. Laminated glass is rein-forced, which provides better protection againstbreak-ins and improved soundproofing in thepassenger compartment.
The panoramic roof* also has laminated glass.
The symbol shows the windows containing laminatedglass1
Related information
Pinch protection for windows and sun cur-tains (p. 166)
Panoramic roof* (p. 172)
Power windows (p. 167)
Rearview/door mirrors (p. 169)
Head-up display* (p. 142)
Using the windshield wipers (p. 176)
Using the windshield and headlight washers(p. 179)
Activating and deactivating the heated wind-shield* (p. 219)
Activating and deactivating the heated rearwindow and door mirrors (p. 221)
Pinch protection for windows andsun curtains
All power windows and sun curtains* have apinch protection function that is triggered if any-thing blocks them while they are opening orclosing.
If pinch protection is activated, movement willstop and then retract automatically to approx.50 mm (2 inches) from the point at which it wasblocked (or to full ventilation position).
It is still possible to override pinch protectionwhen closing is interrupted (e.g. due to ice) bypressing and holding down the control in thesame direction.
If there is any problem with the pinch protection,a rest procedure can be tested.
WARNING
If the starter battery is disconnected, the func-tion for automatic opening and closing mustbe reset to function correctly. A reset isrequired in order for the pinch protection towork.
1Does not apply to windshield and panoramic roof*, which are always laminated and therefore do not have this symbol.
Page 169 of 695

WINDOWS, GLASS AND MIRRORS
}}
* Option/accessory.167
Related information
Reset procedure for pinch protection(p. 167)
Operating the power windows (p. 168)
Panoramic roof* (p. 172)
Reset procedure for pinchprotection
If you experience any problems with the electri-cal functions for the power windows, you can tryto perform a reset.
WARNING
If the starter battery is disconnected, the func-tion for automatic opening and closing mustbe reset to function correctly. A reset isrequired in order for the pinch protection towork.
If the problem persists or if it affects the panor-
amic roof or sunroof, contact a workshop2.
Resetting a power window
1. Start with the window in the closed position.
2. Then operate the window in manual modethree times upward toward the closed posi-tion.
> The system will be automatically initiated.
Related information
Pinch protection for windows and sun cur-tains (p. 166)
Operating the power windows (p. 168)
Power windows
The power windows are operated using the con-trol panels found in the doors. The driver's doorhas controls for operating all windows and foractivating the child safety locks.
Driver's door control panel.
Electric child safety locks* that deactivate thecontrols in the rear doors to prevent thedoors or windows from being opened fromthe inside.
Rear window controls.
Front window controls.
The power windows have pinch protection. Ifthere is any problem with the pinch protection, arest procedure can be tested.
2An authorized Volvo workshop is recommended.
Page 181 of 695

WINDOWS, GLASS AND MIRRORS
* Option/accessory.179
Using the windshield and headlightwashers
The windshield and headlight washers clean thewindshield and headlights. Use the right-sidesteering wheel lever to start the windshield andheadlight washers.
Starting the windshield and headlight
washers
Washing function, right-hand steering wheel lever.
–Move the right-hand steering wheel levertoward the steering wheel to start the wind-shield and headlight washers.
>After the lever is released, the wipersmake several extra sweeps.
CAUTION
Avoid activating the washer system when it isfrozen or the fluid reservoir is empty. Other-wise, there is a risk of damaging the pump.
Headlight washer *
To save washer fluid, the headlights are washedautomatically according to a defined intervalwhen the headlights are on.
Reduced washing
When there is about 1 liter (1 qt) of washer fluidleft in the reservoir and the Washer fluid Levellow, refill message is displayed in the instrument
panel together with the symbol, the washerfluid supply to the headlights is cut off. This is toprioritize windshield cleaning and visibilitythrough it. The headlights are only washed if highor low beam is on.
Related information
Using the rain sensor (p. 177)
Using automatic rear window wiping whenbacking up (p. 180)
Wiper blades and washer fluid (p. 176)
Using the rain sensor's memory function(p. 178)
Using the rear window wiper/washer(p. 180)
Filling washer fluid (p. 660)
Windshield wipers in the service position(p. 659)
Replacing windshield wiper blades (p. 658)
Changing rear window wipers (p. 657)
Using the windshield wipers (p. 176)